Mar 12th 2018
Honda Motor Company is currently the world’s largest manufacturer of internal combustion engines by volume with over 14 million engines produced annually. The Japanese keiretsu, or conglomerate, is famously known for producing automobiles, power equipment, aircraft, powersports vehicles, and even robotics. However, it’s the company’s success with motorcycles and engine production that have earned them the top spot as the world’s largest motorcycle manufacturer; a title they’ve held since 1959. Honda’s all-encompassing range of motorcycles, from dirt bikes to touring cruisers to high-performance sport bikes, has allowed them to best even the most legendary motorcycle marques including Harley-Davidson, Indian, Triumph, BMW, and Ducati, as well as their contemporaries in Yamaha, Suzuki, and Kawasaki. When the Jiger Corporation introduced the world’s first all-terrain vehicle (ATV) in 1965, Honda was one of the first motorcycle manufacturers to attempt to capitalize on its success and stake their claim in this new market.
1970 Honda ATC90
In 1970, Honda developed their very first ATV called the ATC90 (originally known as US90). It was a 3-wheeled, motorcycle-based concept that was designed to tackle most any terrain and environment. In 1984, Honda’s first 4-wheel ATV, the TRX200, was released followed by the first 4-wheel drive ATV, the TRX350 FourTrax 4X4, 2 years later. By applying the same spirit of innovation to their ATV series as their motorcycle lineup, Honda became one of the leading names in ATV powersports vehicles and is currently one of the market’s best-selling manufacturers.
2006 Honda TRX450R
Owners of Honda TRX series ATVs such as the high-performance TRX450R all know that proper maintenance is crucial for long-term reliability. One of the most basic and routine of maintenance tasks is the oil change. Oil is the lifeblood of your engine and regularly-scheduled oil changes, regardless of how often or how little you use your sport ATV, will ensure that your four-wheeler is ready to take on the next off-road adventure or outdoor excursion with ease.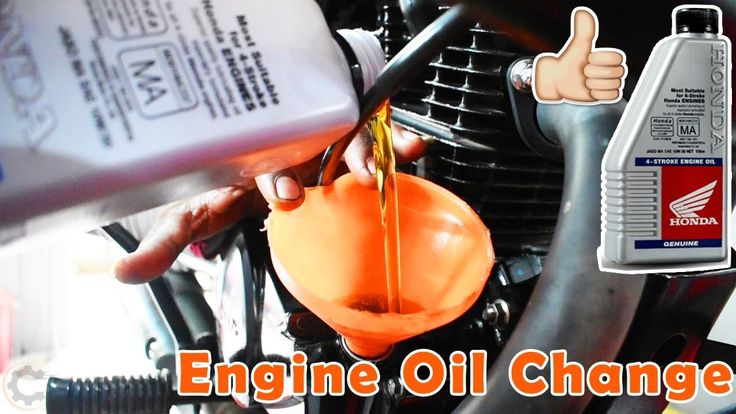
The engine in your Honda TRX series ATV may have either a dry-sump or wet-sump type oiling system. In a dry-sump system, the oil reservoir is kept separate from the engine and uses 2 or more pumps to send oil to and from the crankcase. A wet-sump oiling system places the oil reservoir, or oil pan, directly underneath the crankcase and uses only 1 pump. Dry-sump oiling systems are typically used in high-performance or racing applications whereas the conventional wet-sump system is found on most everyday passenger cars, trucks, and motorcycles.
Here, we’ll cover how to change oil in a Honda TRX450R 4-stroke engine that uses a dry-sump oiling system. The directions are the same as changing the oil in a vehicle that uses a wet-sump, but without the additional step of draining the auxiliary oil tank. If you’ve ever changed the oil in your car or truck by yourself, you’ll have no problem changing the oil in your Honda ATV. If you’ve never changed oil yourself and always had someone else do it, here’s a chance for you to learn a simple and important maintenance skill that’ll prolong the life of your sport ATV as well as save you some extra bucks.
Fire the engine and let it idle for about 5 minutes, then shut it off. You always want to change the oil when it’s at temperature. Oil flows freer when it’s hot and this is the most effective way to clear out as much of the old contaminated oil as possible before replacing it with fresh new oil.
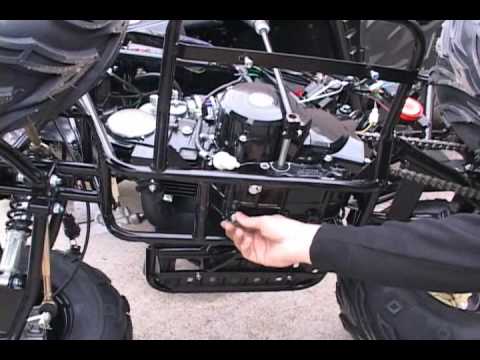
Place your oil drain pan underneath the engine of your ATV. If your ATV’s engine utilizes a dry-sump oiling system (as in the case of the Honda TRX450R), loosen the dipstick on the oil tank to relieve internal pressure.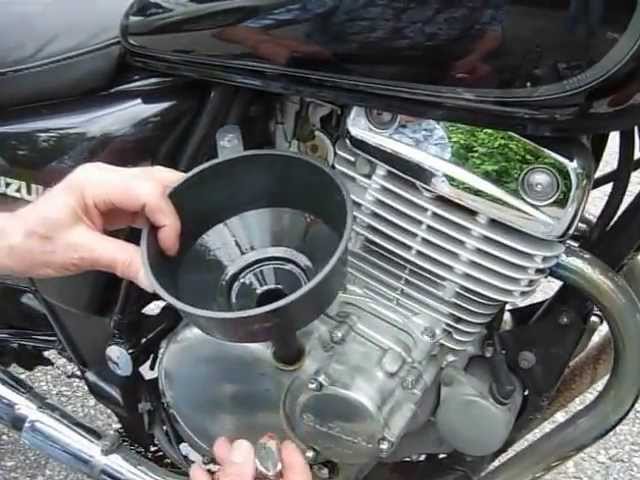
Move around to the opposite side of the ATV and remove the two 8mm bolts that secure the oil filter cover. There is oil in this compartment, so make sure that your oil drain pan is still underneath the ATV. Once the bolts have been removed, take off the oil filter cover and let the excess oil drain completely.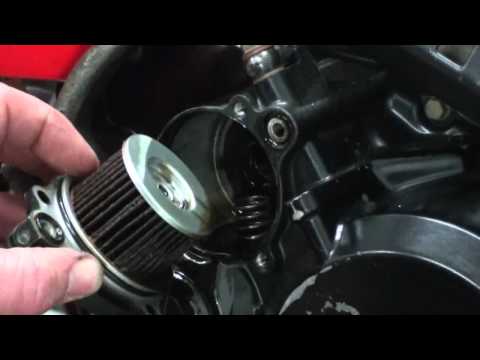 While you have your oil filter cover off, now would be a good time to inspect the o-ring gasket that seals the cover to the engine block. If you notice any visible cracks or wear, replace the o-ring gasket (HQ Powersports sells Winderosa OEM-quality replacement oil seals and complete gasket kits for Honda ATVs, including the TRX450R).
 Tighten both bolts securely.
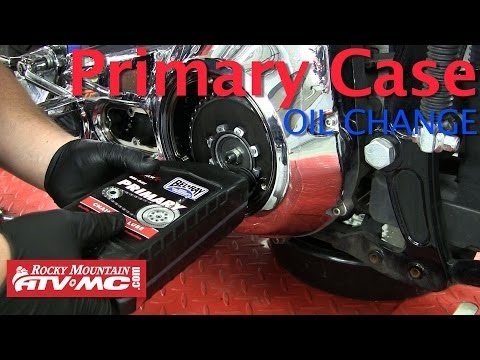
K&N filters aren't just for cars and trucks!
K&N Engineering is, perhaps, the most popular brand in automotive filter technology. Famous in the automotive world for their line of washable cotton gauze air filters and performance cold air intake systems for cars and trucks, K&N also develops a full line of spin-on and cartridge-type oil filters for motorcycles, ATVs, and powersports vehicles. K&N oil filters meet and exceed OEM specifications and are designed and engineered to outperform the stock standard filter, all without voiding the manufacturer’s warranty. K&N filters trap more harmful particulates and contaminants as well as allow for greater capacity flow at higher rates.
At HQ Powersports, we’re proud to be a retailer for K&N Engineering and we stock a full array of replacement K&N cartridge oil filters for ATVs such as the Honda TRX450R.
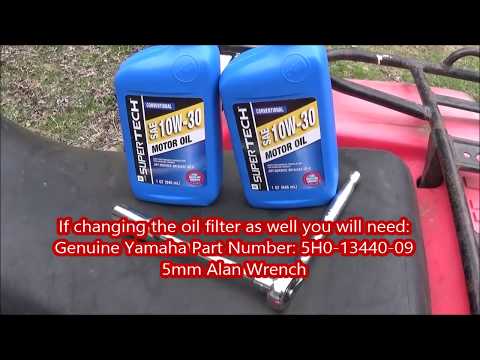
Remove the dipstick (on a dry-sump system, the dipstick will be on the oil reservoir tank) and insert the funnel. The oil capacity for the Honda TRX450R is 1.9 quarts, but you cannot pour in the amount all at once. Instead, gently pour in the first quart, remove the funnel, then reinsert the dipstick. Turn on the engine and have it idle for 15 seconds. This lets the new oil begin to circulate throughout the crankcase and the engine. While the engine is running, visually inspect the drain bolts and oil filter cover bolts for leakage. If leakage is discovered, stop the engine immediately and re-tighten any loose bolts. If no leaks are found, shut the engine off after 15 seconds, remove the dipstick, reinsert the funnel, and pour in the remaining 3/4ths of the second quart of oil. Remove the funnel, reinsert the dipstick, and fire the engine for 3 minutes. After the 3 minutes, shut off the engine and check the dipstick. If the level on the dipstick reads ‘UPPER’, you have properly refilled the oil to the specified capacity.
It’s that simple!
Sep 21st 2018
Honda ATVs--like their motorcycles, and power equipment--are world famous for their dependable durability and steadfast reliability. However, the key to that durability and reliability is making sure that proper maintenance is performed on a regular basis. One of the easiest and most important maintenance jobs that you, the owner, can perform yourself is the basic oil change. Oil is the lifeblood of the engine and as long as that engine is adequately filled with fresh, clean oil, it can continue to provide you with many years and miles of fun, adventure, and trouble-free service.
2013 Honda TRX450R FourTrax
One of Honda’s most popular ATV models is the TRX450R, based off of the best-selling FourTrax Foreman. In this quick How-To, we’ll be using the TRX450R as our subject vehicle but the actual process itself is fairly *universal for most ATVs.
*
NOTE: Your ATV may be equipped with either a dry-sump or wet-sump oiling system. For dry-sump systems, the auxiliary oil tank must also be drained. This is an additional step in the procedure, but otherwise, directions are as follows.
Start your engine, let it idle for 5 minutes, and then turn it off. The reason for this is because you want that engine nice and hot so that it flows easier, thus drains easier. You want to minimize any of that leftover contaminated oil before you replace it with a brand new, fresh batch.
Place your oil drain pan underneath the engine of your ATV. If your ATV’s engine utilizes a dry-sump oiling system (as in the case of the Honda TRX450R), loosen the dipstick on the oil tank to relieve internal pressure.
Remove the two
8mm bolts that secure the oil filter cover. These can be found at the opposite side of the engine. Keep in mind that there is still old oil in this compartment; make sure that your drain pan is still underneath the ATV. Once the bolts have been removed, remove the oil filter cover and let the excess oil drain completely.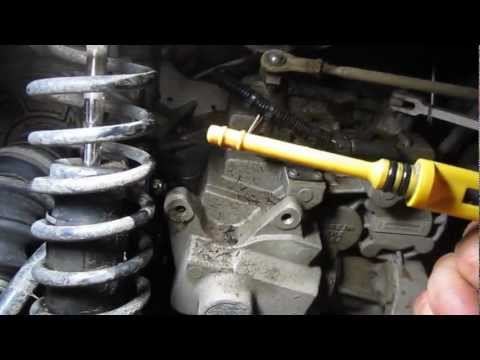 While the oil filter cover is off, you should probably inspect the o-ring gasket that seals the cover to the engine block. If you notice any visible wear or damage, replace the o-ring gasket (Discount Starter & Alternator sells Winderosa OEM-quality replacement oil seals and complete gasket kits for Honda ATVs, including the TRX450R).
 Tighten both bolts securely.
Remove the dipstick (on a dry-sump system, this will be on the oil reservoir tank). Insert funnel and fill with new oil but don’t fill all
1.9 quarts in just yet. Instead, gently pour in the first quart, remove the funnel, then reinsert the dipstick. Start the engine and let it run for about 15 to 20 seconds. While the engine is running, visually inspect your drain bolts and filter cover bolts for leaks. If leaks are detected, stop the engine immediately and retorque any and all loose bolts. If you don’t see any leaks while the engine is running, let it idle for 15 to 20 uninterrupted seconds and then shut it down. Remove the dipstick, reinsert the funnel, and pour in the remaining 3/4ths of the second quart of oil. Now, fire the engine and let it run for 3 minutes. After the 3 minutes are up, turn off the engine and check the dipstick. If the level on the dipstick reads ‘UPPER’, the oil is at the appropriate factory OEM-spec level.
Congratulations! You now know how to do ATV oil changes all by yourself!
140622
The durability of the scooter and a comfortable, trouble-free ride depend on various factors. One of the most important experts consider the timely and correct replacement of engine oil. This procedure can be completed at the service station, but it will not be difficult to cope on your own either. Moreover, it will save money and give 100% confidence in the use of high-quality oil.
Rules for self-changing scooter oil
○ New Stels scooters are available in Moscow with delivery to your region! Big choice. Best price guarantee!
To begin with, you should carefully study the instructions for your device, if, of course, there is one.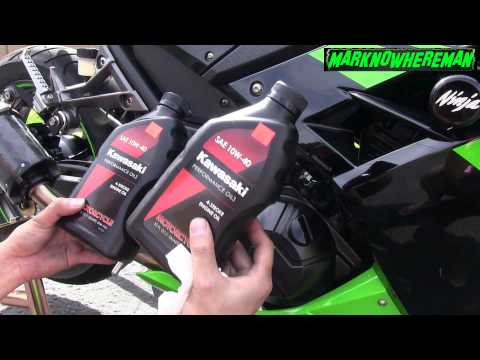 Any manufacturer, even Chinese, gives clear and understandable recommendations on this issue. If the instructions are not available, which is often the case when buying used equipment, then you can use the following time-tested and experienced recommendations:
1. The first replacement with new equipment is desirable after the initial 300 km of run. During this period, the parts are actively rubbed, and the oil becomes contaminated with the smallest metal particles.
2. The second time should be done at around 800 km.
3. A third oil change is recommended after 1,500 kilometers driven.
Subsequent independent replacements are recommended by experts after every 2000 km. If the scooter is used mostly on dusty country roads, the procedure should be performed more frequently.
Step-by-step oil change procedure
The process itself is relatively simple: we put the iron horse on the central stand and “drive” the engine for 15-20 minutes. Some experts advise replacing immediately after the next trip, when the engine is well “worked out”.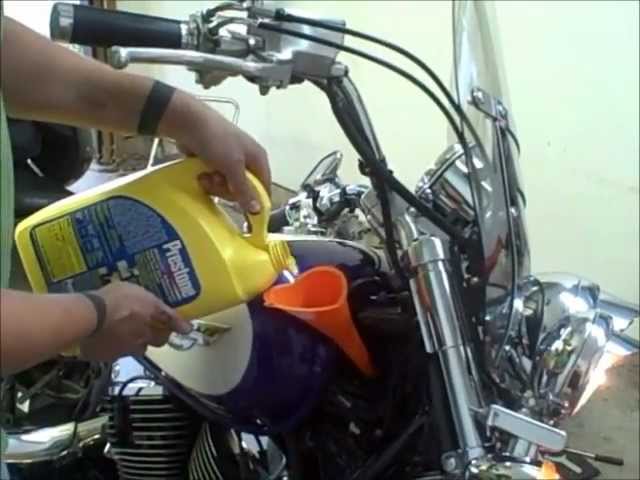 We reserve a container for working out in advance, find the drain plug and unscrew it with a socket wrench. Care should be taken in the process, as the temperature of the oil can reach 100-150 degrees and cause injury. Next, unscrew the plug and remove the filter.
Then, with the ignition off, turn the crank fast and repeatedly until the rest of the oil flows out. Wash the parts of the oil filter removed from the scooter in gasoline and blow with compressed air.
The next step is to replace the oil filter. To do this, carefully wipe all parts and openings with a clean, dry rag. On the connectors, you can carefully apply a little sealant and tighten tightly.
Use a funnel for accuracy when adding oil. It is advisable to use an oil brand from the list of recommended manufacturers for your scooter. Saving money by purchasing cheap brands with the risk of counterfeiting should not be categorically. Immediately after the replacement, you should not load the engine to the full - let it idle so that the oil is harmoniously distributed throughout the system.
Thus, self-changing the oil in any scooter is not an insoluble problem. Moreover, there are many videos on the Internet with this process and a description of the tricks.
○ The scooter store offers us a wide range and convenient payment methods: cash to the courier, card, credit, installment.
140622
100522
180521
270421
160320
Timely oil change in an ATV is a guarantee of durability of its operation and the absence of unplanned problems with the engine of an ATV and its other components.
The rubbing parts of the engine, ATV gearbox, ATV gearboxes experience enormous loads in severe temperature conditions, and only the right oil for the ATV and its timely replacement will prevent their rapid wear and failure. Changing the oil in an ATV involves a set of works:
All oils poured into cars and motorcycles are divided into:
mineral, isolated from natural petroleum products;
semi-synthetic, obtained by mixing synthetic and mineral oils, with a share of the latter of 30-50%.
Synthetic oils are considered the best in quality and at the same time the most expensive, so they are recommended for filling in new ATV engines. "Mineralka" is inferior in quality to synthetic oil, but much more affordable. For these reasons, it is advisable to fill in mineral oil in engines with high mileage, operated in regions with winter temperatures not lower than 15º below zero. Semi-synthetic oils - as you yourself now understand, there is a compromise between quality and price and are recommended for filling in modern ATV engines with sufficient mileage.
Surely all of you know the accepted SAE viscosity classification of oils, for example, 15W40. Recall that the smaller the number before the letter “W”, the less thick the oil in frost, which, accordingly, makes it easier to start the engine in frost; and the larger the number after the letter “W”, the more viscous the oil is at high summer temperatures, which, accordingly, improves engine performance in the heat.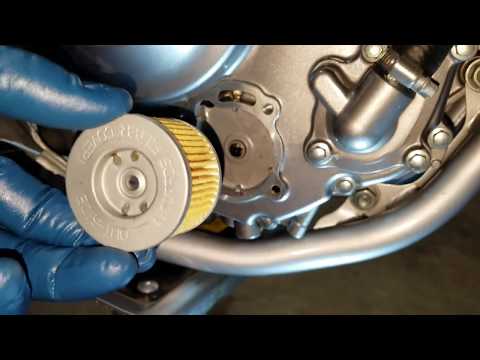 It is now clear that when choosing an ATV engine oil, you must follow the recommendations of the ATV manufacturer and take into account the time of year and engine mileage.
Let's move on to changing the oil in the ATV gearbox. Due to the fact that ATVs are assembled with different types of boxes, the oil must also be appropriate: for mechanical boxes - engine oil, for automatic and semi-automatic boxes - gear oil. Here also, first of all, it is necessary to follow the recommendations of the manufacturers and remember that more thermally loaded elements require a more viscous oil. ATV gear oil, according to many, is 75W9 engine oil0. The opinion of many is authoritative, but still, it is better to follow the recommendations of the manufacturers and once again look into the instruction manual for your ATV.
ATV oil change intervals are indicated in the ATV operating instructions. As a rule, it is necessary to change the oil after the first 500 km of break-in, and then every 1000 km, with the obligatory replacement of the oil filter.