Tires are an essential part in automobiles. There is a lot of advancement in tires from traditional vehicles to modern age. From tube tires to tubeless ones, the manufacturers have strived hard to make our long drives smooth. Tubeless tires are the most advanced technology in the market. These tires hold air for longer, and the grip is perfect as well. One of the biggest dilemmas related to tires is leakage. A leaking tire worsens the beautiful journeys in no time. Getting familiar with the fixing process of how to stop a tire from leaking around the rim might assist greatly.
Let us introduce to you “how do you seal a leaking rim” by checking the process of fixing tire bead leak below.
The tire does not work “alone” so you may find that even if the tire is not leaked, the tire is still flatted. So there is a really easy way for you to check if the tire is leaking around the rim or not. Let us show you how to do it!
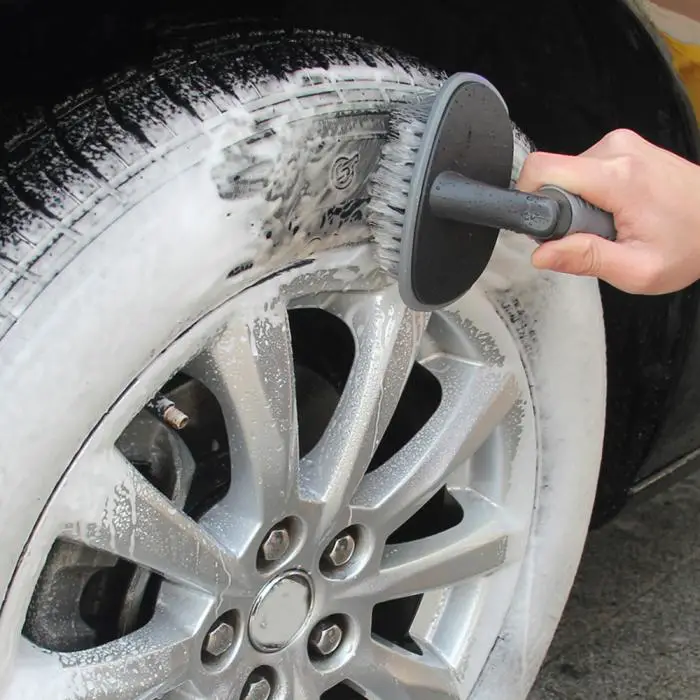
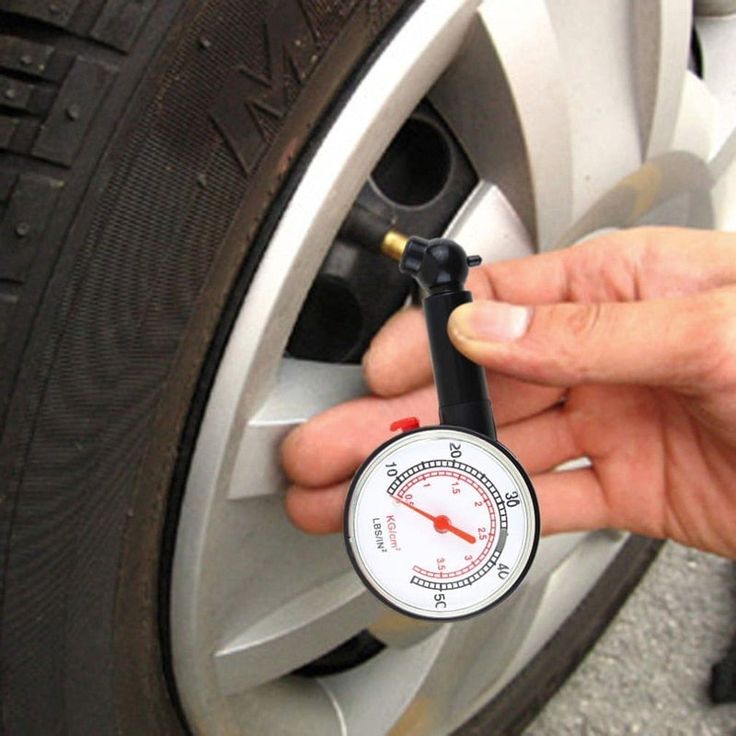
Get yourself a generic spray bottle. Then make a mix of liquid which includes the dish soap with water, mix well and put it into the bottle. The ratio is 1 soap and 4 water, but you do not need to make it exactly. The next step is inflate the tire to the valve caps off and spray solution on the end of the valve as well as so you can see if the valve itself is leaking. If you see the soap bubbles forming anywhere there is a leak. For the small leak, it takes 10-20 minutes to see the change of the tire and the bubbles of the soap.
This method is easy to check your tire at home and you can do it without experience.
Fixing the leaking tire is not that intricate as it may sound. The changing process is much easier if you have an appropriate equipment kit with you. One might have to visit a mechanic for fixing the inner-tube tires. Fixing tubeless tires is easy with special technique and equipment.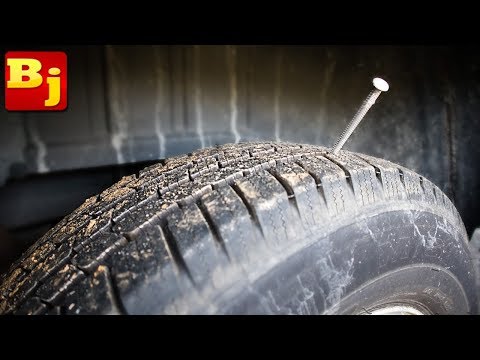
Let’s go through the fixing process of how to stop a tire from leaking around the rim in an automobile.
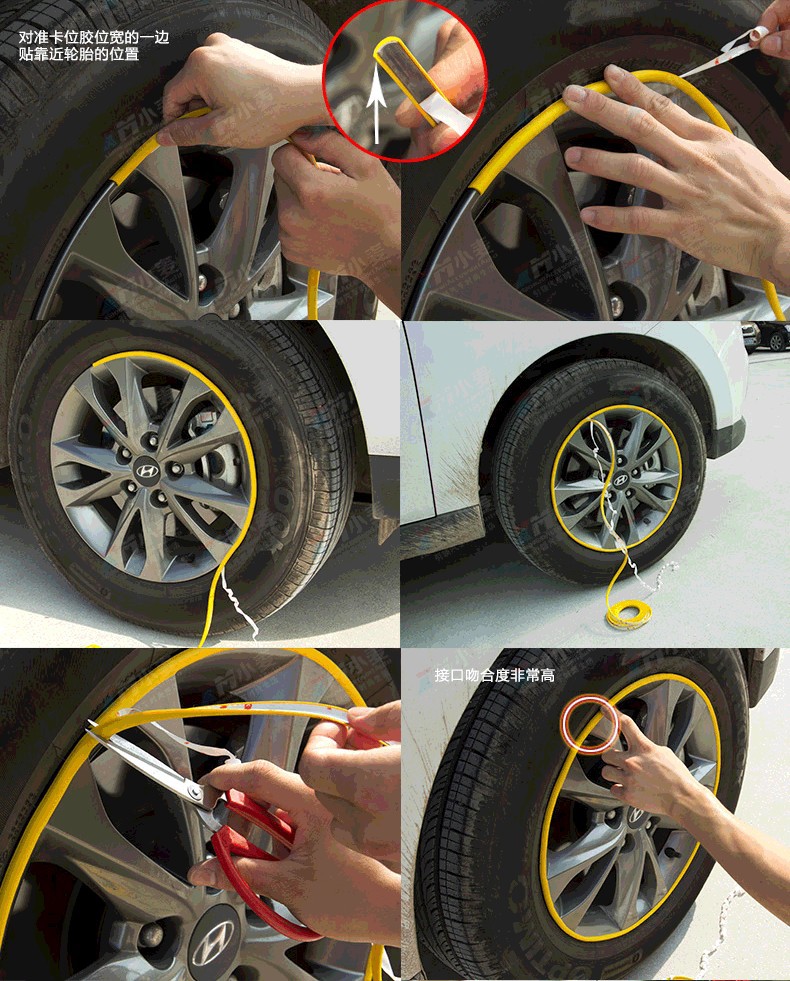
The first step of how to stop a tire from leaking around the rim is removing the tire and placing it on a flat surface. Make sure the air inlet valve is not facing the ground. Examine if there is any leak or hole visible. It will be easier to treat the leakage outside than that of tire leaking around rim seal. Fill the tire and rim attachment with water. The leak area will be identified with bubbles from leaking air. Check both sides of the tire and with simple or soapy water.
SEE MORE:
Spot the leakage area on the tire and mark it accordingly. Empty the tire air by pressing the valve inlet with a pin. It is essential to release the air from the tire before treating. There is a valve-removing tool in the car equipment kit as well. Make sure the leaking side of the tire and rim are visible to treat. That’s all you need to do for the second step of
how to fix a rim leak.
There is a valve-removing tool in the car equipment kit as well. Make sure the leaking side of the tire and rim are visible to treat. That’s all you need to do for the second step of
how to fix a rim leak.
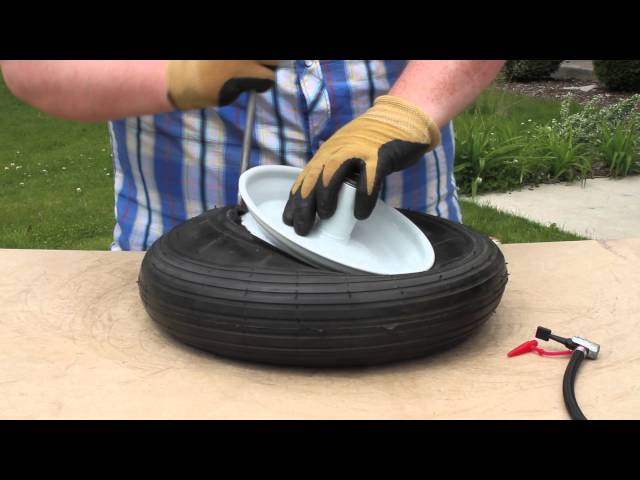
Tire and rim are attached with a seal. The air inside the tire tightens the seal. You might need something heavy to release the attachment. According to expert’s maintenance tips, a heavy hammer and wooden plank will do the job perfectly. It is essential to remove the tire from the rim if the tire leaking around rim seal is the issue. Hit the plank with the hammer after putting it close to the tire-rim seal.
The final step of how to stop a tire from leaking around the rim is cleaning the edges of the tire with a cloth after releasing the seal. It is easy to press the removed tire with hands and clean it accordingly. Put some repairing solution on the leakage and fill the air again.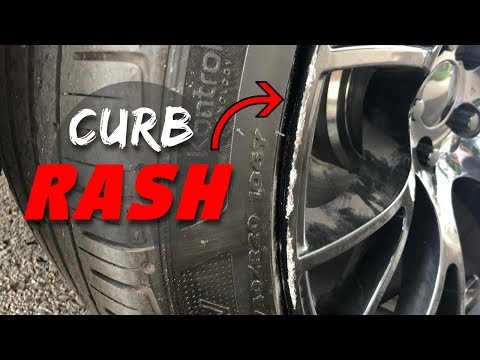 While the air flows into the tire, make sure to position the tire and rim appropriately. You can check the tire leakage again with water.
>> We have used Japanese cars whose tires are always in perfect condition. Click here!!! <<
Most people who ask how to stop a tire from leaking around the rim wonder how much it costs to fix the leak. If it is the rims, then the wheels have trouble. At the mechanic, the repairman will unmount the tire, clean the rim on the inside, then apply the bead sealer and the unmounted tire. He also changes the valve stem for you. The total cost is around $20 – 30 for one wheel.
The problem is, may shop, instead of fixing the problem from the rim, they write it off as a bad bead or something that they will charge you a lot of money to throw the sealer at the issue. Your car will be fine for one week and the leak will come back to what they were before. Besides, some shops may just grab something around the shop and smooth it out. They try to smooth out the surface where it was leaking then slap on a bunch of bead sealer. So again, the problem is not completely solved.
That’s all about how to stop a tire from leaking around the rim.Follow these vital tips and continue your flawless journey on the roads. You can do it yourself at home or if you are not sure that you can do it or not. Bring your car to the trustful garage, tell them that you have a slow leak on the tire and ask them to check the rim. So everything will be on track.
by Damon Hildebrand
Aaron Fink/Demand Media
Tubeless tires hold air better, and last longer, than old fashioned tires with an inner-tube. With the exception of punching a hole in the tire by running over an object, or jumping the curb at the mall, tubeless tires generally hold up well. There are times, however, when a tire develops a leak between the wheel and rim. In this case, remove the tire to reseat the bead and reseal the tire.
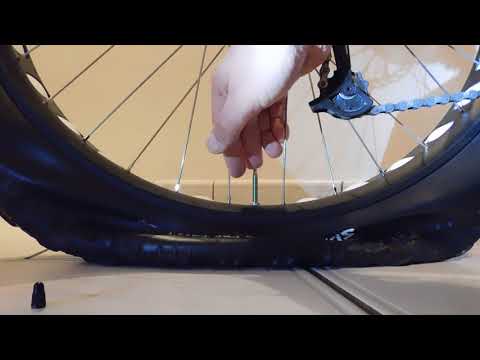
Remove the tire from the car and lay it on a flat, hard surface with the valve-stem sticking up.
Fill the tire with air and spray soapy water around the outer edge of the rim where the tire meets it. The area of the leak is indentifiable by bubbles generated from leaking air. If one side of the tire shows no sign of a leak, turn the tire over and repeat the soapy water leak test.
Mark the leaking area of the tire with chalk.
Release the air from the tire by pressing inward on the valve-stem. If a valve-stem removal tool is available, remove the valve-stem needle by unscrewing it from the stem.
Turn the tire so the leaking side of the rim and tire face up.
Place one end of the 2 by 4 board on the rubber part of the tire, right next to the steel rim's edge. While holding the board in position, hit the board with the shop hammer to break the tire's bead loose from the rim. Once the seal breaks, the entire side of the tire will release from the rim.
Press the tire downward, away from the rim. Clean the inside edge of the rim with warm soapy water and a shop rag. Dry the area with a clean shop rag. Also, wipe the inner edge of the tire to clean any loose debris or dirt.
Place the needle back into the valve-stem and begin filling the tire with air. While air is flowing into the tire, pull up aggressively on the sides of the tire to mate the inner edge of the tire back onto the rim. When the tire touches the rim, air will fill the tire and continue seating itself along the rim.
Fill the tire to the desired air pressure. Recheck the tire for leaks with the soapy water.
References
Tips
 Avoid these products if possible.
 Things You'll Need
Writer Bio
Damon Hildebrand is a retired U.S. Navy veteran. He has more than 15 years within the oil and gas industry in both technical and managerial positions. Hildebrand has been a technical writer and communicator for the last four years. He is a certified specialists in lubrication and tribology, as well as a certified maintenance and reliability professional.
If you find a flat tire, stop in a safe place, turn on the warning light, assess visibility and, if necessary, set a warning triangle: The Highway Code requires a distance of at least 15 meters from the car in a built-up area and at least 30 meters from the car outside the settlement.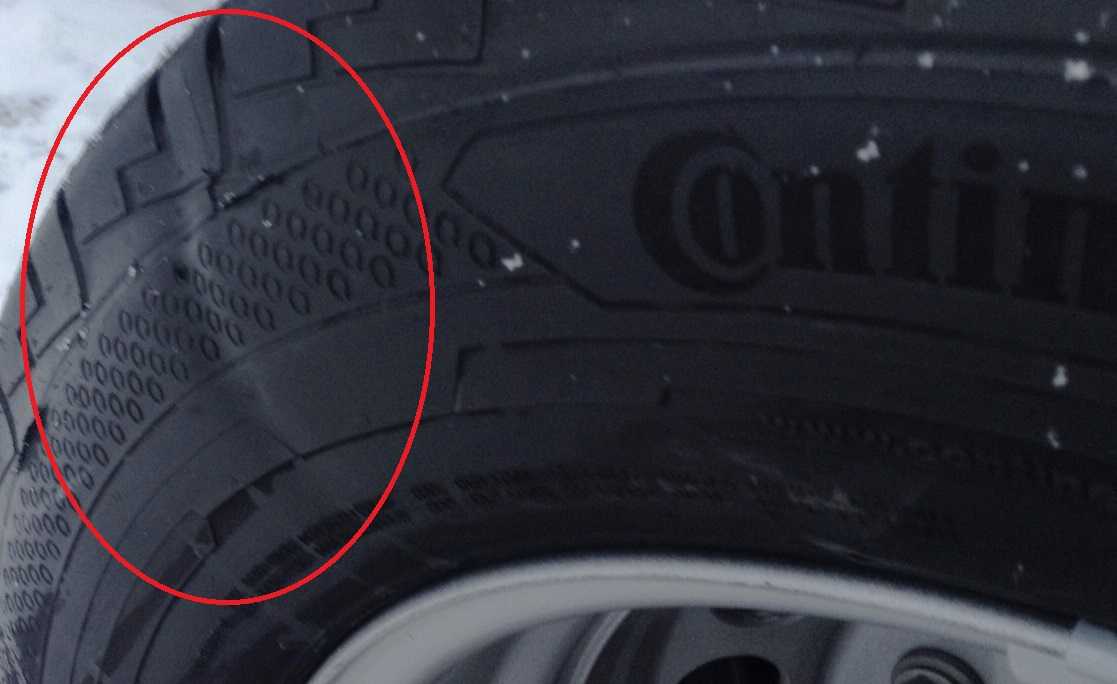 When choosing where to stop, consider the amount of space on the side of the vehicle that is needed to deal with a flat tire. Do not stop on the road or in places where stopping is prohibited: a punctured tire can cause a sudden stop, but you can drive several tens of meters to find a safe and convenient place to stop. At night or in conditions of limited visibility (for example, in fog or rain), it is mandatory to wear a vest with reflective elements - this is required by section 2.3.4 of the Highway Code and common sense.
Now we can start working on the wheel. We will look at several options in turn, and then proceed to repair the damaged tire.
The most obvious solution to a flat tire is to replace it. If you have a spare tire that you know is in good condition, it's best to have it installed and have the punctured tire repaired at a car repair shop - it's much safer and better than doing it yourself.
Flat tire - punctured If you don't have a working spare but you do have an inflator or compressor, you can assess the damage to the tire and try to re-inflate it to get to a tire shop. The best place to start looking for air leaks is at the valve (aka "nipple" or "nipple"): a failed nipple is often the cause of a tire puncture. It's easy to check: unscrew the protective cap (if there is one), pour water on it (or suck on it, as in childhood): air bubbles will let you know there is a leak. In this case, you can try to replace the spool valve by unscrewing it and screwing in a new one, but if a new valve is not available, and also at the nearest store, you can try just unscrewing and screwing it back. Whether it helps or not, you should visit a tire shop to have the valve core or entire valve replaced.
If the valve is tight and the tire is flat, it is most likely a puncture. The easiest way to find a puncture, if there are no foreign bodies, is to pour water on the tire and check its surface: damage will be detected by air bubbles. However, often the cause of a puncture can be found along with it: a screw, nail or other random object sticking out of the wheel will clearly indicate the place of depressurization. In this case, there is no need to immediately remove the foreign body: it will partially seal the hole, and if the pressure loss is slow, you can try to inflate the tire and go to the tire shop.
The same applies to wheels that leak around the rim or due to a faulty valve. Usually the air deflates slowly, and you can inflate the tire and drive to the repair shop. By the way, rim leaks can occur as a result of deformation of the rim upon impact - for example, when hitting a pothole with sharp edges. Such situations can lead to damage to both the rim and the tire bead, in which case the rim must be straightened and the tire repaired or even replaced. To avoid rim leakage, check the rim every time you change tires. Loss of tightness is caused either by corrosion or disk deformation, and not only steel disks are subject to corrosion, but also disks made of light alloys. Therefore, if you see paint blistering or rust on the rim, seal the tires with rim sealant: when changing tires, it will be cheaper than removing and reinstalling the tire to fix a leak on the rim.
If you find a puncture, but there are no foreign bodies in it, and you do not have a spare tire and tire repair kits, there is another popular method of temporary "repair". You can screw a self-tapping screw into the hole found - if you have one, of course. In extreme cases, you can look for a self-tapping screw in the car, unscrewing it from some interior detail. This method is not reliable: it is unlikely to completely seal the wheel, but at least it will help you get to the nearest tire shop.
Some other useful tips. If the tire is completely flat, it's easier to inflate it without the spool: unscrew the spool, then inflate the tire and quickly screw it back on. The fact is that the spool itself creates resistance to the compressor when inflated, and if the flat tire does not fit snugly against the disk, the performance of a conventional magazine compressor may not be enough, and the absence of a spool helps to increase air flow and facilitate the operation of the compressor. If that still doesn't help, you can raise the car by letting the punctured tire sag: this will improve the contact between the tire and the rim and make it more likely to inflate the tire.
Now it's time to consider repairing your tires yourself using special materials that you can carry with you or, if you have a punctured tire in the city, buy at a local auto repair shop.
The most common, cheap and easy DIY repair method is to install a raw rubber band. The kit includes an abrasive awl to expand the hole in the tire and improve the contact of the repair tourniquet with the edges, a needle for installing the tourniquet and glue to fix it when sealing a puncture. When choosing a repair kit in the store, you should pay attention to the following points:

The wiring harness is installed in the following order. First, the hole found is expanded with an abrasive awl - it must be inserted and pulled out several times at the puncture site. Then a tourniquet is inserted into the eye of the needle and glue is applied to it. Then insert the needle with the tourniquet into the hole in the tire and quickly pull it out so that the tourniquet remains in the hole and the needle comes out without it. After that, simply cut the end of the harness so that it is flush with the tire and inflate the wheel.
The advantage of applying a tourniquet is that it is quite decent in terms of reliability, simplicity and cheapness. You can ride a repaired tire for a long time, and if the repair site starts to leak, you can replace the harness or have the tire repaired by professionals. The disadvantages include the possibility of damage to the tire cord during installation and less reliability compared to repair methods in a "full" tire shop. Strictly speaking, the harness is still a temporary repair, so if you can pump up the wheel and go to a tire shop, it's better not to enlarge the hole in the tire and go to the professionals.
The second repair option is liquid aerosol sealants sold in cans. To repair a punctured tire with sealant, it is necessary to remove the foreign body from the puncture site, then pour the sealant into the wheel through the valve, turn it to distribute the compound inside the tire, inflate the wheel and drive several kilometers at low speed for the final even distribution of the sealant.
The advantages of this repair include its simplicity and less labor intensity compared to installing the strapping. However, it has its drawbacks: the larger the hole, the greater the chance that the sealant will not be able to patch it, and, in addition, such repairs can affect the balance of the wheel. Compared to a harness, it can be considered even less reliable and preferable, but simpler.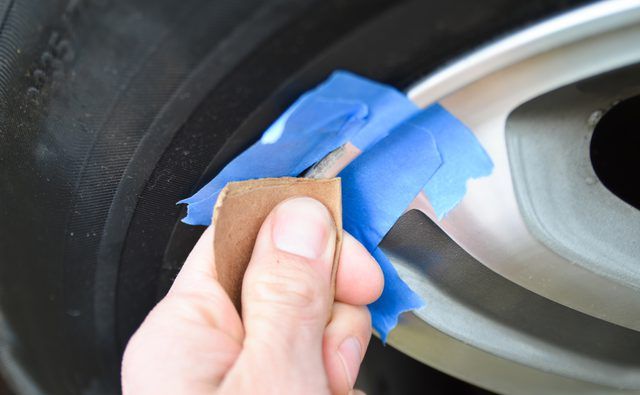
If you fit a spare tire and take the wheel to a tire shop, you may also be offered several repair options. Consider the most popular of them with an indication of the advantages and disadvantages.
1. The first way to repair is the same harness installation as described above. As we remember, the tourniquet refers to emergency repairs, so among professional tire fitters this method is considered bad form, but many workshops do not exclude it from the list of their services. The advantages and disadvantages are the same here: it will be the fastest, easiest and cheapest repair, but less reliable than other methods. It should be chosen in cases where the price and / or speed of treatment is more important to you than anything else. If quality is a priority, you might be better off using the options below.
2. The second option for repairing a punctured tire is to patch the inside of the tire, known as cold vulcanization.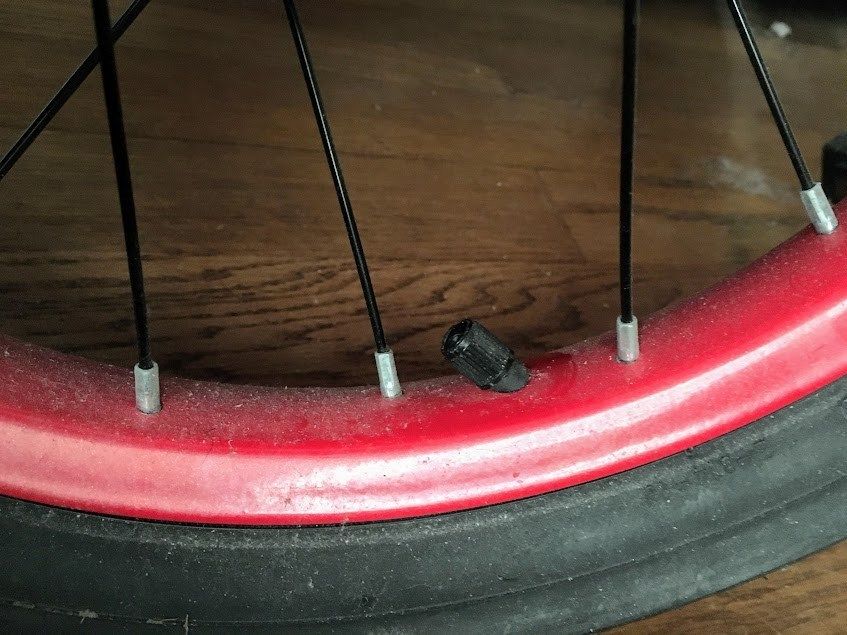 The tire is removed from the rim, the area around the puncture is cleaned with an abrasive and sealed with a plaster. This is a better repair solution than a harness, which is much more reliable and durable, especially in side punctures when the tire tread is not very thick and the sidewall is thinner than thick. The only downside is the higher cost: in addition to the tire repair itself, you will have to pay for the removal and installation of the wheel (or do it yourself), mounting the tire and balancing it.
3. The third option is a “complex” of the first and second: installation of the so-called repair “mushroom”. The “cap” of the mushroom is a patch, and the “leg” is pushed from the inside of the tire out. After the patch is glued into place, we cut off the excess part of the stem, similar to a tourniquet. This seals not only the inside of the tire, but the hole itself. The advantages and disadvantages of this repair method are basically the same as patching.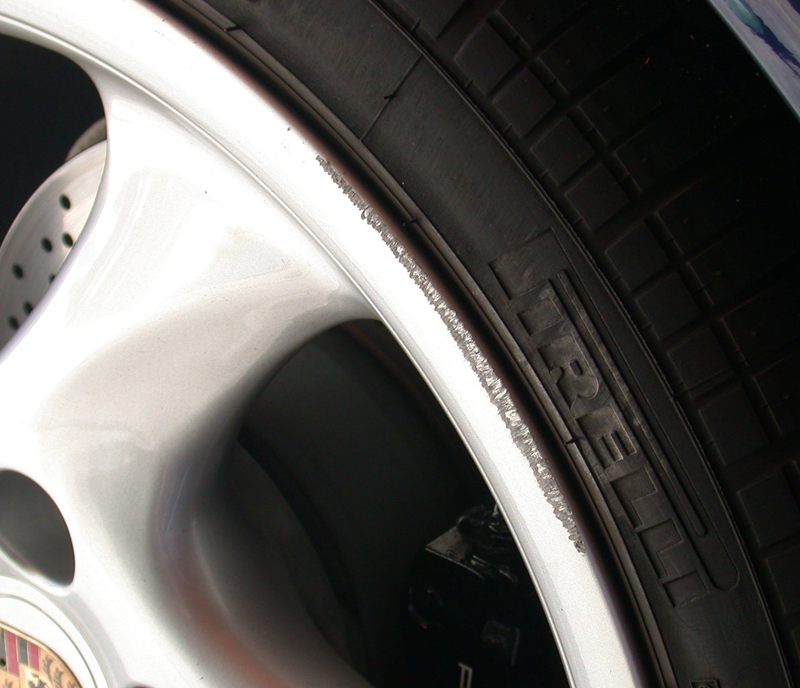
4 . An extreme "emergency" way to repair a punctured tire is to install an inner tube. This method is usually used for tires that are no longer worth repairing, or for "safety" after repairing a puncture joint. It is important to know that almost all modern tires are tubeless, so the inner tube should not be used for a long time, and you should not ride a wheel repaired in this way. Threading the inner tube is a temporary solution until you have to buy a new tire and sometimes you can keep it as a spare. Therefore, this repair method can be kept in mind as a fallback option.
We have deliberately left out of the scope of this text methods such as combined tire and patch repair and hot vulcanization. The first is used quite rarely and for specific types of damage, and it is quite easy to find out about its existence. The second method is used to repair severe side cuts and is not only rare, but also quite expensive. The cut area in this case is prepared, filled with raw rubber and processed with a hot vulcanizing press. Not every tire shop has the equipment for this procedure, and the cost of a repair can be about half the cost of a new tire.
Contents:
A flat tire on a car is always a nuisance, especially if the loss of pressure caught the driver not in the garage, but on an empty highway. And it's not always a puncture, because the bleeding of air can occur along the disk. Why the wheel is lowering along the rim and what to do about it, we will analyze in the article.
This problem is quite common with tubeless tires, where the rubber adheres to the disc due to internal pressure. At the junction of the disk and tire, the seal is sometimes broken and air is bled, which ultimately leads to a complete loss of pressure.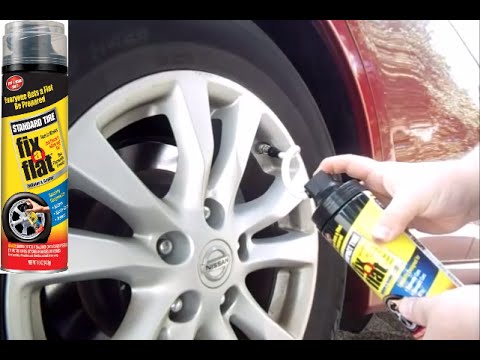 In chamber tires, the situation is more unambiguous: if the wheel is flat, then look for a puncture.
Deformation is the main reason. Disc geometry is an extremely important thing for full-fledged work, sometimes even a dent in an insignificant place can be fatal. The car drove into the pit - the disk bent, the tightness of the cord was broken and all the air came out. Low temperatures outside the car, which causes the rubber to harden, is a common cause, especially if tightened with a tire change. Also, due to poor maintenance, improper storage of the prefabricated kit, or constant driving on roads sprinkled with reagents, the disc begins to rust, as a result of which corrosion eats away the metal, forming micro-holes through which air will be gradually etched. Blowing off the wheel can also occur through a faulty nipple.
In the end, the reason that the wheel is going down is the most banal - the rubber is already old and deformed over time, which means it is physically unable to provide the desired density at the point of contact.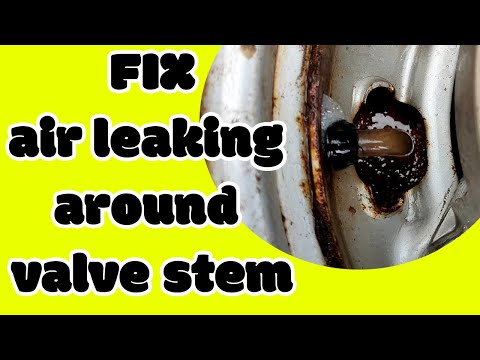 There is nothing to prevaricate here: the tire urgently needs to be replaced.
It would seem that since such a disaster does not happen with chamber tires, isn’t it better to give preference to them? Maybe in this sense this is true, but in fact, tubeless has more than one advantage. Here they are:
They have no friction between the tube and rubber, which means that the tire heats up less during long rides.
It is lighter and more reliable, since the chamber version can burst at high speed.
It balances better and holds pressure longer after a puncture.
A hole in the tread may not interfere with the ride at all - a stuck nail will simply not allow air to escape. With a chamber tire, this is impossible, it will be blown away pretty quickly.
Damage to the tread can be urgently repaired with a repair harness. This is quite enough to get to the nearest tire center and change tires.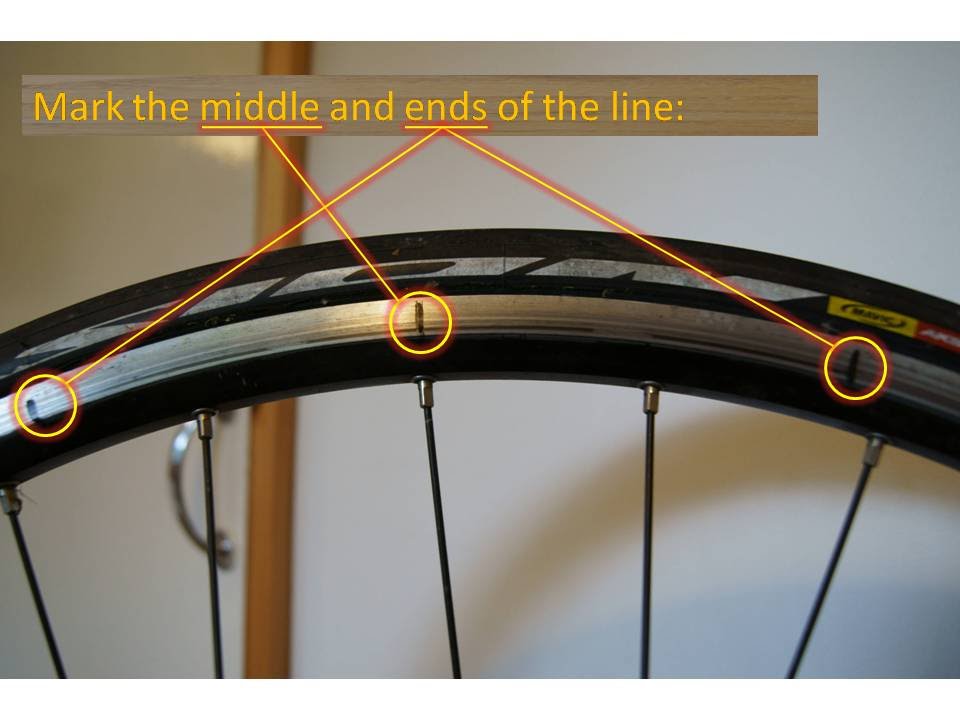
First, make sure that you do not have a puncture in the wheel or that the cause of the trouble is not in the nipple. It is elementary to notice a protruding nail, but it is not always necessary to pull it out immediately and immediately. As we wrote above, a foreign object can simply get stuck in the tread and the air will have nowhere to go. An open puncture is repaired with a tourniquet.
The valve must be smeared with soapy water or simply slobbered - if there are no bubbles anywhere, then it has nothing to do with it. A defective nipple will have to be replaced with a new one.
If the valve is in order, fully inflate the tire and smear the edges of the cord with soapy water. You can do this with a brush or use a sprayer. Air bubbles will tell you that the source of the trouble is in the detachment of the cord from the disk surface, i.e. in violation of the tightness of the tire seat. Metal edges should also be carefully examined - any cracks and welding defects can be the cause of a pressure drop.
To eliminate the descent from under the rim, you can do this:
We poison all the air and remove the wheel from the car.
It is best to disassemble it, so it will be much more reliable to fix the problem. In order not to do the balancing again after the procedure, it’s a good idea to mark the position of the nipple with chalk first.
The disk edges will have to be properly sanded with fine sandpaper in places of rust damage and covered with a new layer of paint.
After the paintwork has dried, we put the tire back on and spread the rubber on the places where the cord touches the disk with a special sealant or mastic. Or you can use the soap solution again, but this time cook it much thicker so that it resembles glue in viscosity. And with the help of a simple brush, we go around the entire circumference of the cord on both sides of the wheel.
We inflate the tire with a compressor, pressing the cord against the disk.
So we will eliminate the damage and provide a tighter fit on the seat. The sealing compound must penetrate all micropores and prevent new bleeding of air.
If there is absolutely no time to remove the wheel, and trouble overtook you on the road, it is enough to bend the edge of the cord and also smear the rubber with sealant or soap. This is quite enough to reach the garage or car service.
The described methods are suitable if there was no serious deformation and there are no cracks in places near the mounting holes or there is no damage to the tire cord. In the worst case, you can’t do without rolling a disk in a tire fitting or replacing it. If you have an alloy wheel, then you can fix it, but this is an extremely expensive business, comparable to buying a new one. However, even when repairing at a tire center, rolling a casting does not always help, and it may soon crack. It’s better not to even think about repairing the wheels yourself. A mistake can be costly.