Getting a big Utility ATV stopped on the trail can be a task – especially so if there is some weight on the front or rear racks. Braking is something that many ATV owners take for granted and even neglect until the entire system begins to break down beyond repair.
We recently serviced our 2003 Honda Rancher before hunting season and when it came to the brake system the pads were not the only item in the death zone. In this short and sweet process we will show you how to rebuild a degraded master cylinder to keep the brakes working at their full potential.
For a little background information, the master cylinder holds an ATV’s brake fluid and acts as a pumping device to pressurize the brake lines, activating the brake calipers. We knew our master cylinder needed attention because the brakes were starting to feel spongy and not holding pressure.
After removing the two screws that hold the cap on our front brake master cylinder reservoir, we noticed we really needed to change the fluid. The reservoir had also become caramel brown and the fluid had collected flakey contaminants from years without a change. This corrosion was getting in the way of the o-rings and rubber seals doing their job properly.
Step One
This is not what you want to find when you crack open your master cylinder.
Carefully remove the twin Phillips head screws that hold the cap on and set the cover along with the diaphragm plate and rubber diaphragm to the side for now. Be sure the handlebar is positioned so the master cylinder is as level as possible to avoid spills. Using a couple of paper towels or disposable shop rag dry up the fluid in the master cylinder until the majority of the old fluid is gone. Be very cautious as to where you dispose of these rags after they have soaked in the fluid. If these rub up against some metal or painted surfaces, things will start to corrode.
Step Two
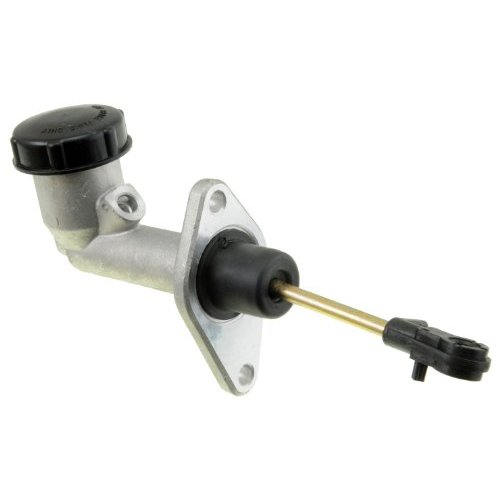
Time to remove the master cylinder from the handlebar.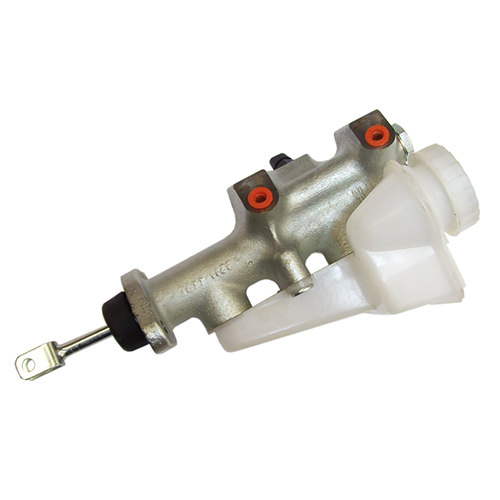
To gain better access to the master cylinder for cleaning, remove the master cylinder from the handlebar by removing the two 8mm bolts that keep it in place.
Step Three
Remove the brake line from the master cylinder.
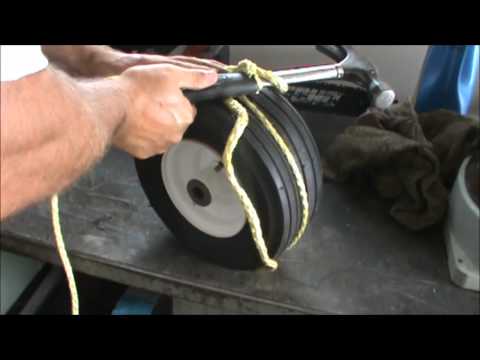
Loosen the 10mm banjo bolt that holds the brake line to the master cylinder. Be sure to not lose the copper washers as you will need them once you start to put the system back together. You may want to wrap the line with an old shop rag just below the bolt as fluid remaining in the line could leak out. Loosen the two 8mm bolts that hold the brake master cylinder to the bars and pull the master cylinder from the bars.
Step Four
Remove the brake lever from the master cylinder.
Remove the brake lever from the master cylinder by removing a single pivot bolt, which is held in by a locking nut. This will allow you to see the plunger and rubber boot that covers the plunger. There is a snap ring that holds the plunger in place and you will need long thin snap ring bits to get down inside the cast body of the master cylinder to get it out. The old plunger, spring and seals should simply pull out of the master cylinder. You will also want to remove the black silicone seal inside the master cylinder to get any debris out from under it.
Step Five
The new master cylinder components (left) compared to the corroded ones (right).
Once everything is removed you are ready to completely clean the master cylinder. After it is prepped for the new plunger, spring and seals add a little coating of brake fluid to the seals. This should help the reinstall of the new plunger and spring.
This is where every step shown above is basically reversed. The plunger should now be seated properly in the MC and the new snap ring and boot should be in place. This is a fairly simple process and can be completed in just a couple hours by anyone with mild to moderate mechanical skills.
This is what the inside of a master cylinder should look like.
Master cylinder kits are available from your local dealer and are only about $30. 00 depending on the model and make of your ride. You will need some extra brake fluid to refill the reservoir. Draining the entire brake system can be a little more difficult, so we opted to simply crack open each bleed screw individually and pump the new fluid down through the line one wheel at a time. Be sure your brakes are properly bled before you take off to the trails!
Honda Part Number: 45530-471-831
Brakes that won’t build or hold pressure for some reason is a common issue people have with their ATVs. In this post, we’ll have a look at the most common causes of why this happens and how to fix it.
Related: How to Bleed ATV Brakes; Manual and Vacuum Method
Page Contents
This one is the most likely cause, even if you think you got all of the air out. No air bubbles coming out when you bleed with the manual method does not necessarily mean that there is no air left in the system.
Any time you replace or disassemble any of the brake components in direct contact with the brake fluid, air will enter the otherwise closed brake line system.
New brake lines are going to be full of air. This air needs to be bled out entirely before the brakes will start working as they should.
If the brakes feel mushy, there is more than likely still air inside, even if you think you got all of the air out.
 Add more fluid before it drops below the minimum mark. If you do this operation manually without a vacuum bleeder, expect to pump the brake many times before you have got fluid through the system. Patience is vital for this part of the procedure.
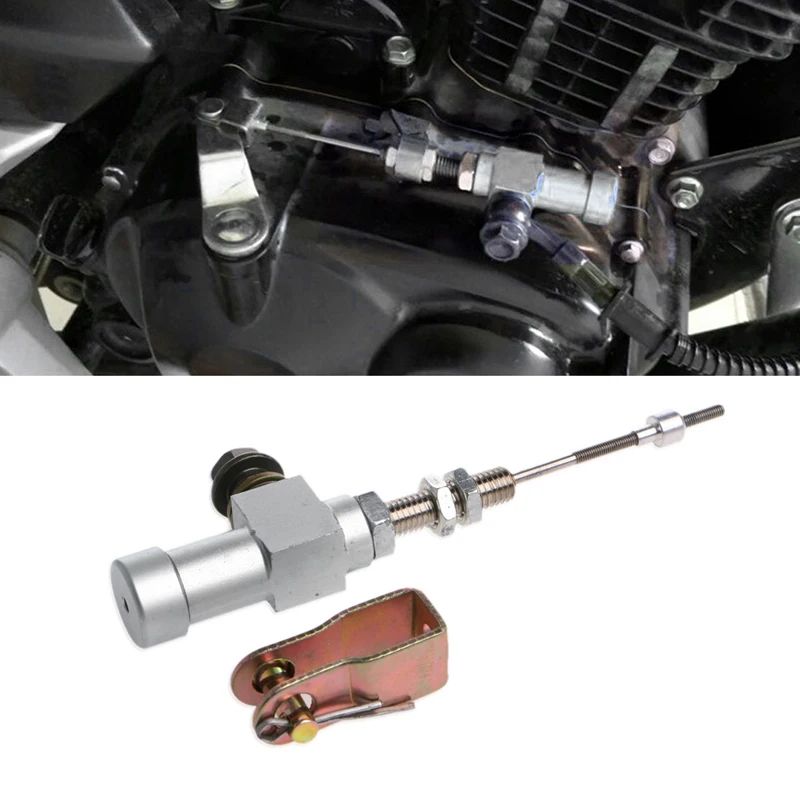
Another popular method for ATV brake bleeding that usually will work is reverse bleeding. This post will tell you how to reverse bleed the brakes on your ATV.
The rubber piston seals in a brake system spend their life in a highly corrosive environment. If these seals are left dry for more than just a few days, they may develop knicks, making them useless.
Through a small hole at the bottom of the brake fluid reservoir, you can get a glimpse of the piston and the piston rubber seal.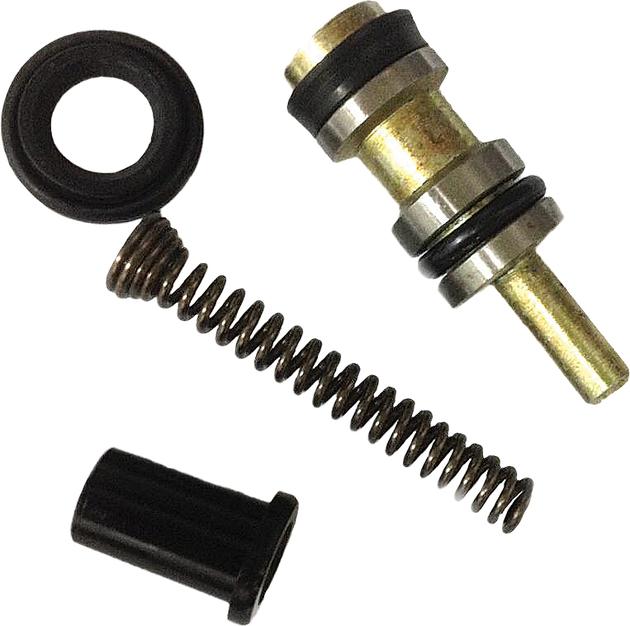
This may happen if you’re waiting for parts to arrive or doing a major rebuild that leaves the master cylinder dry.
Try keeping the rubber seals soaked in brake fluid if you’re unable to finish the job in a few days. If they crack and go bad, you will need a rebuild kit.
Any time you are planning a major rebuild of an old ATV, or a bike that has been standing for some time, it’s a good idea to throw a rebuild kit into your cart along with the other parts you plan on replacing. Expect to pay $10 – $35 for a complete rebuild kit that consists of:
If the brake fluid gets contaminated or dirty, the master cylinder won’t work as it should. The dirt will build up inside the small canals and compartments of the master cylinder housing, possibly preventing proper brake fluid flow.
Rubber gaskets and parts sliding over the dirt buildup will allow brake fluid to bypass where it shouldn’t, and the piston won’t be able to build pressure as it should.
To fix this issue, you need to:
• Bleed all of the old brake fluid out. Just open the bleed valve and pump the brake lever until all of the liquid is out.
• Disassemble and clean the inside of the master cylinder using brake cleaner and a small brush.
• The dirt has likely worn the rubber O-rings and gaskets inside the master cylinder. Get a master cylinder replacement kit and replace these parts.
• Reinstall the master cylinder and add new brake fluid according to factory spec (usually DOT4).
If you have any problems with bleeding the master cylinder after doing this cleanup job, look at this post where we look at several different ways of bleeding a master cylinder, or this post about ATV brakes that won’t bleed.
When we’re doing off-road riding, brake lines may get damaged from smashing into rocks and branches. A smashed brake line won’t allow brake fluid to flow as it should. Or, there may be corrosion buildup that will also prevent proper flow.
Reinforced brake lines that are damaged will not provide a rock hard brake feel as they should.
Inspect the brake lines all the way from the master cylinder and down to the caliper. If you see any signs of damage or corrosion, replace the damaged component with a new one and see if this fixes your issue.
You should be able to follow the brake lines from the calipers and up to the master cylinder.If moisture gets into the brake system and the master cylinder, there will be a residue build up over time. This residue will prevent the rubber seals from closing entirely, letting brake fluid bypass when you brake.
To fix this issue, you have to remove all brake fluid, flush the brake system with plenty of new brake fluid, clean out any residue from the master cylinder, and get a master cylinder rebuild kit.
Make sure the brake fluid reservoir cap is sealing properly so the problem won’t come back. Get a new seal if it’s not included in the master cylinder rebuild kit.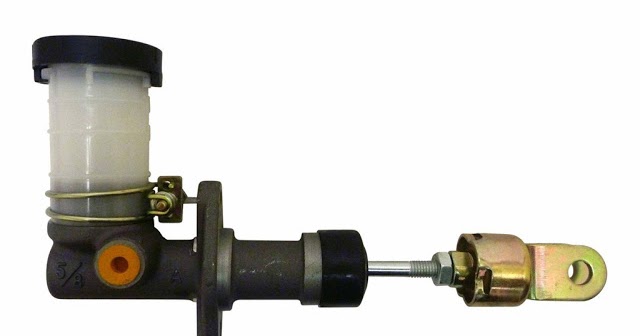
The brake shoes on drum brakes need to be adjusted properly before you can successfully bleed the brakes. If you don’t, air may still be trapped, and you will not be able to build brake pressure.
Note that this only applies with drum brakes, not disc brakes.
Do this on all brake shoe adjusters, one at a time. Tighten the adjuster until the brake locks up. Then back off the adjuster three clicks and move on to the next adjuster. Repeat on all wheels that have drum brakes before bleeding the brakes manually.
If your brake system leaks, you will likely have problems building proper pressure. The leak does not have to be big before you start noticing that something is not right.
A small leak may be just barely visible on a dirty ATV, without any brake fluid dripping to the ground. There is only a moist spot in the area where the leak is located.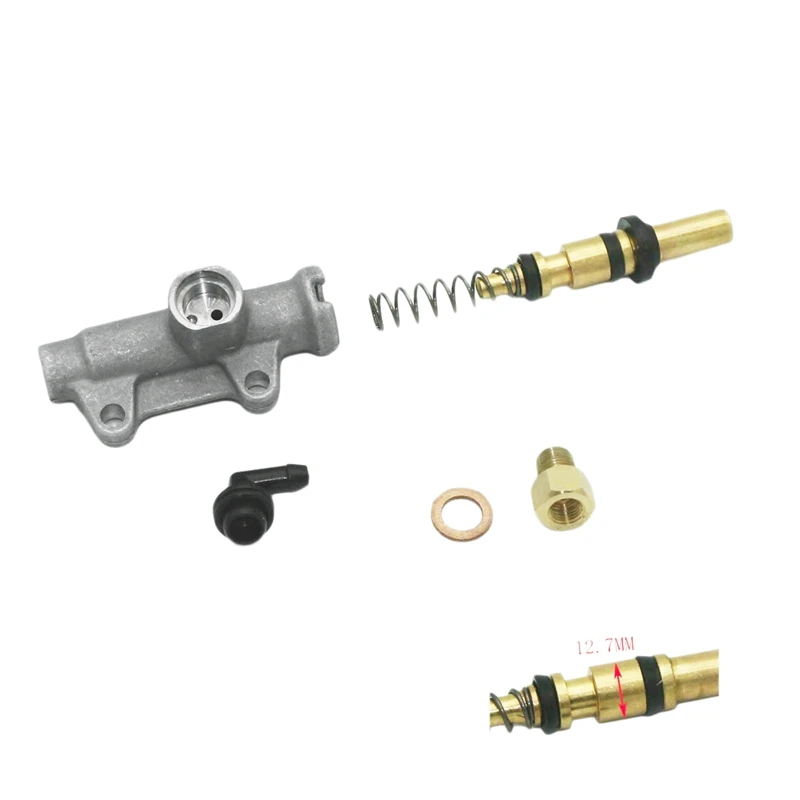
Again, you need to inspect the brake lines from the master cylinder and down to the brake calipers. Use a clean piece of paper and drag it along the brake line, making it easier to pick up any leaked brake fluid.
The leak may just as well be in the master cylinder itself or any of the calipers. Again, use a piece of paper towel to find the leak.
Replace any damaged parts. If the leak is in the master cylinder or brake caliper, you will need a master cylinder rebuild kit.
If the leak is in any of the brake line connections, such as the banjo bolt up by the master cylinder, you may be able to stop the leak just by cleaning.
If you are doing a brake rebuild and try building brake pressure before installing the brake drums, you will likely not succeed.
The drums must be installed when you try building brake pressure. If they are not, the plungers inside the brake cylinders will get pushed out too far, allowing air to get back into the system.
Install the drums, bleed the brakes, and see if that’s what was causing your issue.
You won’t always be able to push new brake fluid down empty new brake lines only by pumping the master cylinder repeatedly.
If the brake fluid reservoir level does not seem to be dropping after 10-20 pumps on the brake lever, you will likely need to use another method for bleeding the brakes.
My favorite method to try in situations like this is using a simple vacuum bleeder to suck the new brake fluid down the brake lines.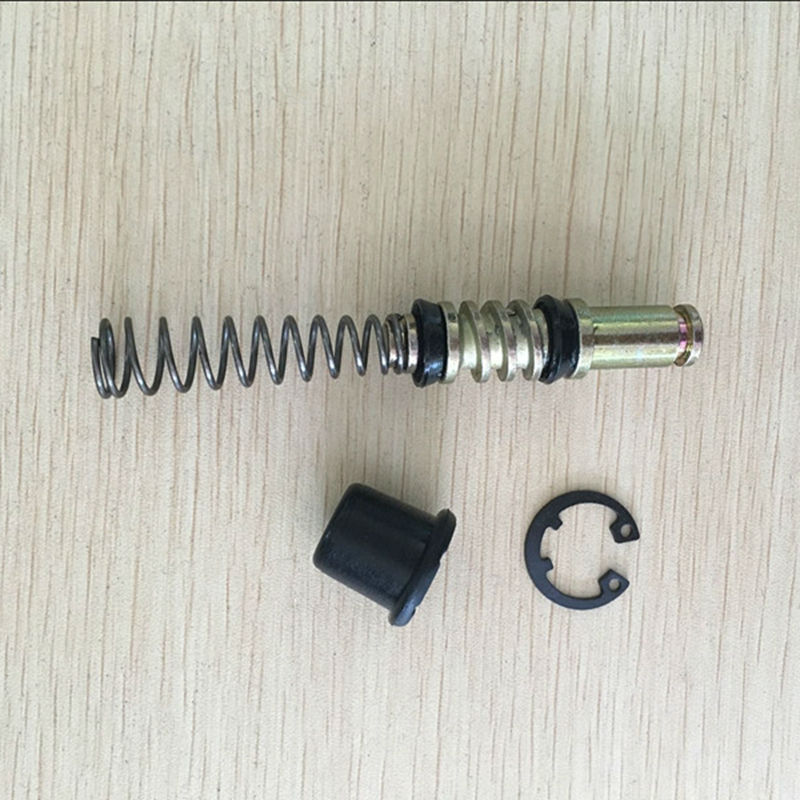 You can get it at any auto supply store for 10-20 bucks.
I write about how to use one in this post that also covers a range of other methods you can use to bleed the brakes.
When you replace worn brake pads, you need to push the plunger in the brake caliper back to make room for new ones. If you are not careful, you may damage the rubber seal, causing a leak. The seal may also be bad just due to old age.
Not all ATV brake calipers have visible rubber piston seals, like on this Polaris.If you’re working on a clean, smooth surface, you should be able to spot a leak in this area quite fast. If you’re working on dirt or gravel, you may end up refilling the brake fluid reservoir several times before you notice the problem.
If you damage the seal, there is no way around replacing it. Rebuild kits are cheap, and the job is relatively easy to do.
Inside the master cylinder, there are many tight spots where small bubbles of air can get trapped.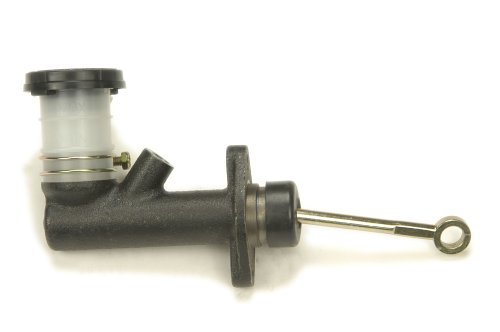 If you’ve got air in the master cylinder, you may have difficulty getting it to start building pressure.
Read this post about how to bleed the master cylinder properly. Doing so should get you started. Then you can proceed to bleed your brakes with the manual method.
Don’t forget that your ATV will have two master cylinders: One up on the handlebars for the front (and sometimes also the rear wheels) and one down by the foot brake for the rear wheels.
Depending on how the brake system on your bike is designed, you need to make sure both master cylinders are properly bled.
Removal of the master brake cylinder of the GAZ-53A car must be carried out in the following sequence
Stop the engine and release the booster from vacuum by pressing the brake pedal several times.
Disconnect the pipe from the master cylinder coupling.
Discharge the brake fluid from the master cylinder into a container by depressing the pedal several times.
Remove the rubber cap with compression ring from the end of the master cylinder.
Remove the brake pedal return spring. Remove the pin, pusher with rod and remove the protective cap with the clamping ring.
Remove the master cylinder from the pedal bracket. When unscrewing the bolts, it is recommended to use the wrench shown in fig. 1.
Removing the brake and clutch master cylinder of the GAZ-66 car must be performed in the following sequence.
Release the vacuum from the amplifier.
Disconnect the pipes from the master cylinder couplings.
Expel fluid from the master cylinder into a container.
Remove the master cylinder bracket with pedal assembly.
Remove the rubber caps with compression rings from the piston stop cap.
Loosen the nuts of the eccentric axles, remove the eccentric axles, remove the piston pushers with bushings (under the eccentric axles) and protective rubber caps from the cylinders.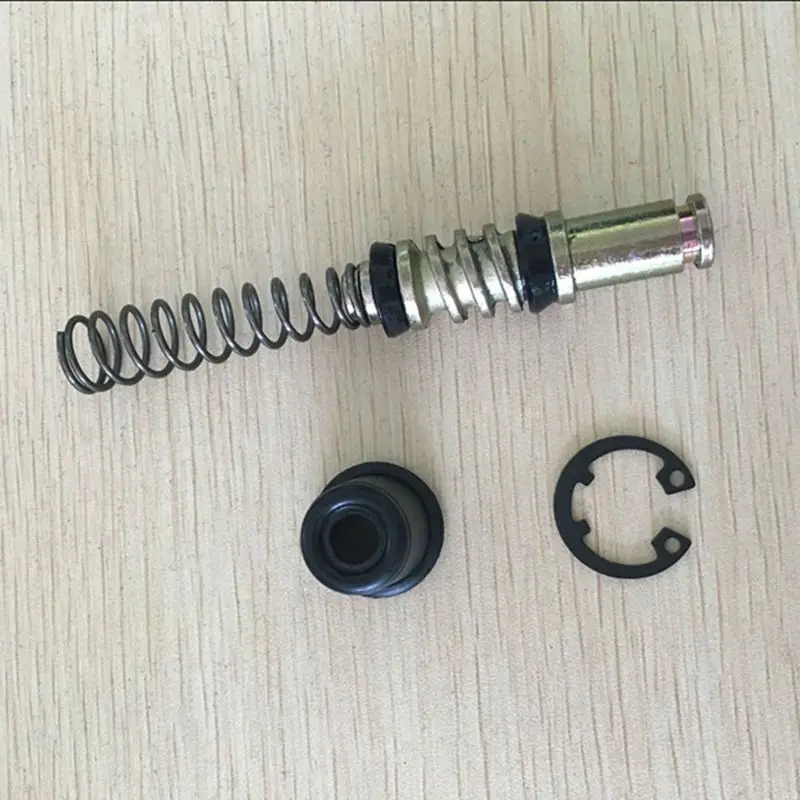
Remove the cylinder from the pedal bracket.
Disassembly of the brake master cylinder must be performed in the following sequence.
Clean the outer surface of the cylinder. Remove filler plug with gasket. Pour out the brake fluid remaining in the cylinder and reservoir.
Remove couplings with copper seals.
Remove the retaining ring, thrust washer (or remove the thrust cover with gasket for GAZ-66), piston, cuff, spring with holder and valve from the cylinder.
To remove parts, compressed air can be forced into the cylinder through the outlet port at the end of the cylinder.
Remove the master cylinder cover with gasket.
Wash all parts of the master cylinder in pure alcohol and wipe with a clean cloth. Check parts for wear and condition. The data of the maximum permissible dimensions of the parts of the main cylinder are indicated in Table. 1.
| Nominal* and repair dimensions of master cylinder parts, mm | |||
|---|---|---|---|
| Size | bore | piston diameter | edge diameter work cuffs |
| denomination | 32. | 32.00 -0.025 (31.85) | 33 ± 0.2 (32.75) |
| 1st repair | 32.25 +0.027 | 32.25 -0.025 | 33.50 ± 0.2 |
| 2nd repair | 32.50 +0.027 | 32.50 -0.025 | - |
| 3rd repair | 32.75 +0.027 | 32.75 -0.025 | 34.00 ± 0.2 |
| 4th repair | 33.00 +0.027 | 33.00 -0.025 | - |
| Dimension shown in brackets without repair | |||
Master cylinder housing.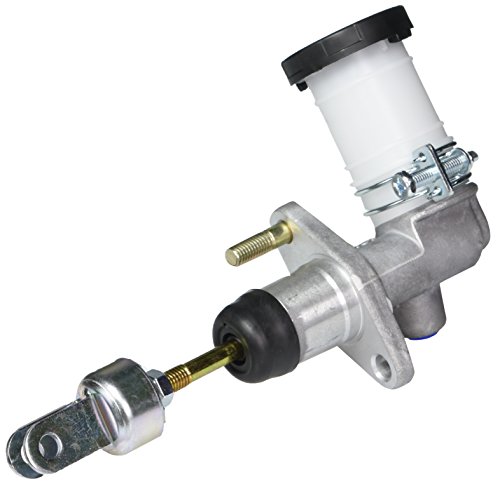 Check for burrs and corrosion on the cylinder running surface. Clean
the crankcase overflow and outlet holes with a wooden stick, and the compensation hole with soft blunt wire Ø 0.6 mm.
If the cylinder surface shows signs of scuffing, corrosion and wear, it is honed to a diameter not exceeding 32.152 mm. In this case, install new cuffs.
If a leak appears after the repair, bore the cylinder and then honing it to one of the repair dimensions. At the same time, the corresponding dimensions of the pistons and cuffs are set.
Master Cylinder Piston Check for burrs, corrosion, wear, or blocked bypass ports.
If the spring valve riveted to the front end of the piston is not seated securely or has moved so that the piston holes are open, reinstall the valve and secure it with additional punching.
Valve. Clean the valve before washing with a blunt tool and soak in alcohol to flush. Any damage or swelling must be replaced.
Thoroughly remove dirt from the cylinder filler cap and clean the vent hole.
The seals of the master cylinder piston must be elastic, and the working edges must be sharp and without flaws.
Wash all parts of the master cylinder in pure alcohol and blow with compressed air before assembly. Lubricate the cuffs and the mirror of the cylinder with brake fluid.
Assemble the master cylinder in the reverse order of disassembly.
After the spring with valve and holder assembly, inner seal and piston are installed in the cylinder, check that the piston returns well under the action of the spring.
With the washer and retaining ring installed in the cylinder, check with a soft wire Ø 0.6 mm with a blunt end that the oil seal compensating hole is not blocked.
After assembling the master cylinder, hole "A" with a diameter of 0.7 mm must not be blocked by a rubber collar (fig.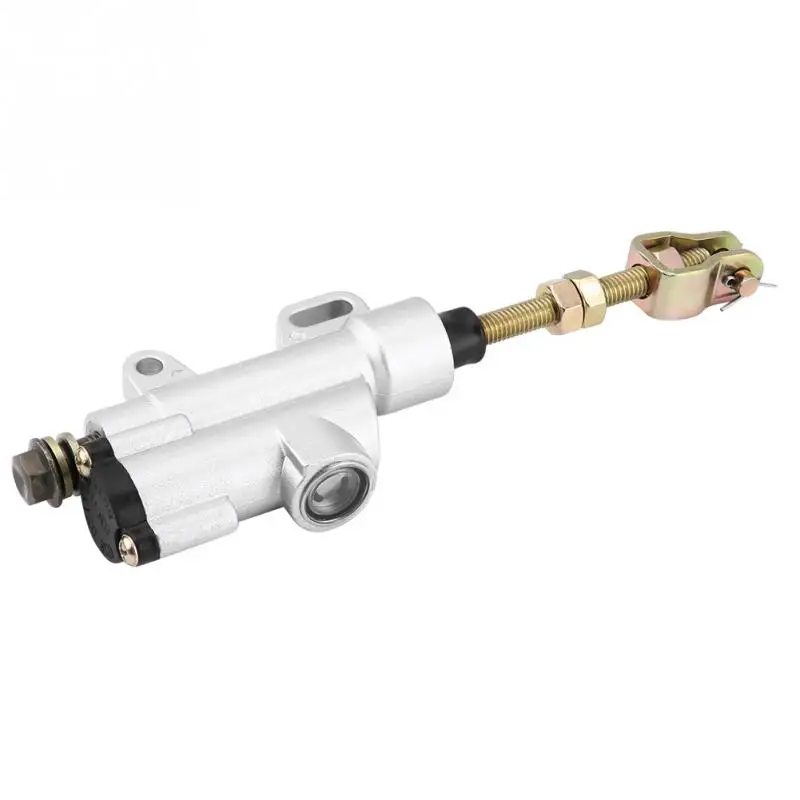 2). This is checked with a wire with a diameter of 0.6 mm.
The distance from the crankcase mounting flange to the pusher end must be 92.5 mm. The piston stroke must not exceed 37 mm (see fig. 2).
After installing the cylinder on the pedal bracket, install the pushrod with cap assembly into the cylinder piston without putting the cap on the body.
Test the master cylinder, for this you need:
No fluid leakage, no pressure drop, no pedal movement for 1.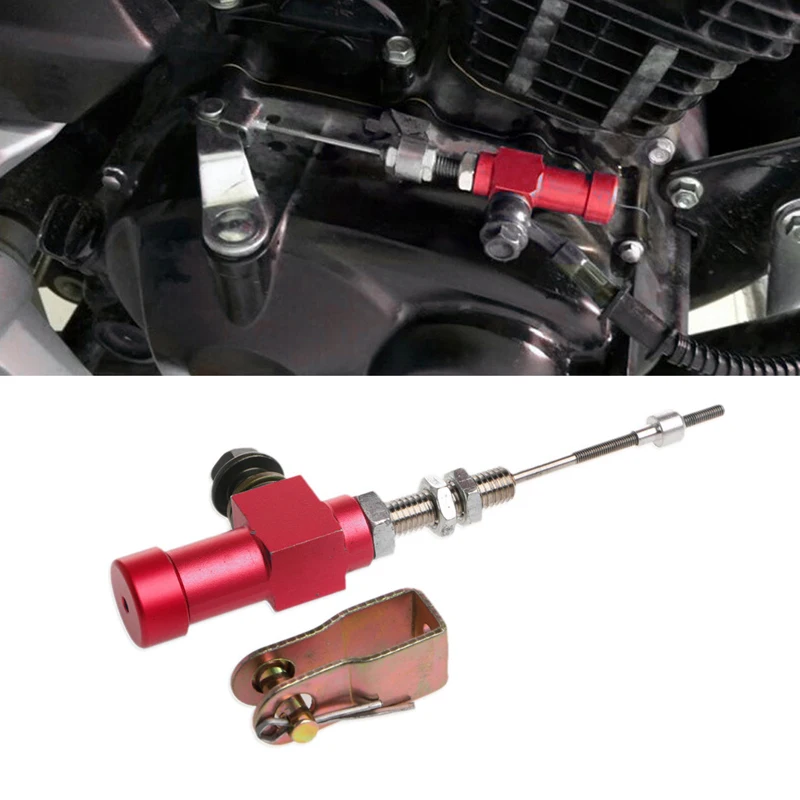 5 minutes;
Note pressure gauge reading; the valve must maintain an overpressure of 0.8 kg/cm 2 in the system for one hour;
When assembling the GAZ-66 master cylinder, take into account that an overpressure valve is not installed in the cavity of the clutch drive master cylinder, and the pistons rest against the cover.
Clean and flush before replacing parts.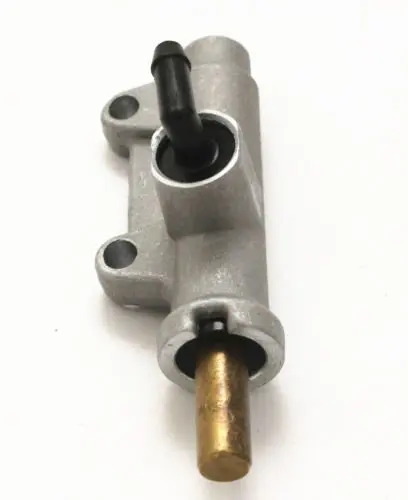
When replacing tubing, hoses or tees, tighten them securely.
Brake pipe is replaced in case of damage, dents in the narrowing of the section.
When bending the pipeline in relation to its installation site, be careful not to allow cracks.
To do this, put a spring sheath of the appropriate diameter on the pipeline or bend the pipeline with a roller.
Pipe ends must be double flared to ensure tight connections.
When making new pipelines, cut off their ends strictly perpendicular, preferably with a pipe cutter, so as not to crush them. Thoroughly clean the burrs on the ends along the outer and inner diameters.
Clean the inner walls of new brake lines with pure alcohol.
Brake Flex Hose Replace if scratched or otherwise damaged.
When replacing the brake hose, unscrew the connecting nut of the pipeline that fits it, then unscrew the nut securing the hose to the frame and then unscrew it from the wheel cylinder or tee on the rear axle.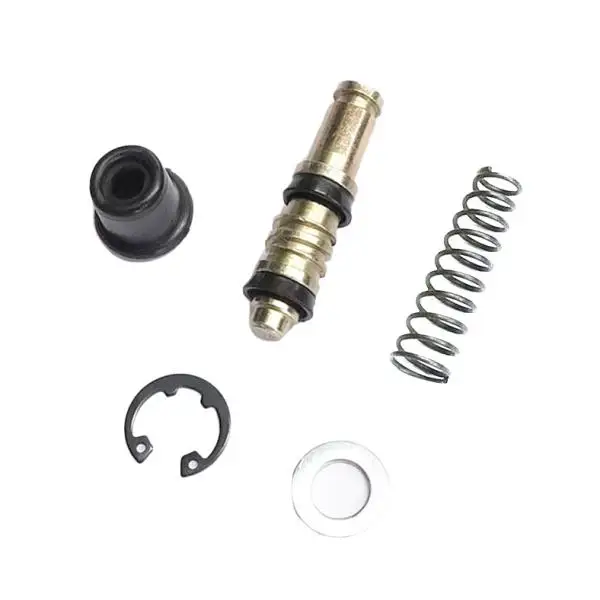
Install the hose in reverse order.
When tightening the hose fastening nut or pipe connecting nut, hold the hose with a torque wrench.
The hose must not come into contact with parts of the chassis.
Features of the brake system of ATV
The main causes of brake malfunction
Remedcaps for ATV
The caliper is considered one of the important components of the brake system of the ATV, which transfers the effort to press the brake to the disk or the disk or the disk or the disk or the disk or wheel. The principle of operation of the mechanism is based on creating the effect of hydraulic force due to the difference in the size of the caliper and pistons of the master cylinder. During braking, the piston extends and presses the pad against the surface of the disc.
ATVs have two independent brake circuits - front and common.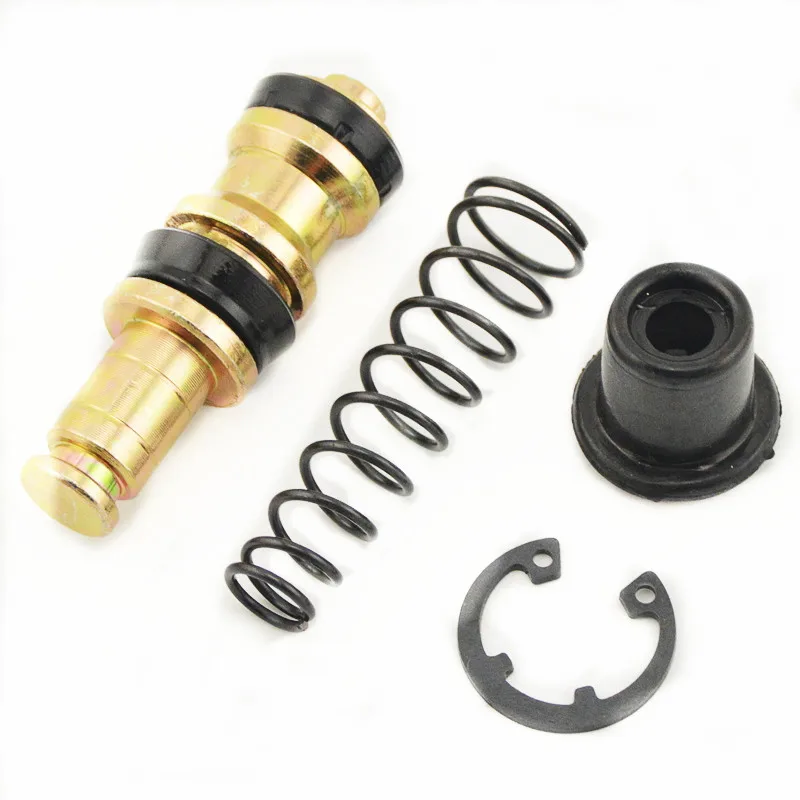 The front calipers have two fittings for draining and connecting brake hoses. One hose is connected to the right handlebar cylinder and the other to the ATV pedal. Inside, the calipers are separated by a cuff, thanks to which both circuits function independently of each other. The rear brake works simultaneously with the front and has a four-piston caliper.
This stainless steel piston kit was custom made for the BRP G2 ATV. The brake system is the same on models 650, 800 and 800 max. We also manufacture piston seals.
A brake caliper typically has a lifespan of 7-8 years, but some parts of the assembly can wear out much faster. Most often, the anthers of hydraulic cylinders and caliper fingers fail, which is why the brakes begin to overheat and wedge. When the anther is worn, the working surfaces of the hydraulic cylinders and pistons are more susceptible to corrosion and abrasive processes, which leads to the breakdown of the entire assembly.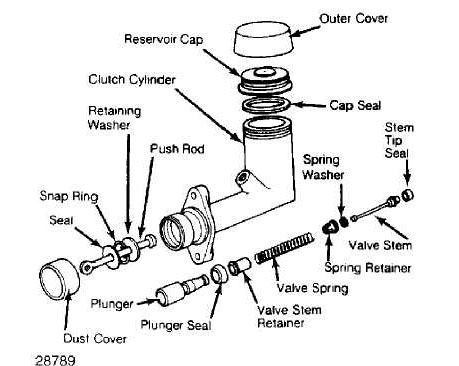 Also, the causes of a caliper malfunction can be associated with a violation of the geometry of its individual elements, which occurs when the pressure of the hydraulic cylinder on the disc is uneven, overheating, or extraneous mechanical action on the parts.
The ATV caliper is quite expensive, so replacing the entire assembly is impractical and very expensive. Original spare parts from the manufacturer have metal pistons with a chrome coating, which turns sour after a few years. The piston-caliper.rf company offers an alternative solution to the problem with minimal expenses.
We produce high-quality and inexpensive brake caliper repair kits for any ATV models. For the production of pistons, alloyed stainless steel with machined polished surfaces is used. The material is distinguished by high strength, durability, high resistance to temperature and road chemicals, which ensures the stable operation of all elements of the brake system and traffic safety.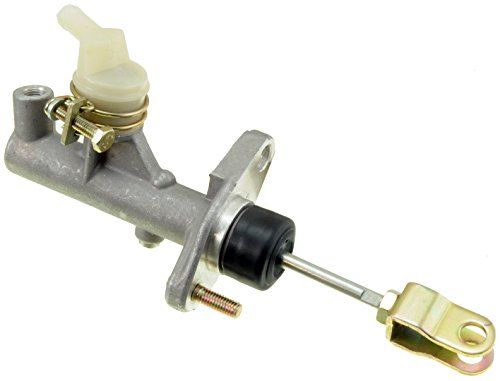

 00 +0.027 (32.08)