It happens all the time, water gets sucked into your engine or somehow makes its way into your gas tank. It makes sense with all the puddles, rivers, and streams you ride through out on the trail. Or maybe the gas tank was left open and it rained quite a bit.
However it happened, you need to remove the water from your fuel tank or engine before you try to start up the machine. It’s not a very hard process and if you follow the steps below, you will be able to start your engine without causing any damage.
They do make a Fuel System Water Remover found here on Amazon. But this is only really useful for small amounts of water and this will only remove water from your fuel system. To completely clean all water out of your machine, follow the steps below.
The most common results from running an ATV with water in the engine include, blown piston rings, blown valves, or a hole in the cylinder wall or head. You see the engine was made to compress an air/fuel mixture.
The air/fuel mixture will compress by the piston moving up, to the point where a spark will light it causing a small explosion which sends the piston back down. Water doesn’t compress. So if there is water in the combustion chamber when the piston is moving upwards trying to compress an air/fuel mixture. The pressure gets to be too much and the water will find its way out of the cylinder somehow.
Usually it will just blow a piston ring, but those aren’t fun to replace. In any matter, it’s best to remove the water from the engine and the fuel before trying to start the ATV. So lets get into the steps to do that.
If ever think you’re getting water in your ATV engine, like if you’re in really deep water or something. It’s best to shut the engine off immediately. As you can see in my picture in the sidebar, I’ve done this before. Thankfully I shut the engine off as I started to feel the ATV bog down and prevented any real damage from happening.
Luckily you shut the engine off before any real damage was done too, right. If so, follow these steps before trying to start your ATV again.
Check the air filter first, none of the other steps will do you any good if your air filter is wet when you go to try starting the machine up again. If the air filter is wet, take it out of the air box.
Wipe the air box out with paper towels or rags and let dry completely. If you can get your air filter to dry out, you might be able to use it again. Just make extra sure it’s completely dry inside and out.
Drain the fuel tank, fuel lines, and clean the carburetor if your engine has one. While you’re at it, drain the oil and remove the oil filter too. If any water got in your oil, it could cause some major problems for you later on.
I like to spray some carb cleaner in all the ins and outs of the carburetor just to make sure any water in there gets removed. It’s a good idea to let your gas tank air dry after you drained it as well.
You’ve already drained the oil out of the engine and removed the oil filter, so now to force the water out of the cylinder, remove the spark plugs and turn the engine over a few times. Most of the water should have come out when you drained the oil, but this will help get any remaining water out.
Refill the engine with oil, put on a new oil filter, and turn the engine over again, with the spark plugs still taken out. You’re going to want to look at the oil after you’ve let it sit for a few minutes. You’re trying to see if there is any water mixed in with the new oil you just added. If there is water you will see white colored milky areas rising to the top of the oil.
If you see water in there still, drain the oil and do those steps again. You really want to make sure there is very little or no milky white stuff in the oil.
Put the spark plugs back in, put some fresh fuel in the tank, and see if it’ll start up. After you let it run for a few minutes, check the oil again for water. If you don’t see any milky white liquid in the oil, you should be good to go. If you do see some, change the oil and filter again until you don’t see any water in the oil.
If it does not start up, you may have done some damage. You will probably want to check the piston rings, piston, and cylinder for damage. I sank an old Polaris Scrambler when I was younger, and water got into the engine. The piston rings were shot and needed to be replaced.
If you want some tips on how to get an ATV to run again by doing a tune-up check out my, ATV Won’t Start: Common Problems And How To Fix article.
With some of the terrain you ride through, it may be impossible to avoid water. But do try to avoid going too deep. Try to keep your exhaust and air filter above water at all times. Your air filter may be in an air intake box, if so, keep that above water also.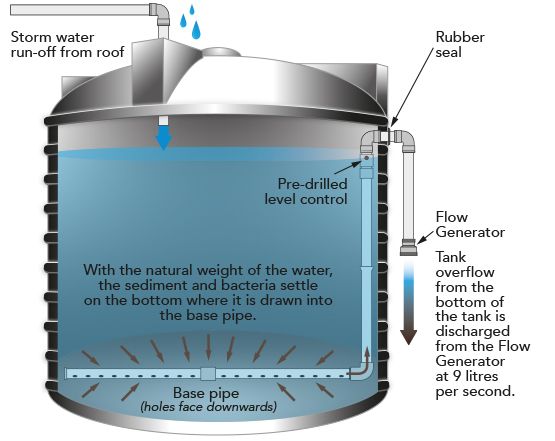
You could also try adding a snorkel kit to your ATV. Snorkel kits allow you to go into deeper water with your ATV without the worry of doing damage to your engine. To learn more about snorkel kits and how to make one yourself, check out my How To Snorkel An ATV article.
Sharing is caring!
Water can get into an ATV engine or fuel tank in several ways. Perhaps the most common is through submerging an ATV in deep water. But it’s also possible for water to seep in when riding through deep mud or for water to splash up into the engine.
What’s the big deal about water? Well, it actually takes a surprisingly small amount of water in an engine for significant damage to occur. Unlike air, water can’t be compressed much.
So, the piston has nowhere to go, causing the bike to seize up. If you’re unlucky and were stressing the engine at the time, the pressure has to go somewhere, and you can end up with a broken piston rod, fractured crankcase, or damaged bearings.
Photo credit: Derek Gardner
Assuming water is getting into the engine because you’re in deep water or mud, the first step is to get the bike out as soon as possible. You’ll often need a winch. Once recovered, turn off the machine and tow it.
Do not try to start the engine! At this point, you could do irreparable damage to your vehicle if the engine is indeed flooded.
If you suspect water has made its way into the gas tank, check the air filter. If it’s wet, you’ll need to remove it and dry it or replace it entirely before performing the other troubleshooting steps.
If there’s mud or water in the airbox, disassemble it and clean it thoroughly. Now, tilt the bike backwards, if possible, to remove any excess water you can.
Reminder: don’t start the engine! Tow it back to the garage before starting your real sleuthing.
ATV are waterproof & breathable riding gear
Find out the items that suit your needs
Clean out mud and debris from the air inlet. Check the breather tubes too for mud. Clean them with water and leave them to dry.
Check the stator by removing the housing. If any water pours out, you’ll need to use an air compressor and/or hairdryer to dry out the stator. Alternatively, wait for the stator to dry out of its own accord.
Image from www.can-amforum.com
Belt-driven transmission ATVs usually have a drain plug at the bottom for getting rid of water, should it get in. Some older ATVs require you to remove the belt housing cover instead.
If you were submerged deep in mud, you might need to open the belt housing cover anyway to clean it all out. Again, you’ll need to wait till the system is completely dry before riding.
In severe cases of submersion, you’ll need to drain the cooling system of contaminated water. Re-fill with coolant.
Deep submersion results in water in the gas tank.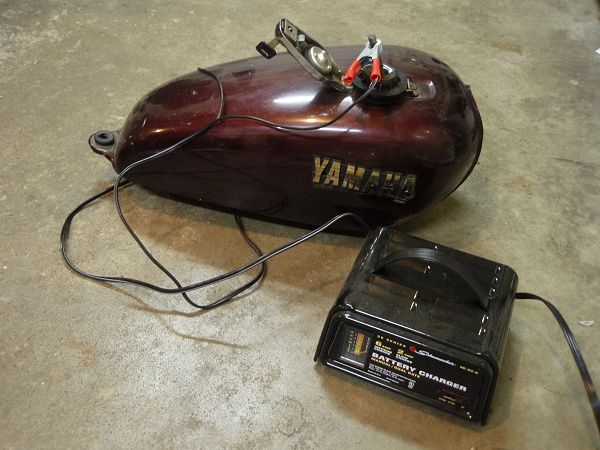 Drain both the tank and the carb. Usually, there’s a drain screw in both components. Otherwise, you’ll need to open them up to drain them.
For a thorough job, you should remove the carb, disassemble it, and clean out all water. Use carb cleaner, and leave it to dry. Check the gaskets and replace them if they got wet.
ATV are waterproof & breathable riding gear
Find out the items that suit your needs
Remove the spark plugs or injectors so the water will have somewhere to flow. Turn the engine multiple times until no water is released.
Put the spark plug back in and start up the engine. Simply let it idle for several minutes, occasionally spraying a small amount of WD-40 into the air inlet. Expect the ATV to smoke a lot during this step.
Image from www.boostatv.com
If the ATV runs rough, it’s likely the spark plugs have gone bad. You may need to replace the spark plug a few times, as any residual water in the engine can be enough to foul a new plug.
If you suspect the engine oil has been contaminated with water, drain the crankcase. If the oil is mushy or light brown, you’ll need to flush the bad oil and water. Replace with new engine oil.
A few other things to quickly check for water contamination. are the brake system and electric connections With any luck, your ATV should now be back in good condition.
SPORTSMAN Black
36 EUR
32.40 EUR
-10%
HIT
ENDURO LIGHT Graphite
the most durable
458 EUR
412.20 EUR
-10%
HIT
ENDURO Camogrey
the most durable
657 EUR
591.30 EUR
-10%
HIT
ENDURO Graphite
the most durable
279 EUR
251.10 EUR
-10%
HIT
ENDURO Graphite
the most durable
657 EUR
591. 30 EUR
AQUAMASTER-ZIP LIGHT Camogrey
with central zipper
598 EUR
412.50 EUR
-10%
HIT
ENDURO LIGHT Camogrey
the most durable
458 EUR
412.20 EUR
AQUAMASTER LIGHT Red
reliability & comfort
438 EUR
324.50 EUR
NEODRY Black
17 EUR
11.90 EUR
-10%
HIT
ENDURO Camogrey
the most durable
279 EUR
251.10 EUR
AQUAMASTER Blue
reliability & comfort
647 EUR
582.30 EUR
-30%
HIT
AQUAMASTER Red
reliability & comfort
259 EUR
181.30 EUR
-40%
HIT
AQUAMASTER Orange
reliability & comfort
259 EUR
155. 40 EUR
AQUAMASTER Red
reliability & comfort
677 EUR
591.40 EUR
-40%
HIT
AQUAMASTER Camogreen
reliability & comfort
259 EUR
155.40 EUR
BELT
9 EUR
8.10 EUR
ENDURO BF Camogrey
bootfoot waders
528 EUR
475.20 EUR
ENDURO BF Camogreen
bootfoot waders
289 EUR
173.40 EUR
ALL SEASON Black
62 EUR
55.80 EUR
ENDURO BF Camogrey
bootfoot waders
329 EUR
296.10 EUR
Explore all

Eduard Raskin
Planet Earth is arranged in such a way that the temperature difference leads to the formation of condensate in each cavity, and even if it is closed, then over time a whole lake can accumulate there. The gas tank is no exception. In one calendar year, only in this way, at least half a liter of h3O ends up in the fuel storage, and the water also enters the “tank” with gasoline: somewhere the tank is leaking, and somewhere, without thinking twice, they simply diluted it with “flowing” one.
As soon as there is water, there will be rust. Day after day, hour after hour, the “red beast” will capture the entire fuel tank, leading not only to the appearance of holes, but also to the failure of the fuel pump - he definitely won’t like rust flakes, clogging the mesh and scratching the rather tender inside of this reliable and quite resource device.
To prevent this from happening, the old people regularly cleaned the entire system every spring, flushing the gas tank with a simple and very cheap compound. He will help today, and even in advanced cases. For a comprehensive cleaning of the fuel storage, you will need: citric acid, warm water, a battery charger, a metal rod, half a liter of rust converter and soda. Moreover, it is better to use soda not simple, in red packaging, which since the time of the tsars has been under every sink from Kaliningrad to Vladivostok, but calcined soda - it is a little more expensive and unsuitable for cooking, but it copes much better with various contaminants.
Photo: AvtoVzglyad
First of all, we drain the remaining gasoline, if the thick brown slurry can even be called that, rinse the tank with plain water and fill it to the eyeballs with a powerful cocktail of soda and hot water so that the liquid is up to the top. Soda should be diluted in the proportion of one pack per bucket of water. Next, we lower our rod into the neck so that it does not touch the bottom and edges - a rubber mat will help to cope with the task. Next, we connect the charger for the battery: “minus” to the tank, and “plus” to the metal rod.
In this form, they will have to stand for at least 6 hours, after which, after turning off the power, you need to drain the dirt, rinse the tank with running water: if there are traces of rust, then the operation should be repeated. As soon as the “red” has gone, you need to refill the gas tank with warm water and add citric acid. Half an hour will be enough for the remnants of the “traces of exploitation” to finally disappear, and the interior decoration to sparkle with cleanliness.
The last step is finishing. We plug the holes, fill in the rust converter, close the lid and carefully shake the container from side to side, processing all the recesses and cavities from the inside. After the gas tank must be carefully and slowly dried and installed in its rightful place. Now it will last a few more years, and if you carry out the cleaning procedure regularly, then twice as long. The operation takes a lot of time, but it is necessary for every car. There is only one alternative: a store, a cash register, an SMS from a bank. So-so perspective.
We evaluate the latest Japanese sedan new newve
38306
We evaluate the fresh new new newve
,0009,0009,000gas stations, petrol, traffic safety, used cars, car service, repair, spare parts, components, accessories, life hack
Rating 2.2 out of 5. Votes: 22
The ingress of water into the gas tank is undesirable, as it can damage the nozzles and other parts of the engine, provoke the loss of some of its power. If there are all signs of this, you should quickly remove the water from the gas tank - either on your own or by stopping at a car service.
Send it to your social network, it will come in handy! Every driver is faced with a problem when his iron horse stops starting - the reason for this may be the accumulation of water in the gas tank. In this case, it's time to sound the alarm, it can harm the car. Often under attack are cars with injection and diesel engines. The problem will consist not only of the fact that it has ceased to start. The engine itself will survive the presence of water in the gas tank, but the fuel injection system or high pressure fuel pump can fail. And these parts are not cheap.
The presence of water in winter is especially dangerous, because water is heavier than gasoline. The fuel system must be sealed in principle - question? Where is the water in the tank from? Water does not mix with gasoline and begins to accumulate at the bottom of any gas tank. Some drivers use gasoline to the last drop without leaving reserves in the gas tank, because of this, condensate forms and soon it enters the gas line. Naturally, it freezes there with ease, blocking the path of gasoline. In this case, the car will stall and will not start. An inexperienced driver may decide that the tank has run out of gas and refill it, trying in vain to start the car. And if the water is not completely frozen yet, then it will definitely reach the engine, which can cause disastrous consequences.
Most often, water enters the gas tank through its hatch before refueling. Remember that when the tank is opened, there is a slight “zilch” - this is the sound of air entering the tank, the amount of water that has entered depends on how much fuel is in the gas tank, that is, on the empty space. If the air outside is humid, containing water vapor, then as a result of condensation, a few drops will appear in your gas tank. So, drop by drop, it will sink to the bottom of the tank. Also, the reason for the penetration of water into the tank may be not very high-quality fuel. Here, of course, the owners of gas stations will be completely to blame, who, by diluting gasoline with water, are trying to increase their profits. It is quite difficult here, because it is not possible for the working personnel to prove that their gasoline is to blame. In this case, they have a lot of versions: “You are not only refueling with us” or “You have condensate in the tank. ” It may also not be the correct storage or transportation of gasoline to the gas station. Do not disregard the "good-natured" neighbors who could add water to your tank in order to avenge the car you put in an inconvenient place for them.
Some high-octane gasoline components are hygroscopic, so they pull moisture into the gas tank with them.
Actually, those who do not know, we have a method for measuring the amount of H2O in a fuel truck. What is there to hide, for example, suburban gas stations neglect this technique, and pour everything that is mixed in a fuel truck into our iron tanks. Although they must first use the technique, since they work in open areas.
What is the danger of water that gets into the gas tank? When the amount of water in the tank goes off scale, it together or, even worse (instead of) gasoline (ohm) will begin to flow into the cylinders, which leads to an interruption in the operation of the engine - water naturally does not burn!
In most cases, water ingress damages the injector nozzles or the injector plunger pair.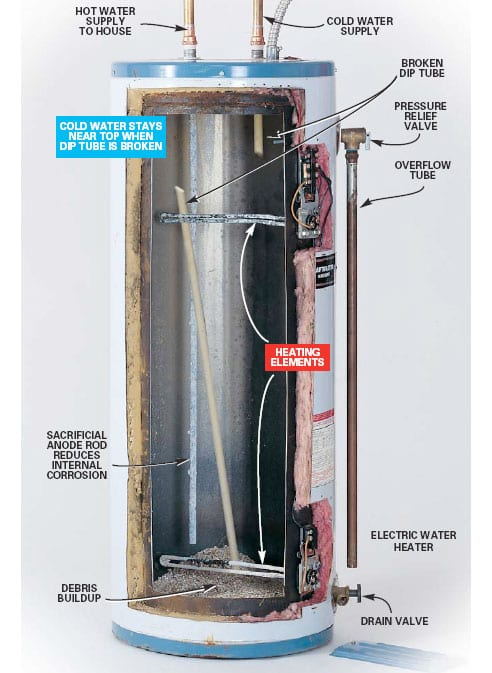 Its presence in the tank contributes to the occurrence of rust in the tank itself, which forces it to be replaced soon. Once in the combustion chamber of the engine, water provokes the appearance of the same rust on the walls of the engine cylinders, and this is already a huge problem.
What to do about water, which still got into the gas tank? You should not try to leave the car with an open tank in the warm sun, warming the hope that the water will evaporate on its own. As we have already understood, water is heavier than gasoline, it will “cover” it and prevent it from evaporating. Let's look at some options:
First way :
Water practically does not combine with gasoline, but with alcohol (isopropyl, ethyl or methyl) it is even very good. Therefore, do not be greedy, tear off 200-400 grams of pure alcohol from your soul and add it to gasoline. This will help the water to mix with the alcohol and end up with a consistency that is similar in density to gasoline, which will allow the water to exit the gas tank through the fuel line without harming the engine. Instead of alcohol, you can still use water displacers and all kinds of fuel system cleaners, they work on the same principle. But one thing remains in this method: - this is the price and quality of the product.
Second way :
You can take advantage of the fact that the water lies at the bottom of the tank under the gasoline, in this position it can be expelled through the fuel rail. To do this trick, unscrew the spool and connect the hose. We apply voltage to the fuel pump through the diagnostic block, after which we drain the water from the tank into a preferably transparent container in order to see its amount.
Third way :
You can also pour water through a straw. To do this, you need to remove the fuel pump, install a hose from the dropper at the bottom of the tank, and drain the water into the other bucket, which must be installed below the tank (in the hole).
Today we looked at some means to help eliminate water from the gas tank, but the problem itself is better to prevent than to deal with it.