If you don’t have a UTV winch installed on your side-by-side, you need to do it before your next ride. Whether you’re stuck in a ditch, in the mud, or on a log, a good winch is your get out of jail free card. If you just don’t don’t know how to install a UTV winch, you’re in the right place.
We’re here to make that intimidating wiring seem easy and to walk you through the steps to get it done.
But before we get into all that, let’s cover the basics.
Choosing The Right UTV Winch to InstallThe first step is always to pick the appropriate winch for the job. A 2500 lb. winch is an ideal ATV winch—small, affordable, and easy to use. A 3500 lb. winch works great on ATVs and most small UTVs. However, these winches might start to bog down if you’re buried in deep mud, climbing over rocks, or running a larger vehicle like a four-seater.
If you’ve got a big machine sporting some extra accessories, you’ll probably be better served by a 4500 lb. or 6000 lb. winch. The added weight of bigger tires and hefty suspension mods will pretty much guarantee you’ll need at least a 4500 lb. winch. And if you plan on hauling your buddies when they break down, you might as well get a 6000 lb. winch just to be sure.
A 12,000 lb. winch is for the biggest of the big. Most people don’t need a winch this size. For those that do—you know who you are.
CHOOSING THE RIGHT WINCH MOUNTOkay, so now that you’ve figured out which winch to get, you need to get it mounted. You can’t finish your UTV winch install without a winch mount plate or a winch-ready bumper.
You can easily find either on the SuperATV website by selecting Winch & Winch Mounts or Bumpers from the category options, and then filtering based on your specific needs. Just note that bumpers that are winch ready will be called “Winch Ready” bumpers. If it doesn’t say “Winch Ready,” you can’t mount a bumper to it!
If you’re in the market for a bumper along with a winch, a bumper with a built-in winch mounting plate is exactly what you need. Mounting a winch to it is a breeze and the free spool knob is usually more accessible than if it were mounted inside your chassis with a winch mounting plate—handy for when you’re buried in mud.
If you decide to go with a winch mounting plate, just make sure it’s compatible with the winch you need by checking the bolt pattern. SuperATV’s 2500 lb. and 3500 lb. winches both have a 3.0” x 4.87” bolt pattern (76mm x 124mm.), and the 4500 lb. and 6000 lb. winches both have a 3.0” x 6.6” bolt pattern (76mm x 168mm).
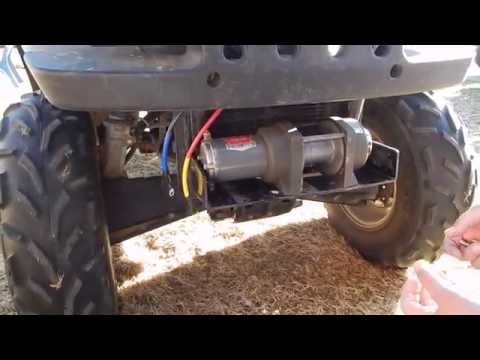
How to Install a Winch and Winch Mount on a Polaris Ranger Full-SizeLet’s walk through the steps to install a winch and mount. These steps will be identical whether you’re installing a SuperATV Mount on a Ranger XP 1000, Ranger XP 900, or Ranger XP 570. These are the most common vehicles people mount a winch to.
Here’s how to install a SuperATV Winch and Winch Mount on Full-Size Polaris Ranger.
 For 2018 Ranger XP 1000 models, the stock plow catch must also be removed.
You’re done with the easy part of your UTV winch install! All that’s left is the wiring.
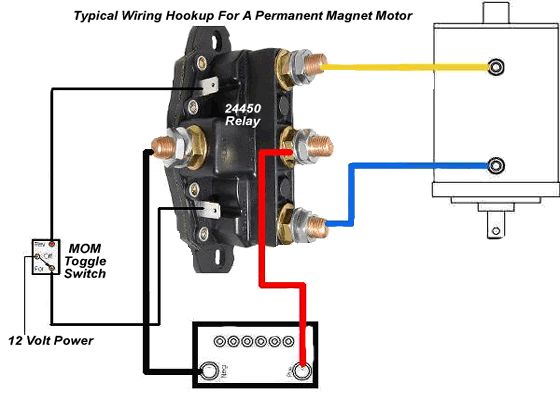
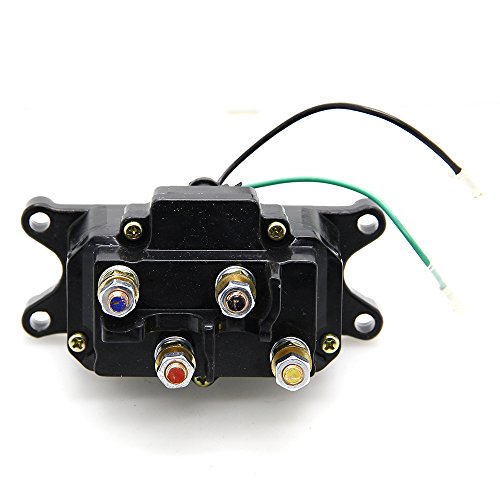
How to Wire a Black Ops WinchNow that you have the winch plate mounted and tightened up, it is time to wire the winch. Follow the diagram below to make sure you’ve got it right. If you swap the positive and negative wires, the winch will spool out when you press “in” and spool in when you press “out.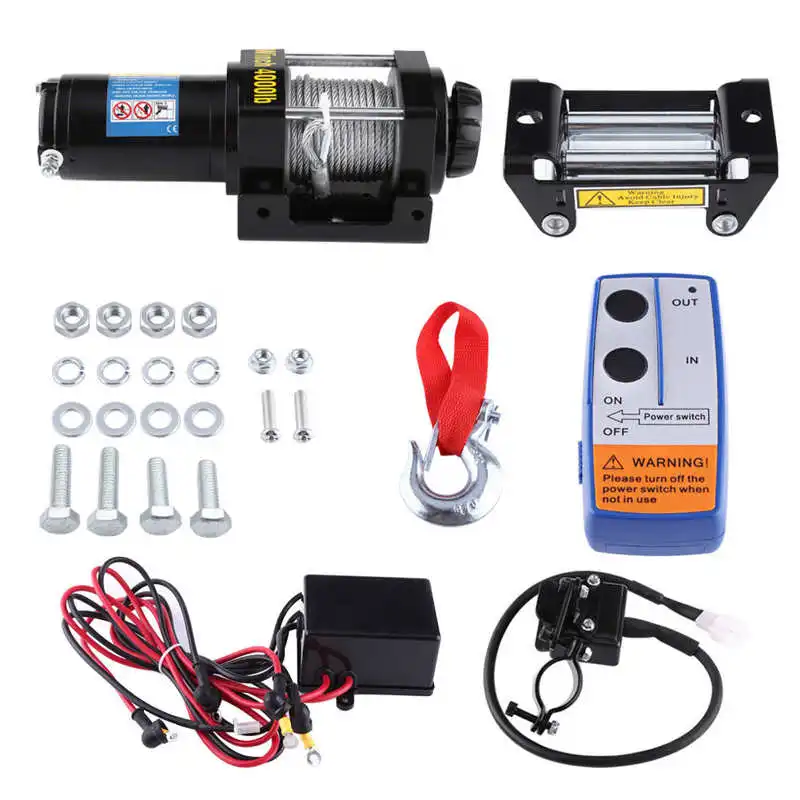 ” It’s not the end of the world, but it’s still nice to get it right the first time.
Here are step-by-step instructions for installing your winch on a Full-Size Polaris Ranger.
After you’ve finished installing everything, you can reattach any trim and/or bumper parts.
If you’re looking for even more precise winch installation instructions, check out our full-length UTV winch install video.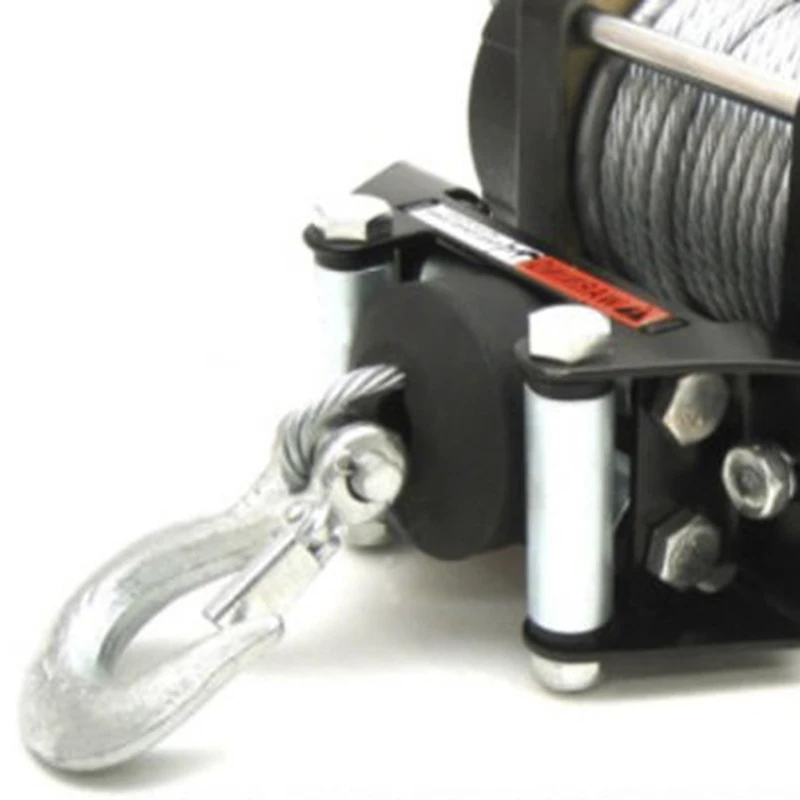
Congratulations! Your winch is now installed and you’re ready to get dirty!
Winch Guide
6 min readAdd comment
Installing a winch on an ATV is just as easy as installing it on any other rig. You will have to do certain modifications to custom fit that winch on your ATV, and this article will touch upon those specific points to make your installation a breeze.
The first thing to remember about winch installation in an ATV is that they do not come designed to incorporate the winch in their build, be it the frame or the bumper. If you have a winch ready bumper, then installation would be
You will find yourself removing quite a bit of the ATV outer chassis to mount the winch.
You will have to find the precise mounting plate for your winch, as well as a durable bumper that will be compatible with the winch.
A couple of tools you will require to work around with are –
Quick Navigation:
Mounting Winch Plate – Wiring Handlebar Switch – Wiring Solenoid
Tidying up the FrontBefore installing the winch, read through the instruction manual that came with the winch to ensure you do not miss out on anything crucial.
Remove the protector plate from the front bumper by unscrewing the bolts using the drill machine and do the same with the plastic cover that fits just behind the plate.
The cordless drill machine from black & decker comes with 30 piece accessories designed for most common home needs.
Mounting Bracket, Cable & FairleadDepending on the type of winch you are installing in ATV, the bracket’s mounting can be done before you install the winch or alongside, by fitting them together. Follow the mounting plate and winch installation instructions from your manual.
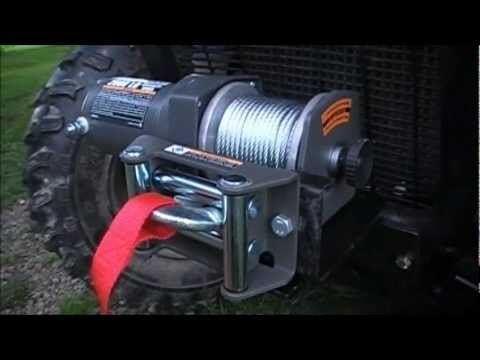
A winch mounting plate attaches your winch to the mounting bracket and to the front bumper of your ATV. They are designed to withstand the tension of pulling your ATVs out.
You will need to have a specific winch mount that holds the winch without any hassles. Most winches include a winch mount that may or may not fit all vehicles.
In case not having a winch mount, purchase the winch mounting plate separately that will fit inside your ATV. Here are some of the universal mounting plates that can fit most ATVs.
Mounting Plate For:
Once you have the exact mounting plate, attach the winch to the mounting plate using the bolts then attach it to your vehicle front.
Most winches come with the pre-spooled cable on the winch drum.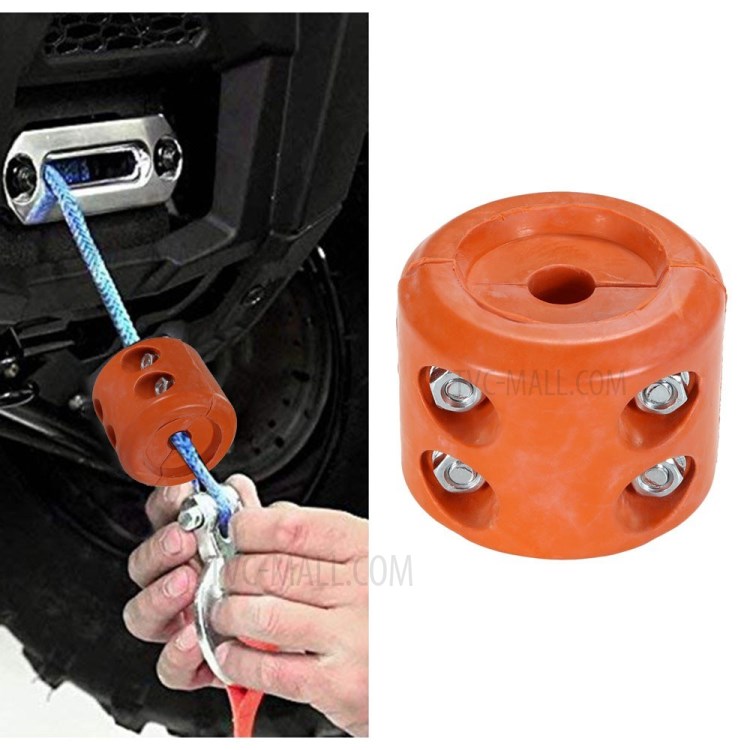 In case your winch is not pre-spooled or you want to replace the existing cable on the winch, find out the six different ways on how to attach cable to winch drum depending upon the type of winch you have.
A Fairlead helps prevent the line from being tangles and coming off the spool in the winch. It keeps the winch line running smoothly. A steel cable comes with a roller fairlead whereas the synthetic rope comes with a hawse fairlead.
Once the winch with the mounting plate is installed on your ATV, then you have to attach the fairlead to the mounting plate using the given bolts.
If you have a hook at the end of the cable or rope make sure to pass it through the fairlead before attaching it.
Handlebar & Remote Control SwitchRefer to your instructions manual on wiring up your handlebar and remote controller.
Note: During the wiring process, always disconnect the negative terminal of the battery to prevent current flow that can avoid a short circuit.
To install the handlebar switch, find the proper spot to place your rocker switch on ATV. Using the given clamps, position the switch in a convenient place and mount them with bolts & screws.
The handlebar switch is connected to the solenoid and to the power source.
Power Source Connection: Red wire comes from the handlebar or rocker switch has to be connected to the power source of ATV. Find out which wire is supplying the 12v of power from the wiring harness using the help of a test light or a voltmeter.
After making sure it is the right wire you are looking for, use a snap wire connector to combine the handlebar wire to the power source.
The quick snap wire connector helps to connect the wires without stripping or use of solder. You can just insert the wires and squeezing them together with pliers to make fast and secure connections.
Winch Connection: While the green and black wire should be connected to the controller or solenoid box. Green to the left side and the black to the right side of the terminal.
The backlit digital LCD circuit tester from Jastind comes with a 140-inch extended spring wire for ease of circuit testing. The multimeter from AstroAi comes with a backlit LCD display and multi-functional features for troubleshooting various problems.
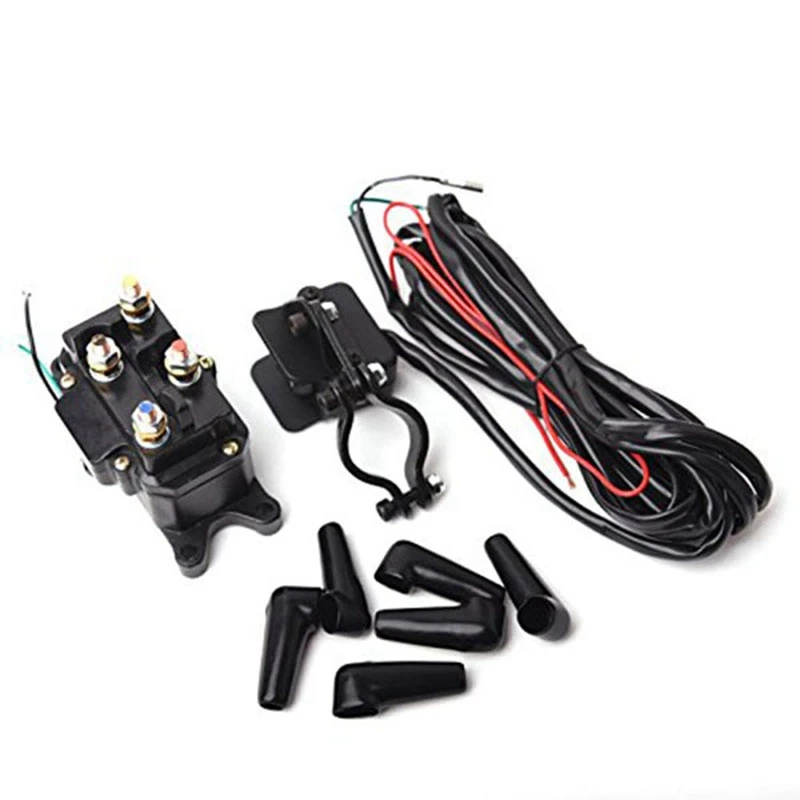
Wiring and Installation of the Solenoid BoxEnsure you place the Solenoid box in a spot that remains dry and out of the general reach of moving parts of the ATV. Hook up the other set of wires from the Handle-bar switch to the Solenoid box so you can use the winch even if your ATV is switched off.
If you want to connect the wired remote control, now is the time to draw up the cables together with all the other wires and cables being installed.
Wire the Solenoid to the winch by following the color-coded cables as given in the instruction manual. The Black cable connects to the Black terminal on the Solenoid box, and the Red cable connects to the Red terminal on the Solenoid box; similarly for the winch.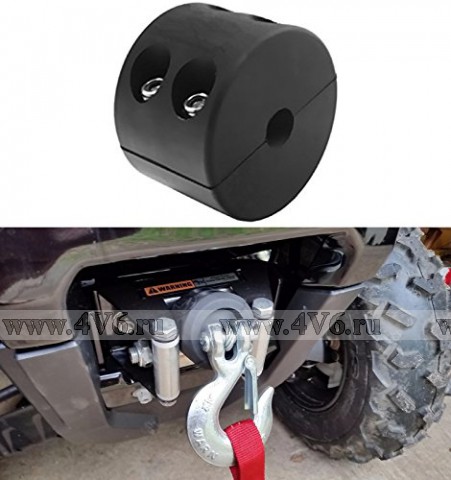
The Circuit breaker is connected to the Red cable and attached to the Red cable coming from the Solenoid box.
After this step, start the engine and test the winch for operation. Turn the power off and try hitting the Handle-bar ignition again. If the winch starts again, you will have to check the switch’s connections to the ignition box and set them upright.
Tucking up the WiresEnsure the Solenoid box is fits snugly and safe, close to the battery. Bundle up all the cables and wires and tuck them in, making sure they do not contact any sharp edges or moving parts since that can lead to faster wearing of the cables.
A little improvisation goes a long way, even when installing a winch in an ATV. But be sure to adhere to the manual if you have any doubts about the steps suggested here. Remember that all ATV’s are different, and also the winches that can be mounted on them. Some of the steps may differ from model to model, but the basic gist of Installing a winch to an ATV remains the same.
Click to rate this post!
[Total: 2 Average: 5]
ATV winch is a traction equipment that will become a faithful assistant in the fight against problematic terrain. With its help, it will not be difficult to pull the ATV from the swamp, pit, ravines. The winch is quite light and reliable, does not require significant maintenance, and the presence of a powerful battery-powered electric motor will make the operation of the mechanism easier and more convenient. However, before starting operation, you should know how to install a winch on an ATV:

Connect the electrical box with extreme care. In no case should you start wiring with the battery terminals on. In order to avoid current loss and short circuit, it is recommended to shorten the wires after laying and hide the cables in the corrugation. Also, you should adhere to the correct connection, which is indicated below in the diagram.
After successfully installing the electric winch, it should be thoroughly tested. In order for the mechanism to serve for a long time and effectively, the following safety rules must be observed:
Installing a winch on a ATV is a process that requires attention and certain skills. Therefore, the experts of the online store Winch UA recommend not to install the winch on your own, but to contact a specialized service. However, if you still want to install it yourself, be sure to follow the instructions provided in the device passport. nine0003
Most ATVs have a winch in the front as standard. If there is no winch, you can buy it and install it yourself.
Below we will tell you how to use it correctly and how to choose it if you need to buy a new one.
The winch helps:
In principle, it is possible to do without a winch, but only if you are going to ride on dry and proven routes, and you definitely will not be tempted to go beyond them.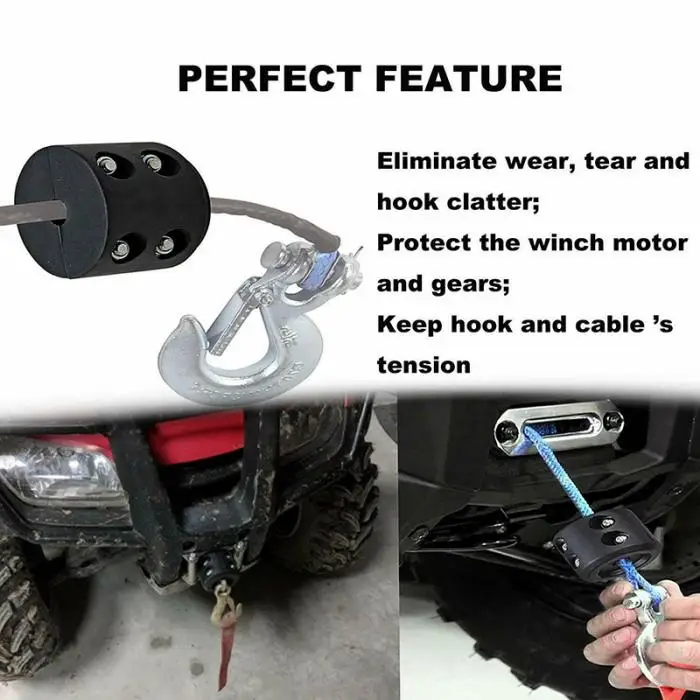 In any other case - if you are not afraid of fords, mud, steep slopes, forests - a winch is a must.
Structurally, it is a drum on which a cable with a hook at the end is wound. On the sides of the drum are an electric drive and a gearbox to reduce the number of revolutions so that the drum spins slowly. The drive is connected to the battery of the ATV itself, and is powered by it, even if the engine is turned off. Usually, on winches, the cable is unwound in two ways: either manually or by the same electric drive. nine0003
The whole structure is mounted on a special platform, which is usually located on the front bumper of the ATV.
Before buying a winch, check if your ATV has a prepared platform for mounting it - some models do not have it as standard. If not, you first need to buy and install a platform, and then attach the winch itself to it.
Please note:
 The main characteristic of the winch: indicates what kind of load it can pull out. You need to calculate using the formula the weight of the ATV x 2-2.5 . It is better to multiply the weight by 2.5 so that there is more stock. It is indicated in pounds (lb), but in Russian-speaking stores they usually write and translate into kilograms. And if they don’t write, you can call and clarify, or simply convert pounds to kilograms online.
  The switch on the handlebar is less convenient, because you need to be on the ATV (which can be buried in mud or submerged in water) to turn the winch on and off - so it's better to take a more expensive remote control.
 The winch will run on battery power, but its supply is not infinite. nine0010
Did you check if you have a playground? Have you already chosen and bought a winch?
Now it needs to be installed: