Written By: David Munoz (and 3 other contributors)
Difficulty
Difficult
Steps
5
Time Required
25 minutes - 1 hour
Sections
1
Flags
0
In this guide, we will explain how to replace a valve stem, such that people of all mechanical backgrounds can attempt this repair. This guide assumes you have removed your wheel from the vehicle. For instructions on removing the wheel, refer to this guide.
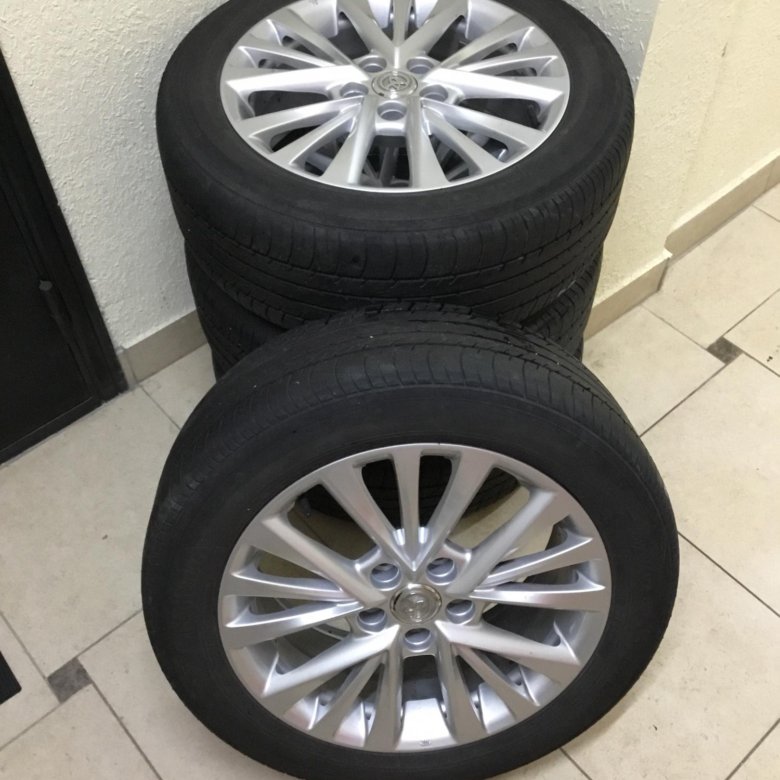
Valve Stem
Available for sale on Amazon
Buy
Locate the stem valve and remove the cap.
Using the Schrader valve core bit in your 1/4" driver, unscrew the valve core from the stem.
Allow the tire to fully deflate before proceeding.
Edit
To reach the valve stem, you will need to break the bead on the tire. The bead on a tire is where the rubber meets the rim.
Insert the pry bar in between the rim and the tire. Push the pry bar as far down as possible. This will require a large amount of force.
The bead is broken when the tire is visibly separated from the rim. Use the pry bar to hold the tire down by leveraging it against the small lip inside the rim.
Edit
Locate the stem valve on the inside of the rim. It will be a large piece of rubber underneath the lip.
Use the diagonal cutters to cut off an appropriate amount of rubber from the under-side, as shown.
Remove the stem by pulling it through the face of the rim.
Edit
Insert the new stem up through the rim. Use the diagonal cutters to help pull the stem into its seated position. There will be an audible pop when it is in correctly.
When using the diagonal cutters, take care not to pinch the stem too tight.
If you are having trouble seating the stem, use the rim as leverage.
Edit
The tire must be re-inflated. Simply use your air compressor to inflate the tire. We recommend re-inflating to 32 p.s.i. to check for leaks.
When inflating, the tire will produce a loud pop as the bead returns to its place. If the tire is having trouble inflating, squeeze the tire against the rim to create a seal.
Edit
Almost done!
If all goes well, your tire should be fully resealed and good as new.
Conclusion
If all goes well, your tire should be fully resealed and good as new.
Cancel: I did not complete this guide.
One other person completed this guide.
with 3 other contributors
Badges: 4
+1 more badge
Ask a question, get an answer ASAP!
☰
×
GET A QUOTE
| Save Big on Auto Repairs | Get a Quote |
Tire valve stems are the valves located in a vehicle’s wheel where the tires are inflated from.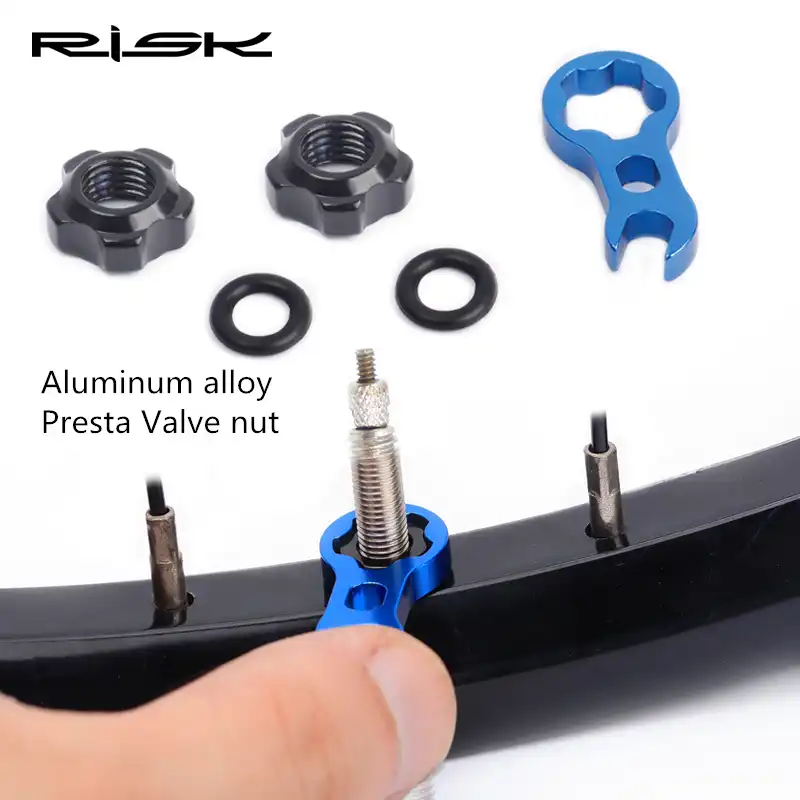 They contain a spring loaded valve core that seals itself using the air pressure inside of the tire. Over time valve stems may get old, crack, become brittle, or begin to leak, causing larger problems with your tire and your driving experience.
When valve stems begin to leak, the tire will no longer hold air. Depending on the severity of the leak, the tire may leak air slowly, or in more sever cases not hold air at all, warranting replacement of the valve stem.
In most cases the the fastest way to replace a valve stem is to take it to a tire shop and have them remove the tire and replace the valve stem using aid of a tire machine. However, for instances where this is not an option, a tire can be removed and the valve stem changed manually. In this step by step guide we will cover how to remove a tire from a wheel manually, using a tire iron, to replace the valve stem.
Materials Needed
Step 1: Loosen the lug nuts.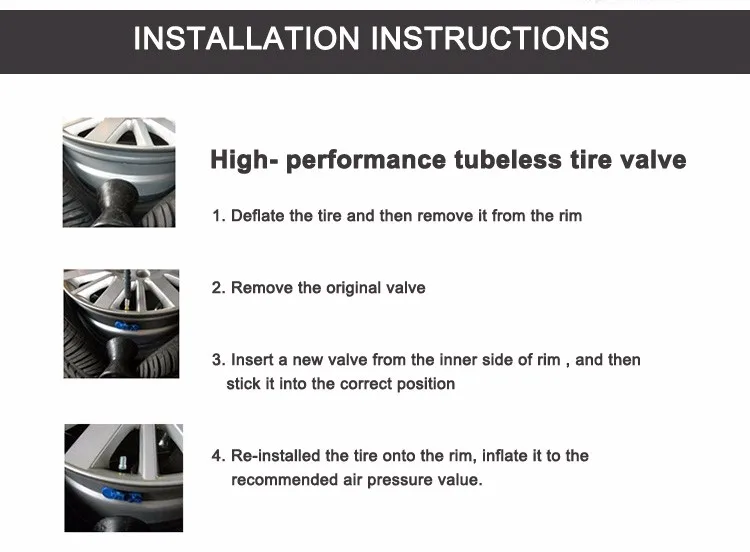 Loosen the lug nuts of the wheel from which the valve stem is going to be replaced.
Step 2: Raise the car on jack stands. Set the parking brake, and then raise the vehicle and secure it on jack stands.
Step 3: Remove the wheel. Once the vehicle is raised, remove the wheel and set it flat on the ground with the outside of the wheel facing up.
Step 4: Deflate the tire. Remove the cap from the valve stem, and then remove the valve stem core using the valve stem removal tool to release the air from the wheel.
Once the valve stem core is removed the tire should deflate on its own.
Step 5: Separate the tire’s bead from the wheel. Next, use the sledgehammer to break the tire’s bead free from the wheel.
Hit the sidewall of the tire using the sledgehammer in the same place until the bead breaks loose.
When the bead breaks loose you may hear a crack or popping sound, and you will see the inside lip of tire visibly separate from the lip of the wheel.
Once the bead has been broken, continue around the tire with the sledgehammer until the bead is completely broken all the way round the tire.
Step 6: Lift the lip of the tire up from the wheel. Once the tire’s bead has been broken, insert your tire iron between the edge of the rim and the inside lip of the tire, and then pry upward to pull the lip of the tire over the edge of the wheel.
Once you have pulled the lip of the tire over the edge of the wheel, work the tire iron around the rim until the entire lip of the tire is off the rim.
Step 7: Remove the tire. Grab the tire by its removed lip and pull it upward so that the opposite lip that was at the bottom of the wheel is now touching the top edge of the rim.
Insert the tire iron in between the the tire’s lip and the edge of the wheel and pry upwards to pull the lip over the edge of the rim.
Once the lip is over the edge of the rim, work the tire iron around the edge of the wheel until the tire is removed from the wheel.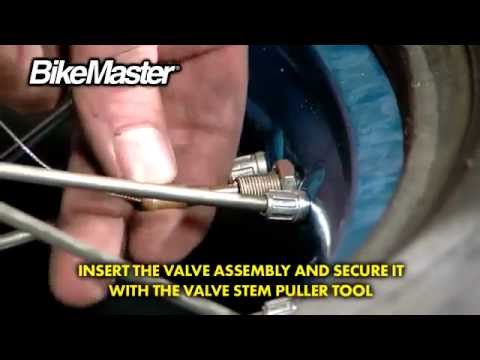
Step 8: Remove the valve stem. Once the tire is removed from the wheel remove the valve stem. Use the needle nose pliers to pull the valve stem free from the wheel.
Step 9: Install the new valve stem. Take your replacement valve stem and install it from the inside of the wheel. Once it is in position use the needle nose pliers to pull it through into place.
Step 10: Reinstall the tire. Reinstall the tire onto the wheel by pressing it down over the the rim until the bottom bead clears the edge of the rim.
Then press the side of the tire down underneath the edge of the wheel, tuck your tire iron in between the lip of wheel and the bead, and then pry the bead over the lip the of the wheel.
Once the bead clears the lip of the wheel, work your way round the entire wheel until the the tire is completely installed on the wheel.
Step 11: Inflate the tire. Once the tire has been re-installed onto the wheel, turn on the air compressor and inflate the tire to the correct specification.
For most tires, the recommended pressure is between 32-35 pounds per square inch (psi).
Step 12: Check for leaks. Once the tire is properly inflated, double check to make sure that there are no leaks of any kind, and then reinstall the tire onto the vehicle and lower it off of the jack stands.
For most cases, the easiest course of action to replace a valve stem would be to simply take it to a tire shop, have the tire removed with a machine, and then have the valve replaced.
However, in the instances where that is not an option, a valve stem, and even a tire, can be removed and replaced manually with the correct tools and the correct procedure. If you find that there is a leak or damage in the tire and not just the valve stem, you may want to replace the tire entirely.
Tires
wheels
The statements expressed above are only for informational purposes and should be independently verified.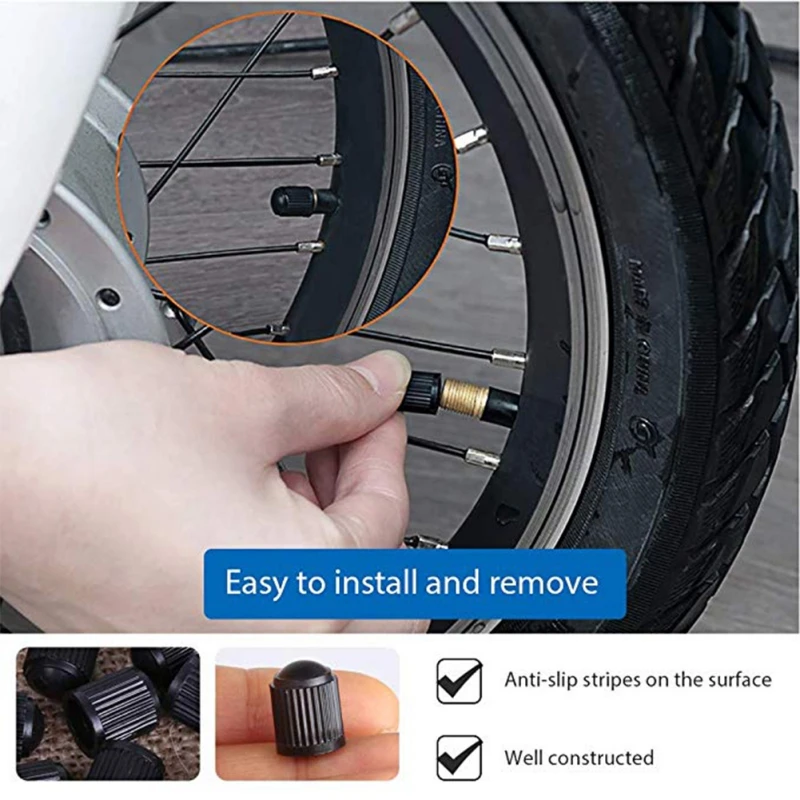 Please see our terms of service for more details
4.2 Average Rating
Service Hours
7 AM - 9 PM
7 days a week
Phone Number
1 (855) 347-2779
Phone Hours
Mon - Fri / 6 AM - 5 PM PST
Sat - Sun / 7 AM - 4 PM PST
Address
We come to you at no extra charge
Guarantee
12-month/12,000-mile warranty
Our certified mobile mechanics perform over 600 services, including diagnostics, brakes, oil changes, scheduled mileage maintenances, and will come to you with all necessary parts and tools.
Get a fair & transparent quote instantly before booking.
Earn up to
$70/hr
Apply Now
Our certified mobile mechanics make house calls in over 2,000 U.S. cities. Fast, free online quotes for your car repair.
GET A QUOTE
GET A QUOTE
How to Do a Tire Safety Inspection
Car tires are a big part of staying safe on the road. Check tire inflation, tread depth, and sidewalls to make sure they're in good shape.
How to Replace the Rear Hub Bearing on a Ford Explorer
Wheel bearings allow the car's wheels to give you a smooth ride. A howling or grinding noise is a sign that your hub bearing should be replaced.
What are the Best Car Tire Brands to Buy?
Car tires come as all season passenger tires, summer passenger tires, on-road light duty truck and SUV tires, and off-road truck and SUV tires.
Steering wheel vibration over 60 mph
Hello. This vehicle should not shake like this when driving at high speeds. If it only occurs at higher rates of speed then it either has a warped front hub assembly or it may have a problem with the alignment....
Car stalls when stopped, steering wheel locks up
Yes, this is a common problem with CX-9. Carbon deposits can build in the throttle body (https://www.yourmechanic.com/article/symptoms-of-a-bad-or-failing-throttle-body) causing a restriction in airflow and reaction time of the throttle plate causing stalling with no Check Engine Light or no diagnostic trouble...
How can you tell if my tires need to be rotated?
Hi, thanks for writing in. If it has been more than 5000 miles, then it is time. Also, you can take a look at the front and rear tires and move your hand over top of the tires in one...
Maintenance
Services
Estimates
Our service team is available 7 days a week, Monday - Friday from 6 AM to 5 PM PST, Saturday - Sunday 7 AM - 4 PM PST.
1 (855) 347-2779 · [email protected]
Read FAQ
GET A QUOTE
5/5 - (2 votes)
Once you get the hang of fitting tubeless tires, you can change them almost as easily as tube tires.
Tires are one of the most important factors in determining how a bike feels and behaves. Not only do they make a huge difference when it comes to performance, but they are also an inexpensive way to upgrade. The right tires can provide more comfort, more speed, and more puncture protection, and tubeless tires take this concept even further. Switching to better tubeless road tires can result in lower rolling resistance, fewer punctures, and the ability to use lower pressures for more comfort. It also means learning a new skill and understanding how to install tubeless tires.
With the right tools and an understanding of what to expect, installing tubeless tires shouldn't be difficult. Keep reading for tips and tricks for fitting tubeless tires. Very soon, you will be changing tires as easily as traditional inner tube tires.
Contents
Everything you need to install tubeless tires
When it comes to installing tubeless tires, you'll need supplies and tools.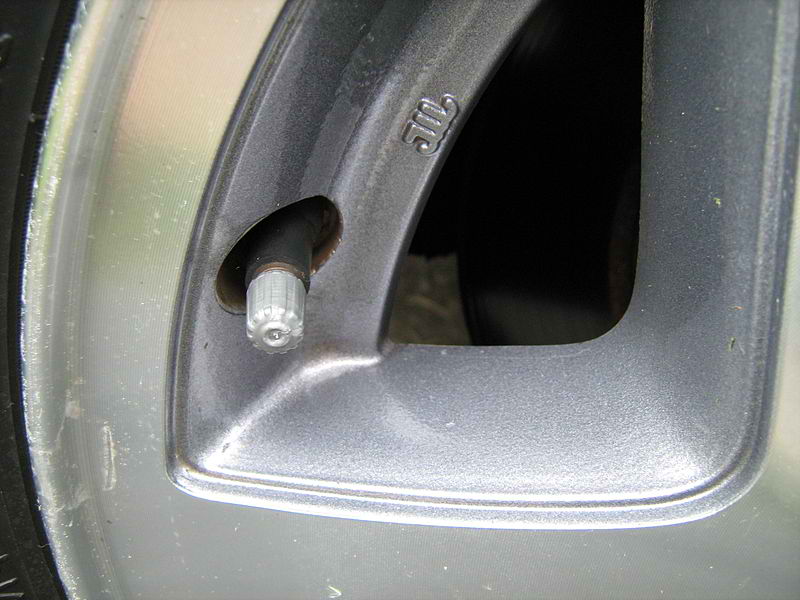
When it comes to tools, there is good news and bad news. The good news is that you may not need all of the tools we have listed below; with the passage of time and the spread of tubeless tires, they are getting better and easier to install. Higher quality wheels, along with better tubeless road tires, are often immediately inflated with a track pump, while others may require something more powerful.
The bad news, however, is that you won't know until you try a particular tire and rim combination, so it's good to have the right tools on hand.
Tubeless tires have a very tight bead that does not stretch, making it difficult to fit on the rim in some cases. When buying levers, you need to be sure that you are getting something thin yet strong enough to work with the tire/rim interface. Look for rounded edges that will prevent damage to the rim. Some tire levers are reinforced with a steel core for added strength.
You need a way to get enough air into the tire quickly so that it sits properly on the rim..thumb.jpg.c246dc5125edce7368c2457f427d5caa.jpg) If you win, the pressure will rise and the tire will sit correctly. To facilitate this task, you can use a floor pump, which has a built-in reservoir for charging tubeless tires. First, before inflating, you will close the charging tank, which will compress the air in the tank. You will then immediately release all the pressurized air into the tire.
If you win, the pressure will rise and the tire will sit correctly. To facilitate this task, you can use a floor pump, which has a built-in reservoir for charging tubeless tires. First, before inflating, you will close the charging tank, which will compress the air in the tank. You will then immediately release all the pressurized air into the tire.
If you are buying a new pump, get one that combines the pump and reservoir. If you already have a favorite pump, it is possible to purchase the tanks separately. Another option is an air compressor, which is the most convenient way when you need to use one, but be aware that most inexpensive tankless electric pumps won't work as they don't move air fast enough.
Most new wheels come already sealed, but this is not always the case. If you're having issues with a tubeless setup, it's almost always due to a tape issue. To solve this problem, we recommend re-gluing the inner rim from scratch.
Also be aware that the tape comes in different widths, so make sure you order the correct one - it's always best to use the right size rim tape, as doubling a smaller width tape isn't always smart. The translucent tape will make it easier to find the valve hole in the right place.
Again, these often come with new wheels, but not always. Make sure you buy something long enough to go through the rim and leave room for the pump mount. A little extra length won't hurt, so if you can't find the perfect length, don't be afraid to go longer.
You can get by with a pair of pliers, but it's not worth the hassle. The right tool is inexpensive and makes life a lot easier. It's a good idea to have an extra tool in your emergency kit, as valve cores can get clogged over time and you may need to fix one that's leaking slowly during your trip.
Again, you can do without it, but it's much easier if you have the right tool. You can see instructions for pouring sealant into a tire and then trying to install, which might work, but it can be incredibly messy. Instead, use a syringe and inject the sealant through the valve stem. Some sealants come with a tube, but if you don't have one, we recommend adding one to your toolbox. The syringe is usually supplied with a valve tool and additional spools. It's also a convenient way to use just the right amount of sealant.
You probably already have these tools, but it's a good idea to prepare them. You will need scissors to cut the rim tape. A small towel will come in handy when sealing the rim. A soapy solution in a spray bottle will make life easier during installation. A small screwdriver or pen will come in handy to poke a hole in the rim tape to push the valve stem through.
A properly installed rim tape should be smooth and fill the channel.
The first thing you need to do is seal the rim. If the rim is already sealed, you don't need to seal it, but if you find you're having trouble sealing the tire, don't waste hours looking for it - just seal it.
Every time you rearrange things, there is a chance that you will open a leak in the tubeless belt. It also often happens that you seal the wheel perfectly and then make a subtle mistake when installing the valve core through the tape. If in doubt, reseal it.
Start tape about an inch before the valve hole in the wheel. You want to have enough space so that there is a good seal between the rim and the band up to the valve opening. Press the band against the rim with one hand, then pull the band out a little. Advance only as far as you feel comfortable holding the band, then gently lower it to the surface of the rim. You need to stretch the tape, and it's better to do it little by little, rather than trying to work the entire rim in one fell swoop.
After bringing the tape to the surface of the rim, hold it there.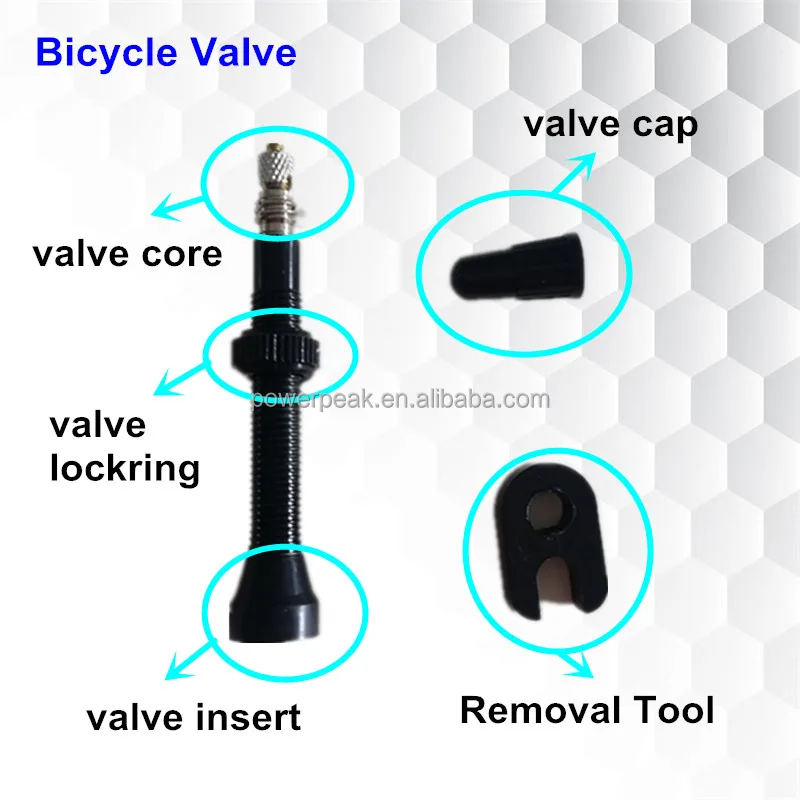 The tape is not very strong, so it will come off the rim if you don't hold on to it. Use a cloth or gloves so that the hand that you held the beginning of the tape with can slide over the rim tape. Press firmly on the rim to help the adhesive stick and move air bubbles to the end of the glued area.
When the two hands are together, repeat what you did from the beginning. Holding the tape against the rim with one hand, you are about to pull more tape from the roll. Stretch it out to the sides of the rim, then gently pull it back and repeat the process again. Continue these two steps until you have gone all the way around the wheel. When you get back to where you started, you should put tape over the vent hole by about the same amount as you started with. Then just cut the tape.
Some people and most bike shops make two layers of tape. If the tape is not wide enough, it is necessary to completely seal the space between the tire beads. Even if the band is wide enough, this needs to be done to increase the circumference of the wheel and create a tighter seal between tire and rim, but modern tires and rims are made to tighter tolerances so this is often not necessary.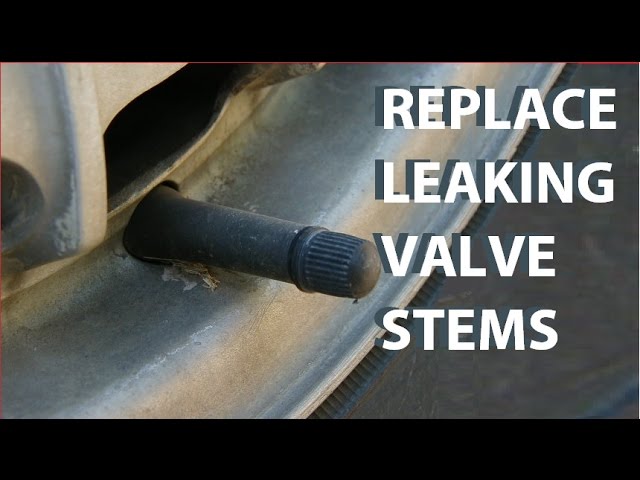 It can also make it difficult to fit the tire as it is very tight. It's one of those things you can't know until you try it. If you prefer to play it safe, then do so.
Push the valve stem through the band.
Start by locating the valve hole in the rim. This will be easier if you can see through the rim tape, but it's possible otherwise if you find a hole in the inside edge of the rim. Once you know where it is, press down on it with your fingers and you can make a small mark outlining the edge of the hole.
Once you know where it is, poke a small hole in the tape. You can use whatever you have. Hex keys, small screwdrivers, knobs, even the sharp end of a valve stem.
Remember that you want this hole to be as central and as small as possible and you don't want to damage the wheel. Any sharp object you use can cause damage, so be careful. This is combined with the fact that you don't try to open the hole completely, you just open it for the valve stem, and when the hole is ready, let the valve stem stretch it.
Once the hole is punched, push the valve stem back into place. There should be some kind of rubber seal at the base of the valve stem that presses against the hole you just pierced and with enough pressure it will seal. On the inner edge of the rim, where the valve now protrudes, you need to install a rubber seal, and then the nut that is attached to the valve stem. You don't need to tighten everything all at once, as you may need to push the rubber seal inside the tire away from the rim to get the tire into place.
The extremely tight fit means you will likely need to use spudgers to fit each side of the tire to the rim.
The process is the same as for the tube tire. Don't forget to check the direction of rotation of the tire, and remember that it's fashionable to line up the logo and name so that the valve is in the middle (this also helps to find the valve when you need to inflate the tire).
Start at the valve and insert the washer into the space between the valve and the wheel sidewall.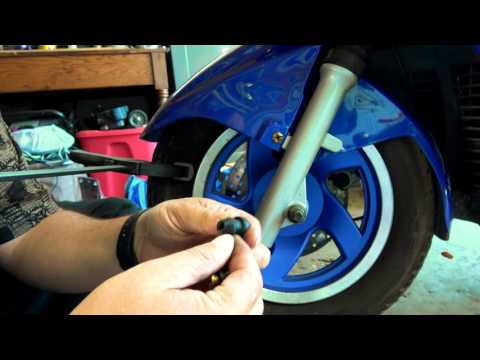 First on one side, then on the other. When you get to the other side, opposite the vent, things get more complicated.
The difference between a tubeless tire and a tubed tire is that the tubeless tire and the rim are closer together. Grabbing each side of a tire on a wheel is often a difficult task and the use of tire levers will most likely be necessary. To facilitate landing, moisten the edges of the tire with soapy water.
Soapy water helps everything slide. The tire will slide more easily over the tire arm and the tire arm will slide more easily between the tire and rim. Once the tire is in place, the soap solution will also help create a seal for the first inflation.
The tire should be in the center of the rim cavity but at the edges next to the valve.
The idea is to put the tire in the center of the rim. The less the tire will rise and fall from the edges, the better. However, it should be on the edges near the valve stem.
In reality, there is little you can do at this stage. Just look for obvious problems and do your best to fix them. A good way to get everything in proper condition is to roll an uninflated wheel with a tire on a carpeted floor, applying pressure on it. The pressure will help the tire sit properly in the channel.
Once you have the tire in place, make sure the valve stem nut is tight and the valve stem is in place.
If you are using a tubeless tire pump, it's time to pressurize the reservoir.
If you are using a standard pump, you need to pump quickly. If you are using a tubeless pump, then pressurize the tank before releasing the air in one shot. It's a good idea to inflate the tire, but be careful with the amount as tubeless tires and carbon wheels often have a lower maximum pressure than you'd expect.
You may or may not hear a pop as the sidewall snaps into place. This helps if the sidewall is wet and slips easily, but even then you may not hear anything. It's a nice sound when the bead clicks into place, but if you can't hear it, it doesn't mean it didn't work.
For initial inflation it may be useful to remove the spool. However, this is not always possible because depending on the pump you have, they do not always secure effectively if there is no valve core.
Using a sealant injector is the easiest way to add sealant to a tire.
If you have time to let the tire sit, this is a good idea. Sealant should not be needed to keep air in the tire. If you have time to let the tire sit with air, you can determine if it is losing air at a reasonable rate. If you left a tubeless tire inflated overnight and returned to a flat tire the next morning, then you need to troubleshoot. This almost always means new rim tape, and it's much easier and cleaner when there's no sealant. You can also check the tightness with a soap solution.
Once you've made sure the tire is installed correctly, it's time to add sealant.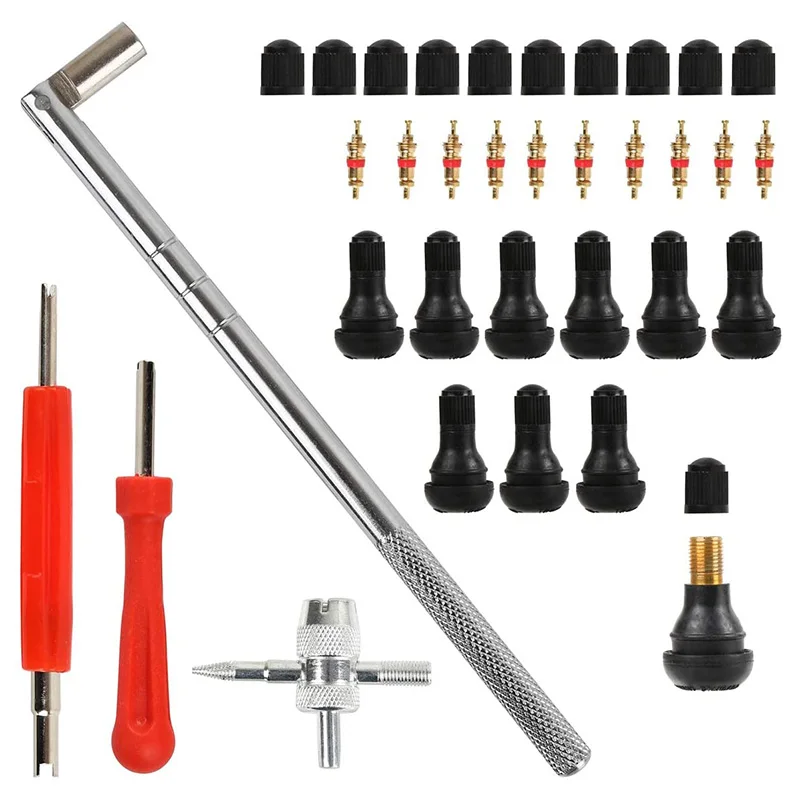 Release the air from the tire, and then unscrew the valve core.
Put some sealant into the injector and turn the tire so that the valve is not at the very bottom and not at the very top of the wheel. At the top, it can leak out of the valve, and at the bottom, the flattened tire leaves no room for sealant. Inject the sealant and install the valve core in place. Inflate the tire to the desired pressure and remove the pump. Spin the tire and give it a shake so that the sealant coats as much of the inner surface of the tire as possible.
Congratulations, you now have a tubeless tyre.
You may be interested in:
The tire valve is a tip that inflates the tire and ensures its tightness. It is attached either directly to the inner tube or to the wheel rim. The tire valve is damaged while driving and must be replaced at the same time as the tires.
La d'un valve tire A car tire is a rubber lug that sits on the tire.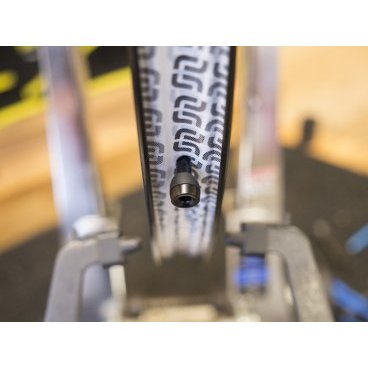 The tire valve, fitted with a plastic cap, has two main functions:
The tire valve can be attached to the inner tube or to the rim, as is the case with tubeless tire valves. It comes in two types:
In short, the tire valve prevents air from escaping the tire, but also prevents dirt from entering the tire. Hence, it also plays a protective role. Finally, this allows, in particular, to do tire pressure and then maintain that pressure by keeping the air inside.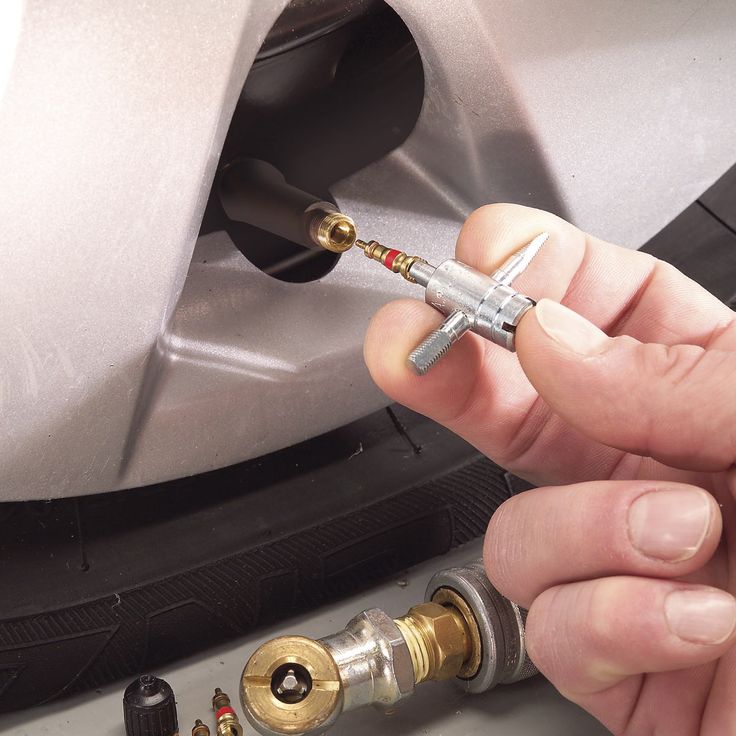
One of the functions of a tire valve is to seal it by keeping air inside the tire. But over time and miles, it can get worse as it is subjected to the pressure and centrifugal force of rolling tires.
Damaged tire valve can cause Air leak and pressure drop tire. The main cause of tire valve leakage is its age, and the mechanism it contains eventually fails.
The risk of tire valve failure lies in the slow release of air from the tire. No matter how hard you apply pressure and re-inflate it, it will continue to lose air. However, driving with improperly inflated tires is dangerous: loss of traction, increased stopping distance, reduced tire life and risk of bursting.
Therefore, the valve in a leaking tire must be repaired or replaced. We also recommend replacing tire valves every time you change tires.
To change the tire valve, you must disassemble the wheel and separate the tire from the rim. You must use valve stem extractor to replace the latter. However, there are also CIP tire valve replacement tools, but these are often not compatible with electronic valves.
Material:
Start by loosening the nuts on the wheel whose tire valve you want to replace. Do this with the car on the ground without completely removing the nuts, then jack up the car and place it on jack stands to secure it.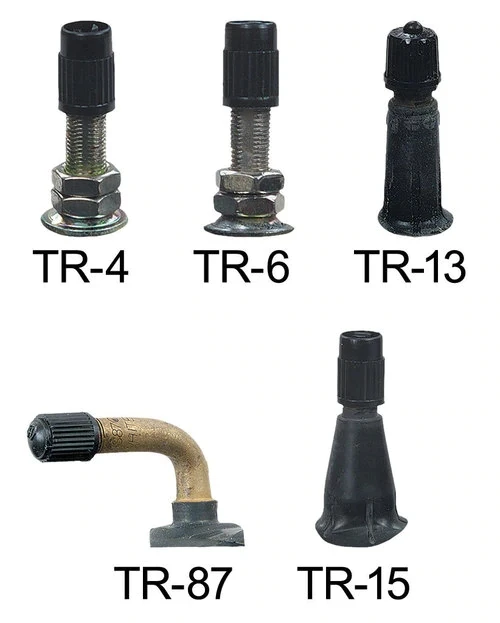
Finish loosening the wheel nuts and remove it. Lay it on the floor with the outer side up. Remove the tire valve cap, then remove the core with a valve stem remover. Let the tire go down.
After the tire is flat, you must detach it from the rim. You can use a sledgehammer all over the tire. Then, using an iron, remove the tire from the rim by inserting it between the tire and the edge of the rim.
After separating the tire from the rim, you can remove the stem from the tire valve. Use pliers to remove the old valve and install the new one in its place. You can then put the tire back on the rim and inflate it to the pressure recommended by the manufacturer. Complete the wheel assembly and check the tire valve for leaks.
The price of a tire valve depends on the type of valve, its size and of course where you buy it.