To prepare for installation, you’ll need to remove the blade and the old tires and then clean the wheels. It’s crucial to clean the wheels and make sure they’re residue-free before installing new tires. A clean wheel allows you to get to the proper fit and keeps the tire from wearing unevenly. Here are all the steps you need to take.
To remove the blade, follow the manufacturer’s instructions or use the following steps as a guide:
You may also want to remove the wheels before installing new tires, so they’re easier to work with. Remove each nut at the end of the axles and pull off the wheels.
With a razor blade or sharp utility knife, cut the glue holding the tires in place. You might also use a flat-head screwdriver to pry off the old tires.
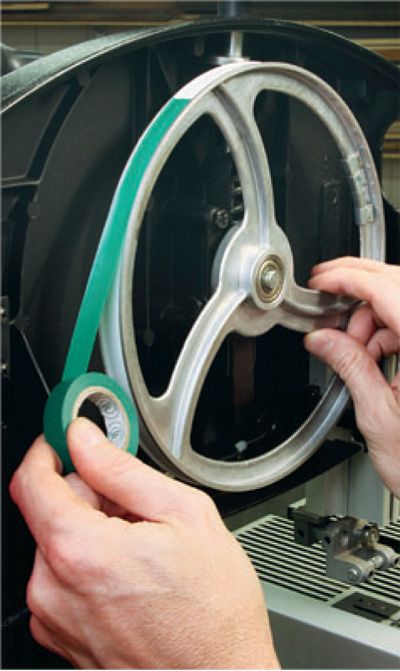
Use a putty knife or flat-head screwdriver to remove any residue or leftover tire pieces from the wheels. A stiff brush can also help you scrape away residue. If anything remains, clean the wheels with a rag and lacquer thinner.
Finally, wipe the wheel rims with denatured alcohol and let them dry completely before installing the new tires. You want each wheel surface to be spotless to ensure the tires adhere to the wheels.
Rubber tire installation requires a special adhesive and a few other tools. Here’s what you’ll need:
To install the rubber tire, take these steps:
When you get back to the starting point, there will be a small area where you won’t be able to add glue, but this is nothing to worry about. Let the glue dry for 24 hours before putting the wheels back on the bandsaw. Another tip: If the tire is too wide, you can use a utility knife to trim it after the glue dries, using the rim as a guide.
Installing a urethane tire is a simple process. The trick to urethane tire installation is heating the tire first, so that’s it’s pliable and easy to stretch. Here’s what you’ll need:
To install the urethane tire, take these steps:
Make sure the hot water you use is no more than 120 degrees Fahrenheit. Boiling water, for example, will damage the urethane.
Just like with a car, bad tires will keep your machinery from performing the way it should. Your bandsaw uses two wheels, one on the top and one on the bottom, to operate the blade. Each wheel needs a rubber or urethane tire to keep the blade from getting damaged. Eventually, these tires wear out and need replacing.
You can replace the tires yourself, but first, you need to determine if it’s even necessary. Your bandsaw tires may only need a thorough cleaning for them to perform smoothly again. If you notice any of the following signs when you inspect your tires, it’s time to change them:
Tracking issues may also indicate a need for new tires.
The first step to installing bandsaw tires is to take measurements and order your new tires. You need to get the correct measurements to ensure you buy the right size for your machine. To measure for new tires, take these steps:
You want the tire to be slightly smaller than the wheel, so it fits tightly and doesn’t slip off while you saw. Consider removing the blade and the tire before taking any measurements to get the most accurate numbers.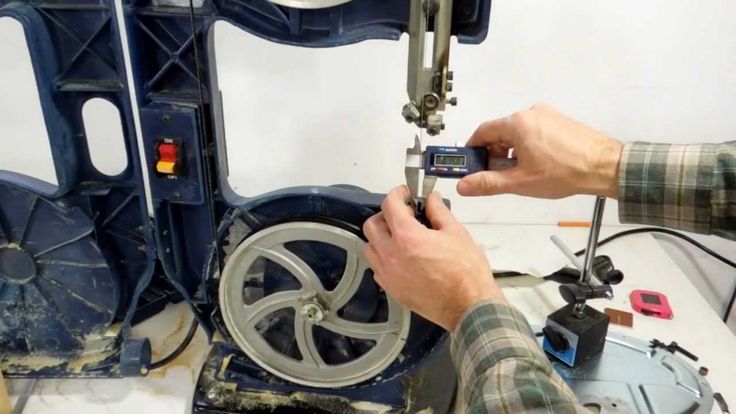 You’ll also need to decide what type of material you want to replace them with — urethane or rubber.
Rubber tires are the standard, cost-effective option. Rubber tires may wear quicker than urethane tires and therefore need to be replaced more frequently. They are also prone to dry rot in arid climates. However, a high-quality rubber tire can last just as long as urethane. Rubber tires require the use of a special adhesive to install.
Urethane tires are a popular option because they are long-lasting. They are easy to install and stay in place without the need for special glue.
Whether you choose urethane or rubber tires, it’s a good idea to order them in pairs, even though stores sell them individually. You’ll want to replace both tires on your machine at the same time.
Replacing your bandsaw tires is easy, as long as you use quality products and follow the instructions provided. When you shop for woodworking supplies from Luxite Saw, you benefit from durable, high-performance bandsaw tires backed by unmatched product knowledge and technical support. For more about our product line and how to install rubber or urethane bandsaw tires, visit us online or call us at 1.800.654.7297 for additional details. View our made-in-the-USA rubber bandsaw tires and urethane bandsaw tires here! We also offer glue for rubber bandsaw tires!
Bandsaw tires are an important contributor to the performance and precision that you expect from your bandsaw. They provide grip to drive the blade, and they endure a lot of wear and tear. If your bandsaw isn’t performing like it should, one of the first things to inspect is the tires. Are there stress cracks beginning to form?
If you remove the blade, can you see ridges where the blade once sat? Does the tire seem glazed and slick, indicating that perhaps the blade won’t get a good grip?
There comes a time in the life of any bandsaw tire when it needs to be replaced, and when yours reach that point don’t panic. It’s not a difficult job at all.
Rubber vs. Urethane. Your first choice will be to choose the type of tire you will use. In the past, virtually all bandsaw tires were made of rubber, and that is still an option today. Rubber is cheaper and stretches more easily onto the wheel.
On the downside, they don’t last as long, and you have to apply adhesive when you install them, making it a messy job on the installation side and more of a hassle when you remove them. Urethane wheels require no adhesive, last longer, and are easier to remove.
Contrary to urban legend, you won’t notice a performance difference on your bandsaw with either option, other than the longevity advantage in favor of urethane. So, in short, go with urethane tires.
Tools needed. You’ll want to have the following items on hand before you dive in:
Let’s get started…
Out with the old. If your old tires are urethane, you should be able to slip a flathead screwdriver underneath, and pry the old tire off. Careful to not ding up the wheel.
Soak the new tire. Place the new urethane tire in a bath of hot soapy water for 10 minutes before you install it. This will make it more pliable, and easier to stretch onto the wheel.
Without taking this step, your tire might be very difficult to install, depending on the characteristics of your particular time. Some tires can be installed without this step.
Begin stretching tire onto the wheel. Place a couple spring clamps in place at the point where the tire cannot be stretched further onto the wheel.
Stretch further with hands. With the clamps in place, make additional progress by stretching the tire further into position, taking it as far as you can with hand pressure.
Finish with a screw driver. Slip a screw driver underneath the tire and use it to leverage the remainder of the tire into position. Remove the clamps, but leave the screw driver underneath the tire for the next step.
Balance the tension around the tire’s perimeter. To ensure that the tire has even tension, slide the screwdriver (still underneath the tire) around the perimeter of the wheel a couple times. Then remove the screwdriver.
Install wheel back on the saw. Clean off any soapy residue and let the tires cool off and tighten themselves onto the wheel before using.
For additional details on the process, a full video can be found on the ToolMetrix YouTube channel here.
Paul Mayer is a guest blogger. He operates under the name "ToolMetrix" (because of his passion for detailed tool analysis) and his work can be found on his:
YouTube Channel: (youtube.com/c/ToolMetrix)
Instagram Feed: (instagram. com/ToolMetrix)
Facebook Page: (facebook.com/ToolMetrix)
- November 16, 2022
- October 26, 2022
- October 12, 2022
For cutting metal blanks, you can make a band saw. Bicycle rims are great for her as pulleys. When using a sufficiently powerful motor, a homemade saw is generally in no way inferior to a purchased one.
A rectangular frame of the machine sole is welded from a profile tube. A frame from the same pipe is welded into it at a right angle. All sizes are selected individually, based on the length of the selected tape fabric. The bed is welded to the crossbar inside the sole. Its racks must be shifted as in the photo. The engine will be installed in the lower offset, and the table in the upper one. nine0003
Next, you need to make a guide for attaching the upper belt drive pulley. It consists of a frame with a narrow profile and two pieces of a large pipe. A square is welded to them to form skids for sliding the frame. Tubes with skids are welded on top of the frame so that a frame is inserted between them.
A hole is made in the frame itself, and an M12 stud is welded into it. Then a fork is welded to it to install a bicycle disc.
Springs and a small section of a profile pipe with a hole are put on the stud, then the nut is screwed on. The frame is inserted into the skids, and the studded tube is welded to the rails. Handles can be welded to the stud nut to rotate it without a key when adjusting the web tension.
A disk is inserted into the yoke, a web is thrown over it and a measurement is taken to determine the height of the lower pulley. According to the mark, a pipe section with a hole for the disk axis is welded to the frame. Next, an L-shaped blank is welded to increase the rigidity of the fastening of the lower belt drive pulley. nine0003
The discs are removed and several layers of rubber strips cut from the chamber are glued onto them. On the tubercles from the spokes, the rubber is drilled with a small crown, and another strip is glued on top. Then rings cut from their native chamber are stretched on top of the disks.
A belt pulley is welded onto the axle of the lower disc to the sprocket. After that, the discs are set in place, and the saw blade is pulled over them.
The base is welded to the machine bed and the motor is screwed onto it. Then a belt is pulled between it and the pulley on the disk. nine0003
To prevent the saw blade from moving away while sawing, it is necessary to make limit rollers at the top and bottom. They can be used as bearings. For this, an L-shaped bracket is made of sheet steel. 3 bearings on the shoulders of the square are installed on it. Of these, 2 will slide towards each other to hold the canvas on the sides, and one is attached to them at right angles to support it from the edge.
One bracket with bearings is welded to the frame at the bottom just in front of the pulley through a pipe spacer. For the second, you need to make a sliding guide to change the position of the rollers if you install a longer or shorter blade. nine0003
The final stage of assembly is the installation of the table. It is cut from 6 mm sheet steel. A slot is made on the table under the canvas. Then it is welded to the frame at the place of displacement of the racks.
The result is a very handy, repairable band saw. Only bearings inside bicycle discs can break in it, which is easily repaired. The design provides for tension adjustment, and quick replacement of the saw blade. To do this, you only need to fold the drive belt away from the motor. nine0003
The design of amateur, semi-professional and professional chainsaws is identical. The operability of the tool is ensured by a saw set, which directly cuts and saws wood. That is why the bar and chain are subject to increased wear. They need to be changed periodically. Today we will talk about the guide rail. Consider the key characteristics of interchangeable equipment, the features of the choice of these elements. nine0003
A tire is an oval, elongated product made of high-strength steel alloy. One side of the part is attached to the chainsaw, and the other ends with a driven sprocket. Thanks to this tire device, the chain runs smoothly, and the load on the power unit of the tool is reduced.
Along the entire perimeter of the part there are grooves and grooves into which the chain shanks enter. During operation, the chain rubs against the tire, which leads to heating of the saw set and its abrasion. To reduce friction and slow down wear, a quality lubricant must be used to lubricate the work area. Oil protects metal elements from overheating and premature failure. nine0003
The range of saw sets is very wide. The market is overflowing with consumables of varying quality and cost. To choose a really high-quality tire for your chainsaw, do not be too lazy to study the key characteristics of the products, analyze all kinds of criteria when buying: material of manufacture, length, thickness, brand, etc.
Chainsaw guides according to design features and scope are classified into 3 categories. nine0003
The choice of tire depends primarily on the consumer characteristics and scope of the chainsaw. Ordinary flat guides are used for completing household tools, but the other 2 types are for professional-grade models.
The width of the guide groove determines the speed and aggressiveness of the tool. This indicator affects the choice of chain. The size of the headset shank must match the depth of the bar grooves. nine0003
If the thickness of the chain shank and the width of the groove do not match, this may cause overheating of the metal components and their premature failure. A more dangerous consequence is an open circuit, which can lead to serious injury to the operator.
Similar troubles also arise in cases where the chain pitch and the crown of the drive mechanism do not match. This provokes increased abrasion of the drive sprocket, and replacing this element is a costly task, since it must be carried out using specialized equipment in a service center. nine0003
The pitch of the sprocket and chain set also affects the operation of the chainsaw.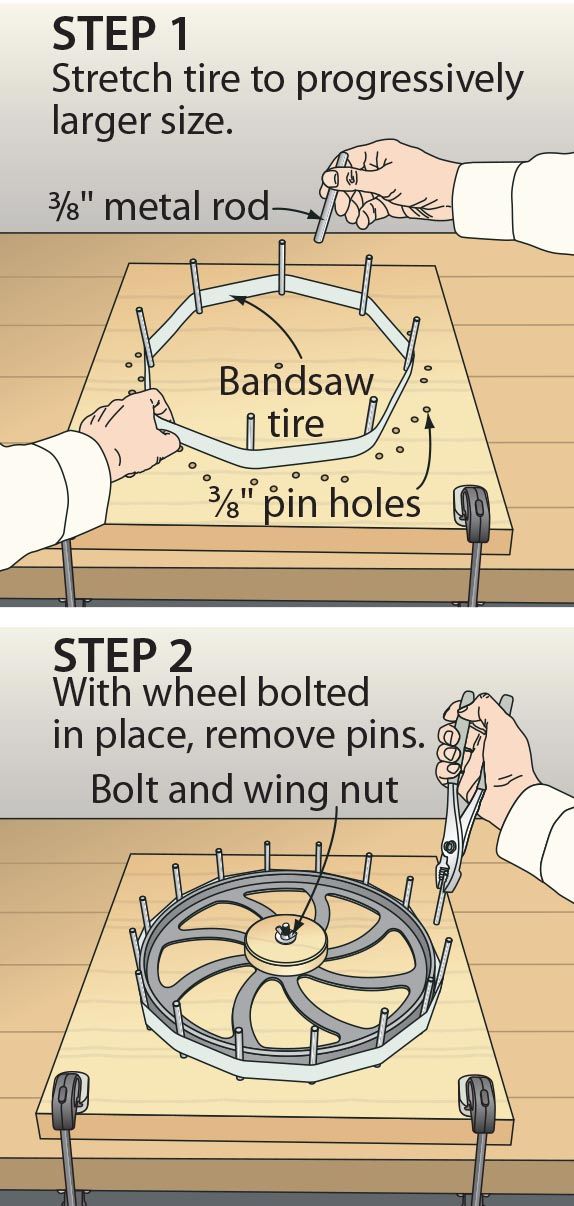 Models with a pitch of 0.325 inches are rightfully considered the most popular. This indicator is typical for saws whose power does not exceed 3 hp. More productive models are equipped with a saw set with a 3/8-inch pitch. There are other options, but they are not so common.
Important!
The driven sprocket often wears out faster than other components. This is due to the fact that this part of the tire is not centrally lubricated. To protect the sprocket from premature wear, it should be regularly lubricated by hand (every 8-10 hours of operation). nine0003
Length refers to the main characteristics of the saw guide. It affects the functionality of the tool, must match the power of the engine. The longer the tire, the larger the trees can be cut with it. It is impossible to put a longer bar on the saw than the manufacturer allows, as this leads to an increase in the load on the engine, and, accordingly, to a reduction in tool life. nine0003
The maximum possible length of the guide rail is indicated by the manufacturer in the technical documentation. If for some reason you cannot find the tool passport, you can measure the length of the tire with your own hands. How to measure chainsaw bar length? All you need is a construction tape. It is necessary to measure the distance from the end to the beginning of the tire cutout with it. This will be the length indicator. An easier way is to look at the side of the tire. But it is not always possible to read the information on the working surface, since the data is erased during the operation of the chainsaw, then you need to measure it. nine0003
Buy tires of the appropriate size for your saw. Ignoring this requirement leads to the following consequences:
To ensure that your instrument performs flawlessly and extends its life, use the correct headset. Length is measured in inches. Consider the features of the range of tires for chainsaws.
Powerful units for professional use are equipped with tires, the length of which reaches 75 cm. The functionality of such models, of course, is impeccable, but you won’t work for a long time. The fact is that the length of the tire directly proportionally affects the weight of the tool and the convenience of its operation. nine0003
An important characteristic of tires is interchangeability. There are a large number of elements on the market with the same number of links, identical dimensional parameters. How do you know which tire is best for a chainsaw or electric saw? The selection of components should be carried out taking into account various criteria, including the brand. The saw set is produced by many manufacturers of gasoline saws. There are, of course, firms that specialize only in the production of chains and tires, but there are few of them. nine0003
Installing a chainsaw tire from the same manufacturer as the tool itself is a guarantee that the unit will work properly and for a long time. Consider the most popular brands of chainsaw guides.

The choice of a headset for a gasoline saw should be taken very carefully. Change parts in a timely manner. If signs of wear appear and the tire no longer copes with its functions, you will have to replace it with a new one.
Please note!
If you need a different tire size, you can lengthen or shorten the old one, but it's still better to buy a new consumable item of the right length. nine0003
The tire is one of the most important working parts of a chainsaw. It, like all other elements, periodically fails, wears out. Operating a tool with a defective tire cannot be considered safe. Change guides promptly. How much does a tire cost? Depends on the quality and size of the product. You can, of course, buy a cheap one, but it does not have a large working resource.
When buying a tire for a chainsaw, consider these recommendations: nine0003
Not only the performance and ease of use of the tool, but also the health of the operator depends on the quality of the parts.