Length: 25:22
Created: October 6, 2020
[0:00] Hey everybody! Today I’ll show you how to install SuperATV’s winch mount and winch on this Honda Talon 1000, so let’s jump right in.
The first step to installing the winch and mount is to remove the bumper from our machine. We’ll need to remove this bolt here, these two Allen-headed screws here, and the two bolts right here. Then we’ll repeat those steps for the opposite side.
Once all of our hardware is removed, we’ll grab hold of our bumper and wiggle it straight out from the machine. Once our bumper is removed and on the table, we’ll grab a tape measure and measure half an inch off of this front bar. This is a SuperATV bumper but the installation will be exactly the same if you have a factory bumper.
We have our factory bumper here. We’ve already drilled holes, but essentially we’re going to measure half an inch and make a mark. Then grab our bracket and line it up. Do the same thing on the opposite side.
[1:16] Now that we’ve made our marks, we’ll continue this mark around the side. If you have a flat piece of metal, you can use that to guide our line.
Now our line is on here. We’ll take our bracket and line it up with the line we just made. Then trace around this, and trace around the hole, too. I’ll fill the hole in with the marker so that way, when we put this on here, we know it needs to line up just like that.
Next we’ll drill straight through. Once the initial hole is drilled, we want to make sure we can keep our drill as straight as we can. Drill through the opposite side. Make sure the bracket is going to line up well with the hole.
It lines up good there, so we’ll repeat these steps over on the opposite side.
[2:18] Once our holes are drilled and all of our marker or paint marker is cleaned up, another thing you want to do is make sure you blow out these tubes from wherever you drill through.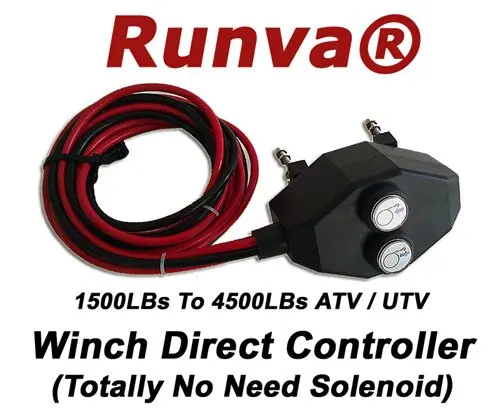 There will be metal shavings down in there and you don’t want to leave them. Over time, they’ll rust and cause issues, so we blew everything out and cleaned it up really nicely.
Now we’ll grab our brackets that we used to mark our holes. Grab one of the long M8 bolts and slide it straight through. We’ll do this on both sides, then grab our fairlead bracket. Slide them onto the bolts, just like that.
Grab our M8 nuts and the Nyloc nuts that are provided in the hardware kit. Thread these on, but don’t fully tighten anything just yet. We’ll just get everything put together here.
Grab our M8 x 20 mm hardware—two for each side—and line up our bracket with the fairlead mount. These will actually just thread right into the mount, and they are adjustable. They do have cutouts so you can move them around.
I’ll run these in by hand. Then we’ll flip it up and take a look to make sure it looks good and straight.
[3:29] Now we’ll grab our Allen-headed hardware and install our fairlead plate.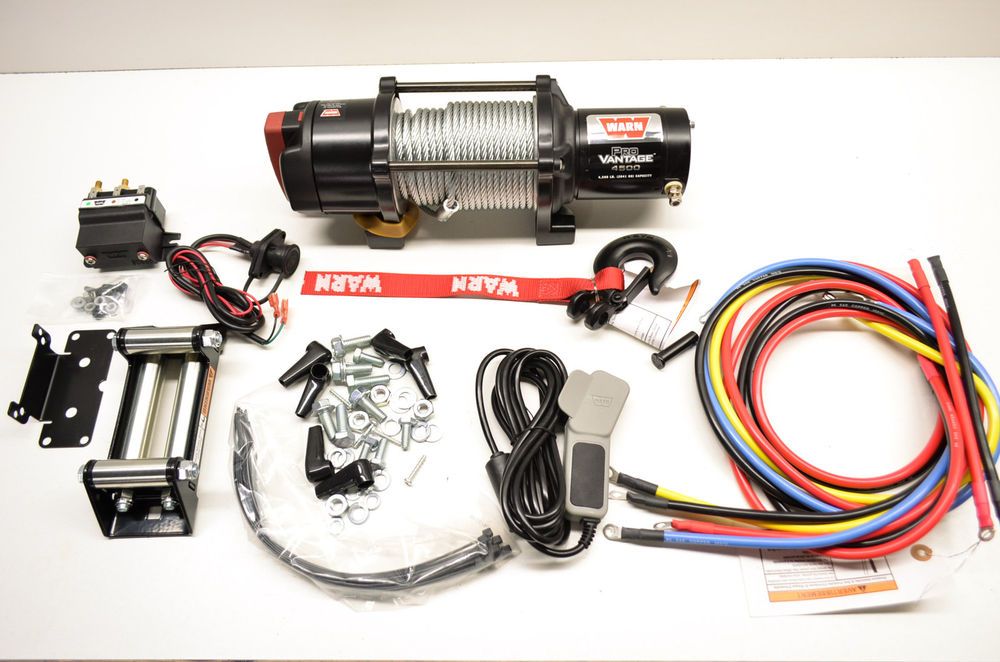 Let’s take the Allen-headed screw and slide it through the front, just like that, on both sides. We’ll put our nuts on the bottom.
If you’re running a 4500 lb. or 5000 lb. winch, you’ll just bolt this directly to the fairlead bracket. If you’re running a 3500 lb. winch, you’ll have to use the adapter, which will be in the kit with your winch.
Now we’ll go through and fully tighten all this hardware. Then take our bumper and reinstall it. Just grab the tabs of your fascia and slide them out of the way.
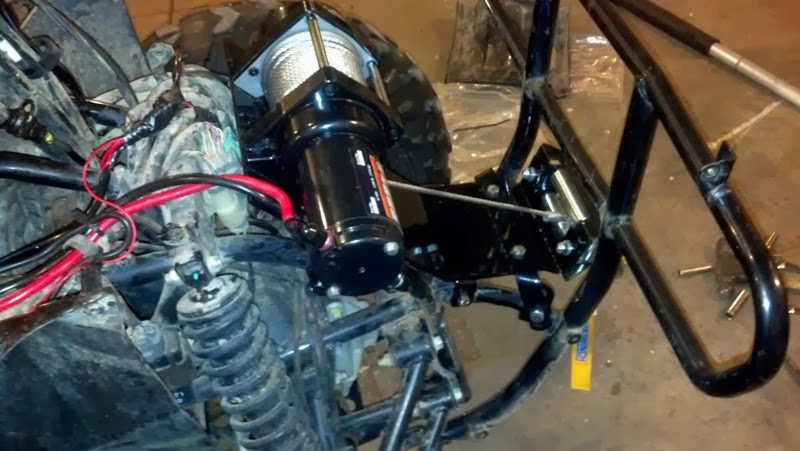
Next, we’ll install our winch mounting plate. You want to angle this portion of the mount toward the front of the machine, and once you get the mount in, just slide it right up to where the factory bolts are lined up. But we’re not going to use our factory bolts—we’re going to use the provided M8 bolts that came in the hardware kit.
Don’t fully tighten them yet. You just want to make sure the holes on your mount are lined up and start the bolts.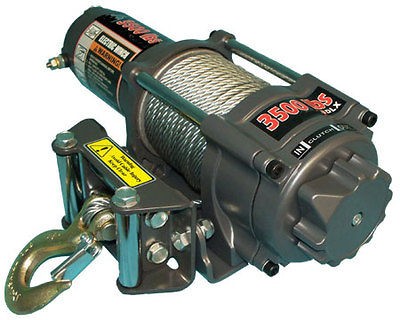
[4:38] At this time we’ll go through and start all of the hardware securing our bumper to the machine. Don’t tighten anything yet—we’re just going to start a couple threads on all of the bolts.
Next, we’ll grab our tube clamps and the rest of our M8 hardware. It’ll be the last bit of hardware left in the hardware kit. I’ll install it just like this, right around the cage of the machine. Go through and start all of the screws, then we’ll do the same thing for the opposite side.
Once all of our hardware is started, we’ll go through and fully tighten it all.
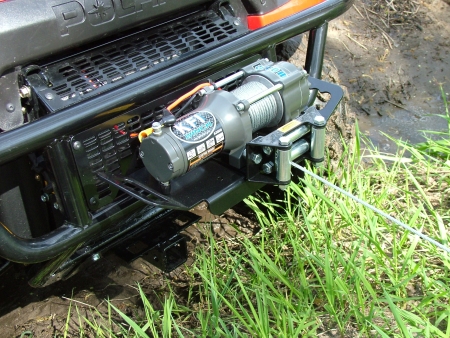
[5:24] Now we have our new SuperATV 4500 Lb. Black Ops Winch and we’re ready to install it on our Honda Talon. First, we’ll put the winch in free spool mode. Pull some of the rope out while it’s nice and easy, and not mounted up yet.
Run the winch rope through the fairlead. Then take the winch and slide it in sideways. We’ll line it up to the outer holes because we’re running a 4500 lb. winch today. If you’re running a 3500 lb. winch, go to the innermost holes.
Once our holes are lined up, install the hardware—a lock washer and a washer. Make sure your lock washer is first, and then your washer.
Pick up the winch and stick the bolt through. Kind of feel around to get it right in there by hand. Do the lower bolt as welll.
Once all of the hardware is started, we’ll fully tighten it.
[6:32] Now that the winch is fully tightened and we’ve pulled the rope through our fairlead, we’ll remove the clevis hook and take the pin out of it. Slide the pin right back through the clevis, onto the winch rope.
Now install the cotter pin by bending it away from itself. Grab the pull strap and slide it right into the clevis hook, then take the stop block and make it so the flat portion is going toward the machine, at the side with the opening. Put it right over the rope, just like that.
Grab the provided hardware. In the kit, you’ll have a long Allen-headed screw and washers and lock nuts.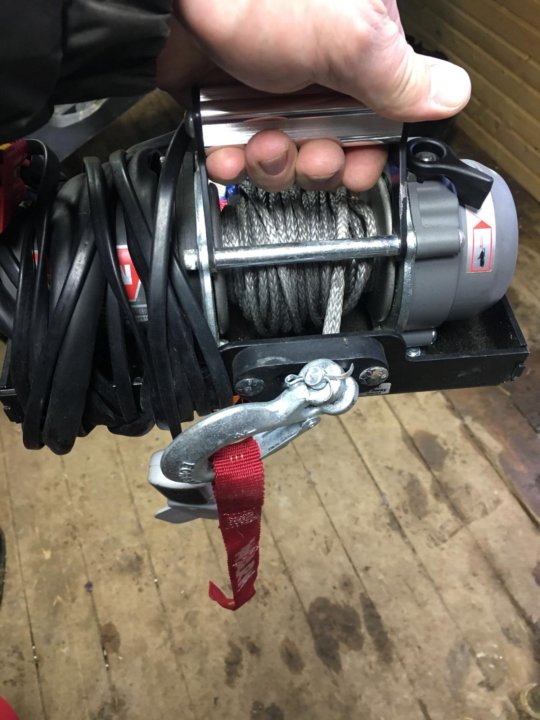 Put the washer on the screw, then take your Nyloc nut and start it.
[7:24] Once your hardware is started, slide the stop block all the way down to the end of the winch rope. Then go through and fully tighten the hardware, then it’s time to wire the winch.
Now that our winch is installed, we’ll come up to the hood. Pick up on each of these tabs, rotate them, and remove the hood from the machine. Grab the solenoid out of the kit. I like to mount the solenoid right here on the crossbar of the frame, so it’ll sit like this.
We’ll still have plenty of clearance for the hood, which is the only thing that we’d make contact with. So we’ll drop it down as low as we can and then take a paint marker. Mark our holes.
This one will be a little harder to mark. As you can see, there’s a little rubber covering here. It kind of slides over a couple different tabs. Go ahead and pick that up and slide it down, out of the way. That way we can have enough room to get in there and drill the holes.
[8:49] Now I’ll make sure my holes are lined up good. I’ll take this side where all of the studs are, put my screw through it, and slide it through the previously drilled hole. Then take the paint marker and mark the other side. Again, double check that the holes are in the right position.
Once the other hole is exactly where it needs to be, let’s drill it. Grab another piece of hardware, another screw—these will be the small ones provided in the winch kit. Let’s take it and line our holes up.
Now we’ll slide a lock washer and washer on. You have to reach in and find the easiest way for you. Go ahead and start it all the way down, as far as you can get it by hand. Then do the exact same thing for the opposite side.
[9:57] Once both sides are started, go through and fully tighten all hardware.
Next, we’ll remove the following push pins from the inner fender well panel—this one, this one, that one, and then there will be one here on top as well.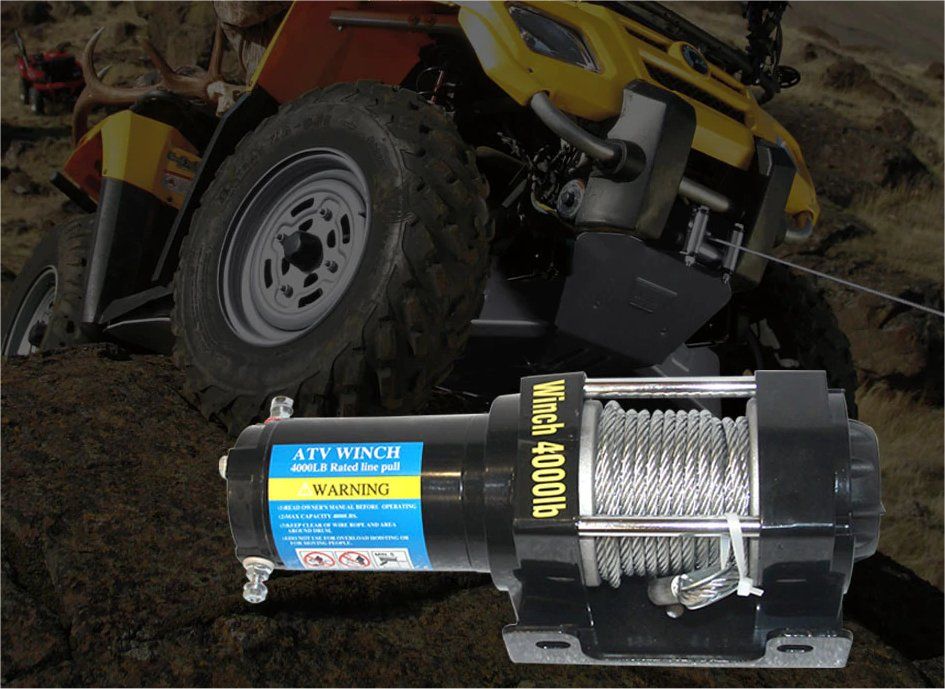
We’ve already pulled all the centers out of our push pins, just to make it go a little faster. So now we’ll go through and remove the ones that we’ve pointed to. We’ll remove this panel.
Inside this panel, right by the power steering unit, you’ll see that you have a hot and a ground wire. These will absolutely be acceptable to use as the hot and the ground on our winch. Obviously, black is going to be the ground, so we can go ahead and feed it to the black stud on our solenoid.
Remove the nut off the black stud. You’ll see that you have a lock washer, as well as a regular washer. Go ahead and pull the lock washer off and take this. You can probably run it back behind here, just to make it look a little cleaner. Slide it onto the black stud. Put your lock washer back on.
Then we’ll take our red wire and run it through here as well. We went ahead and taped ours up because it’s already plugged in the rear, and we’ll show you how to do that.
Then we’ll do the same thing with our red wire. I’ll slide it onto our red terminal here, put our lock washer on, and then our nut. Just make sure this red wire is powered up already on our machine, and that you’re keeping it separated from either of the two studs. That way you don’t get zapped.
[12:17] We’ll come back to the driver’s side, right next to your shock. You’ll see a battery box that has three holders on it. Grab hold of each of them and pop all three loose. Pop this cover off. This is where the battery is on the Talon.
As you can see, you’ll have some red wires running up to this solenoid. You’ll also have a ground wire. These wires will not be hooked up on your specific machine unless someone’s already hooked them up.
To get in there a little easier, you can take your battery and hold down “off.” It’ll just flip down and off. You can then grab hold of your battery, wiggle it out, and then you’ll see your wires running up to the top. But they won’t be hooked in, obviously. You’ll have to hook them on.
[13:19] You’ll have a little 10 mm nut right here on top, and then a little 10 mm nut up here. Make sure you ground the black wire and hook the red wire to the hot side, or the red side. Again, these wires will not be hooked up. They’ll just be hanging out back here in the back of the battery box.
You’ll have to undo this nut, as well as this nut. Wire them in and then tighten them back down.
Once you’ve done that, your red wire that’s running up to the front, that’s wired into the solenoid, will be directly powered to the battery. Once you have those hooked in, put your battery strapped back on, as well as your battery box cover.
Don’t forget to put your snaps back on.
[14:13] Now we’ll get our yellow and blue wires out of the kit. Cut the zip ties and unravel them, then we’ll feed them down. On your top stud, it’ll be yellow, and on your bottom stud, it’ll be blue./photo/2022/01/08/img_7944jpg-20220108074912.jpg)
Obviously we have a yellow and a blue wire. We’ll start with the yellow because it’s on top. Feed it straight down underneath here, next to the coolant jug beside your radiator hose, and then right to the top of your winch.
I’ll attach it down here just to mock it up for now. That way we have a good reference of how long our wires need to be. We’ll take our blue wire, since we’re already down here. I’ll feed it back up and through.
I like to make sure my wires take the same route, so we’ll do the same thing with our blue wire. Just get it mocked up and in position, like it will be when it’s completely wired in. It’ll look something like that. Obviously it will look a bit cleaner once we’re done.
Then, lay this wire up here. I like to leave a little bit of slack. That way, if I do make a mistake, I have a little bit of room to where I can make another connection. We laid it up there for the blue.
[15:44] Now we’ll do the yellow. Grab the wires and pull them back down and through. Remove them from the winch. We’ll get in our kit and as you can see, there’s heat shrink in there. There are connectors and everything we need.
When you make these connections, make sure to slide the heat shrink on first and then make your connection. Crimp it down and heat shrink it.
Next we’ll take our wires and route them down, just like we did previously when we’re mocking everything up. Once we get them down here, we’ll come up top and make the connections on our solenoid. Take your nut off, then your lock washer. Install your wire, lock washer, and nut. It’s the same process, nothing has changed.
We’ll do the same thing for the other wire. Lay it down in position, then come down here and hand snug those.
Then we’ll come over here. We already got the terminal covers out of the wiring kit. We’ll slide one of those on each of our connections going into the winch. Remove a washer and slide the wire on. Reinstall the washer, as well as the nut. Do the same thing for the lower wire, the blue wire.
[17:33] Slide your washer on. Then we’ll go through and fully tighten all the hardware on the solenoid, as well as the winch.
Once your hardware is tightened on the winch, make sure to pull your coverings over top of the connections. Then you’ll see right down here, there is a plug. It’ll come apart and look just like this.
This wire on the left, the white one with the black stripe, that’s a keyed-on power source. We already probed it and checked it all out. We unplugged the dummy plug off of it. To get the plug off the frame, there’s a little tab right here on the back side. Just pull up on that and you can slide it off the actual tab on the frame.
There are two spots back here where a hot and a ground pin could go. Obviously, we went ahead and unpinned the hot side. We found the correct pin and installed it.
[18:47] This is the best way to do it, but you don’t have to do it this way.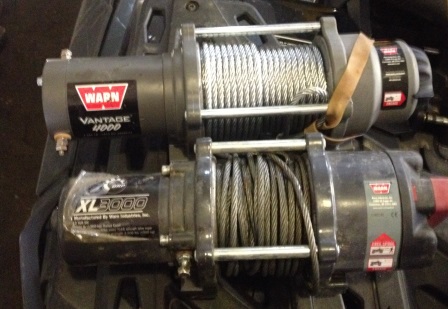 You could just tap into this white wire that we just showed you. That’ll be the keyed-on power source. You could crimp it or you could cut it and then crimp a connection to it. Use Scotch Lock or anything that you can use to get the power from that wire right there.
This just seemed to be the best option for us. We had pins on hand and just found out what size pin it was. We put it in the connector and now when we plug it up, plug it in, and turn the key on, this wire right here gets hot. So we’ve located our keyed-on power source.
We told you where the power source is. However you decide to wire it up is completely up to you. Just make sure you’ve got a good connection and it’s functioning properly.
[19:32] We’ll go ahead and plug this back in where it was. We’ll go inside and show you how to install the rocker switch panel, as well as the dash-mounted rocker switch.
Obviously, on the Talons, there isn’t a very good spot to mount a rocker switch./photo/2021/09/07/whatsapp-image-2021-09-07-at-19-20210907074329.jpeg) That’s what we’ll be using for this install, is our dash-mounted rocker switch.
That’s what we’ll be using for this install, is our dash-mounted rocker switch.
With that being said and there not really being a good place to mount it, we came up with a rocker switch panel. I highly advise that you pick one up if you don’t already have one. It’s very easy to mount, nice and easy, and a great product to use.
In each corner here inside the cubby, you’ll see a little hole. We drilled that hole out, big enough for this plug right here to fit through. Take your rocker switch panel and install it. Lay it up where it looks good.
[20:39] You can get a screw gun or just line it up using a Phillips-head screwdriver. I’ll put these in. You don’t have to use a screw gun or drill or anything like that. Just make sure you get it straight.
We didn’t have to countersink any holes. We just lined it up and pushed on the screws a little bit while we were installing them, and they go right into position with no problem.
[21:15] That’s how simple it is to install the rocker switch panel! It’s a very easy install, nothing to it. If you already had the rocker switch panel installed, you just want to pop it apart really quick.
Now we have our holes lined up, so it goes together nice and easy. Just pull all four of your screws out. Take one of your rocker switch plugs, which will be these right here, and snap them out.
We have one of our rocker switch knockouts knocked out. I’m just going to run our wiring right through here. Then we’ll go down through the hole we created previously. We’ll feed all of our harness through there. That way we can get a hold of it on the outside.
Lay our panel back up into position. We’ll set the hardware aside for the time being.
[22:14] Now we’ll head back to the front and make some connections. For all of our excess, we’ll just bundle it up behind the panel here.
Now reach up underneath the dash and grab hold of the wires that we previously fed through. One of them will go right to this connection here, on the bottom of the solenoid.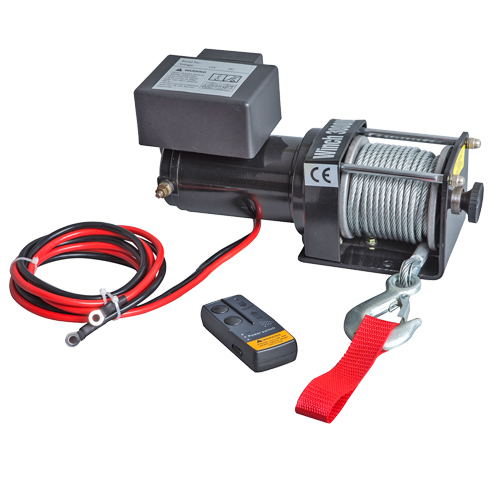 This other one will go to our keyed-on power source, which, like we talked about earlier, is this right here.
Now we can take our bullet connector, or any style of connector that you’d like to utilize. Make sure the keyed-on power source is attached and has a good connection. Then we can start feeding our harness and everything back toward the machine.
Once we have it all pulled through, we’ll come out here and make sure our wires are tied up nice and clean. Then we’ll check the winch. We’ll go ahead and pop our switch into the panel, just like that. Then we’ll bundle up our wiring just like it was when it was packaged up.
Lay it in the cubby, like that, and then double check to make sure everything’s working. The winch is working good, so now we’ll screw our panel back down.
In your kit, you’ll have a remote. On this remote is a pull tab. Grab hold of it and wiggle it right out. Once it’s removed, you can hold down both buttons on your winch controller and with the key on, you can control your winch.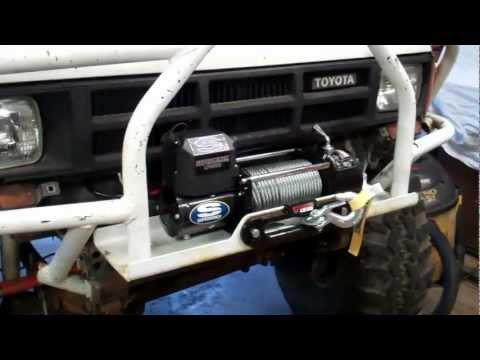
To power this off, hold both buttons down and the red light will shut off.
[24:38] Now everything is wired up on this machine. The last thing we need to do is go through and tidy up our wiring as best as we possibly can. Make it look nice and use some of the zip ties to tie everything up out of the way. Reinstall a few panels.
Once you’ve done that, that’s all there is to installing SuperATV’s 4500 Lb. Black Ops Winch and Winch Mount on this Honda Talon 1000! For more information on this winch, the mount, or any of SuperATV’s great products, feel free to give us a call at 855-743-3427, or check us out online at SuperATV.com. Thanks for watching and we’ll catch you next time.
$47. 95
95
Brand New "KFI" Winch Mount for the following Honda ATV's:
| Honda Models | Year |
| Foreman TRX500 FE** | '14-19 |
| Foreman TRX500 FM** | '14-19 |
| Foreman Rubicon TRX500 FA** | '15-19 |
| Foreman Rubicon TRX500 FM** | '15-19 |
| Rancher TRX420 FA** (Solid Axle ONLY) | 2014 |
| Rancher TRX420 FA** | '15-19 |
| Rancher TRX420 FE** | '14-19 |
| Rancher TRX420 FM** | '14-19 |
| Rancher TRX420 TE** | '14-19 |
| Rancher TRX420 TM** | '14-19 |
Designed to work with the following winches:
 5ci / 2.5ci / 2.5ce / 3.0ci / 3.0ce / 3.0s
/photo/2021/07/14/_mg_6535jpg-20210714093750.jpg)
Specifications:
For extreme off-road ATV riders, an electric winch is a real lifesaver when stuck in potholes and mud. The electric winch is very easy to install and operate, it is controlled by a remote control, which is installed on the steering wheel of the ATV. Most importantly, such a winch will not require much physical effort from you to pull out the ATV. It has an electric motor powered by a battery. When choosing, you need to proceed from engine power and tractive effort. It is recommended to choose a winch with a pulling force of 1.5-2 times the weight of the ATV. And how to install, connect and use it, we will tell in this article.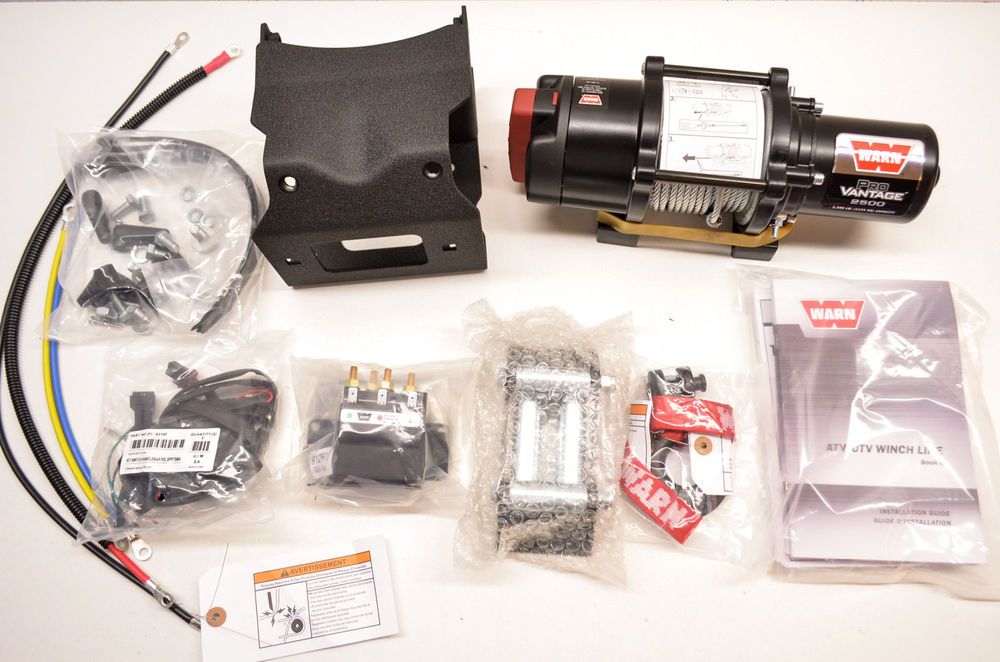
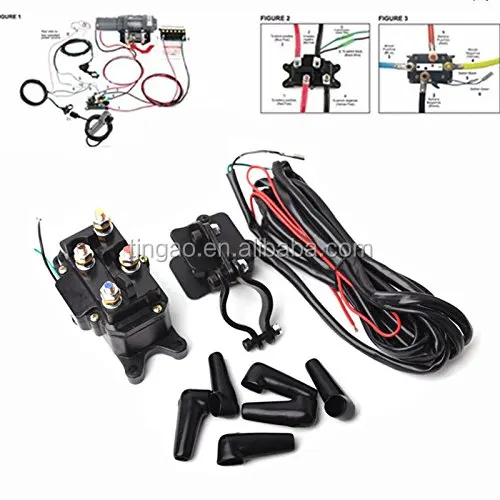
Electric winch is a drum with an electric motor. To connect it to the battery, the kit includes an electric unit and a set of wires, with the help of which the battery and the winch are connected. The control panel can be wireless and wired, which is also connected to the unit.
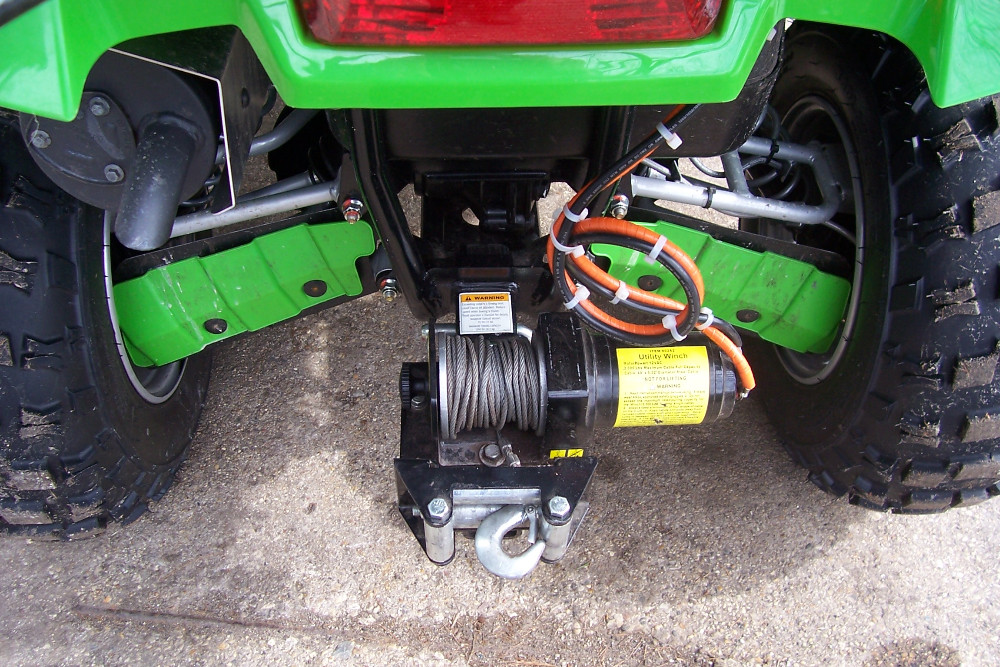
To mount the winch to the ATV, you need a platform, brackets, bolts and clamps. The kit also includes a roller lip, and a cable complete with a hook may also be included.
 On the bumper, you need to unscrew a few bolts in order to use the holes for attaching the platform. If there are not enough of them, you need to drill holes in the frame or on the platform.
 The electrical box is recommended to be installed slightly away from the winch, but most often it is installed on the site. Next, we connect the power cables in accordance with the connection diagram specified by the manufacturer in the product data sheet.
We connect the control panel and install it on the ATV steering wheel. It is recommended to pull the wires tightly, excluding their friction with other parts. They also need to be protected with cable corrugations.
Next, we fix the roller lip to the platform using bolts.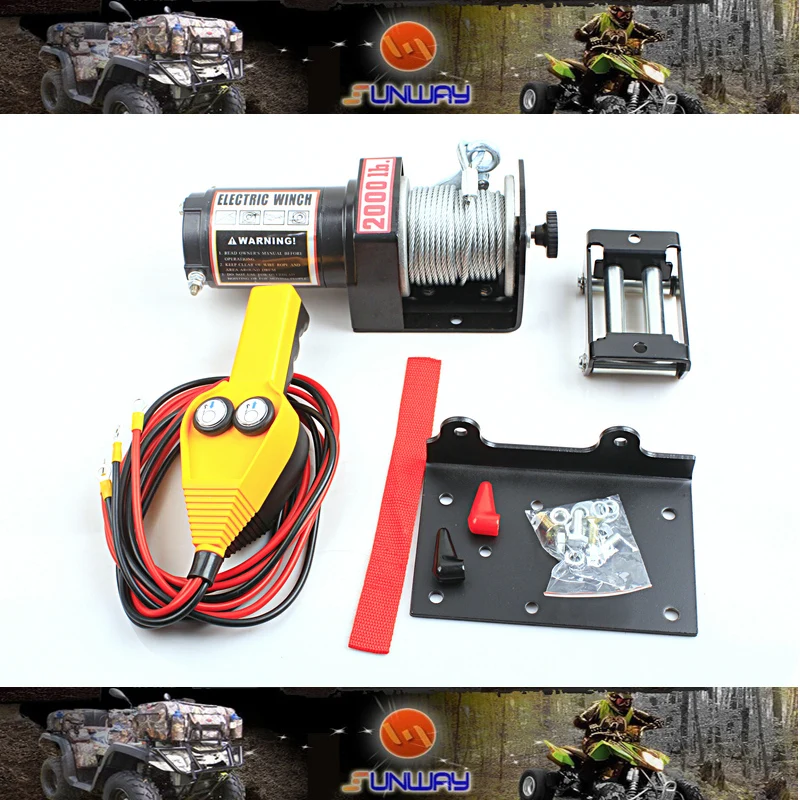 And you can assemble all parts of the ATV back.
Once you've installed your electric winch, it's worth testing it out on level ground before driving it off-road. Using a winch requires certain knowledge and compliance with safety rules. Below, we will tell you what you need to know when pulling an ATV out of a hole or mud with a winch.
 At least five turns must be left on the drum.
  This will increase the friction force and eliminate long towing in place.
 Important!
When working with a winch, all safety rules specified in the equipment passport must be observed. You must not approach the cable and winch in working condition and allow other people to approach it. It is necessary to use a cable damper, as in the event of a break, it can damage people and objects around.
Before use, you need to make sure that all elements are in working condition, that they do not have breaks or damage, and that all fasteners are fixed sufficiently securely.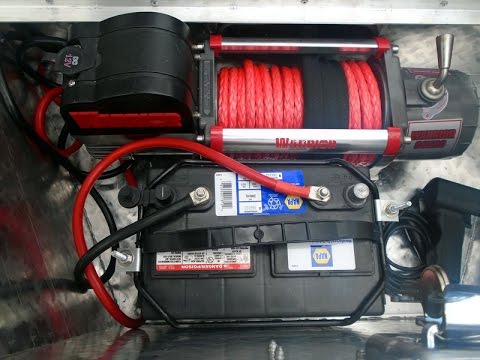
After using the winch, it must be cleaned of dirt, dried and lubricated with special oil.
How exactly does an ATV winch work? The winch consists of 3 main parts: in the center there is a drum with a cable, on one side of the drum - an electric motor, on the other - a gearbox. A shaft passes through the drum, which transmits rotation from the motor to the gearbox. The gearbox contains planetary gears, usually 2 or 3 stages. The gearbox reduces the speed of rotation, and thereby increases the tractive effort. Then the rotation from the last stage of the gearbox is transferred to the drum. A winch is a fairly simple device, but also a powerful and incredibly useful tool for off-road vehicles.
The winch is attached with a platform. If you already had a winch, then you already have a platform, if not, then you need to buy a platform separately. Here are they are .
Mounting is simple, all ATV and UTV winches have standard mounting dimensions.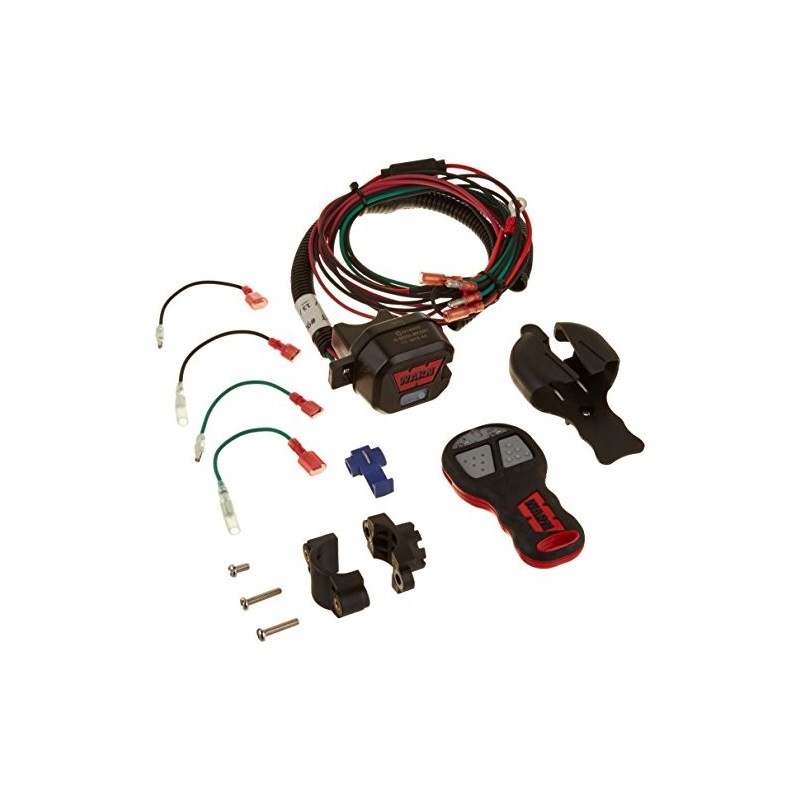 There are only two standards: ATV winches (narrow drum) and side winches (wide drum).
So the question “Will such and such a winch fit my quad” almost always has an affirmative answer if you have chosen the right traction.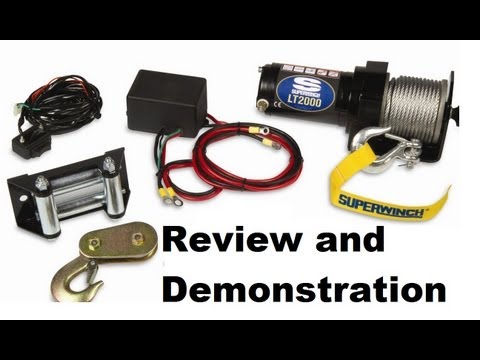
We have already somewhat limited the choice of the winch by its mounting dimensions. Now let's talk more about traction.
Pull on winches is measured in pounds (lbs). Pulling force is always specified in the winch model (for example, Superwinch Terra 35 is 3500 lbs). 1 lbs = 0.45 kg . That is, a winch with a traction of 3500 lbs is 1588 kg.
The pulling force of the winch depends on the power of the motor, the gear ratio of the gearbox and the diameter of the drum, taking into account the number of coiled turns of the cable. A winch with a powerful motor does not always have the best traction. A bit of math to understand:
I hope everything is clear with the dependence of traction and speed on the motor and gearbox. As for the diameter of the drum with a cable, if the cable is completely wound on the drum (large overall diameter), then the speed increases and the thrust drops, if the cable is completely unwound and the winch winds the first or second layer, then the speed is not high, but the thrust is maximum. It is on the first turn that the manufacturer indicates the pulling force of the winch in the model name.
By the way, many mistakenly believe that tractive effort is some kind of force that is measured in a horizontal plane. This is not true! If you hang a weight scale between a tree and a winch, then the scales will show at a maximum load of 1500 kg, if you have a winch with a pulling force of 1500 kg. It makes no difference in which plane the winch works, if it works in a vertical plane, it must lift a load of 1500kg.
Forget (if you knew) the rule of jeepers that the weight of the car must be multiplied by two and we get the desired winch traction. ATVs burrow harder relative to their weight, and even a winch with three times its mass will not save.
 Even if you have a light five hundred, over time, a snorkel and evil off-road tires may appear on it. Pulling out , as it were, a light 500-ku, in addition to its weight, you will drag a huge pile of dirt in front of you and on yourself, comparable to the weight of the quadra itself.
 This topic always provokes heated debate. My unequivocal opinion is better than synthetics.