WildATV Rating: 4.8 out of 5
Pros and Cons
Flexible Design
All Rite Gun & Bow Rack has a universal fit that allows it to be used for ATVs, SxS and motorcycles. An adjustable flexible design also means that it can safely carry long guns as well as other hunting accessories and gear such as bows, fishing rods, shovels and axes.
This ATV gun rack easily attaches with steel U bolts that fit any round or square tube/bars that are 1/2” – 1” in diameter. Some big ATVs/SxS may have larger bars, so this rack wouldn’t work for these vehicles.
Strength And Protection
Aircraft grade aluminum mounting blocks with steel forks. Forks are covered in soft rubber and can fully rotate 360 degrees for mounting flexibility.
This rack may be used with some lower profile soft sided gun carriers, but the carrier could have to be thin. It definitively won’t work with hard sided gun boots.
Check Price
WildATV Rating: 4.6 out of 5
Pros and Cons
Best Seller
Kolpin is well known for producing some of the best ATV gun rack and storage solutions on market.
Of all the clamp/grip style gun carriers currently available, this one by Kolpin is by far the most popular. Overall, customer satisfaction is very high. Of course, there are some unhappy buyers too, but you can’t please everyone.
Durable flexible grips with rubber straps can safely carry a wide range of items including guns, fishing poles, shovels and axes. These racks can accommodate up to 15 lbs.
Fast Easy Install (Mostly)
The flexible design of this ATV gun rack allows it to be used with virtually any type of vehicle. If you’re installing it on racks or roll bars, it will take just seconds to get it installed. The included mounting hardware fits any tubular or square bar from 5/8″-1-1/4″ in diameter. However, if you want to mount it on a flat surface, you will need to drill 4 holes to secure it in place.
Another thing to keep in mind is that you need some clearance under your gun rack in order to easily attach the hardware. The screws that are included occasionally strip when trying to tighten the lock nut.
A better solution for an easier install may be substituting U bolts for the provided installation hardware. Plus, the U bolt will work better if you have limited clearance.
Although these are advertised as having a universal fit, they’re better suited to round bars vs. Square bars.
Check Price
WildATV Rating: 4.6 out of 5
Pros and Cons
Kolpin Hits A Home Run
Kolpin is a respected industry leader when it comes to ATV accessories.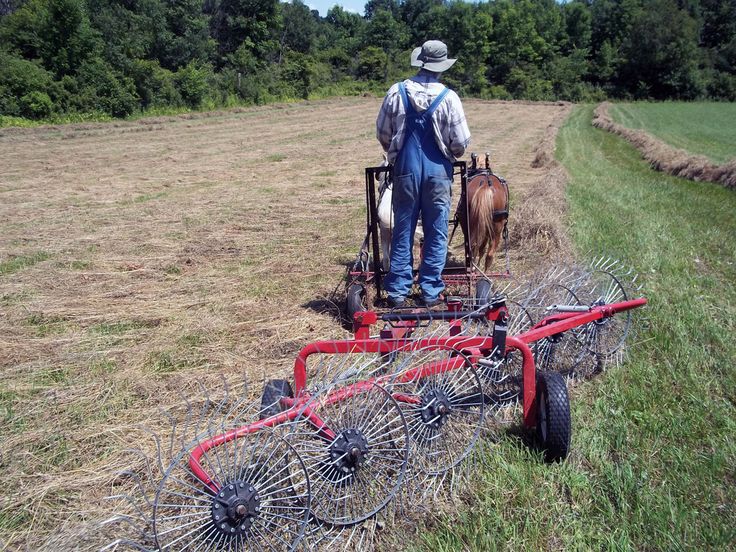 They’re especially well known for their gun carriers and boots and this UTV gun rack is one of their best most popular.
Gun rack bolts to the UTV floor to hold one or two guns securely in even the toughest terrain. The rack height can adjust from 27-1/2″ to 35-1/2″, plus it can angle up to 45 degrees in either direction
Difficult Installation
The biggest draw back to this rack is the installation. That fact that it is bolted to the floor is what makes it so secure, but not everyone is comfortable drilling holes in their floor.
Another potential negative is that installation isn’t straight forward for all vehicles. This gun rack can only be installed on a flat surface. So, if you own a vehicle with a center transmission hump you will need to also purchase a gun rack mount adapter riser (20074) or fabricate your own work around.
Check Price
WildATV Rating: 4. 5 out of 5
Pros and Cons
Great Features
Honestly, it doesn’t get much easier as far as installation go – you put it on the seat, run a seat belt through it, click it and BOOM done. Hard to beat that!
The best thing about this gun rack is that it holds guns in a downward position which is the safest way possible to carry a gun.
Guns are kept well protected in a foam channel while secured in place with nylon straps.
“Universal” Fit
For the most part, this gun rack is pretty universal. It will fit most ATVs, SUVs and even full sized cars and trucks. It will work on almost any vehicle that has a seat and a seat belt. However, as with all “one size fits all” solutions, there are always situations where it may not work.
This item is generally advertised as for use with a middle seat, but if you have a center transmission hump or a particularly long gun, this rack may not work for you. Also, if you have a smaller cab it may not work.
Check Price
WildATV Rating: 4.4 out of 5
Pros and Cons
Made In The USA
The best feature of roll bar gun storage is that it frees up space while keeping the guns secure and out of the way. The Power-Ride Gun Rack fits most popular brands of UTVs. They have several different model sizes which are based on your roll bar configuration.
Install this rack in seconds – just drop the rack over the roll bar, tighten the wing nuts and it’s ready to go.
Soft flexible cradles can accommodate nearly any size long gun. Velcro straps keep the cradle tight for a secure mount.
Great Day Inc. proudly makes this gun rack in the USA.
Gun Safety…?
Although horizontal gun mounts have been used for years, some people don’t view it as optimal from a safety point of view. You never point a gun, even an unloaded gun, at anything you’re not intending to kill.
So, even though you may be transporting weapons unloaded with the safety on, horizontal gun gun storage points the weapon at anyone who is along side you.
Check Price
WildATV Rating: 4. 8 out of 5
Pros and Cons
Safe From Prying Eyes
A roof rack keeps your guns safe and secure while also keeping them out of view from the casual observer. With most vehicles, when viewing from a distance or looking straight in the window, an overhead gun rack is hard to see.
Holes In The Roof….?
How is this rack installed? Well, since each vehicle is different, you may have to work this out on your own. Vehicles without double-wall construction will require through-the-roof or through-the-sidewall mounting.
You can find work arounds by removing the backseat handholds and using those holes to secure the rack. But, this may or may not work with your vehicle.
So, if you’re not comfortable drilling holes in your nice shiny vehicle, this may not be the gun rack for you.
Depending on the design of your vehicle and/or gun length, you have the option of installing this rack length-wise or width-wise on the roof.
Big Sky does make an easier to install version of this rack specifically for UTVs. It has mounting bracket to attach to roll bars. You can check it out here: Big Sky Overhead UTV Gun Rack
Check Price
WildATV Rating: 4.6 out of 5
Pros and Cons
Lockable Gun Boot
One of the best features of an enclosed ATV gun case is the ability to lock it and keep your weapons secure. Obviously this security comes at the expense of quick gun access.
Guns are held securely in place in a padded case. The case keeps it out of the weather and protects it from dirt, grit and flying rocks.
Brackets Included And I Like It
I like that the mounting brackets are included. I’m not a fan of having to buy separate parts.
This gun case is advertised as “dust and water resistant” and it is. As long as the gun case doesn’t get fully submerged, it will provide good weather protection. I just wish it were 100% waterproof! This isn’t a negative reflection on Black Boar – none of the other gun cases are waterproof either.
Ideally, you’d like to get something that works “right out of the box”, but life isn’t always like that. With this gun case, you may find the “impact liner” insufficient, it’s just a thin foam liner. You may need to add some extra padding.
With the multitude of vehicles and guns out there, it’s near impossible to find a gun boot or rack that is going to work for 100% of all users, so you may need to make some slight modifications. But, a tweak here, some padding there and it could be perfect.
Check Price
WildATV Rating: 4.6 out of 5
Pros and Cons
Convenient Universal Mount System
This Kolpin gun case works with the Stronghold universal mounting system that works for several gun attachments and boots. In the winter, the mount can also be used with an ice auger boot or ice rod boot.
Have gun will travel
The best feature of this ATV gun case is that it meets TSA guidelines for air travel. If you ever plan on a dream trip to Alaska or moose hunting in Maine, this feature could come in handy.
This hard case comes with a removeable soft sided case with carrying handles. This case is a nice feature and can be used on it’s own. The Interior bag has customizable fit foam inserts and a couple external pockets.
Kolpin has been in business since 1973 – they’re a well know respected industry leader of outdoor equipment. They stand by their products and returns are easy.
Other Kolpin gun boots are advertised as manufactured in the USA which is a huge selling point for me. Unfortunately this one isn’t advertised as made in the US, so I’m assuming it’s not.
Check Price
Read Next
I have always had a problem with storing my firearms- just where to put them?
Maybe I should’ve considered getting a gun safe or trying out some of these hidden gun storage ideas, but that’s not really what I wanted.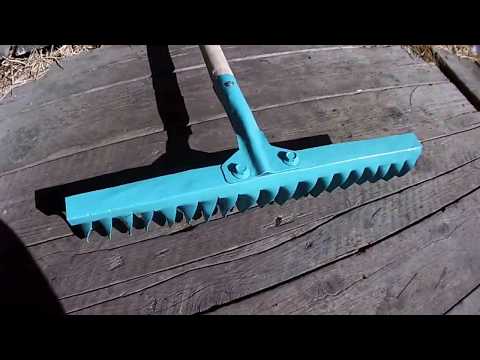
They were all over the place and it became hard to find them.
I would often end up looking for hours and it would even get to the point where I would forget where I put one of them.
This is when I decided to build a gun rack out of wood.
View this post on Instagram
A post shared by Monty (@squirrel8695)
It was extremely simple, took me one day, and solved all my problems with storing my guns in a way that made it so much easier for me to find what I needed.
I have a lot more space now, because the gun rack only takes up about an inch of space on each side of the wall where its mounted which means there’s room for other things in my house now which is great because I have been wanting to get more furniture.
Check out some of my favorite DIY gun rack plans below:
Contents
 Sheriff’s Wooden Gun Rack
 Sheriff’s Wooden Gun Rack
View plans
A DIY gun rack is a rack made from materials you can find at your local hardware store. It’s a really easy project to complete and with the right materials it only costs about $50.
View plans
If you’re savvy enough to build this plan- check out our DIY shooting bench plans for some target practice!
View plans
A gun rack is a storage system for firearms. There are many types of racks, including those made of metal, those made of wood, and those that can be mounted on the wall.
View plans
View plans
 Pellet Gun Rack Made From Pallets
View plans
A DIY gun rack is a perfect choice if you want something personalized and inexpensive that fits your particular needs precisely.
A DIY gun rack is a DIY project that you can make from wood, metal or any other kind of material. You might need to make a few measurements, but the project only takes about an hour.
If you’ve been looking for a way to hang your guns without drilling a hole in the wall, a DIY gun rack is an option for you.
A DIY gun rack can be as simple as a few shelves with hooks to hang the rifles and shotguns from. You can also make a wall-mounted rack that swings open like a cabinet door for easy access to the firearms.
(Go to 1:55 in the video)
I found that many people who hunt and ride ATVs want to carry their guns with them, but it is difficult to do so without a gun rack.
The reason I added a gun rack to my ATV is that it is currently the only storage space I have for my firearms when I go riding.
I live in rural Minnesota, and we get a lot of hunting seasons that require firearms. Naturally, I would like to keep my firearms close at hand when I’m driving through the woods or through the property checking on the livestock.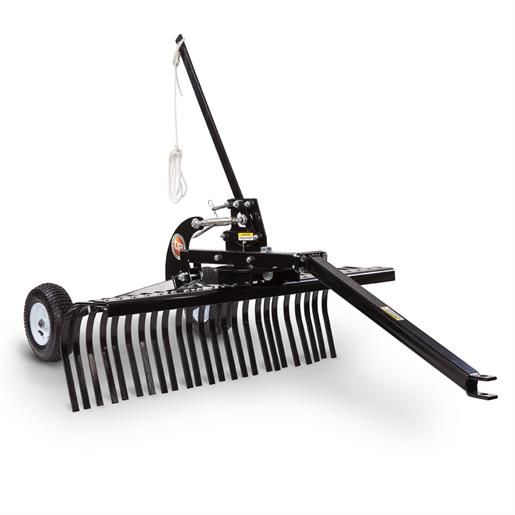
But it’s not always possible to stow firearms in a vehicle. This can be both inconvenient and dangerous, especially if we’re talking about handguns and rifles (or shotguns).
The gun rack was an easy and cheap solution to this problem. It’s also very sturdy and holds up well with all the weight of my guns on it – which is good because when you are out hunting, sometimes you can’t find anything but dirt roads or gravel on the bumpy roads.
This is a very simple and straightforward topic, so let’s get right to the point: we’ve all seen people driving around in their trucks with guns sticking out of the window and we think they’re crazy.
It’s a much better idea to install a gun rack in your truck.
We’ll start with the most obvious one: it protects your firearms from getting scratched or damaged while they’re not in use.
It can also be useful if you want to take your firearms with you on long trips and hunting expeditions. You can protect them from dust and dirt while they travel and free up room in your vehicle.
Gather these materials:
The rack should be tall enough to accommodate the length of the gun, plus a couple of inches for clearance. The width of the rack should be at least as wide as the gun. It is best to make the rack a couple of inches narrower than the gun so that it is more stable.
Cut a piece of plywood to the desired size. Use a saw to cut a 1-inch wide vertical slot from end to end. Ensure that the cut is exactly down the center of the plywood.
Attach another piece of wood to the bottom edge at a right angle, using nails and a hammer.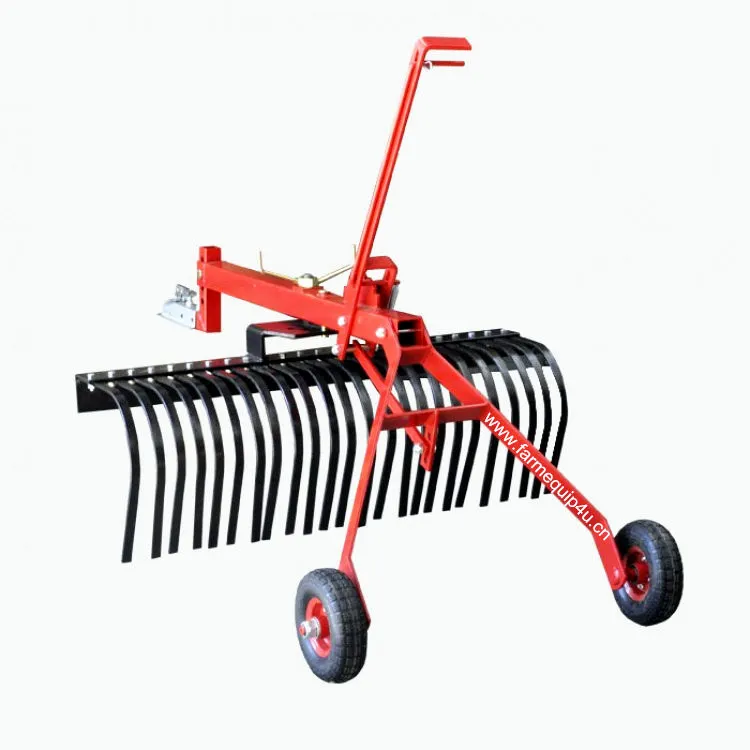 This will yield two long pieces of wood with 1-inch slots in them, plus two vertical pieces that are attached perpendicularly on either side.
Drill a hole in the top piece, near one end. This hole should be wide enough to accommodate a screw or nail that will attach it to a wall stud, while also being close enough to the edge of the plywood not to weaken it.
Similarly, drill a hole in the bottom piece, near one end. This hole should be wide enough to accommodate a screw or nail that will attach it to a wall stud, while also being close enough to the edge of the plywood not to weaken it.
Screw or nail the top and bottom pieces in place in their respective drilled holes. Ensure that the screws or nails don’t protrude through the wood, where they could injure someone.
Finally, attach both pieces of plywood to a stud in the wall. Use long screws with flat heads that won’t be too cumbersome for you or your guests to handle when accessing the guns.
Finally, if desired, attach a padlock to the front of the rack. This will help prevent unauthorized access to your gun collection during parties with lots of guests, etc.
Use a rag and cleaning solution to wipe down both sides of the plywood as well as all pieces that have been assembled. Let the rack dry completely before use.
Vertical gun racks take up much less space than horizontal racks. This is especially beneficial if you are tight on space in your home or garage.
Vertical gun racks are easy to access, as guns can be pulled straight out from the rack. This is not the case with horizontal gun racks, where you typically have to pull the gun out at an angle or remove it completely to access the one behind it.
Vertical storage prevents delicate rifle stocks from being marred by leaning against one another, which can lead to cracks and chips over time. This is especially beneficial if guns are handed down through generations of a family and you want to keep them in pristine condition.
Vertical storage also reduces the amount of wear on your guns caused by contact with other guns. This is because the barrels of the guns are not rubbing against each other, as they would if stored horizontally.
Vertical gun storage is harder for thieves to access and can make it more difficult for them to steal your guns. This is because they would have to cut through the plywood to get to the guns, rather than just grabbing them and running.
Vertical gun racks prevent curious guests or children from easily accessing your guns, which can decrease accidental shootings and other accidents. This is because the design of vertical storage makes it difficult to take a gun off and out of the rack without removing and rearranging all the other guns first unless you leave it hanging in front of the rack.
Vertical gun racks tend to be more expensive than horizontal ones. This is because they are made out of thicker pieces of wood and use more nails, screws, and other materials.
Vertical gun racks are often heavier than their horizontal counterparts, due to the extra thickness of the wood used in construction. This can make them difficult to move around, especially if they are already full of guns.
Vertical gun racks are more prone to wobble and instability than horizontal ones, as the weight of the guns is not evenly distributed. This can be dangerous, as it increases the chances of a gun accidentally falling out of the rack or falling on someone.
Vertical gun racks can leave marks and dents on the stocks of rifles, which is especially an issue if you store your guns in high humidity areas or areas where there are rapid temperature changes. This is because wood swells when it is wet and shrinks when it is dry, which can cause the rack to grip the stocks too tightly.
Vertical gun racks tend to be bulkier than horizontal ones, as they are wider and take up more wall space. This can be a problem if you are limited on space or want to keep your guns hidden from view.
Vertical gun racks also take up more floor space than horizontal ones, as they are typically wider. This can be a problem if you do not have much room in your home or garage.
Each style of gun storage has its unique pros and cons, which you should consider carefully before deciding on a solution. If you are tight on space or want to easily access your guns, vertical storage may be the best option for you.
MyMy Team
Hi, my name’s Elena Coolidge. I’m a DIY enthusiast who loves building fun woodworking plans. These DIY plans are fun hobby projects for enthusiasts or even more advanced builders that want to build things like bunk beds, end tables or even a duck box!
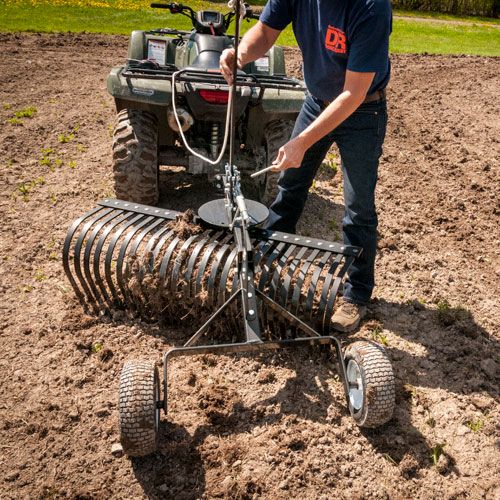
Modern manufacturers are trying to equip walk-behind tractors with various additional devices. A rake is one of these devices, it belongs to the category of trailed equipment and is designed for cleaning grass and hay on the site.
The rake for the walk-behind tractor has a special design with an adjustable handle and is lifting. They can be installed to the front or rear hitch, depending on their design features.
Features of the rake application:
Grader is an important tool in gardening and horticulture. Its use makes it much easier to work on the site.
Contents
, depending on the method of application and design features, these devices are divided into such types:
 They are connected to the unit using an adapter, have an adjustable handle that can be adjusted to fit your height. Models are mainly made of high-quality stainless steel, so they will last a very long time.
When choosing a rake for a walk-behind tractor, you should remember about their functional purpose and installation method. High-quality models will last a very long time, as well as several times increase the efficiency of work on the site.
These tools are essential helpers in agriculture. This accessory must be purchased separately. But if buyers are afraid of the cost of models, you can create a homemade rake.
When making a rake, it is important to use blueprints and take the creation of the tool seriously. Below is an instruction with a photo that will help you make high-quality rakes for a walk-behind tractor.
Required tools:
The creation of such a device consists of several stages, which are important to carefully follow.
 We weld the retaining ring from the inside, and drill a lock hole for the splitter from the outside (you can use an electrode). In the center of the rod we make a seat with a drill.
 Creating attachment points on the axle. Take the metal plates and place them on the frame at a distance of 100 mm. Weld these plates securely, since in the future it is with their help that the rake can be attached to the walk-behind tractor.
 Having cut one and a half meters from the pipe, we make a working grip. Next, place the axis horizontally to the uprights. You should get a pipe that spins quietly in the mount.
 You also need to take care of the reinforcement system, which will avoid breakdowns. It is desirable to install metal squares on weak points. Strengthening the equipment will also provide traction for raising or lowering the rake.
Finally, the product must be lubricated with grease, which will ensure its correct operation. The video provides detailed recommendations for creating a rake for working on the site.
This type of attachment can be used with motor blocks Neva, MTZ, Agro and others.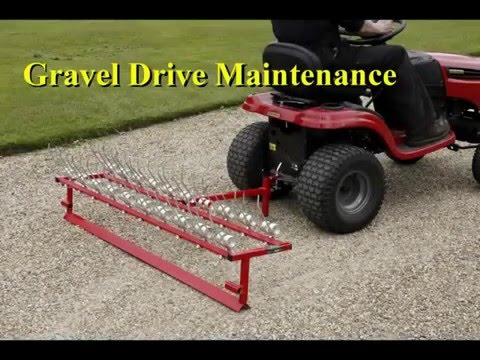 Devices will ensure the efficiency of agricultural tasks and facilitate the work on the site.
Modern walk-behind tractors are equipped by many manufacturers with various kinds of additional attachments. However, it often happens that the device necessary for the household needs to be purchased separately. A tedder rake is one such tool.
Now we will look at how to make a rake for a walk-behind tractor with your own hands. It should be noted that these will be universal rakes that are suitable for both Neva walk-behind tractors and other brands of equipment.
Before you start making a rake, you need to prepare drawings. Below you can see the instructions with a photo - with its help you can make a rake for a high quality walk-behind tractor.
The horse rake became the prototype of our device - people used it for centuries, and even today in the villages in the Russian outback you can find horse rakes.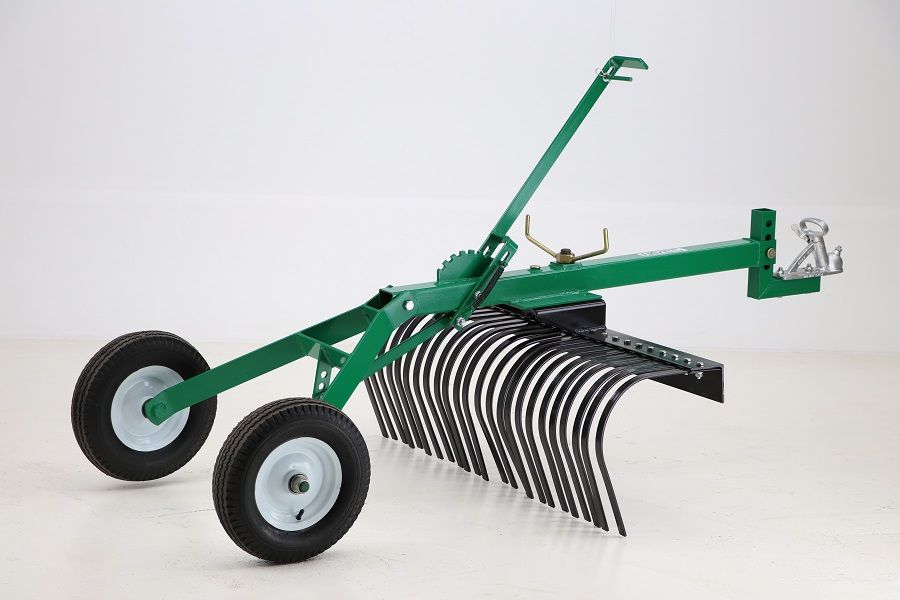
First of all, we build the base - we put the wheels on the axle. We weld two platforms onto it to strengthen the fastening of the rake mechanism. Two thick steel strips are suitable as platforms. We strengthen them at a distance of 10-12 cm from each wheel. Then we fix the drawbar in the center of the wheel axis - it can be made from a thick-walled pipe. A loop is welded at the end of the drawbar - with its help, the rake is docked with the walk-behind tractor. We have made the base.
The next step is to make the working mechanism itself. We weld racks onto the wheel axle, on which we attach two pieces of pipe by welding - a section of 40 mm. Insert the rake axle into the pipe, which should turn freely. We make retaining rings on both sides of the tubes for fastening to prevent the rake from shifting to the sides. After these operations, we supply the rake with a lever. It will serve to raise and lower the teeth.


.png)