By Meagan Fikes Leave a Comment
Some links on this site are affiliate links which means that if you make a purchase at one of these links, I may receive a small commission at no additional cost to you. Additionally, I am a participant in the Amazon Services LLC Associates Program, an affiliate advertising program designed to provide a means for sites to earn fees by linking to Amazon.com and affiliated sites. I only link to products and services I personally recommend and believe will benefit my readers. These links help to cover some of my blogging expenses. I appreciate your support!
I've missed decorating cakes so much! You may have seen me mention or read in my bio that my passion for cooking began with cake decorating. After being diagnosed with gluten intolerance, I gave up cake decorating for a while because 1) I had to start cooking all my own meals so there was no extra time to make cakes, 2) I was unsure if certain decorating ingredients were safe for me, 3) I had my doubts that a cake without gluten would be sturdy enough to hold multiple layers and heavy decorations, and 4) I had to replace all my decorating equipment that had touched gluten which is so expensive! The idea of picking it up again was overwhelming.
I took care of my urge to bake by re-learning how to bake, this time using unfamiliar gluten free flours and other ingredients. I stopped sharing large cakes with people and started a blog to share my own original recipes. I also switched my creative outlet from cake decorating to food styling and food photography for the blog. All of this kept me happy but I still had the itch to make more cakes.
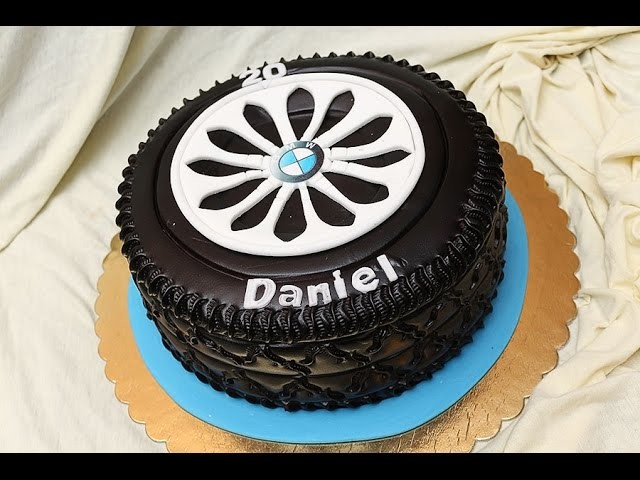
My son's first birthday was in December and I decided to just go for it! He's obsessed with cars and wheels (and anything that kind of looks like it might be a wheel) so I started thinking of how I could make a cake look like a car or the simpler shape - a tire.
I was at a loss on how to make the tread so I started searching Pinterest and yes, this had been done many, many times before. I really liked the tread pattern used on the website "Yes It's Cake" so I tried to imitate that pattern.
Now, keep in mind, I wasn't great at cake decorating before this and it's been about seven years since I last tried! I took a few shortcuts that I knew better than to take and unfortunately, it shows. And those "shortcuts" really only saved a few minutes over the span of a nine hour project so it wasn't worth it. I'll tell you where I cut corners and what I would do different next time.
I think the most obvious mistake was the piping icing. I couldn't find my recipe for the icing I usually make (which wouldn't have even taken 10 minutes) so I just used the store bought stuff and figured I'd add powdered sugar to stiffen it. Except I lost my patience and didn't add the powdered sugar. Since the icing was too runny, the grass didn't hold a nice shape and many strands were too long. Thankfully, I found my icing recipe so I could at least include it in this post.
The other negative outcome from not making my own icing was that I also used it as my crumb coat and it was too wet. This caused my fondant to moisten and pull away from the cake. It actually developed a hole and slid partway off which has never happened to me before! I'll admit, I was a little horrified ;) I patched it up but you can see what I mean about it sliding/pulling away in the photo right where the light hits the side.
I thought maybe I didn't use enough powdered sugar in my fondant because it was a little wet after I rolled it out on the shortening greased countertop. I really forgot what it was supposed to feel like and just kind of guessed. However, now I think it was wet because I used regular food coloring instead of gel. I know you're supposed to use gel coloring for fondant but I didn't even think to check for gluten free gel food coloring. Turns out, it exists! (Update: I used it in the frosting on my son's 2nd birthday cake and it seems to works well!) The wet fondant combined with the wetter crumb coat contributed to that hole I mentioned. I tried to let the fondant dry out a little by leaving the lid off the cake carrier as long as possible but there was no saving it.
I also wish I would have replaced my fondant rolling pin. Oh man, that was tough to get the fondant over the cake without one! I literally wrapped it over my forearm to lift it up without it tearing. Seriously, get a fondant rolling pin. And a lazy susan - I wasn't able to find mine until about a week after I made the cake. Thankfully I was able to hide most of the bumps in my fondant with the tire tread pieces.
There was actually one area I cut corners on and it probably turned out better! I typically only decorate my cake with edible ingredients and planned on making sugar cookie cars but they probably would have been too big. I asked Lenny to pick up a red or blue toy car so he picked those and I love the way they look on the cake. He even found a CRX which he used to drive so that was a really neat addition!
Learn how to decorate a cake using only gluten free ingredients. I made this vanilla cake decorated in a tire tread pattern for my son's first birthday.
*Please see notes section at bottom of recipe first*
 Something like these cardboard cake circles would work too)
 Feel free to add extra flour if needed - any excess flour can be dumped out or saved for the next batch of cake. Just make sure there are no large clumps of flour, especially in the edges of the pan that would create dents in the cake. Set aside.
 Wash and dry the cake pans and prep again as you did in step 3. Repeat the same process to bake, cool, and remove the cake from the pans.
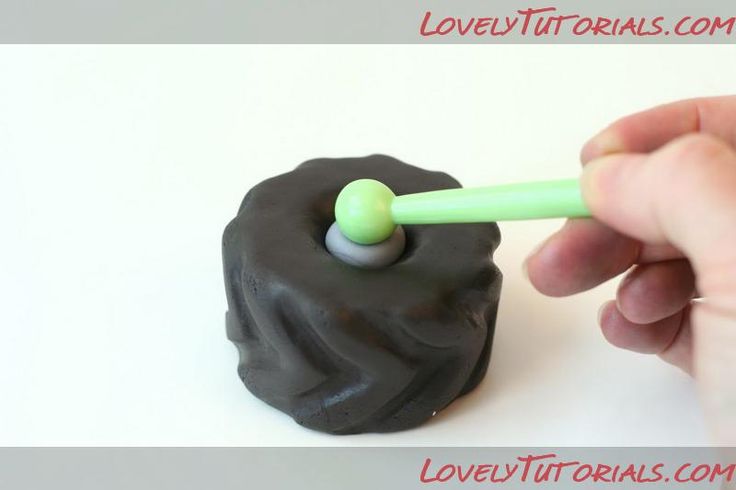 Place one of your four cake layers in the middle of the cake board so it's secured by the icing smear.
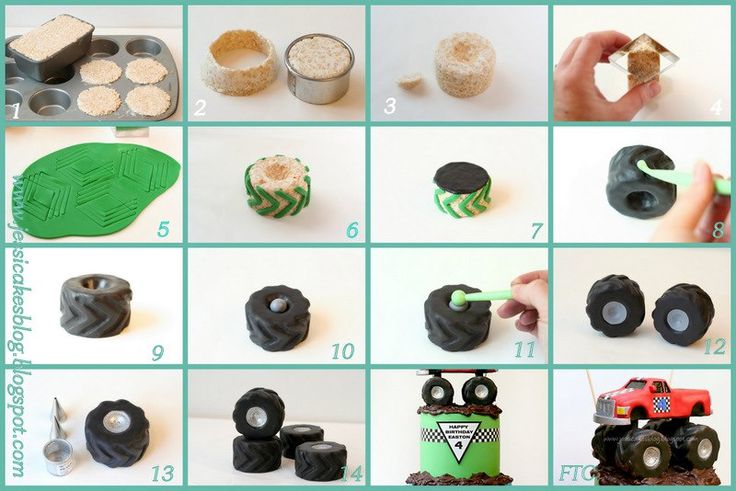 Too thick of a layer can cause the fondant to soften and break. After icing, make sure your cake is still stacked nicely before proceeding. Set the cake aside and store the remaining icing as you did before with plastic wrap and an airtight container.
 Starting at the base of your cake, slowly unroll the fondant up and over the top then back down the other side until it is covered. Grease the fondant smoother with the shortening and gently coax the fondant to lay flat against every surface of the cake, down to the base. Once you work your way down to the base, use a fondant cutter or knife to cut away the excess fondant (save this excess for the next step!). Use a damp paper towel or cotton swabs to clean the exposed area of the cake board. *Tip: If you develop small cracks in the fondant after it's already on the cake, paint in the area with some of the black food coloring.*
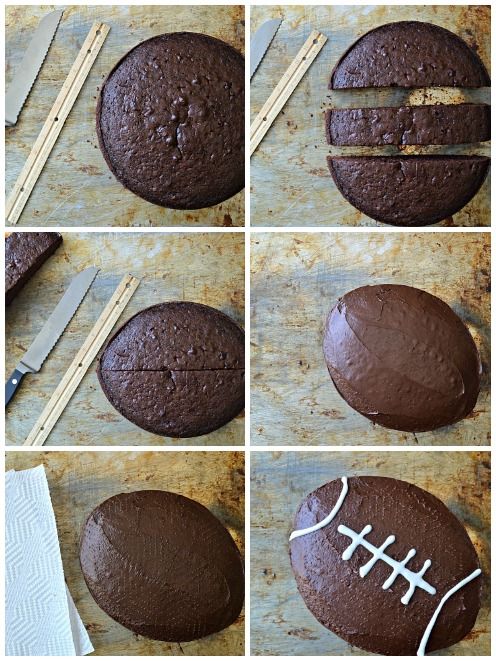 They should stick without needing to add anything.
 Put this in a clean piping bag with the Wilton tip #233. Pipe grass all over the top of the cake, staying outside the number you outlined.
I've linked to many of the products I used for this recipe which worked for me (severely gluten intolerant and mild dairy allergy) but if you have food allergies/intolerances or are cooking for someone who does, please thoroughly research the ingredients you buy and follow safe practices to prevent the cross contamination of any problematic allergens while cooking.
Even if you own four of those 8 inch round cake pans, you don't want to put four pans in the oven at the same time unless they all fit on the same rack.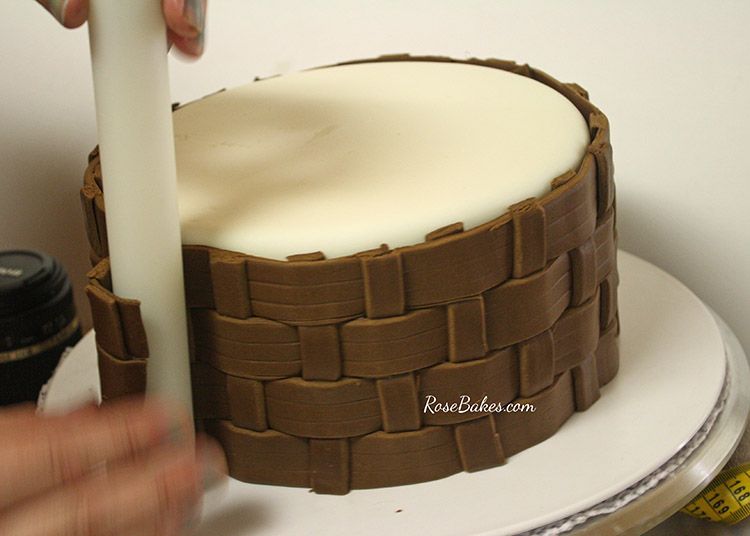 If you have some on the top rack and some on the bottom, they won't bake correctly.
Tag @eatsomethingdelicious on Instagram and hashtag it #eatsomethingdelicious
· Modified: by Rose Atwater · This post may contain affiliate links · 7 Comments
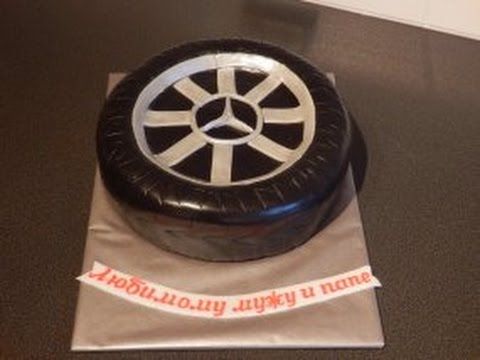
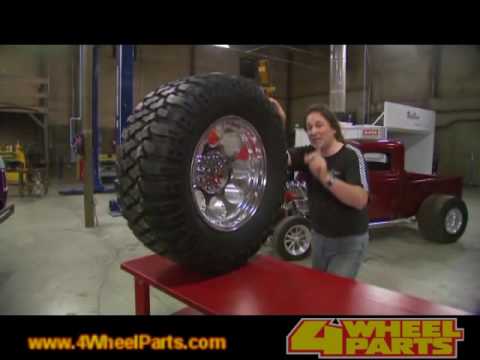
This Good Years Tire Cake is the perfect cake for a man (or woman) who loves cars or is in the auto industry! Or in this case, is celebrating a milestone birthday! Ed was celebrating 49 "good years" and loves his cars! His wife ordered this cake for him! Keep reading to find out the details of how I made it.
I don't take a lot of last minute orders. But every now and then I get a request I can't say "no" to. This was one of those times. When the client called, it was Thursday and she wanted to pick up the cake on Saturday afternoon. Talk about last minute!!
But when she sent the pic and it was a tire cake (and I only had one other order that weekend), I knew I had to say yes! I'd had this tire tread impression mat already for quite awhile and I'd only used it once (I think). Plus, my brother owns a tire shop so I thought it would be cool to show him as well.
So, here are the details:
This was an 8" round vanilla bean cake. It was baked in my favorite Magic Line pans, then cooled, filled and frosted with vanilla buttercream.
I'd haved loved to use the diamond plate texture mat with fondant to cover the board (I'd have used silver spray to make it SO cool!) BUT, since it was such short notice, I just wrapped the board in silver paper and used a red ribbon border (tutorial here) to make it pop!
For the center of the tire, I scooped out a small amount of cake in the center of the top to give the tire dimension. I re-frosted that "hole", then I covered the cake in Satin Ice Black Fondant.
Next I rolled out a long piece of black fondant (approximately 25 inches long and 6 inches wide). Then I laid the tire tread impression mat over the fondant and used a rolling pin to press it down evenly. I had to move it a few times to get the texture covering the full length.
After measuring the height of the cake, I trimmed the tread to the correct height. Then rolled it up on a rolling pin and unrolled it around the cake. The soft fondant adhered to the cake pretty easily but if you have trouble with it sticking, you can use a light brush of shortening or water.
For the top of the cake, I used a round cookie cutter to cut out the "hub" from homemade marshmallow fondant, then I used large round piping tips to cut out the smaller circles. Silver edible spray was used to get it the shimmery silver color. After it dried, I centered it in the hole I'd made earlier.
The letters were done with alphabet cutters similar to these and the numbers were cut with cutters similar to these. I used homemade marshmallow fondant for the letters and Satin Ice for the red fondant.
Satin Ice Black Fondant
Buy Now →Fondant Smoother
Buy Now →Xacto
Buy Now →The only other detail for the Good Years Tire Cake is the symbol. It was a rough hand sketch that I cut out with an xacto blade then used a black food marker to draw the details. Easy-peasy!
And that's it.. I think that's all of the details I can share with you on this cake! If you have questions, leave me a comment!
I do have one more treat for you! Here's another cake I made years ago and never posted... it's an Engine on a Tire Cake:
Rose Atwater is the founder and cake decorator behind Rose Bakes. She is baker, cake decorator, author, wife to Richy and homeschooling mommy to 6 wonderful kiddos! Her work has been featured in American Cake Decorating Magazine, Cakes Decor, Pretty Witty Cakes Magazine, Huffington Post and Cake Geek Magazine. Learn more here...
Profile
Favorites
December 20, 2017, 11:10 December 20, 2017, 12:10 December 20, 2017, 13:10 December 20, 2017, 14:10 December 20, 2017, 15:10 December 20, 2017, 16:10 December 20, 2017, 17:10 December 20, 2017, 18:10 December 20, 2017, 19:10 December 20, 2017, 20:10 December 20, 2017, 21:10
Issue topics: production and use of tires, materials and technologies, safety and other issues of iron horse "shoes" . ..
..
Historical Date: In 1892 (125 years ago), engineers Alexander Brown and George Stillman of Syracuse, NY received the first patent for pneumatic tires.
Guest of the broadcast - Associate Professor of the Department "Operation of road transport and car service" Professor MADI Vadim Arkadievich Yanchevsky .
What is the secret of the popularity of certain tires? In the tread, in rubber?
Vadim Yanchevsky: In most cases, it seems to me that this is more marketing, in modern terms. Today, it is rather difficult to identify the obvious advantages or disadvantages of certain tires. It all depends on what the tire is intended for and in what mode it is operated. Some are able to work in more extreme conditions, but if you operate the tires in normal conditions and speeds - of course there are differences, but not as they say ...
Vadim Yanchevsky: Tire production process: it is now 80% automatic assembly, and in the old days, 80% tires were assembled manually.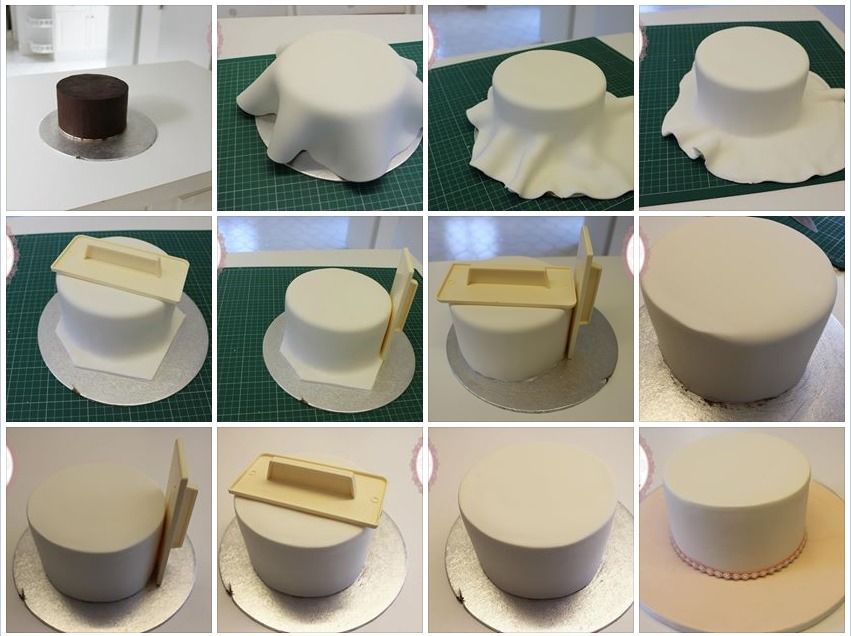 The girls worked on the machines, cut them into scarves and then assembled them, like a layer cake, on the stand by hand - very hard work in the shops. The temperature in the workshops was over 35 degrees. In tires, it all depends on the material. Now the quality of the material is almost the same for everyone. But build quality means a lot. The more control over build quality, the better the tires will turn out.
Vadim Yanchevsky: About 30 years ago there was a conversation about the search for synthetic materials to, roughly speaking, make a tire like galoshes, and not assemble it by hand, because it is very complex - it's such a layer cake. If someone once tore a tire, or cut it on purpose, they will see how many different layers are inside. The rubber itself is just like a protective shell and like a tread - a connection with the road. And everything else is those materials that are designed for one thing: to hold air.
In tires, it all comes down to a balance of two requirements - on the one hand, to consume as little fuel as possible - so that it has less rolling resistance, on the other hand, what the car needs - that it keeps good grip on the road.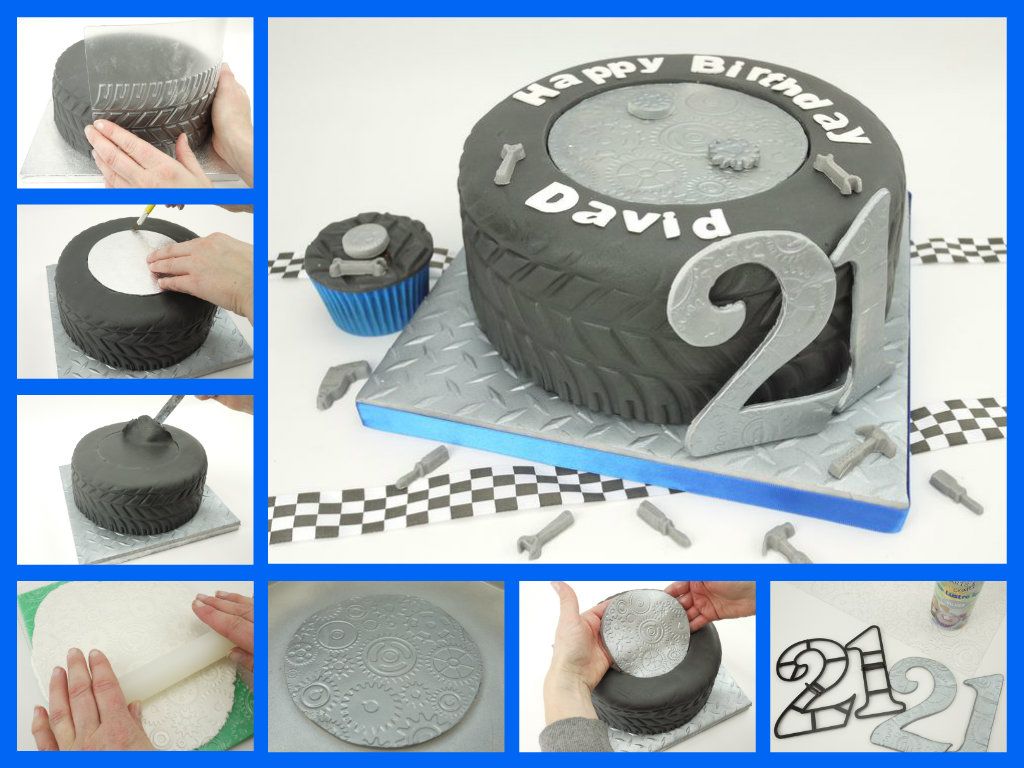
Vadim Yanchevsky: There is nothing more important in tires than air pressure! Well, you see the footage when the car suddenly loses control for no reason and starts spinning along the road, when they say “the driver lost control and the car ended up in the oncoming lane.” 80% of this is due to air pressure ...
Listen to the full recording of the conversation in the audio file.
Auto-geolocation
Mirror glaze is the best recipe on the Internet, a recipe that is guaranteed to work!
Ingredients
gelatin - 12g
glucose (or invert) syrup - 150g
Water - 75g
Sugar - 150g 9000 glossy coating of modern cakes and pastries.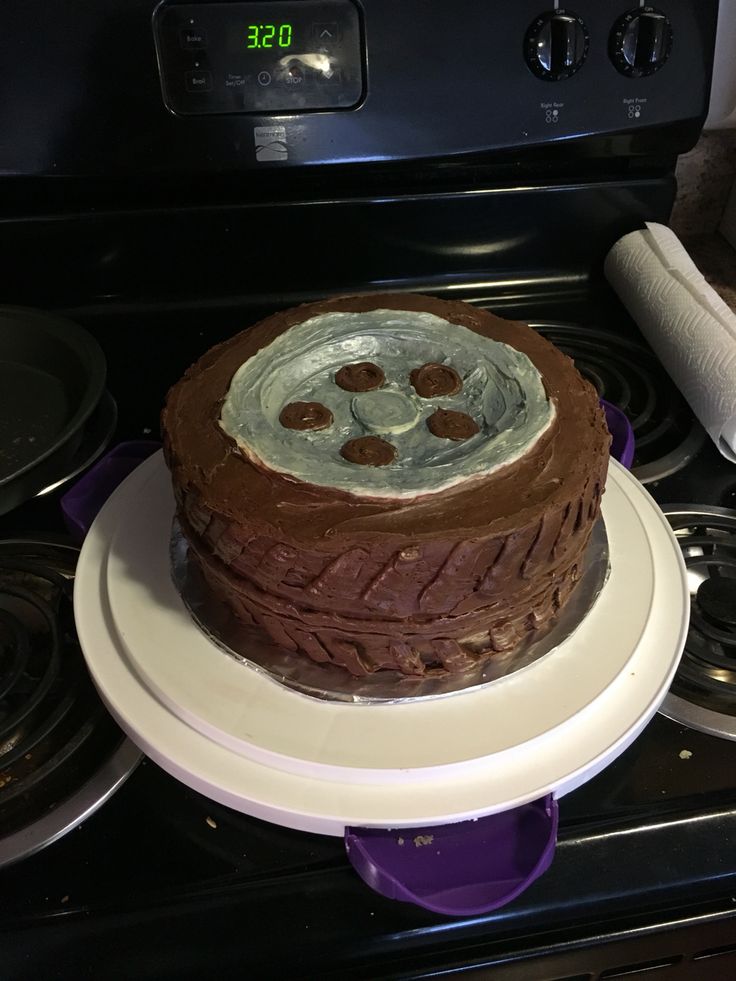 It is most often used in mousse desserts, but sometimes traditional cakes are also covered with it, however, in this case, as a rule, not completely, but only the top, so that the icing flows in beautiful drips.
Colored mirror glaze excited my mind for quite a long time until I learned how to make it :) I always imagined that these amazing cakes were nothing more than photoshop! Well, there can't be an edible surface so polished, so reflective, so perfect, I thought! It turns out it can! And most importantly, according to this recipe, it turned out for me the first time!
The simplest ingredients are used for its preparation. But you can’t do without a culinary thermometer: the glaze has a so-called working temperature at which it is poured over a cake or pastries. This temperature is 30-35 degrees, on average 32. And it is very important to observe it, because plus a few degrees - and the icing will drain too much, leaving gaps, and minus - it will seize before it has time to cover the cake.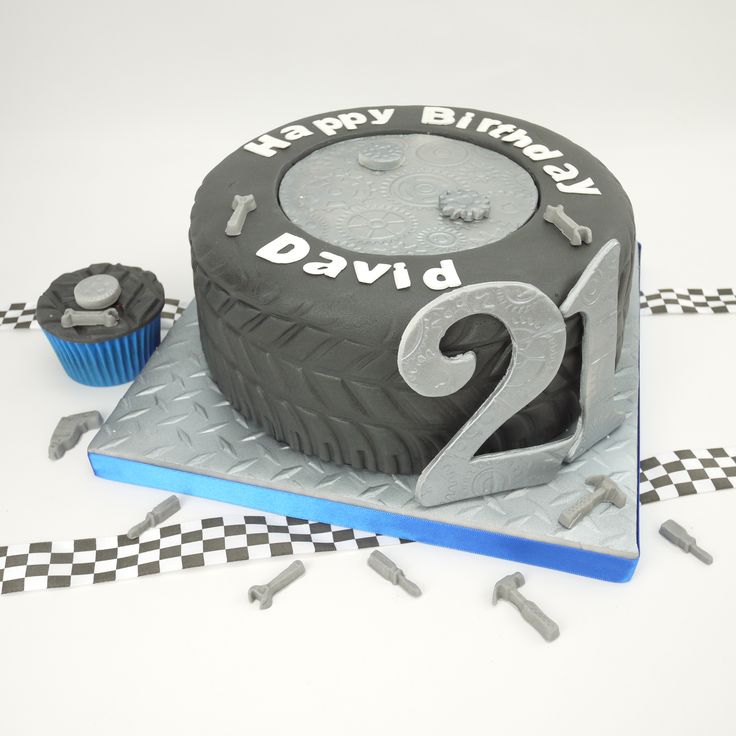 And since the icing is the final stage in the preparation of the cake, it can also easily nullify all previous efforts. If you ignore the rules, of course. And the temperature of the cake itself is also very important: it must be well frozen and you need to get it out of the freezer just before you fill it with icing.
IMPORTANT: if the icing is used for drips on the cake, its temperature should be lower, in my experience, no more than 30, about 28 degrees. Otherwise, the drips will reach the very bottom of the cake and puddles will form on the substrate. It doesn't look very good.
To prepare a colored mirror glaze, we need:
Products, as you can see, are available, and everything except the dye can be bought in any supermarket. Dyes are sold in specialized stores for confectioners. In this recipe, I will be using Americolor gel color. It is high quality and economical. You can also use powdered fat-soluble food coloring. If you need a snow-white glaze, titanium dioxide will help (looks exactly like tooth powder :)). Natural dyes a la beetroot juice or spinach for mirror glaze will not work, and if you don’t have any dye, there is only one way out: try to make glaze simply based on dark chocolate. And more recently, I discovered a recipe for glaze with berry puree, depending on the berries, it can also turn out bright, but that's still a completely different story.
So, the ingredients seem to have been decided. Go!
Pour 12 g of gelatin into 60 g of cold water.
Put 150 g of sugar in a saucepan, pour it with 75 g of water and 150 g of invert syrup. The view of all this is breathtaking! :)
We put it on fire.
Bring to a boil until sugar dissolves completely.
Melt 150 g of chocolate in a water bath or microwave. It is important not to overheat, otherwise the chocolate will curl up and be spoiled. Build a water bath so that boiling water does not touch the bottom of the pan with chocolate. In general, immediately after boiling, it is better to turn off the fire and, constantly stirring the pieces of chocolate, wait until they completely melt. If using a microwave, place the container of chocolate in it for 15 seconds, remove, stir, reheat, etc., until all the chocolate has melted.
Pour the chocolate into a tall blender glass. In principle, icing can be made without a blender and, accordingly, a glass from it, but it is faster and more convenient with them.
Pour 100 g of condensed milk over the chocolate. Is it worth saying that milk should be of high quality? Its taste directly affects the taste of the finished glaze, so it is advisable to take condensed milk without vegetable ingredients.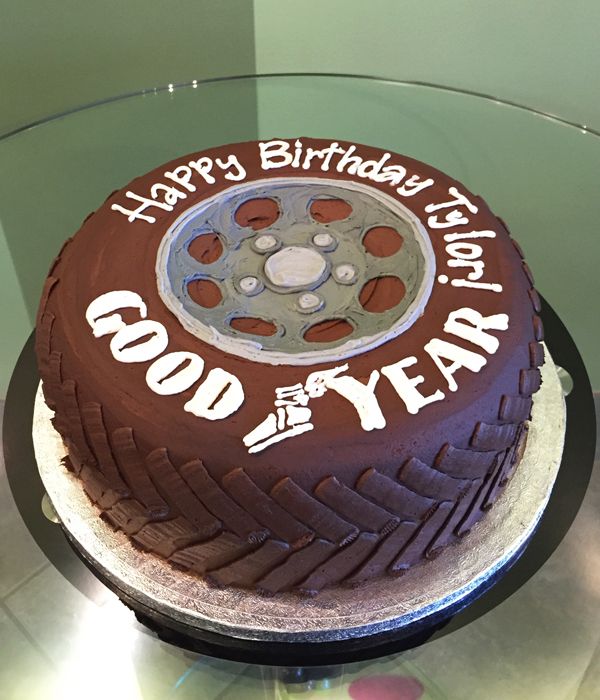 The real one is the one with only milk and sugar.
Pour hot invert syrup over the chocolate-condensed mixture.
This is what happens. Future beauty, by the way! :)
Trying to mix it up. This will be difficult.
Pour the dissolved gelatin in a thin stream, mix. Like chocolate, it is important not to overheat gelatin: at temperatures above 70 degrees, it loses its gelling properties.
Add dye. In the case of gel, a few drops are enough.
And again we try to mix. The photo shows that the mass does not want to become perfectly smooth and uniform, as it should be! There are, of course, craftsmen who manage to get by with a spoon...
… but that's not me :) So let the blender help me! Hold it at a 45-degree angle and try not to lift it above the surface of the glaze to avoid bubbles.
However, no matter how hard I try, I still always get them. Here, look at them, hatched.
But I know how to fix it - pass the icing through a fine sieve!
Actually, our colored mirror glaze is ready!
Glaze from this amount of products is enough to cover a mousse cake with a diameter of 20 cm.