Making your ATV run quieter is actually not all that hard to do. It all starts with the exhaust noise. There’s a few ways you can lower the exhaust noise of your quad that are pretty easy to do yourself.
Suppressing the sound your ATV makes is pretty popular among hunters, bird watchers, or anyone that wants to disturb the wildlife where they ride as little as possible. Others want a quieter machine to avoid bothering the neighbors or to comply with sound pollution regulations in their area. Whatever the case may be you have a few options available to quiet down the noise your ATV makes.
The most effective way to reduce the sound an ATV makes is to install an aftermarket ATV exhaust silencer on your machine. Other options include packing the muffler with sound dampening materials, installing a spark arrestor, or repairing any leaks in the exhaust or muffler system.
This is the preferred method, and you’ll see why later on when I talk about the other options out there. Getting and installing an aftermarket ATV exhaust silencer is so simple and straight forward, and suppresses the exhaust noise better than anything else you could do.
There are plenty of ATV exhaust silencer kits out there to look through. I suggest you start with this Silent Rider ATV Silencer on Amazon. It’s a bit more pricey than some of the other options out there, but well worth it. The Silent Rider makes many versions of this ATV silencer so you should be able to find one that fits your quad. They make it a custom fit for your machine and even offer a one year warranty.
If you’re a bit strapped for cash you could try this Universal Fit Kolpin Stealth Exhaust 2.0 with Heat Shield. Sure it’s about half the price of the Silent Rider, but it’s also about half the star ratings too.
Don’t be put off by that though, most of the complaints are about fitting issues. If you’ll be able to weld this on, you shouldn’t have a problem. The makers of this ATV exhaust silencer, Kolpin, claim there will be no loss in performance with this silencer. That’s a plus in my book.
If you’re trying to spend as little money as possible, you’re looking at the do it yourself approach. You could silence the existing exhaust by packing the muffler with sound dampening materials.
I don’t recommend doing this because you will be restricting airflow out of your engine and could cause overheating or other issues. Still, It’s a viable option if you need to quite the engine quickly and cheaply.
I would advise against using steel wool or anything of that sort because it will heat up pretty quickly in your muffler. Eventually blowing red hot pieces of steel all over the trail. Instead try using heat resistant insulation of some kind.
Sure, you could go into your attic and grab some fiberglass insulation to stuff in your muffler. That should work fine, but the best thing to use would be this Standard Muffler Packing Material, or something similar.
This is low down on the list because it’s not made to reduce the sound of your ATV exhaust. It’s intended to prevent hot debris from being blown out of your exhaust and catching the woods on fire. But, it does reduce the sound your engine makes a little bit.
If you’re going to use the ‘pack the muffler’ method, I highly recommend you make sure your ATV has a spark arrestor because the chances of high heat material getting shot out your exhaust is a lot higher.
It’s pretty easy to install a spark arrestor, and you can find them for around 20 bucks online. Here’s an HMF Spark Arrestor For Exhaust from Amazon to get your search started. As for the install, you simply take the end piece off your exhaust tip, put this on the end of the exhaust and reinstall the end piece.
This may seem like a no brainer but a lot of people don’t realize their exhaust system may have a crack or rusted out areas. If you’re trying to quiet your ATV because you feel the exhaust is overly loud, it may be as simple as fixing the existing exhaust system on the machine.
Check over the exhaust and muffler systems for any small cracks or rusted out areas. Get a flashlight and take care to get a good look, even a small hairline fracture could be causing extra noise.
This is another simple maintenance tip I’ve noticed not many people know about. If you already have an exhaust silencer installed on your quad, you may just need to repack the insulation.
Some ATVs come stock with a silencer on the exhaust from the factory that you will need to repack. You can use the same silencer packing material I recommended up above in the ‘pack the muffler’ section.
You should only need to do this every few years depending on how much you ride. It’s a simple process. Start by taking the exhaust silencer off the exhaust and disassemble until you have access to the material in the silencer.
Pull out all the old silencer packing material and clean the core. It doesn’t hurt to blow out the silencer with compressed air if you can. Install new packing material and reassembly the silencer. Easy as that, you’re done.
There you have it, there’s a few different ways to make your ATV exhaust quieter. I would start with inspecting your exhaust and muffler for damage, rust, and cracks to make sure you don’t have a problem before going through the process of suppressing your ATV exhaust.
If everything looks good, I would repack the stock silencer if you have one, or go ahead and buy an aftermarket silencer for best results. Install a spark arrestor for a little help with the noise if you don’t already have one.
In a pinch you could always pack the muffler, but remember, that could lower your airflow which will reduce your engine power or cause problems.
Sharing is caring!
There are many reasons why ATV owners want to quiet the exhaust noise on their machines. In this post, we’ll take a look at different ways you can achieve this.
We’ll also have a look at some pros and cons of quietening the exhaust, and how well it really works. This will allow you to consider whether the benefits outranks the downsides and to decide whether it’s worth it for you or not.
Page Contents
Adding an aftermarket silencer muffler is a simple and effective way to get a noticeable quieter exhaust sound.
The system consists of an additional muffler and mounts that install to your OEM system as an auxiliary exhaust. Installation time is less than 10 minutes (as long as you don’t have to fabricate mounting brackets), which means you can remove it or install it according to your needs if you want.
There are quite a few different brands out there that offer their take on this concept. They all work by the same principle; the exhaust has to pass through one extra muffler, stuffed with baffles and silencing materials.
One brand or model silencer may work well on some ATVs, but not so good on others. Make sure you read a review specifically for your bike before you decide on what type to get.
For example, some riders think the Kolpin Stealth is the best silencer available, while others report that it did not perform very well on their Polaris Sportsman XP 1000.
You’ll find model-specific mufflers that will bolt straight on to most major ATV brands. Or, if you don’t find one that’s made for your bike, you can opt for a universal model.
The universal models work just as well, but installation may require some modifications, and the final result may not look as stock as a custom muffler will.
What results you should expect varies a bit between the different brands available. But as a general rule, you should see an improvement of about 6-8db at idle. In some cases, you may see a reduction of as much as 10-12 dB when revving the engine at 2000RPM.
While 6-12db may not seem as much, it’s worth noting that an increase of 3 dB equals double the sound intensity. This means that a system putting out 99dB is 4 times more intense than a system that’s only emitting 93dB.
While the main purpose of spark arrestors is preventing forest fires, they also come with the added benefit of slightly reducing the sound output of your ATVs exhaust system.
The sound must pass through the steel mesh or baffles, breaking up the sound waves on their way out of the muffler.
However, do not expect drastic results from this simple tweak. You may expect results in the range of about 1-3dB reduction. On some ATVs, the difference with and without the arrestor is quite easy to notice just by listening.
Many stock exhaust systems already have a spark arrestor installed from when it was new. And if your bike is fitted with an aftermarket performance exhaust system or muffler, the spark arrestor may or may not have been included in the kit.
In some cases, you have to purchase it separately. It’s usually optional whether you want to install it or not.
Check out this post to learn more about spark arrestors, and how to find out if your exhaust system already has one installed or not.
The spark arrestor requires cleaning from time to time, so it has to be easily accessible. Installing a spark arrestor is therefore usually quite straight forward.
A simple spark arrestor made out of fine steel mesh.You may need to drill a hole or remove a couple of bolts, but that is usually about all it takes to install one. Just follow manufacturer’s directions or ask the dealer if you get stuck.
Inside some mufflers, you will find a fiberglass sound dampening material that helps to quiet the exhaust sound. I’ve seen this more often on aftermarket systems, but some stock system uses this technology as well.
Over time, this fiberglass material gets dirty, burns out and looses its dampening effect. So if your system is starting to have some age to it, you should consider removing the old stuffing and replace it with new.
All you need is some high temp silicone and some silencer repacking material that fits your muffler. Most manufacturers sell these as spare parts and it’ s recommend you stick with the OEM stuff.
The repacking process varies, but most manufacturers will provide proper instructions for four your specific silencer.
Some riders use steel wool or steel dish scrubs as dampening material inside their mufflers. This may result in some initial improvement, but it’s not an option that stands well over time.
It also comes with a significant fire hazard, which makes it an alternative I do not recommend.
What may happen is that the wool heats up until it gets glowing red hot. Then it gets tossed out of the exhaust as glowing red particles that can set dry leaves and such on fire.
Over time, oil and fuel may soak the steel wool. The glowing red particles may then cause the muffler to ignite from the inside.
When the steel wool burns out, it quickly loses it’s dampening effect as well. Not to mention potential rust issues.
Fiberglass handles the heat much better and will not glow from the exhaust heat. It is usually cheaper than steel wool as well.
If you are on a budget, fiberglass building insulation is a better alternative for stuffing material than steel wool because you won’t have the risk of incineration.
But the best option is always to get the OEM fiberglass mats. They are easier to install, won’t burn out as fast, and give the best dampening results.
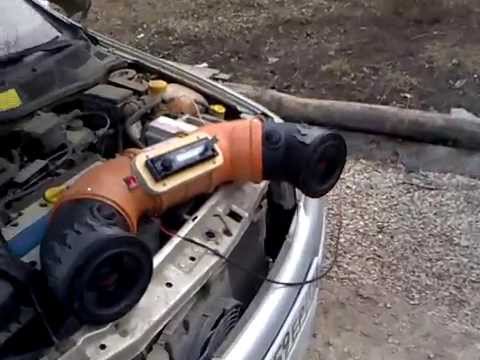
If you want to keep your costs down and don’t care too much about the aesthetics of your system, consider building a DIY extra muffler made from a car muffler. It installs behind the stock system, just like the muffler silencers that are specifically made for ATVs.
Car mufflers are cheap and usually have a good dampening effect. Your best option would be to buy a small size model that fits your bike. You will also need a couple of 90-degree bends of the exhaust pipe in the correct diameter, and some flat steel to make a mounting bracket.
You will also need a welder or a lot of clamps to connect the different parts.
You should be able to make a system like this for half or two-thirds of the cost of a bolt-on system if you can live with the looks.
Be aware that back pressure and power loss may become issues if you choose a muffler that is too effective.
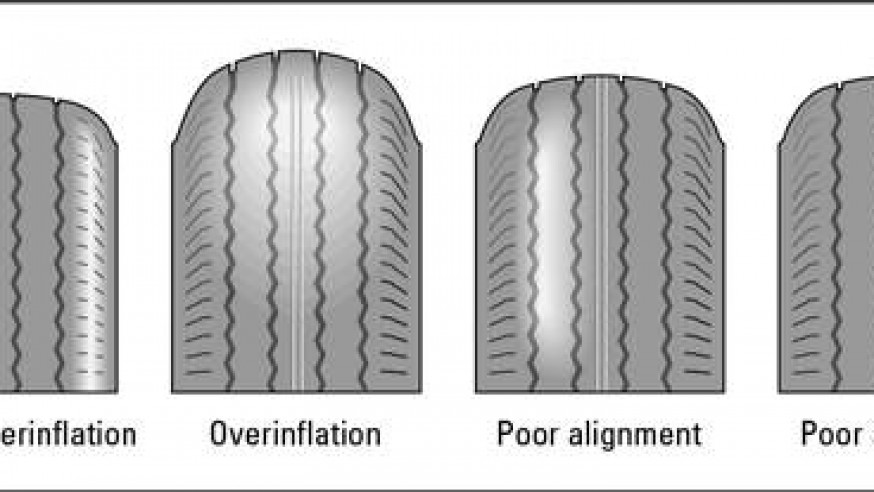
Even the smallest leak or crack can make your exhaust noticeably louder. It is common to experience shrill whistling noises when you apply throttle. Under deceleration, you may even get a backfire due to a change in backpressure.
The leak may be hard to spot, but start at the front and work your way backward.
Check all welds or joints between the different parts of the system extra carefully. The first few inches of pipe from the engine are usually most prone to leaks and cracks because of the big fluctuations in temperature.
Look for black zoot as it will be a sure indicator of a leak. Weld the leak or replace broken parts with new, and you should expect stock performance again.
Like any other part on the ATV, the muffler wears out over time. And when it does, it also starts underperforming.
The most common wear on mufflers is that the sound dampening internals either rust away, burn out or come loose. When this happens, it will no longer dampen the exhaust sound as it’s supposed to. You may also get rattling sounds like a nice bonus.
If you wait long enough, you may find your muffler completely gutted out, with barely any sound dampening effect at all.
Not only will this give you a loud exhaust, but you may also run into issues caused by reduced backpressure.
The easiest way to fix a worn-out muffler is obviously just to get an OEM muffler that bolts straight on to the bike.
But if you want to save a few bucks and potentially get a quieter system there are a couple of DIY alternatives you may look into.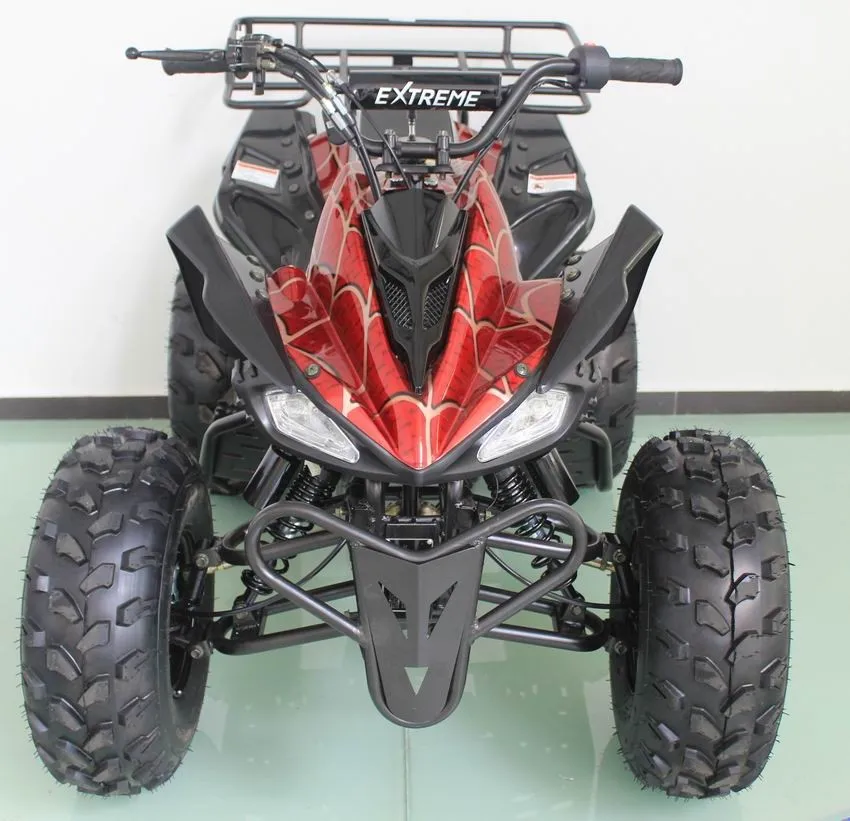
The first one is getting an aftermarket muffler silencer, intended to be installed at the end of your stock system.
Often you’ll find that these mufflers give a more silent system, even if you use it to replace the stock muffler. This option may, however, require some slight modification to make it fit.
Another cool option for silencing your bike on the cheap is replacing the stock muffler with a stock muffler from any Japanese racing motorcycle.
Owners of these bikes often replace their stock mufflers with aftermarket performance exhausts. You should be able to get your hands on the stock one at a very reasonable price or for free.
Modify it to fit your exhaust header pipe and mounts, and you should in most cases get a decent improvement in sound output.
Just remember that any time you create a DIY solution like this you are completely on your own if you run into any issues caused by a change in backpressure. We’ll look more into the potential risks involved further down this post.
Some manufacturers of aftermarket exhaust systems offer quiet core inserts that can be fitted to make the exhaust quieter.
The design if these inserts vary, but usually consists of a baffled or perforated pipe that fits inside the muffler. These core inserts often come in combination with a spark arrestor and/or a downwards facing pipe for directing the sound down to the ground.
Not all manufacturers offer these types of inserts, commonly named dB-killers. But it’s definitely worth checking out if you already own an aftermarket muffler, or if you’re in the market for getting one.
It may be hard to visualize how the system will sound when you are in the process of purchasing the new exhaust.
So if your brand new system ends up sounding louder than you were expecting, it’s good to have the option of installing a simple insert to make it a few dB quieter.
The dB killer inserts usually install in just a matter of minutes.
If there are no bolt-on quiet core kits available for your muffler, consider making one on your own. You should be able to achieve just as good or even better results as with the store-bought kits.
What you should do is to get inexpensive universal baffle inserts and fit it to your existing exhaust system. These inserts come in a variety of shapes and sizes. Find one that fits the diameter of your exhaust pipe.
Depending on your bike’s piping design, you can make it fit by disconnecting a joint and tacking it or bolting it in place inside the pipe.
Alternatively, you can make an extension pipe at the rear of your muffler, that contains the baffle insert.
This is probably the best (cheapest and least ugly) budget solution for those looking to make their stock exhaust a bit more silent.
This modification should work fine on most bikes for low RPM trail riding or utility work. For racing applications, it is likely not the best option. Just make sure you restrict airflow too much so that you build up back pressure that can damage your engine.
More on that further down.
This tip will not actually reduce the actual sound levels your system puts out.
But making sure the sound is being directed downward to the ground will have a big impact on how far the sound will reach after it has left your muffler.
With a straight muffler, the sound gets shot directly backward and can be heard from far away.
But if the sound gets directed straight down to the ground instead, the rough surface will act as an acoustic dampener. The sound waves ” break up”, effectively leaving them unable to reach as far.
To achieve this you simply install a sound direction pipe at the end of the muffler. A so-called down snout tip. This part is simply a small piece of bent pipe that changes the direction of exhaust flow downwards.
Most manufacturers offer this part as an option, or it may even be included when you buy the exhaust system. It should bolt-on in just minutes. And if you look around you will also find universal parts that may fit your exhaust.
As a final alternative, you can just buy a piece of 90degree exhaust pipe and weld it to the rear of your muffler.
If you need to get your exhaust quiet in a hurry, this may be the method for you. Get about 6 feet of flexible metal conduit (made for electrical wires) and connect it to your muffler using a simple clamp. Coil it up and use some steel wire to keep it in place.
This will eliminate almost all exhaust sound, but be aware that you may be restricting exhaust flow too much.
Use this only when in a pinch and only for low RPM riding.
This last tip is completely free.
Any time you find yourself in a place with a risk of disturbing others, simply drive gently until you are alone again. By backing off the throttle slightly you effectively reduce the exhaust sound to more manageable levels.
Now that you have a wide variety of methods to choose from, it’s time to decide which suits you the best.
Besides aspects such as cost, looks and the level of mechanical work involved in the installation you may find yourself asking questions such as;
The sound is widely recognized as the number one challenge by those who work hard to keep our riding trails open. A loud exhaust is also one of the major obstacles when looking to open up new trails to motorized recreation riding.
In later years, the problem has become even worse with large four-stroke engines entering the scene. These bikes tend to be a lot louder than the two strokes, especially when installing performance exhaust systems.
On one hand, you have ATV riders that just want to enjoy their trail rides in nature. They feel that others need to accept the occasional ATV passing by.
On the other hand, you have those that feel loud engine sound is completely ruining their experience of being out enjoying the silence of nature.
In-between you find a great number of ATV enthusiasts that are able to understand both points of view. These riders are frustrated with those that install screaming aftermarket exhausts on their big four-stroke machines just to achieve an almost unnoticeable power gain.
It’s not hard to understand why there is a conflict of interest here. And it really doesn’t matter which side you are on.
The reality is, that riders running loud aftermarket exhausts on open trails are contributing to heat up this conflict up to the boiling point. As a result, we see an increasing number of trails and riding areas being permanently closed.
Being allowed to ride on public ground is a privilege that is directly influenced by the opinion of the majority. On the private land, all it takes is to annoy the landowner, and the trail is closed.
It all comes down to upsetting fewer people. Over time, this strategy will increase the number of ATV trails and riding grounds available for us to enjoy.
Another great benefit of having a silent exhaust on your trail machine is being able to communicate with your passenger without having to scram your lungs out. After longer rides, you get home feeling much less exhausted as well.
It’s not only trails and open riding areas that are in danger of being permanently closed or heavily restricted because of sound issues. This is true for many race tracks as well.
Not all tracks are located out of reach from people’s homes and need to apply sound limitations so that they are allowed to stay open.
As a result of this, more and more manufacturers are now offering high-performance exhausts that keep sound output at reasonable levels as well. 96dB maximum sound level is becoming the norm. Some places even operate with lower limits.
If your goal with quieting the exhaust is to sneak past wild game completely unnoticed, you are most likely wasting your time and money. No matter how silent your exhaust is, most animals will pick you up long before you get within sight.
It is not only the exhaust which makes noise on your bike. Even when leaving exhaust sound out of the equation, the noise still present from your bike’s transmission, drive train, airbox, and mechanical engine noise is enough to make your ears ring.
Bikes with CVT transmissions are particularly noisy, where bikes with manual transmissions make for much better candidates as silent rides.
Even when riding an electric golf cart, the deer will hear you coming from far away. In addition, you have the smell from grease, oils, and exhaust that will blow your cover even if you were moving completely silent.
A quiet exhaust may allow you to drive closer to wildlife without scaring them away, leaving less disturbance in the hunting grounds. But they will still hear you coming.
Why bother using ATVs for hunting at all then?
As operators of loud forestry machinery and farming equipment will likely testify; the sound of their machines has never scared the deer away. How can this be?
The trick is not removing the sound and smell, but making the animal used to it!
All you have to do is take a few rides through the area in the last few weeks before the hunt begins.
Use the bike to check up on your deer stands. Use it to get to know your hunting ground by mapping out important spots such as water sources and food plots. Check your trail cameras.
Make all this a part of your season preparation routine and your riding will soon no longer be an abnormality that scares them.
On opening day you should be able to ride out with little chance of spooking them. In fact, walking in by foot will usually cause a lot more disturbance, than an ATV they are used to from before.
When you make modifications to the exhaust system to make it quieter you will alter how the exhaust gasses flow through the system.
When you add a muffler you make it slightly harder for the exhaust to pass. Therefore it will require a bit more pressure to blow the same amount of air through the system in the same amount of time.
If you restrict air flow too much, backpressure may start building up inside the engine. You may experience issues like misfiring, stalling loss of power and the engine running too rich. None of which are likely to cause any damage to the engine.
But you may also experience the engine running too hot, which is not something you want.
As long as you stick to a reputable brand of mufflers that design and manufacture their mufflers for each specific ATV model, you should have little to worry about. These usually add very little back pressure.
But if you decide on one of the DIY alternatives, you are completely on your own if you mess up. Making such modifications will most likely void warranty, so be careful.
It’s always a good idea to have the jetting checked or to get a fuel programmer when doing modifications like described in this post. You want to make sure the fuel/air mixture is still within acceptable limits.
Aftermarket muffler manufacturers will often claim that you do not need to worry about the jetting, and I have no reason to doubt that they know what they are talking about. But if you want to be completely safe, it’s worth having looked after.
More noice equals more power, right? This is not always the case anymore.
Both European and American manufacturers are now offering systems that are capable of keeping the sound output well below the recommended 96dB limit, without any power loss.
The tradeoff is usually that you get a physically larger and slightly heavier muffler. A small price to pay for keeping the trails open if you ask me.
And as long you stick to a reputable brand, you should have no noticeable loss of power by installing a muffler silencer neither. These systems add just about 2% of back pressure that will make very little impact on the engine performance.
In fact, you may actually experience a slight increase in bottom end power after installing the system.
Some of the DIY solutions, however, may cause some power loss, especially at higher RPMs. This makes such modifications best suited for hunting, Sunday rides or utility work.
If you’re into racing aftermarket systems are really your only good option.
It’s worth noting that if you ride at altitudes above 5000-6000 feet above sea level, you are advised to have the jetting adjusted for best performance. Some manufacturers will even offer specially designed systems made for high altitude riding, that will assure proper air flow and performance where the air gets thin.
An exhaust muffler silencer can reduce the sound level of an ATV exhaust by up to 60%. It dampens the popping or crackling sound from the engine backfiring and changes it to a lower pitch rumble. The actual sound reduction depends on the brand of silencer and ATV engine size.
Winter is coming. But who said you can't ride an ATV in cold weather? In fact, frost will only be a hindrance if proper precautions are not taken before setting out on a day's journey.
ATV owners don't usually store them in their living quarters where they can stay warm. Even a domestic cat moves from the garage to the house on cold nights, but what about an ATV? Cars usually stay outside, but that doesn't mean they can easily endure the cold. But the temperature in a garage or under a shed very often drops below zero, especially when the mercury column in the thermometer shows -12 degrees outside.
Sometimes severe frosts come before the first snow. Therefore, it is possible that during the first winter trips on an ATV, the roads will be clean. However, do not think that starting the engine in such weather will be as easy as on a 26-degree summer day. ATVs don't like cold weather more than their riders.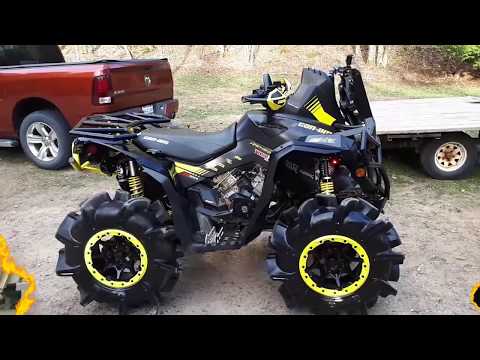 They require proper warm-up before opening the throttle. So if you're itching to get outside and your ATV is in the garage, we recommend that you complete the following checks and take action before heading out into the searing cold of the outdoors.
Like a car, ATVs are also difficult to start in the cold. Fluids get thicker, spark plugs don't spark, and manufacturers don't make motor oils with -5w-30 specifications. Don't be surprised if you get a "hard start" where the engine starts with some effort and its running sound is unusually harsh until the oil has lubricated all the components.
Engine overheating is usually a big concern for drivers, especially those who race and forget to add antifreeze to their coolant. But for those who ride all-terrain vehicles in nature, to remove snow or hunt in cold weather, antifreeze is necessary. Chances are they already use the recommended antifreeze for their cars.
After starting, there will be no problems with engine operation in cold weather. However, if the coolant is of poor quality, contains too much water, or is not certified for low temperatures, it may freeze if the ATV is stored in freezing temperatures. Even more problematic is the expansion of the freezing liquid, which can cause serious damage to individual engine components made of non-ductile cast aluminum and steel. Cylinder walls and water jackets containing engine cooling fluid may be damaged.
Before starting the ATV, check the coolant to make sure it is not frozen. If this happens, you should not start the engine. You need to melt it and replace it. Frozen fluid will be spoiled, and if you continue to use it, the engine will overheat. To avoid freezing of the coolant, it is recommended to replace it immediately after the summer season by adding antifreeze, which protects against freezing and overheating.
Note: Most known refrigerants will not freeze, at least at temperatures slightly above freezing. But for harsher, more extreme weather conditions, a refrigerant with antifreeze is required.
Even if the ATV is not used in winter, it is best to replace the old coolant with new antifreeze fluid to avoid any problems during winter storage of the vehicle.
Don't be surprised if the suspension feels a bit stiff at the beginning of the ride. You don't have to worry - this is normal. Keep moving on. The suspension will not work properly until the thick fluid is heated. It will return to normal after approximately 10 minutes of driving.
Although this is rare, it is still possible. The engine may stall in cold weather if the throttle is turned off too soon after starting. This is called a cold engine failure. Ice-cold oil cannot provide the required lubrication immediately. Therefore, even after the engine has started, it is necessary to let it run at low speed for a while until the oil warms up before increasing the speed. It's like starting an engine without oil: all unlubricated parts will quickly seize up without proper protection.
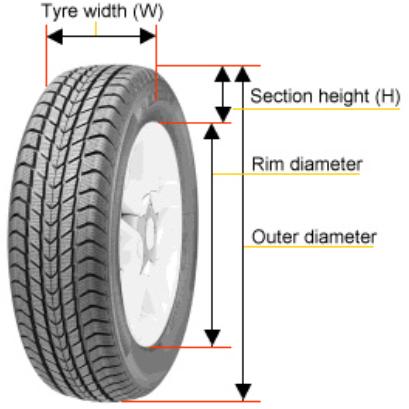
Don't expect tires to perform well when you ride in the cold. Like the suspension, the tires will soon warm up and start functioning properly, but it will take some time. For every 10 degrees change in temperature, tire pressure changes by about 0.07 atm. It is necessary to monitor the pressure and inflate the tires as needed. But after some driving time, you should perform this check again and make sure that the tires are not subjected to excessive pressure, since it can increase by 0.2 atm.
The operation and life of the engine directly depends on the quality of the fuel mixture. The carburetor is responsible for the preparation of the composition, but after prolonged use of the equipment, the settings “go astray”. This results in:
Many riders who decide to buy an inexpensive ATV simply do not spare the technique and ignore this procedure. But even if you plan to change your device in 1.5-2 years, adjustment is needed. The reason for this is increased fuel consumption. A quad with an untuned carburetor "eats" 30-40% more gasoline, and these are tangible costs.
So how do you adjust the carburetor on a Chinese ATV? For this you need:
However, it is important to remember that all adjustments are made only with a "clean" carburettor. This means that the rider needs to remove all the dirt from the node and flush the system to remove condensation and sediment from it.
Note: Just before adjusting, the engine must be warmed up to operating temperature.
To set the carburetor idle speed, the float chamber must first be cleared of fuel. To do this, start the ATV, close the fuel cock and wait until the machine stalls (5-10 minutes). To speed up the process, you can take a little ride on the quadric. Of course, gasoline can be drained, but in any case you will have to warm up the device, so the first method of "removing" gasoline is more effective.
Then:
Read the manual before adjusting the carburetor on a 125cc ATV to be sure. Remember that the location of the bolts is different in different devices, so read the documentation in advance.
To evaluate the quality of the fuel composition, make a test run. After that, unscrew the candle, and evaluate its condition. If it is:

Also look out for these "symptoms": damaged tip (failed electrode), oil deposits (damaged rings and caps), chips and inclusions (sign of a broken motor).
To adjust the mixture you need to twist the needle cover and pull it out. To get the needle, pull out the cable. After that, move the ring in the required direction (lower - more air, but less fuel and vice versa). Then start the engine and make sure it doesn't stall.
The last step in adjusting the 125cc ATV carburetor is adjusting the gasoline level.