Common Tread Supreme Ruler Lance made one of his regular sojourns to ZLA headquarters in Philly from his lair in Ohio in early fall. Although he was up for the trip, his tires were not. His rear Dunlop had seen better days, so he took a little detour up the hill to Lemmy Mountain for some tire attention before making the ride home.
Our first order of business was to eat the doughnuts Lance brought, washing them down with coffee. If you’re swapping tires before 9 a.m., we recommend you do the same. (If it is after 9, please swill beer instead.)
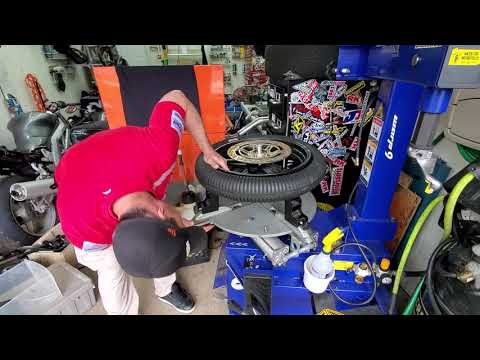
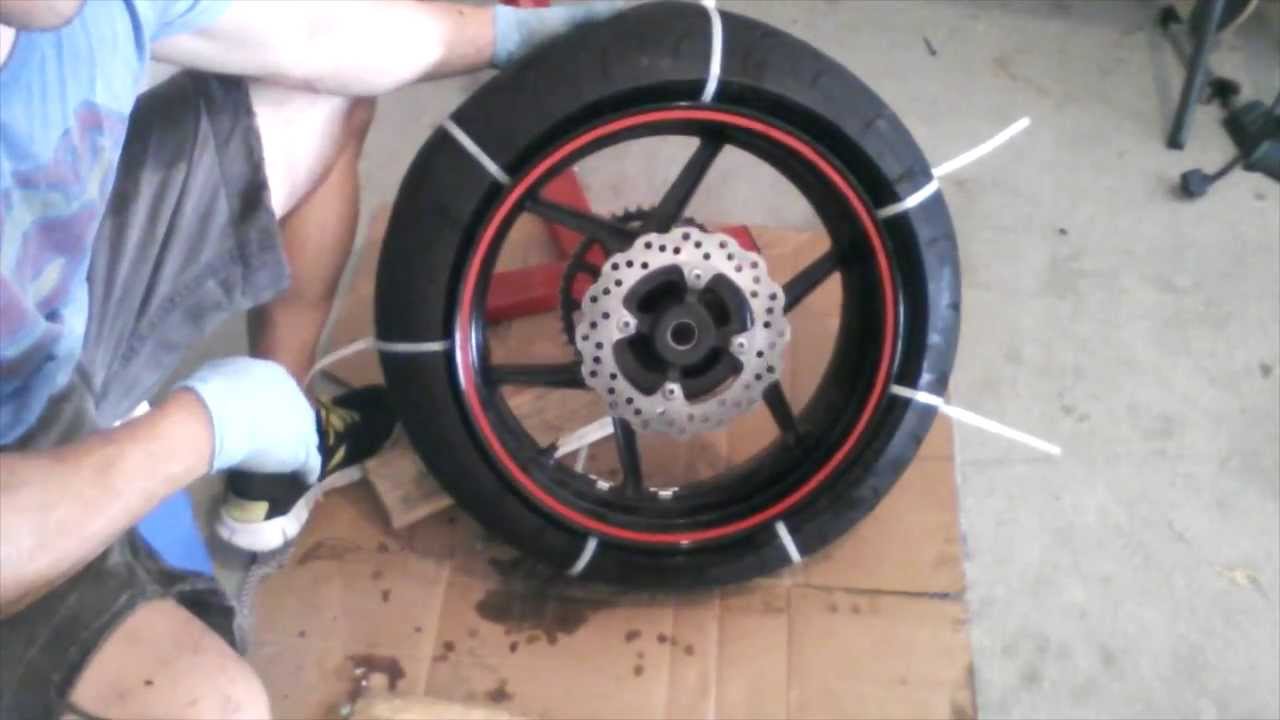
For some reason, we don't always feel comfortable handing off our tire-changing jobs to the "professionals." Photo by Lance Oliver.
Lance's editorial comment #1: Lemmy likes to dive right into a job, but I like to think about the meaning of it all. Such as why do I always change my own tires? There are a couple of good reasons. First, you can save money by buying your motorcycle tires from RevZilla at a good price, probably better than what your local shop charges. Plus, you'll save the fee for changing them. With shops charging $20 to $40 per wheel, the equipment you buy to do it yourself will pay for itself before long. The second reason is that you'll save yourself some time, and that's even more valuable to me than money. I can change my own tires faster than I can make an appointment, take the wheels off the bike, take them to the shop and wait for someone to do the work. I do it on my own schedule, when it's convenient for me.
I should also specify that everything here is about changing tubeless tires. If Lemmy ever gets out and rides his neglected Honda XR650L enough to wear out the OEM tires, maybe I'll be able to get him to do a how-to on changing tube-type tires. Now I'll hand the mic back to Lemmy...
Too many trips across Pennsylvania flat-spotted this rear tire. Before making the 475-mile trip home, Lance wanted a new one. We used jack stands to raise the bike. Photo by Lance Oliver.Our first task was to get the rear end of the bike up in the air. There’s lots of methods for lifting a scooter: bike jacks, ratchet straps to overhead rafters, centerstands, wheelstands, you name it. I’ve even changed tires with a bike frame up on a log before, and I’ve laid them on their sides as well. Be creative, but be careful. Lance set his bike up with a pair of swingarm spools at some point, so we just picked up the machine and put it on some plain old automotive jackstands. We did loosen the axle nut slightly while the bike was still solidly on the ground. No need to torque on it after it's raised.
Lance's editorial comment #2: I have the swingarm spools because at home in my own garage, I'd quickly and easily raise my Versys on my rear stand. Since Lemmy only rides Shovelheads, choppers of muttly lineage and other odd junk, to which no one has ever fitted swingarm spools, he didn't have a rear stand. The jackstands worked just fine.
Next, we loosened the chain adjusters so we could slip the chain off the sprocket, and then slid out the axle. Keep track of the order of the axle hardware, especially wheel spacers. If you fail at this step, you have to put together a little jigsaw puzzle when you reassemble everything.
Lance's editorial comment #3: My tip: I like to put the spacers back on the axle in the proper order and put the nut on loosely. That keeps me from forgetting what goes where and misplacing any pieces. Plus, make a note of where the brake caliper mounting bracket fits into the scheme.
Lemmy uses a drift to coax out the axle. Photo by Lance Oliver.
Rather than let the brake caliper's weight dangle on the brake line, Lemmy suspends it using a bungee cord. Photo by Lance Oliver.Before sliding the axle out, I like to put a little chock of wood under the tire being removed to hold it up. Then I use a drift punch to drive the axle out of the wheel. If you’re doing a front wheel, the process is the same (don't forget to loosen the pinch bolts at the bottom of most fork legs), but you will probably have to remove both brake calipers to remove the wheel.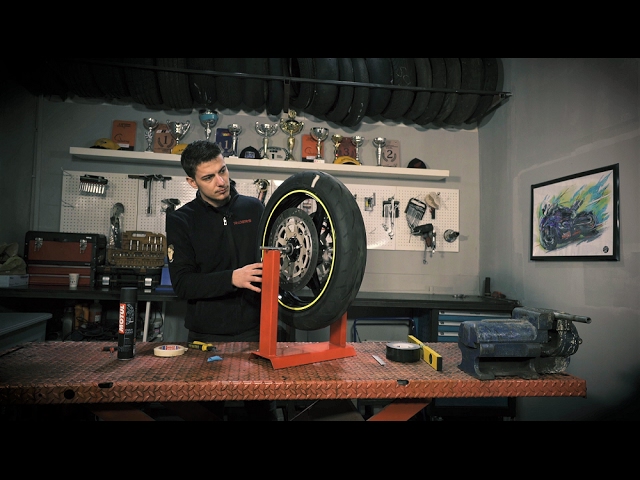 Wire the calipers up out of the way. Don’t let them dangle by the brake hoses.
If you’re so inclined, now is the time to check those wheel bearings. If they feel gritty, repack or replace ‘em! Don’t forget to check the brakes while you’ve got them off, as well.
Deflate the tire by removing the valve core with a valve core tool. After the air has made its exit, it's time to break the beads. There are a multitude of ways to do this, but we elected to use a manual bead breaker. It makes quick work of an otherwise-difficult job.
This bead breaker tool Lemmy has works well. A variety of tools, from clamps to levers and wedges, are available for the job. Photo by Lance Oliver.
Lance's editorial comment #4: Breaking the bead can be the hardest part of the job, in some cases. The tool Lemmy has worked like a charm. At home, I have a Harbor Freight changing stand I bought years ago. It has its drawbacks and doesn't get much respect from tool aficionados, but it has a bead breaker that works well, and that alone makes it worth its cost, to me. There are some other nifty tools that don't cost a fortune.
After the beads are broken on both sides, it's time to begin pulling the tire off the wheel. This part of the job is more of an art than a science. Everyone seems to find their own way of doing things. I like to work on old squares of carpet to keep from beating the tar out of the finish on the wheels.
Lemmy gets down there with the wheel, like an old-style wrassler. Photo by Lance Oliver.
Lance's editorial comment #5: Although it was mildly alarming to watch Lemmy battling my wheel and tire on his knees like an Everglades 'gator wrestler, I have to admit his methods got the job done. Personally, my knees have a lot more miles on them than Lemmy's and I prefer to work standing up. Plus, having the wheel clamped to a stand makes it easier to avoid the possibility of putting pressure on a brake rotor. If you do use the Lemmy method, keep the rotor side up to avoid leaning on it.
There are ways to make your own tire-changing stand, if you're lacking funds to buy one.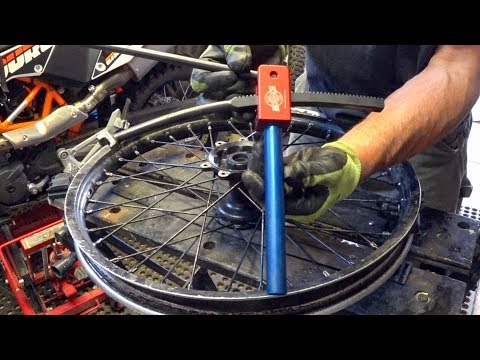 I've seen some good homemade tire-changing setups created with a few dollars of materials: A discarded car wheel with a section of old garden hose sliced lengthwise and put on the wheel's rim for rubber protection, and a threaded rod in the center to clamp your motorcycle wheel to the car wheel. My store-bought tire-changing stand is another option. If you're ready to pay more, I've seen people change tires in a flash without breaking a sweat using one of those fancy (and pricey) No-Mar changers.
The job will go easier with the right tools. Use tire lube. They make this stuff for a reason — it works! It helps with de-mounts as well as mounting, and protects the bead from rips or tears from the tire irons.
Use dedicated tire spoons. I’m not going to kid you and say I’ve never fudged it with the wrong tool, but I’ve also ruined some wheels half-assing the job alongside the road in the middle of East Jabip. Rim protectors are a great idea if you want to keep your wheels looking good. If you think I’m just pitching stuff we sell, let me dispel that notion: You can easily cut up old milk jugs, or you can use College Lemmy’s impromptu rim-saver: heater hose scraps filched from the auto parts joint.
Removing the tire is prolly the trickiest step. Use the spoons, take your time, and as Lance kept reminding me, “Take small bites!” He’s got a great point. I have a habit of getting greedy. I try to de-mount the whole dang tire at once, and it never works. It bends the spoons, makes my arms sore, and puts the delicate beads at risk. Work smart, not hard. Do little sections of bead at a time and don't forget the tire lube.
With one bead off the wheel, it's easy to see the drop-center and understand how it makes this whole process possible. Photo by Lance Oliver.Here's the most important thing to remember. The act of levering the bead over the rim lip only can happen if the bead is in the “drop-center” on the opposite side of the tire. The drop-center is the shallow channel that runs the circumference of the wheel at the center and it makes the whole process possible.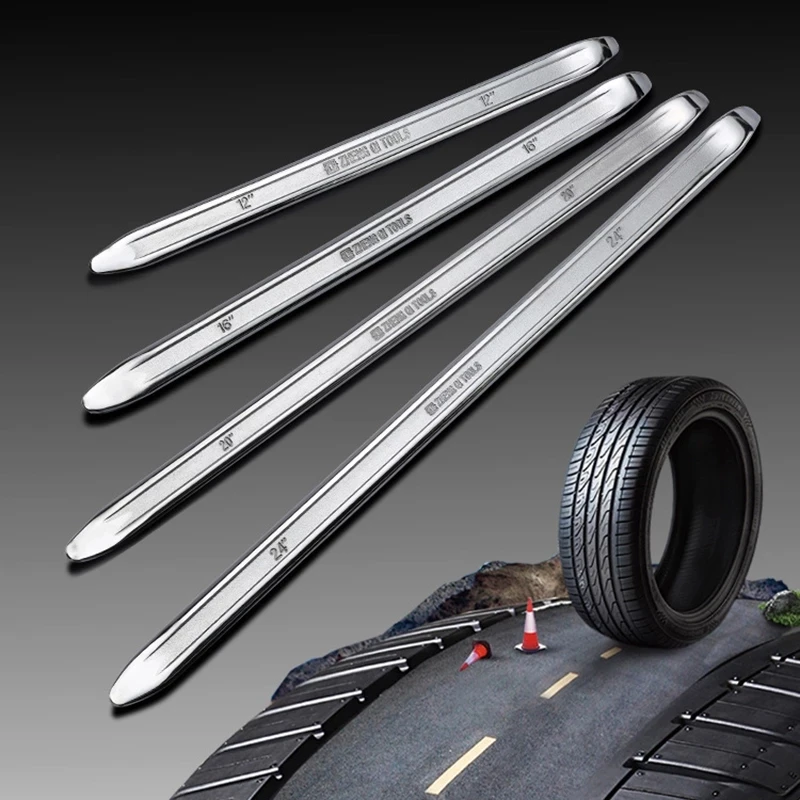 If you're having to use excessive force and still can't get the bead of the tire over the lip of the rim, your problem is that the tire bead is not in the drop-center.
It can be difficult because the tire doesn't want to stay in the drop-center. I typically kneel on the tire to keep it where I want it. At this point, after a few bad words, you should have one bead free of the tire. Repeat the process on the other bead, but the same side of the wheel.
Lance's editorial comment #6: I find that having a couple of different shapes of tire irons makes the job much easier. I have one long iron with a nice bend in it that's almost indispensable for that first grip on the second bead, which is harder to access than the first.
With the tire off, I give the wheel a visual inspection, and then replace the valve stem. You can either pull the old one out with a tool or just cut it out. Lance didn't have a replacement valve stem ready, so we reused the same one. You can do that, but replacing it is cheap protection.
Almost done. Rim protectors keep wheels from getting marred by tire irons. Photo by Lance Oliver.Using the directional arrows on the sidewall, check and double-check the direction of the new tire relative to the wheel. Nothing is worse than mounting it backwards and having to do the job twice. Be generous with the lube and slather the new tire’s beads. Installation of the new tire is much the same as removing the old one. Again, “take small bites” and be sure the opposite bead is in the drop-center of the wheel. If there's a small dot of paint on the sidewall, that's the balancing mark. Line it up with the heaviest part of the wheel, typically where the valve stem bolts in (see balancing section below).
Once the tire is mounted onto the wheel, you need to seat the beads. Remove the valve core from the new stem so you can inflate it faster. A large air compressor will have enough oomph! to blow the beads of most tires onto the wheel, but there are always kludgy exceptions. If your compressor’s not doing the job, there are a number of redneck ways to make the tire assume its new home. I’m not going to claim that I’ve never used ether to blow a bead onto a wheel, but I sure am not recommending anyone else do it. Bead seating tools (also known as Cheetahs) are much less dangerous. Watch your fingers during this step! I have pinched the ever-livin’ bejesus out of myself by getting my finger too close to a bead that was about to seat.
Lance's editorial comment #7: Lube is again your friend when trying to seat the beads. It encourages the bead to slide into its home and, because it is liquid, it will create tell-tale bubbles to show you where air is escaping, instead of inflating your tire. Sometimes pressing on the tread next to the spot where air is escaping past the bead will be enough to get that satisfying and loud "pop!" you're seeking.
With the bead set, replace the valve core and adjust the inflation to the correct pressure. If you are the balancing kind of fellow, now is the time to do so. (Lance and I have similar views on balancing tires. We don’t.) Please don’t leave murderous comments about balancing. I encourage everyone to do what they feel is best with regard to tire balancing.
Lance's editorial comment #8: Uh, actually I've been known to balance tires, especially front ones and especially on a bike I'm going to take to the track and ride at higher speeds, where a vibration can show up that I never felt at street speeds.
Static balancing isn't hard. One of these balancing stands (or a homemade alternative), some stick-on wheel weights and some patience are all you need. The good news is that quality control keeps getting better, and more often these days I find tires need little or no weights to be in balance. You can also use your balancing stand on your wheel alone to determine if the valve stem area really is the heaviest spot on the wheel. That lets you know where to line up the balancing spot on the tire.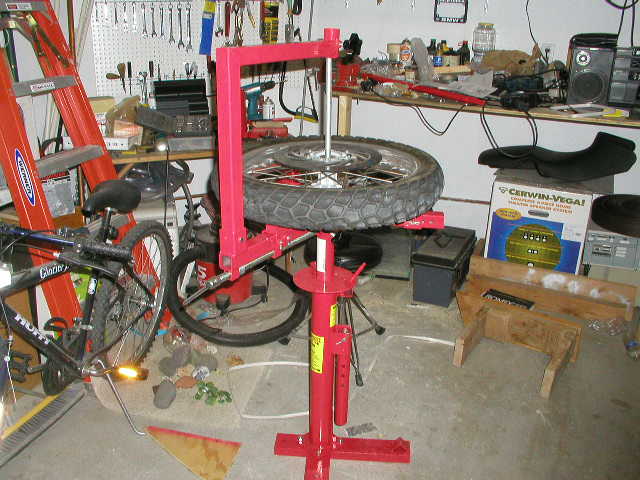
With the chain back on the sprocket and the spacers and brake caliper bracket lined up in place, it's time to slide in the axle. Photo by Lance Oliver.
Lemmy's editorial comment #1: This guy sure has a lot of advice to dole out for a guy with clean hands, doesn't he?
At this stage of the game, you ought to be ready to reinstall your wheel. I put that chock of wood back in place to hold the wheel up. Reinstall your caliper (or brake assembly, if your bike has a drum brake), get all your spacers lined up in the right spots and slide the axle back in. Leave the axle nut slightly loose while you adjust the tension on the chain. Snug everything up, check the chain tension again (the chain on Lance's Versys gets tighter when you torque that axle nut), check to make sure the rear wheel is straight by sighting down the chain, lubricate the chain, put a new cotter pin in the castellated axle nut, and go ride! (Carefully, of course, so you can scrub in that new tire and make sure you have everything snugged down right. And don't forget to pump up the brakes before you ride.)
As a parting thought, keep your head about you if this is the first time you’re changin' tars. Even thousands of tires later, these things still get me riled up. Beads don’t seat, tires won’t get onto their rims. It's always something. Patient and methodical work gets the job done, so don't get discouraged!
Wait-time and availability for mounting varies by store. We will always make an effort to change your tires while you shop, but from time to time there may be a wait-time due to staffing and/or tire service volume so please call ahead and talk to your local store Team before stopping by.
To find out if tire mounting services are available, contact your nearest J&P destination store.
Pricing per tire when purchased from J&P Cycles (online or in store) or one of our partners (discount code required):
Pricing per tire when purchased from other vendors:
Our tire mounting services include:
In preparation for your visit to our stores for our tire mounting services:
Please Note: For maximum riding enjoyment and safety, all rims that require tubes will require new tubes when new tires are installed. Tire tubes degrade over time (chafe, become thin, air valve stem rust and crack) and are more prone to failure. Any tire installation performed at a J&P Cycles location will require replacement of the tubes for safety purposes. Additionally, all tubeless rims will require the rubber air valve to be replaced when new tires are installed. Like tire tubes, rubber air valve stems degrade over time and will leak air. Any tubeless tire installation performed at a J&P Cycles location will require replacement of the rubber air valve stems for safety purposes. Exceptions are steel air valves stems and TPMS (tire-pressure monitoring systems). Tires for rims with a diameter smaller than 15" (fifteen inches) or larger than 21" (twenty-one inches) cannot be mounted due to tire machine limitations. Tires wider than 200mm (two-hundred millimeters) cannot be mounted due to tire machine limitations.
Tire pressure
Sooner or later, the owner of a motorcycle is faced with the need to replace the rubber on the disks of his steel horse.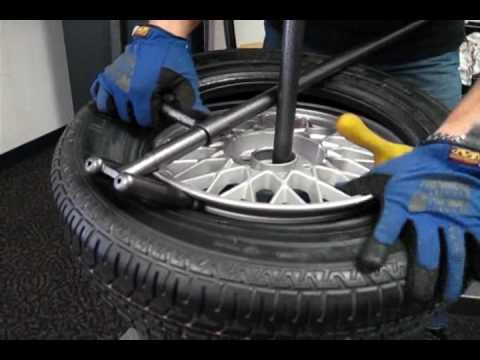 Doing it yourself, even if you have never encountered this problem before, is simple. But one important point should be taken into account - balancing motorcycle wheels, which is almost impossible to do with your own hands. So what to do when you can handle it yourself, and when to resort to the help of specialists?
A motorcycle is a very versatile vehicle, depending on its type, tires with different treads can be used. Rubber for modern two-wheeled vehicles is:
Rubber of this type is purely civil, designed to be able to move at an average speed on public roads. The tread has the necessary number of sipes to ensure reliable grip even in heavy rain.
Road-sport tires warm up quickly, allowing the rider to maintain increased speed with confidence. This comes at the cost of reduced maneuverability in the rain.
Touring motorcycle tires allow you to feel good on the pavement, but not be afraid to move off it if necessary.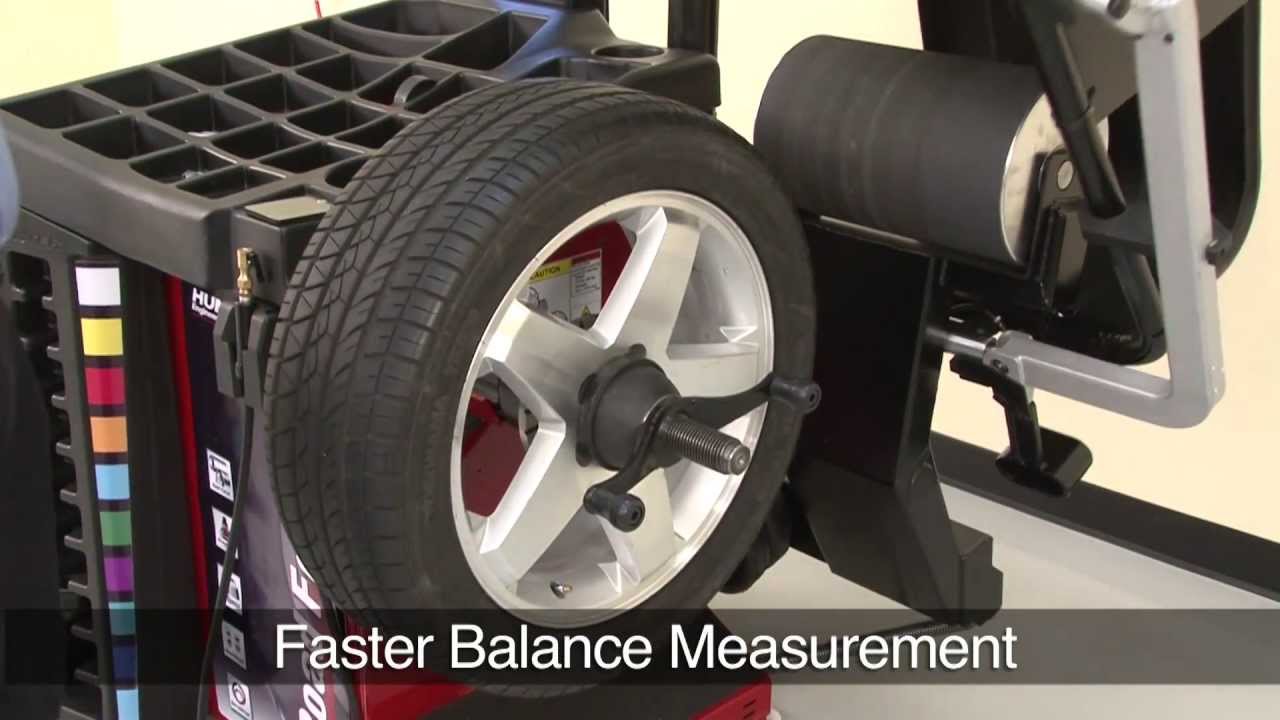 Here the tread has a clear uniform pattern, the directionality of which is designed to facilitate movement in the mud.
Real off-road tires behave very badly on asphalt, they are “noisy”, uncontrollable in the rain. But the directed grooves of the tread are able to “gnaw” the ground, self-clean from dirt, and allow you to get off the road.
The type of tires is selected based on the conditions of use of the motorcycle, its power, season.
You can learn more about tire marking HERE, and how much to pump according to the motorcycle model HERE!
In the operation of motor vehicles, a characteristic feature is that 99% of their owners do not ride in winter, therefore, with the change of season, tires are not replaced on a motorcycle. Although studded tires for motorcycles are produced, they are not very popular. Based on this, the change of rubber occurs in several cases:
Tire rupture or puncture is especially dangerous if tubeless tires are used on a motorcycle, the wheel may explode, which is fraught with loss of vehicle control.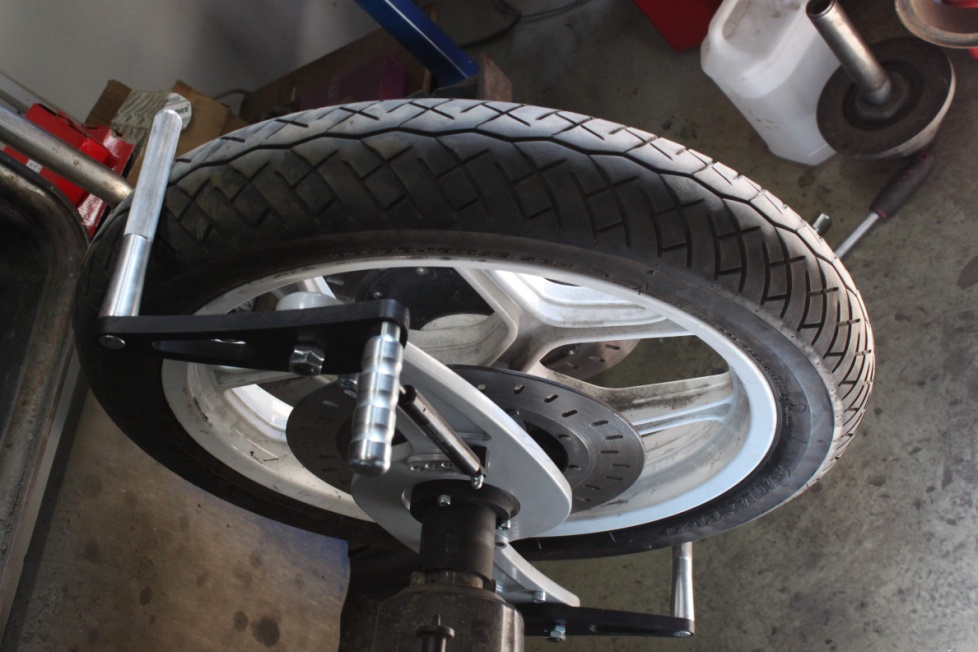 The reason for the appearance of cracks is usually driving on road tires over rough terrain, or driving onto curbs, steps, etc. And regular loads and high mileage contribute to an increase in cracks, which leads to the fact that the tire becomes unusable.
Due to natural aging, tires must be replaced when the motorcycle has not been used for a long time. Such wear of rubber contributes to a long downtime on flat tires, or riding a motorcycle with overload. In the latter case, the tire at the point of contact with the road takes an unnatural shape for it, “breaks”.
Tread wear limits for each tire model are prescribed by the manufacturer. At the same time, for different models, depending on the type of tire, this value can be radically different. Therefore, when choosing wheels for your motorcycle, it is worth making allowances for the likely riding conditions. It must be remembered that traffic rules regulate the minimum allowable limits for the remaining tread. Thus, the height of the tread pattern for legal movement on public roads should not be less than 0.8 mm.
1. To replace tires, you will need a very simple set of tools, tools, which are best purchased once and then used as needed. First of all, in order to pry the rubber, you will need a mount, and preferably two, since it is much more convenient for one, without an assistant, to be controlled by two.
2. A soapy solution will come in handy, it will help put the new rubber on the rim, make it easier to “pull” the old one off it. Without it, you can accidentally break the tire, if the old one deteriorates, then it's okay, it will be a pity for the new one.
Soap and water must be mixed in unequal proportions to form a thick liquid.
Special lubricants can be used instead of a soap solution, but this is not really practical, they are much more expensive, and they are needed every few years.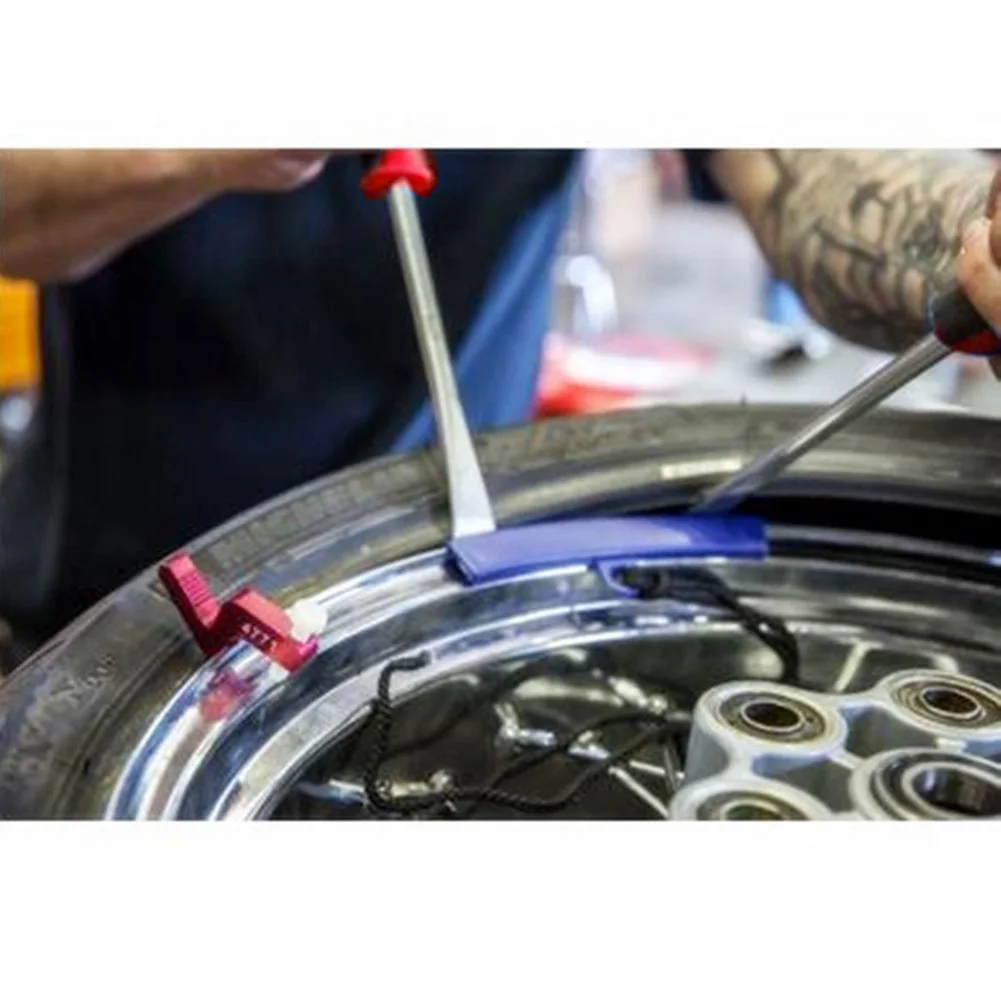
3. In addition, you will need a special cap to unscrew the nipple, quickly release air from the wheel.
4. You also need the usual set of tools. Replacing wheels on a scooter or motorcycle is more difficult than on a car, where 4-5 bolts need to be unscrewed to remove the tire. Here you have to tinker, it is advisable to get instructions from the manufacturer for the correct analysis of the necessary nodes.
If you briefly go through the tire replacement algorithm, it consists of the following items:
Now, in order. First of all, you need to deal with removing the wheel from the motorcycle, you have to change the rubber on the front and on the rear wheel. It is better to first pay attention to the factory documentation, so as not to spoil something out of ignorance. It must be borne in mind that removing the front disc is easier than the rear one, for this you do not need to dismantle the chain and other drive mechanisms. Let's take a look at the front wheel as an example.
Motorcycle tire replacement.
The first step is to loosen the wheel axles while the vehicle is still on the ground. After that, you need to put the motorcycle on a kind of stand so that the front part is hung above the ground. In this case, the bike must be firmly fixed to prevent it from falling while it is standing without the front wheel. Next, you need to carefully unscrew all the fasteners, dismantle the disk with the tire from the motorcycle.
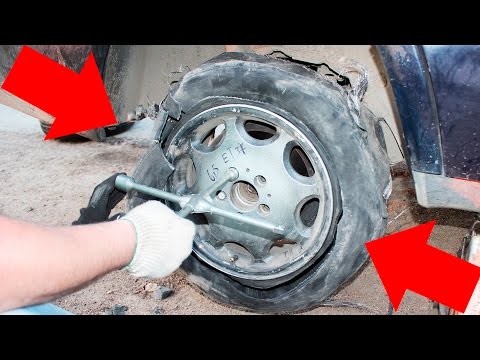
The next step is to release the air, in order to do this you need a special cap, on the other end of which there is a “fork”. She can unscrew the nipple from the valve of the chamber or tire. After the air is deflated, you can proceed to dismantle the tire from the disk. Separating the flat of the tire from the rim can be tricky. If the rubber is no longer subject to use in the future, you can gently tap it with a heavy hammer, or simply “kick” it with your feet. Doing this is important so as not to damage the rim.
Do-it-yourself disassembly.
After the tire still "unsticks" from the rim, take a pry bar and pry it, but this must be done carefully, otherwise the disc may be damaged. It's ideal here to have a second pry bar so that you can go around and take the tire out. Having done this, carefully remove the camera, try not to damage it. After that, you can again go around the mounts in a circle to finally remove the rubber.
First of all, if the wheels are spoked, check the condition of the rubber that protects the tube from the spokes, replace if necessary. On a new tire, you need to pay attention to the tread of motorcycle tires, find an arrow that indicates the direction of its movement. There is also a mark that shows where the camera nipple should be located. Lubricate the new tire liberally with soapy water, fold one edge over the rim, then insert the tube, lay it down, straighten it and then start the second edge. Now screw the nipple back into the valve, pump up the wheel and assemble in the reverse order. The tire pressure values are usually found somewhere on the motorcycle plates. The final tightening of the fasteners should be done on a motorcycle already installed on the ground, it is absolutely impossible to do this on weight.
Inserting the tube into the tire.
If the wheel has been in use for a very long time, separating the rubber from the rim can be a very difficult task. At home or in the garage, you can try to take any action, use the tool, but what if the repair needs to be done on the road? It is unlikely that there will be a mount for repairs with you, you will have to ask for help from passing cars. If you are traveling not alone, but with a company of motorcyclists, here you can apply a kind of "life hack". You need to open the footboard of another moped, put it on the rubber of the removed wheel, using it instead of a mount.
Alloy motorcycle wheels, especially those with spokes, bend extremely easily when hit by bumps in the road. You need to be aware that a severely deformed rim cannot be repaired, it is better to replace it. And it is generally not recommended to repair spoked motorcycle wheels on your own, because you may encounter such problems:
Non-repairable motorcycle wheel.
If there is a desire to repair spoked wheels on your own, then you should understand that the ideal - "zero" - radial runout may be unattainable, and you need to focus on generally accepted tolerances:
 2 - 2 mm for choppers, enduro and domestic motorcycles ;
 The whole point of the adjustment is to change the position of the rim relative to the wheel hub by shortening or lengthening each spoke. You need to understand which of them are subject to adjustment. To change the length of the spokes, you will need a special wrench and a stand to check the runout. Having fixed the disk in it, you need to place a piece of chalk next to it and turn the wheel. Where the chalk leaves a mark on the rim, this will be the most protruding area, although on a heavily deformed disk the “eight” will be visible to the eye.
Spoked motorcycle wheel.
Now you need to loosen the spokes on the side that does not have a mark, and on the opposite side, tighten them. In the central part of the deformed arc of the rim, tighten the spoke by 4-5 turns and, moving in both directions, tighten each of them a quarter of a turn less. After that, you need to check whether those weakened knitting needles have stretched by themselves, on the other hand. If not, the tightening must be repeated in the same sequence.
After all the steps, you will have to put the wheel back into the stand and check how the situation has changed. You probably won't get it right the first time. It should be borne in mind that for such actions you will have to disassemble the wheel, disassemble the motorcycle, all this will take a lot of time. If you need a scooter every day, and you have never encountered such a repair before, then it is definitely better to turn to specialists so as not to waste your time in vain.
DIY needle adjustment.
There are pros and cons both in independent replacement and when contacting specialized motorcycle tire shops. The positive points when replacing with your own hands are:
However, there are obvious disadvantages.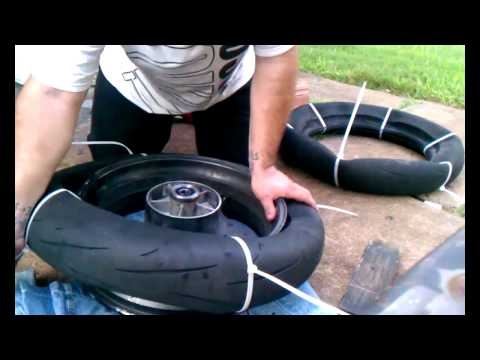 Firstly, you will have to spend more time, especially for those who do it for the first time. You also need to buy all the necessary tools. And if there is no garage or other premises, then you will have to do it on the street, which is not very convenient. And the biggest disadvantage is that you don’t have a wheel balancing stand in your garage, and you won’t be able to make a full and high-quality tire replacement. However, there is one important point - unlike a car, a motorcycle does not have a spare tire, and on a long journey, the experience of replacing it yourself will be very useful.
On the other hand, by turning to professionals, you will receive:
Despite the advantages of doing this task on your own, not every motorcycle owner is ready for this. Therefore, it is really easier for many to turn to specialists. Plus "tire fitting" in the presence of equipment and experienced staff.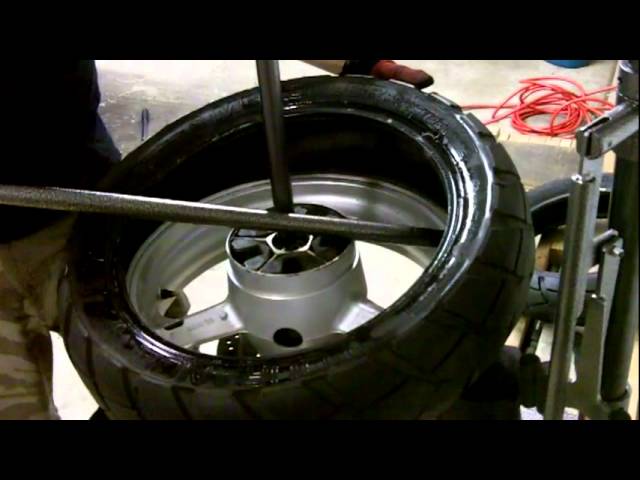 There, the motorcycle is fixed on a special stand, both wheels are immediately removed. The wheel breaking stand makes it easy to remove the tire from the rim, and the wheels can be immediately balanced. But even here there are drawbacks, unlike car workshops, which are everywhere, motorcycle “tire changers” are not so common. In a small town, you still need to try to find such a place. The price is also associated with low prevalence - such services are slightly higher than similar ones for cars.
Which rubber should I choose with spikes or Velcro?
Operation of winter tires
Changing wheels on a car
Repair, replacement of studs on winter tires, studding
How to choose winter tires for crossovers
Replacement of summer tires for winter. Tips
Tire pressure sensors
Which wheel locks to choose?
Truck tire repair
Bicycle tire marking
How to install a tire in the direction of the tread pattern
What is the life of the tires on cars
Wireless charging smartphone holder
Unique in-car smartphone holder with…
↑
Introduction
How to decipher the marking of motorcycle tires
Correspondence table for metric and inch tire marking systems
Conclusion
Motorcycle tires are impossible to choose correctly if you do not understand their sizes. Otherwise, at best, you risk bringing just a useless piece of rubber from the store. To determine the sizes, we have prepared a short decoding method and a comparison table of tire dimensions.
Any motor rubber has a sea of information on the sidewall about the properties, purpose and, of course, size. We need to figure it out, and then compare the readings with the table. You can learn more about motorcycle tire labeling in our previous article.
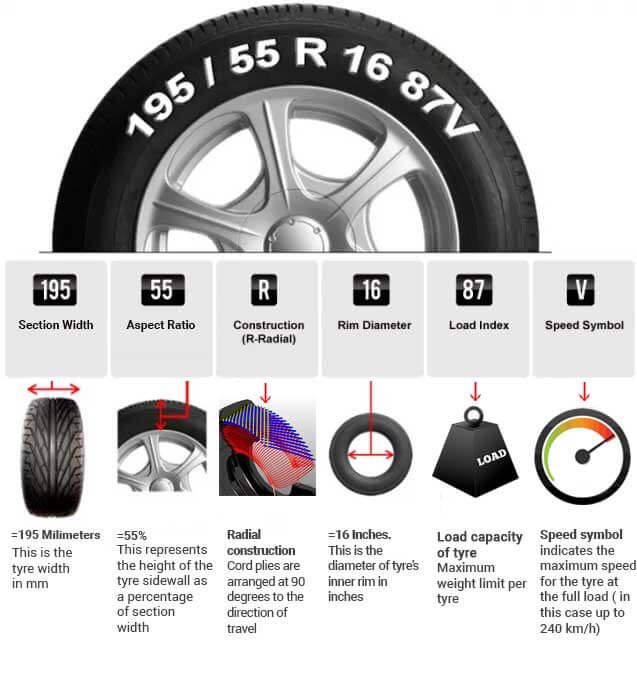
As a rule, the main marking on the side of the motor rubber is as follows: 120/80 R16 59S. This is the so-called metric marking. Let's understand it in more detail:
120 - profile width from edge to edge of the tread, expressed in millimeters.
80 - profile height, expressed as a percentage.
R - radial type of construction.
16 - diameter of the landing area. This indicator should correspond to the same diameter of the rim on which the tire will be put on.
59 - load index, or the maximum weight that the tire can withstand without loss of performance. We are looking for it in the table:
| Tire load index | |||||||
| 40 | 140 | 53 | 206 | 66 | 300 | 79 | 437 |
| 41 | 145 | 54 | 212 | 67 | 307 | 80 | 450 |
| 42 | 150 | 55 | 218 | 68 | 315 | 81 | 462 |
| 43 | 155 | 56 | 224 | 69 | 325 | 82 | 475 |
| 44 | 160 | 57 | 230 | 70 | 335 | 83 | 487 |
| 45 | 165 | 58 | 236 | 71 | 345 | 84 | 500 |
| 46 | 170 | 59 | 243 | 72 | 355 | 85 | 515 |
| 47 | 175 | 60 | 250 | 73 | 365 | 86 | 530 |
| 48 | 180 | 61 | 257 | 74 | 375 | 87 | 545 |
| 49 | 185 | 62 | 265 | 75 | 387 | 88 | 560 |
| 50 | 190 | 63 | 272 | 76 | 400 | 89 | 580 |
| 51 | 195 | 64 | 280 | 77 | 412 | 90 | 600 |
| 52 | 200 | 65 | 290 | 78 | 425 | 91 | 615 |
S is an index of the speed at which the bike can move without losing ride stability, grip and other useful tire characteristics.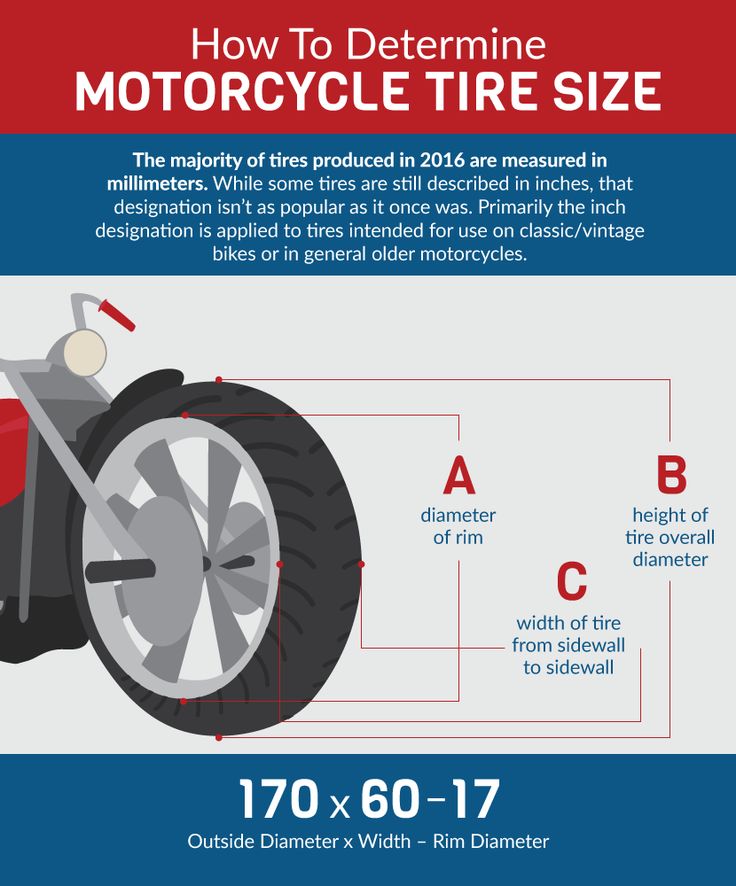 The value is also in a special table:
The models in the top are arranged in terms of price / quality ratio. In the process of writing it, we were guided by the reviews of amateur bikers, professional tests, and were also guided by our own subjective opinion and many years of experience with tires.
| Speed index | Maximum speed, km/h |
|---|---|
| A | 40 |
| B | 50 |
| C | 60 |
| 65 | |
| E | 70 |
| F | 80 |
| G | 90 |
| J | 100 |
| K | 110 |
| L | 120 |
| M | 130 |
| N | 140 |
| P | 150 |
| Q | 160 |
| R | 170 |
| S | 180 |
| T | 190 |
| U | 200 |
| H | 210 |
| V | 240 |
| W | 270 |
| Y | 300 |
| VR | >210 |
| ZR | >240 |
| (W) | >270 |
| Z | >300 |
This method of labeling tires is followed by most manufacturers, but there are those who prefer alternative types, where sizes are indicated in inches.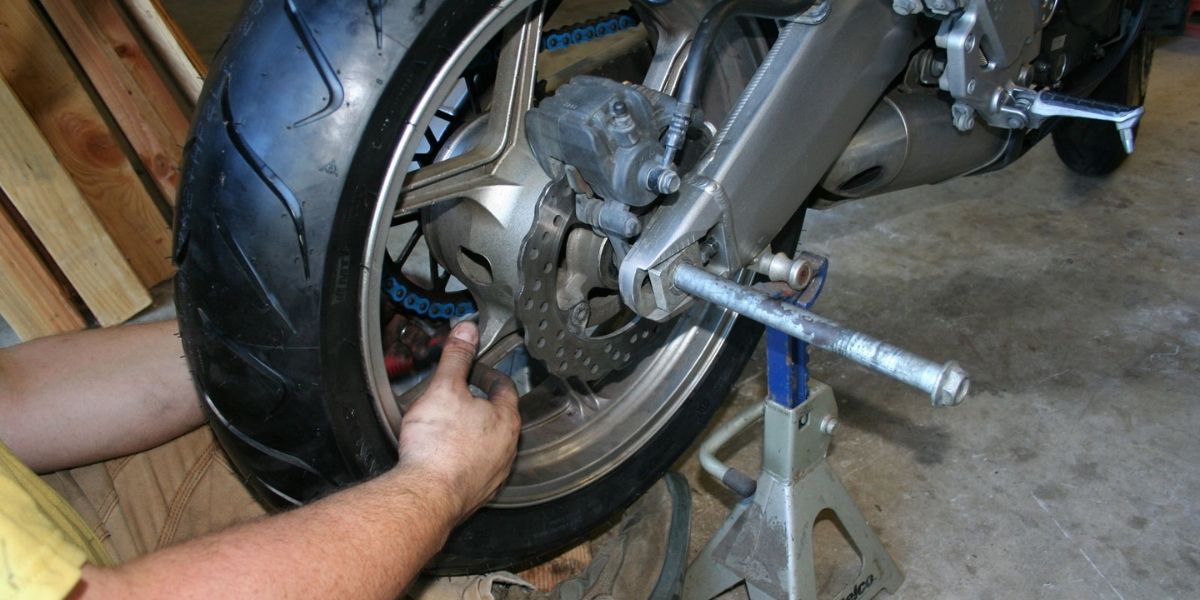 For example, this one is 3.25H-19. Everything is simple here: 3.25 is the tire width expressed in inches, H is the speed index, 19 is the bore diameter.
Sometimes an inch designation can be placed instead of the usual millimeter, for example, like this: 4.60/80 R16.
There is a rather rare alpha system created mainly for sports tourists. For example, this type of MM90S-16, where: MM - profile width in inches (3.75), 90 - profile height in percent; S - speed index, 16 - diameter of the landing rim of the tire.
| Marking alpha | Width in inches |
|---|---|
| MG | 2.75 |
| MH | 3.00 |
| MJ | 3.25 |
| ML | 3.50 |
| MM | 3.75 |
| MN | 4.00 |
| MP | 4. |
| MR | 4.50 |
| MS | 4.75 |
| MT | 5.00 |
| MU | 5.50 |
| MV | 6.00 |
To make it easier for you to determine what the inch size corresponds to in the metric system and vice versa, we have prepared a comparison table for you.
| Tire size in. | Load index | Permissible rim width, inch. | Tire size | ||||
| Alpha | Metric | ||||||
| Standard | Reinforced. | 100 | 90 | 80 | |||
| 2. | 40 | 46 | 1.50-1.85 | MH 90-16 | 80/100-16 | 80/90-16 | 90/80-16 |
| 3.00-16 | 40 | 48 | 1.60-2.15 | MH 90-16 | 90/100-16 | 90/90-16 | 100/80-16 |
| 3.25-16 | 48 | 55 | 1.85-2.50 | MJ 90-16 | 100/100-16 | 100/90-16 | 110/80-16 |
| 3.50-16 | 52 | 58 | 1.85-2.50 | ML 90-16 | 100/100-16 | 100/90-16 | 110/80-16 |
| 4.60-16 | 58 | 59 | 1. | MM 90-16 | 100/100-16 | 110/90-16 | 120/80-16 |
| 2.75-17 | 41 | 47 | 1.50-1.85 | MH 90-17 | 80/100-17 | 80/90-17 | 90/80-17 |
| 3.00-17 | 41 | 50 | 1.60-2.15 | MH 90-17 | 90/100-17 | 90/90-17 | 100/80-17 |
| 4.50-17 | 50 | 67 | 2.15-3.00 | MR 90-17 | 110/100-17 | 130/90-17 | 140/80-17 |
| 4.60-17 | 50 | 62 | 1. | MS 90-17 | 100/100-17 | 110/90-17 | 120/80-17 |
| 5.10-17 | 50 | 67 | 2.50-3.50 | MT 90-17 | 110/100-17 | 130/90-17 | 140/80-17 |
| 2.75-18 | 42 | 48 | 1.50-1.85 | MH 90-18 | 80/100-18 | 80/90-18 | 90/80-18 |
| 3.00-18 | 47 | 52 | 1.60-2.15 | MH 90-18 | 90/100-18 | 90/90-18 | 100/80-18 |
| 3.25-18 | 52 | 59 | 1. | MJ 90-18 | 100/100-18 | 100/90-18 | 110/80-18 |
| 3.50-18 | 56 | 62 | 1.85-2.50 | ML 90-18 | 100/100-18 | 100/90-18 | 110/80-18 |
| 3.60-18 | 51 | 62 | 1.85-2.50 | MH 90-18 | 100/100-18 | 90/90-18 | 100/80-18 |
| 4.00-18 | 64 | 69 | 2.15-3.00 | MN 90-18 | 110/100-18 | 120/90-18 | 130/80-18 |
| 4.10-18 | 60 | 69 | 1.85-3.00 | ML 90-18 | 100/100-18 | 100/90-18 | 110/80-18 |
| 4. | 64 | 69 | 1.85-3.00 | MM 90-18 | 110/100-18 | 110/90-18 | 120/80-18 |
| 4.25-18 | 66 | 69 | 2.15-3.00 | ML 90-18 | 110/100-18 | 120/90-18 | 130/80-18 |
| 4.60-18 | 63 | 69 | 1.85-3.00 | MR 90-18 | 110/100-18 | 120/90-18 | 130/80-18 |
| 3.00-19 | 49 | 54 | 1.60-2.15 | MH 90-19 | 90/100-19 | 90/90-19 | 100/80-19 |
| 3. | 54 | 54 | 1.85-2.50 | MJ 90-19 | 100/100-19 | 100/90-19 | 110/80-19 |
| 3.50-19 | 54 | 57 | 1.85-2.50 | ML 90-19 | 100/100-19 | 100/90-19 | 110/80-19 |
| 3.60-19 | 52 | 54 | 1.85-2.50 | MH 90-19 | 100/100-19 | 90/90-19 | 100/80-19 |
| 2.75-21 | 45 | 54 | 1.50-1.85 | MH 90-21 | 80/100-21 | 80/90-21 | 90/80-21 |
| 3.  | |||||||
 25
25 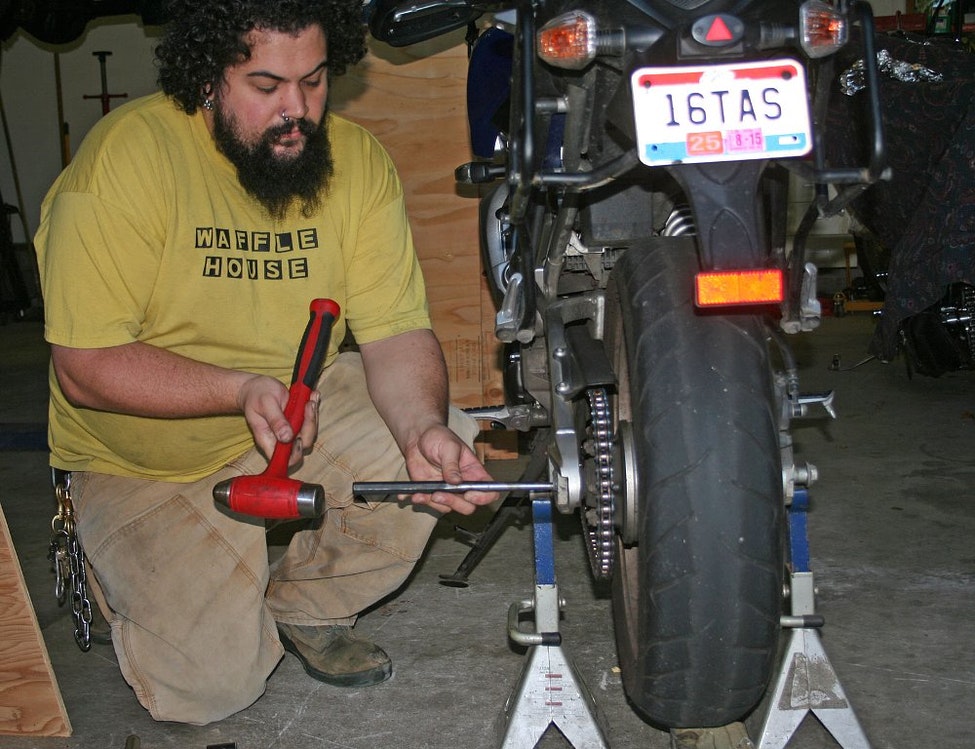 75-16
75-16 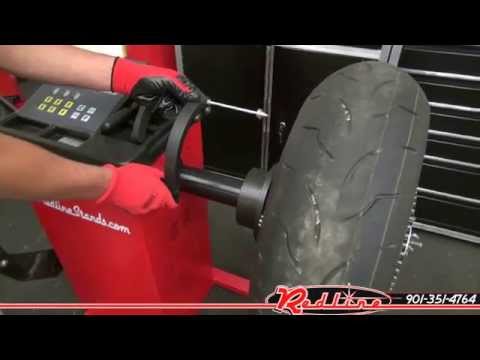 85-3.00
  85-3.00
  85-2.50
  25/85-18
  25-19
25-19