Most ATV owners will at some time have to repair or change a tire on their bike. Recently, I decided it was time to stop being depended on a tire shop to do this job for me. I set out to find the best way to do this job myself.
I did the research, I did the testing, and have found a method that works quite well. This guide will tell you what you need to know to change an ATV tire by hand.
You can get the job done without breaking the bank on expensive specialist tools. But some basic hand tools are required to be able to do the job safely and efficiently.
Page Contents
Before will get into the actual guide, we’ll have a quick look at what many consider to be the hardest part of changing an ATV tire; breaking the bead.
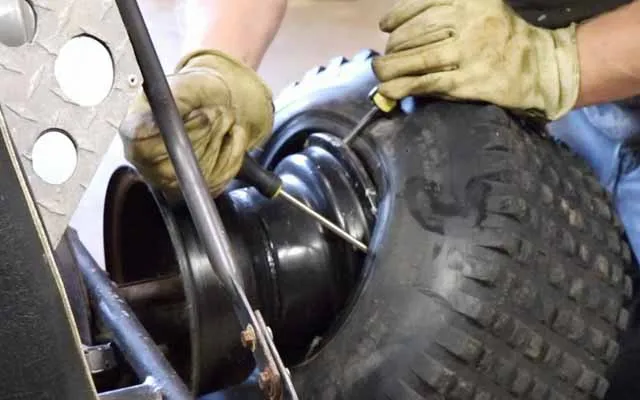
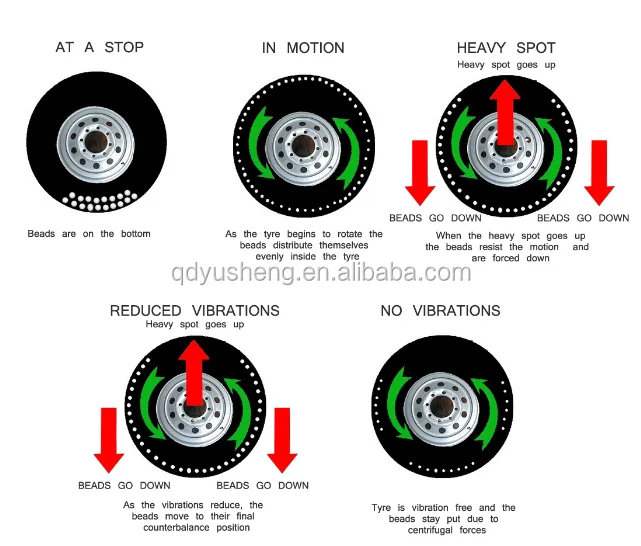
On the inside of the rim, close to the lip, there is a small bump called the “bead retainer”. This little bump goes all the way around the circumstance of the rim.
Then, on each edge of the tire, you find the so-called tire bead. This part of the tire contains a strong steel cable that goes all the way around the tire as well, creating a strong steel inforced loop.
Close-up of the tire bead section of the tire.The tire is beaded when the tire bead has been pressed over the bead retainer and rests against the inside of the lip of the rim. When in this position, the tire is prevented from sliding sideways on the rim itself.
So the primary purpose of the bead retainer is to keep the tire in place. Aggressive riding would otherwise force the tire sideways and it would lose its seal.
It’s not, however, what makes the tire airtight. That’s mostly achieved by the air pressure inside the tires. The air makes sure that the tire is always being pushed outwards against the lip of the rim.
Off-road and trail riding will often involve extreme sideways forces and impacts being inflicted to the wheel. Riding steep side-hills, hitting stumps and landing jumps are often when you are most likely to involuntarily break the bead.
On-road tires will not be faced with challenges like these under normal circumstances.
In addition, off-road tires usually run at a much lower tire pressure. As a result, there is a lot smaller force that pushes the tire outwards against the lip of the rim.
This means the wheel on off-road vehicles has to do a better job at keeping the tire beaded so that you don’t end up with a flat all the time.
To achieve this the tire beads on ATV tires, UTV tires and other off-road tires are extra heavy-duty. Also, the bead retainer bump is usually a bit bigger.
This is great for keeping the tire seated when riding. But it’s also that much more challenging when you want to break the bead.
There are many ways to break the bead of a tire.
What most of the methods have in common is that they involve some sort of tool. Some of which are quite expensive, while others are almost free.
At the higher end of the scale, you have the several thousand dollars tire changing machines that the tire shops use. These are very effective, but usually way out of budget for the average home mechanic.
At the other end, you have some more-or-less effective, almost free, and sometimes downright dangerous DIY solutions.
Underneath are the most common options, good and bad.
I’ve included my top 3 recommendations which are the ones I consider to be the most effective and least risky.
That’s “least risky”, not risk-free. You can still mess up. If you want risk free, take the tire to a tire shop.
This may sound brutal, and that’s exactly what it is.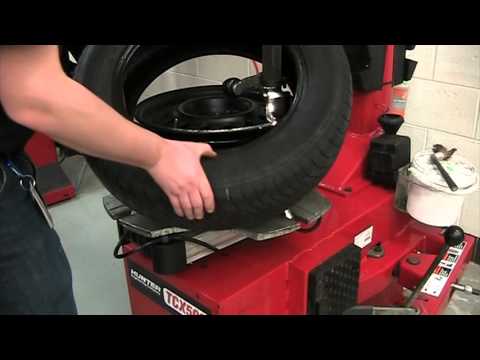 The method is completely free, as long as you already own a truck, and don’t break anything in the process.
The idea is that you lay the wheel flat on the ground, and drive your truck over the tire part of the ATV wheel.
While there are several reports of people successfully performing this method, it’s not one that I recommend. There is a great chance of bending or damaging your rim with this method. Its effectiveness is also quite questionable.
Lay the wheel flat on the ground with a small amount of air (about 3-5PSI) still left in the tire. Then place a piece of 2×6 lumber on top of the tire, as close to the rim as possible.
The idea is you slowly drive a truck up the piece of lumber until the weight of the truck breaks the bead. It may be necessary to reverse, reposition the tire and apply weight several times before the bead will break.
Then back off, refill with 3-5 PSI of air to stiffen the tire and do the other side.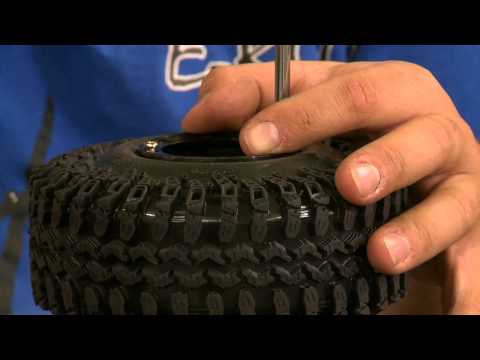
This method is fast and may work fine in most cases. But it’s not something I would suggest for anyone as their go-to method for de-beading a tire.
There is a lot that can go wrong, and no guarantee it will work. If you forget to leave some air there is a great chance of damaging the tire. The piece of lumber fill just slides down the tire sidewall.
And if you leave too much air the tire can blow. Or if you use a car without enough of clearance, you will rip the bumper right off on the way down.
I wanted to find the best, almost free DIY method for breaking the bead on an ATV tire. Not all ATV owners have access to welding machines, so I decided it had to made from wood.
I made 3 different models before I found a design that performed ok. I had good faith in this first design. The idea, found on a motorcycle forum, is really clever. It should work fine with motorcycle tires and such.
But the ATV bead was too strong. The hardware or the wood itself kept breaking on all three versions I built.
I ended up with a really simple design. All you need is a few feet of two by four and a couple of relatively strong hinges. The tool has to be mounted securely to a wall or a post as I did
Two pieces of wood and a couple of strong hinges give you a decent bead breaker in no time. Remember to cut the short piece of wood at about a 15-degree angle.This is the most effective and reliable solutions I have found. That is, for those that do not want to spend a lot of money on tools or don’t want to spend a lot of time on complex fabrication.
You’ve probably seen this tool or a variation of it at some point. You can get them at almost any auto supply or hardware store. They are relatively cheap and works really good on many types of small to medium sized tires.
This portable tire changer is my go-to tool whenever I need to de-bead a tire at home.
The tool needs to be bolted to the floor or some other heavy object to be operated effectively. And, it does require some getting used to.
But many users struggle to successfully break the bead of ATV tires with these things. The bead may be seated so well that the tool instead of breaking the bead just slip and slide down the sidewall of the tire.
When this happens you not only risk damaging your tire but will also build up quite the frustration from each failed attempt.
Despite its flaws, I’ve still listed this tool as recommended. Why? Well first off, they are relatively cheap. And when they do work, they are actually quite effective.
More importantly, there is a little trick you can use to make them work a lot more effective on ATV tires.
To prevent the tool from sliding down the sidewall of the tire, you should leave just a little air in the tire. Do not use more than 3-5 PSI. This will allow you to apply a lot more pressure by the bead before the tool wants to start sliding.
Often this is what makes the difference between a successful and a failed attempt.
It’s also a good idea to spray the bead with some soapy water before you try breaking the bead.
But even when applying these tricks, you may find that this tool will struggle to break the bead on the most stubborn ATV tires. If you are looking to change tires on your 10 years old OEM 400EX wheels, you may have to upgrade to the best tool on the list.
A company called BeadBuster sells a tool that clamps onto the rim and forces a wedge in between the rim and the tire. By rotating a bolt you force the bead down and over the bead retainer.
This tool has one main advantage over the tools we have looked at so far. It does not press down on the thin sidewall of the tire, but directly onto the tire bead.
This reduces any chance of damaging the wheel and tire. The pushing force created by turning the tightening-bolt should be powerful enough to break the bead on almost any ATV tire.
They are the most expensive among the tools I recommend. But if you accept the cost, they are the best option, next to getting a professional tire changing machine.
Another tool that seems to be just as effective as the portable tire changer, are the so-called “Tire Plyers”. These also work by the principle of jamming a wedge in between the rim ant the tire but uses a long handle to lever the wedge down.
It will work on most ATV tires, but some users report breaking the tool because how tight their ATV tire was beaded. This is why I cannot give them a recommended badge by now.
I have not, however, tested these myself. As soon as I get my hands on a pair I will give them a test and consider adding them to the recommended list.
The second most tricky part of changing an ATV tire by hand is mounting it back on the rim again and having it bead properly.
With a couple of tire irons and some soapy water, you should be able to get the tire onto the rim without any big issues.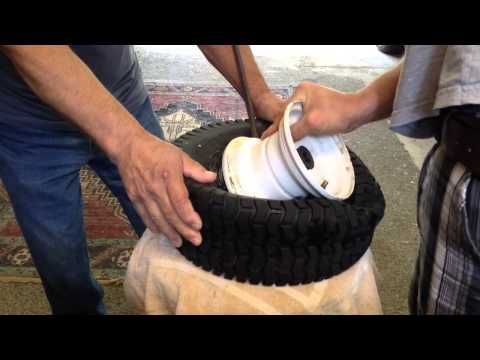 Just take your time and work systematically.
As for beading the tire, this can be a bit tricky on tubeless tires. But in the guide, I’ll show you a simple trick I have learned that should help you succeed.
This guide is for tubeless ATV tires. The procedure for tubed tires is very similar. But then you also need to release the tire-valve and make sure you don’t damage the tube when removing the tire.
 They are very powerful and I’ve seen more than once how quick they can snap a bolt.
I recommend getting a valve stem core removal tool for this part. They are cheap and saves you a lot of time.
While it is possible to deflate the tire just bu pushing the tire valve pin, it will take forever. With a valve stem tool, you can remove the valve stem which will deflate the tire in seconds.
Lefty-loosey, righty-tightly. You know the drill.
Keep two fingers on the valve when unscrewing it so you don’t lose it when the air starts flowing.
Remove the valve stem core, using a valve stem core tool.As soon as the air is out, put the valve stem core back in so you don’t lose it. Do not over tighten, as the threads on these are quite thin.
Choose between one of the recommended procedures for breaking the tire bead;
The DIY de-beading tool.
Portable tire changing tool
Bead buster
If none of these methods breaks the bead, it’s time to take the wheel to a tire shop.
You need two tire irons or a couple of big screwdrivers to perform this step. It’s also recommended that you get some plastic wheel protectors, or use tire irons with protective plastic so that you won’t damage your rims.

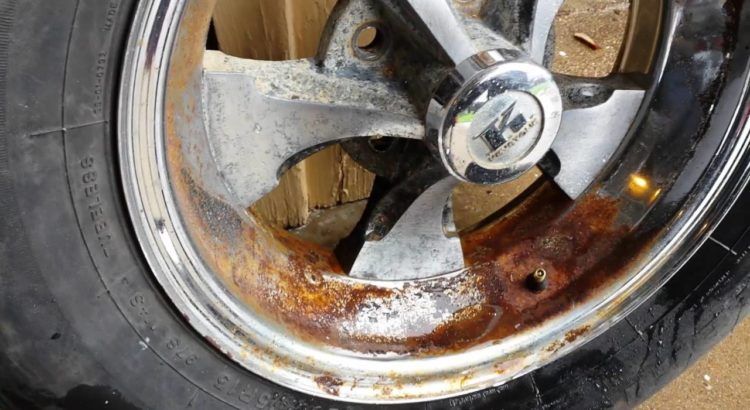
Before you can begin installing the new tire, you need to make sure that the bead of the rim is smooth and clean.
Wash off any dirt, sand or other debris. You may need to use a wire brush to get a good result.
If there is any rust, this has to be removed before you install a new tire. Tools you can use to remove the rust:
Ideally, you want to remove all rust. It’s important that the surface is smooth, so you get a proper airtight seal between the tire and the rim.
After removing the rust you will be left with exposed metal that will start rusting immediately if left untreated. I recommend that you paint it with a quality rust inhibiting paint before installing the tire.
By doing so, you will likely be able to maintain an airtight seal for much longer, and the bike will look a bit healthier.
If your rim and tire are completely free of any damage or nicks by the bead, you may skip this step if you want.
But, as you may know, ATV tires are prone to having tire leak issues by the bead. This happens because the way they are used.
When you ride off-road, sand, dirt and other debris will be caught in the little gap between the rim and tire. This will wear down the paint, creating corrosion issues over time.
There’s also a good chance that you will damage the rim at some point by hitting a rock.
Therefore, I recommend that you always apply a coat of bead sealer on the tire bead before installing the tire. Consider it a cheap insurance against problems down the road.
A good alternative for using purpose made bead sealer is using some silicone.
Be aware that both of these products come with the disadvantage of making it a bit harder to break the bead the next time you need to change the tire.
Spray some soapy water on the bead retainer. Again, this is so that the rubber will slide more easily against the metal rim.
An even better alternative is using a light coat of baby powder on the lip of the rim and tire bead. Give it a try if you struggle to get the new tire back on the rim.
Do not use WD-40 as lube as this may deteriorate rubber over time.
Now it’s time to reinstall the tire.
 The tire bead should be placed in the drop-well or you will struggle to get it over the lip of the rim.
Now you’ve got the tire onto the rim, but it’s still not completely mounted. You need to re-bead the tire to the rim, using air pressure.
But if you try putting air into the tire as it sits right now you will likely get no result.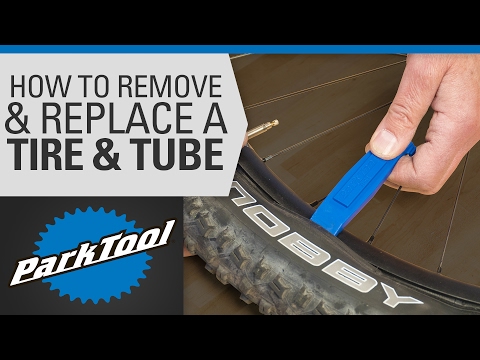 This is because you have a gap between the tire and the rim that is too big.
The air compressor alone won’t be able to supply enough airflow to get it to seal. The air just escapes.
If you happen to have a specialist tool like a “shock-filler” or similar standing in the corner of your garage, now would be a good time to get it.
But most of us don’t have tools like this. And for the occasional tire job, there is not really a need for one neither. There is a simple trick you can use to get the job done.
No, it’s not the one where you put starter fluid inside rim and light it on fire. While this may work, there is another way that is safer, and just as fast.
All you need is a ratchet strap. If you don’t have one, now’s the time to get one. Use the strongest strap you can find. If the strap breaks, it does so with great force!
 Make sure the rim is centered in the tire.
All that is left now is to put air back into the tire until it beads. I recommend using a tire-inflator that has a gauge for this part.
Can you change ATV tires at home?
With a few tools and some basic mechanical skills, it’s very doable to change ATV tires at home. But be aware that air under pressure is potentially very dangerous, so necessary precautions must be taken.
How hard is it to change ATV tires?
ATV tires and other off-road tires have stronger beads than on-road tires. This makes them a bit harder to change. But when you know the steps, changing tires is about as hard as replacing brake pads or installing a new exhaust system.
Tire tech 101
Home → HOW TO CHANGE TIRES
‘Break’ the tire bead loose with a Bead Breaker
Remove the Tire with Tire IronsThe BeadBuster tool only helps with the 1st step.
 We also sell great, Heavy Duty tire irons for Step 2.
MORE INFO AND DEFINITIONS OF TIRE & WHEEL FEATURES
 This kind of bead breaker just doesn’t have the proper mechanical advantage.
Content copyright 2020. BeadBuster LLC. All rights reserved.
October 19, 2018
In the last article, we discussed what to do when an ATV tire is punctured, but punctures and cuts are different.
Side cuts are considered the most unpleasant, as their recovery is complicated by the specific structure of the tire. The sidewalls of the tire must be elastic, as they take part of the road load.
A common puncture in the sidewall of an ATV tire is rare.
Tire sidewalls are more likely to be cut than punctured. In case of a side puncture or cut, the tire must be changed, as its reliability is significantly reduced, and it will not withstand the loads for which it is designed.
But what if you are far from civilization?
There is a method that will reliably repair a tire, but it will be a longer procedure than a simple ATV tire puncture repair.
Side cuts often occur in the mountains where there is kurumnik, since ATV tires are designed to operate at low pressure, the tire bulges very much when riding and can go under a sharp stone, which will create a side cut.
So, what is needed for repair:
ATV tire side cut repair sequence:
 We take the tire and put it on the disk with one rim, after that we put the camera on the disk. Please note that the camera must be put on carefully, straightening it, otherwise it will jam inside the wheel and break after a short time while driving.
 After that, you will safely drive to the starting point, but upon returning home, we recommend replacing the tire with a new one.
Products: brake cleaners, rim cleaner.
Equipment: all modern tire systems are powered by compressed air: pneumatic guns for loosening wheels, tire changer, inflation guns. Therefore, the main tool in tire fitting is a compressor. AT 99% of cases use reciprocating compressors with a capacity of 400 lmin. These compressors require ISO VG 46 and 100 compressor oils, depending on the compressor manufacturer's recommendations. Oil change, on average, 200-250 hours when using mineral oils, that is, about once a month during the tire season. Using synthetic oils, such as Liqui Moly LM 500, article 4076, you can increase the compressor maintenance period up to two times a year.
The air gun is an essential tool for quick wheel removal. It has a lubricator lubrication system, that is, oil is supplied along with compressed air using a special lubricator-lubricator. In small tire shops, they save money on lubricators and periodically bury the oil directly into the air gun. To lubricate air guns, use Liqui Moly Oil fur Pneumatikgerat, part number 7841.
| Fig 1 | Fig 2 | Fig 3 |
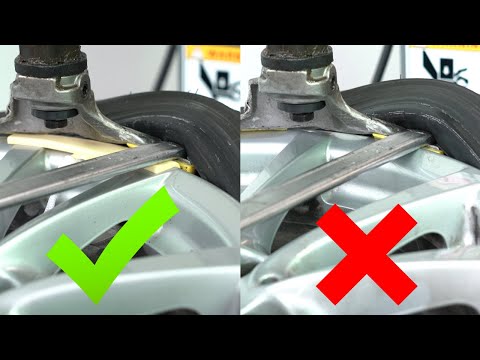
To carry out work, place the vehicle at the place where the brake is to be carried out. work and fix manually Raise the vehicle with a tire jack or scissor lift, unscrew the wheel fasteners and remove the wheel. Wash the wheel in a washing machine, dry it. Using the special tool, unscrew the valve and bleed air from the wheel. Remove balancing weights, if self-adhesive weights are used, then remove the remaining glue from the rim with a rag using Liqui Moly Dichtungs Entferner. It is necessary to carefully inspect the tread for stones stuck in the sipes, since wheel balancing is meaningless with a dirty tread. If you plan to install the tire back after repair, then it is necessary to mark the position of the nipple for inflation on the tire using a special marker or chalk. The tire is installed in the same position in which it was removed from the rim. Install the cleaned wheel on the tire changer and tear off the sidewall of the tire from the rim with a spatula (Fig. 1). Next, center the wheel on the clamps (1) of the machine Fig. 2, (use plastic protective pads when working with light alloy wheels) and completely separate the sidewall of the tire from the hump with a roller (Fig.
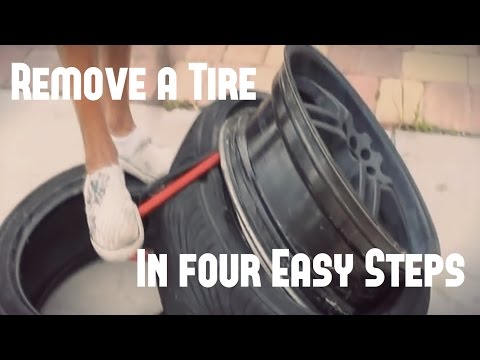 3). Before removing the tire from the rim, apply Liqui Moly Reifen Montierenpaste to the parts of the tire adjacent to the rim.
It is recommended to apply the paste with a flute-type brush, it is not recommended to use fly brushes (Fig. 4). Pry off the sidewall of the tire with a mounting spatula, bring it up by the heel of the machine (Fig. 5) and rotate the tire until the sidewall of the tire completely goes beyond the rim. Do the same with the bottom of the tire and remove the tire from the rim (Fig. 6).
| Figure 4 | Figure 5 | Figure 6 |
| Figure 7 | Figure 8 | Figure 9 |
Before mounting a new or refurbished tire, be sure to replace the valve of the tubeless tire (Fig. 7), clean the tire contact surface with a Reiniger und Ferdunner cleaner (Fig. 8), place the rim in the balancing machine (Fig. 9) and check the runout of the rim .
To mount the tire, it is necessary to put the disk back into the clamps of the machine (Fig. 2). Before installing the tire, apply mounting paste to the sidewalls of the tire adjacent to the rim (Fig. 10) using a flute brush on both sidewalls of the tire. Put the tire on the disc using the machine's thrust pad (Fig. 5). Orient the tire according to the marks made earlier, in case of using a new tire, align the factory mark (yellow or white) with the tire valve by location. Inflate the tire, allow the sidewall to take the correct position on the hump of the rim, for which give an air pressure of 6-8 bar (when the tire is seated, a loud bang will occur). Check the tightness of the fit by using Leck Such Spray or immersion in a water bath. After checking the tightness, bring the pressure in the wheel to the nominal value and install it in the balancing machine.