by Contributing WriterUpdated June 12, 2017
Many of the basic maintenance routines required by a Vehicles series all-terrain Vehicles involves the removal of the Vehicles seat. While removing the seat is not difficult, the absence of a readily available seat latch on the side of the Vehicles can make the task appear more complicated than it is. A quick search under the plastic fender will reveal the missing latch, allowing the seat to be removed with a Vehicles amount of fuss.
Find the release lever for the rear seat legs located on the back underside of your rear bench seat. Rotate the lever upwards.
Tilt the rear seat bench forward by pushing the upper edge of the seat's backrest to release the legs.
Move to the front of the bench seat and pull the three release handles (located at each seat leg) upwards.
Hold the seat by the lower edge of the seat cushion and tilt the bench seat slightly forward.
Lift the seat completely out of the floor anchors and remove from the vehicle. Place the seat in a covered storage area.
Remove the passenger backrest. Open the trunk on your Honda Goldwing. Look at the back of the trunk frame that is under the passenger backrest. You will see two hex screws. Use a 4-mm Allen wrench to remove those screws. Be careful not to lose the plastic washer on each screw.
Locate the hex bolts on each side of the Goldwing seat. The bolts will be under the seat, on the sides of the frame near the pillion of the seat. The pillion is the raise in the seat that begins the "passenger" portion of the motorcycle seat. If you are removing the seat on a Goldwing Aspencade you will have two bolts on each side of the seat (instead of one, as on the Interstate model). Remove the bolts with an Allen wrench; be careful not to lose the small plastic inserts that are inside the bolt holes.
Grab the seat with one hand on each side of the seat just past center (more towards the rear of the motorcycle). Pull the seat off the motorcycle by lifting the rear of the seat slightly higher than the front. The seat is also held in place by plastic tabs that are pushed under the center seat post of the frame when the seat is installed. By lifting the seat out, rear higher, you will pull the tabs out from under the center post and be able to remove the seat easily.
Allen wrench set
Reach under the left side of the rear fender to locate the seat latch on the ATV's frame.
Lift the seat latch upward to unlock the seat.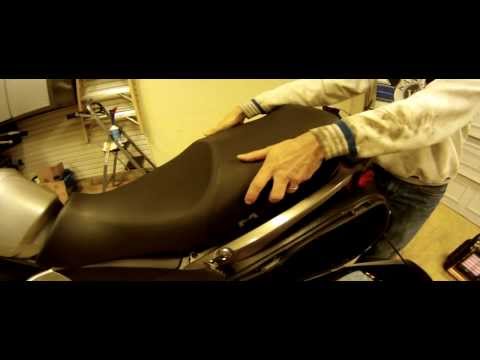
Lift the rear of the seat upward and pull it away from the ATV's gas tank. Set the seat aside.
Position your Ninja 250 on a flat surface and engage either the side prop or the centerstand. If you are just doing everyday parking and want to quickly access under the seat, use the side prop. Use the centerstand if you plan to perform maintenance after you remove the seat.
Turn the engine off and remove the key.
Look on the left side of the seat to find the key lock. This is just above the helmet lock on the left side panel, just below the edge of the seat. Insert your key into the key lock and turn it to release the latch that keeps the seat in place.
Grab the seat and lift up. This is all you need to do to remove the seat from your Kawasaki Ninja 250.
Lift the rear of the passenger seat's cushion to find the screw that secures the seat to the rear fender. Use a 5-mm Allen wrench to remove the screw.
Lift the rear of the passenger seat slightly and pull it away from the rider's seat.
Use the 5-mm Allen wrench to remove the screws from the rear of the rider's seat.
Lift the rear of the rider's seat upward slightly. Pull the seat back until the tabs on the front of the seat separate from the motorcycle's frame.
5 mm Allen wrench
ATV
20 Apr
Every year you need to buy new or different design seat cover for your ATV Quad Bike. You can buy the replacement seat cover for your ATV quad bike from online, but you need to install it yourself, or you need to take it to an upholstery shop near your house.
If we can install the seat cover by yourself, then you can save money. So how to install an ATV seat cover? Let’s go and learn how to install an ATV seat cover.
Before installing your new seat cover, you just need to buy a few materials, it’s one time investments. So don’t be afraid. If you want you can buy it from your near local shop, or you can buy it from Amazon.
Check Out With Amazon | Check Out With Amazon
| Check Out With Amazon |
Note: If you use a hand stapler, press down on the front on the stapler so it will go into the plastic instead of pushing the stapler up and away from the seat
Warning: Do not use glue to secure the cover in any way!
Important Note: The seat cover will stretch to fit better when it’s warm; this is especially important with materials such as diamond plate vinyl.
*** Always be careful not to overheat and melt the vinyl***
Warming Suggestions:
Metal Pans: Some of the older model seats have steel pans rather than the newer plastic. You will need to use the same method that attached the cover that was removed. If the pan is rusted, you can use self-tapping screws to attach the cover to the metal pan.
Installation Steps: please note, when your new cover is lying on top of the seat, it will appear to be 1-3” too short. This is intentional, not a defect and will prevent wrinkles toward the front of the seat
Step 1: Find a clean surface to work on. Make sure the surface does not have any sharp objects or rough surfaces that will damage the vinyl
 Hints: I link to pry one side up with the screwdriver and then remove the other side with pliers.
Step 2: Using the staple gun, attaché the seat cover to the front or back of the seat ( either end is fine to start) using 4-5 staples
Step 3: Apply heat
Step 5: Finishing the cover is meant to fit tightly to avoid wrinkling

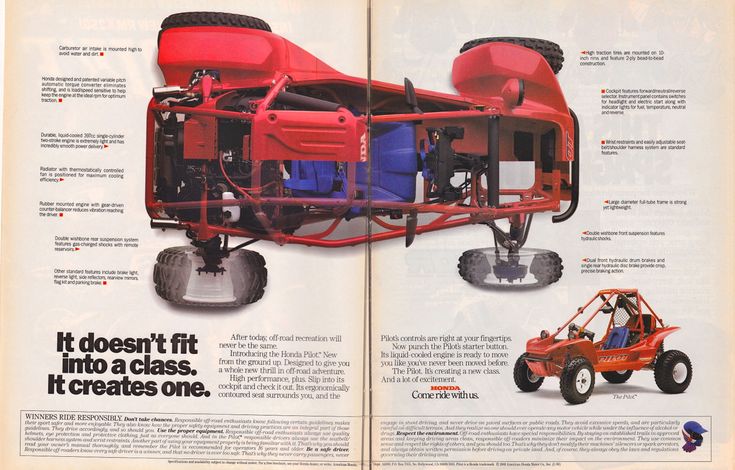
This model has a number of advantages, each of which deserves the attention of consumers. Reliable cushioning system. It allows you to travel not only in the city, but also outside it. There, the Stels Atv 50c ATV can easily overcome impassability. At the same time, you will feel comfort that can only be compared with an expensive SUV equipped with a semi-rigid suspension. Attractive design and style, sustained in every detail. It is enough to take a closer look at the Stels Atv 50c ATV, and you will understand that it will miraculously fit not only into the background of the blue sky and greenery, but will also attract attention in the city stream. High maneuverability of the model and the associated high protection and safety. She really is safe. The design of the model allows you to maintain balance even on steep turns.
| Engine | |
| Ignition | Electronic CDI |
| Engine description | 1-cylinder |
| Engine size | 49.9 cm³ |
| Engine power | 2.9 HP |
| Torque | 3.5 Nm |
| Engine oil type | 10w40 |
| Transmission | |
| Transmission | Variable speed drive |
| Drive | chain |
| Fuel System | |
| Fuel supply | carburetor |
| Fuel injection system | carbureted, gasoline with an octane rating of at least 92 |
| Fuel tank capacity | 4. 5 5 |
| Performance | |
| Fuel | AI-92 |
| Dimensions and Weight | |
| Weight | 115 kg. |
| Options | |
| Seats | 1.5 |
| Seat height | 635 mm |
| Maximum load | 90 kg |
| Frame | |
| Frame material | steel |
| Suspension | |
| Front suspension | independent |
| Front suspension Description | single-lever with spring-hydraulic shock absorbers |
| Rear suspension | dependent |
| Rear suspension Description | pendulum fork with one spring-hydraulic shock absorber |
| Brake system | |
| Front brake | drum; mechanically driven drum |
| Rear brake | disk; Hydraulic |
| Wheels | |
| Front tire? | 16x7-8 |
| Rear tire? | 18x9. 5-8 5-8 |
| Equipment | |
| Speedometer, Under seat rack, Turn signals, Engine protection |
| Key Features | |
| Country | Russia + China |
| Year of manufacture (year) | 2022 |
Scooter device
A scooter seat or a seat as it is called is by no means a simple element. Its dimensions, both in width and length, the strength of the plastic, the thickness of the filler and the quality of the lining form the basis for comfortable movement on a scooter at any time of the year.
Obviously, the plastic must be strong enough not to bend or burst under the weight of two adults, to endure freezing temperatures perfectly. The owners of Japanese and European scooters never complain about the quality of the scooter seat. Here the quality is at its best, elastic and high-quality plastic, excellent sheathing made of leather substitutes, which, by the way, are not inferior in characteristics to genuine leather. The filler is usually a type of foam rubber. It is dense, high enough, does not lose its properties over time.
Not so good with Chinese scooters. Many probably noticed a Chinese scooter with a burst seat, peeling skin and foam sticking through cracks. All three components of a quality scooter seat in this link are not of normal quality, were designed without any calculations and at minimal cost.
You can't talk about all Chinese scooters. Modern models are equipped with more or less high-quality seats, manufacturers learn from their mistakes. However, 5-6 years ago, no one attached much importance to this item.
The seat of a modern Chinese scooter is made of medium quality plastic, which endures increased loads, but the lining is still in question. And so it is in almost every detail. In the end, you get what you pay for. And this is enough for many, for which many thanks to Chinese manufacturers.
Consider the seat arrangement in more detail on the example of one of the Chinese scooter models:0007
No.
Seat block part
1
Seat rack, plastic
2
Seat bracket gasket, rubber
3
Seat mounting bracket axle M6x65mm, steel
4
Spring washer 6mm, steel
5
Nut M6x1.