Delivery options and delivery speeds may vary for different locations
Sign In
or enter a zip code
Email * Password *
REPAIR & HOW TO
MAINTENANCE
TROUBLESHOOTING
GUIDES
TIPS & TRICKS
ALL ARTICLES WATCH VIDEOS ABOUT US SHOP PARTS CONTACT US
An oil change on a TRX 420 Honda ATV is standard maintenance, and an important way to keep your ATV's engine healthy. Honda recommends every 12 months, 100 hours, or 600 miles: whichever comes first.
Watch the video above and follow the steps below to learn how to do an oil change on a Honda TRX 420.
Step 1. Run the engine for a couple of minutes to circulate the oil.
PRO TIP: You don't need to bring the engine all the way up to temperature, but circulating the oil a little will make it easier to drain.
Step 2. Remove the plastic panels on both sides of the unit. You can pull them out by hand without any tools.
PRO TIP: Removing the right side panel allows you to access the oil filter, and on the left hand side you'll find the oil fill cap.
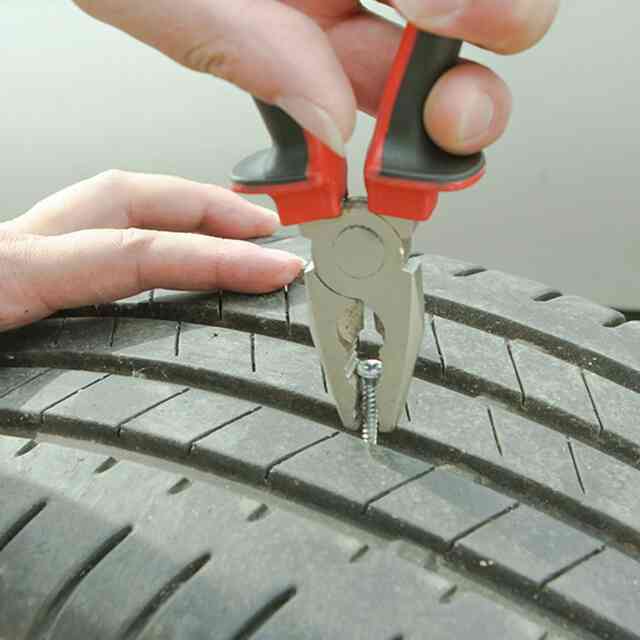
Step 3. Find the drain bolt underneath the unit to remove the used oil, and get a drain pan to catch the oil. See #7 in the Rancher crankcase diagram to find the bolt's location. Access the drain bolt through the hole in the skid plate, and use your 17mm socket to remove it.
NOTE: Be careful not to lose the crush washer on the bolt. If you need to replace it, Honda has a drain bolt crush washer available for purchase.
Step 4. Remove the old oil filter while the used oil drains. The filter is found on the right side of the engine and can be seen as #4 in our Rancher front crankcase cover diagram. Some oil will leak out, so get a rag underneath it to avoid a mess. Take off the three 8mm bolts to remove the cover and expose the filter, then pull the filter out.
NOTE: There's a spring behind the filter that should remain in place.
Step 5. Replace the oil filter. One side of the filter will have "Outside" stamped in the metal. It's crucial that this side faces out toward you when you install the filter. Make sure the spring is behind the filter and then slide it in place.
Step 6. Inspect the O-rings on the oil filter cover and around one of the bolt holes for the cover. Make sure they are not cut or damaged. Then, replace the filter cover and the three 8mm bolts without over-tightening them.
Step 7. Replace the right-hand side plastic. There's a tab at the bottom of the plastic piece. Hook it into place first, then push the rest of the plastic into place and snap it.
Step 8. Replace the drain plug. Hand-tighten it first to get it threaded, then use a torque wrench to tighten it to 18 foot-pounds.
Step 9. Refill the engine with oil.
PRO TIP: Honda says the oil capacity of the Rancher 420 is 3 quarts, but we found that can be a little too much. Pour in 2.5 quarts, replace the fill cap, run the engine for a couple of minutes, and then check the level. To check the oil level on the engine, don't screw in the fill cap. Just plunge it in and remove it, then top the engine off with oil to set the level.
Step 10. Replace the fill cap.
Step 11. Replace the plastic cover and you're done.
Now that you've got the engine oil change done on your Honda TRX 420, why not go ahead and change rear differential oil while you're at it? Watch the video below to see how to change the drive shaft oil on a Honda Rancher 420.
Watch our full Honda Rancher TRX420 repair videos playlist below.
body
Look after your ATV and it will look after you.
The purpose of maintenance is to keep your Honda in the best possible operating condition.
But remember that your Honda Authorised Dealer knows your Honda best and is fully equipped to maintain and repair it. To ensure the best quality and reliability use only new Honda genuine parts or other equivalent for repair and replacement.
The times listed below are based on average riding conditions. Some items will need more frequent service if you ride in unusually wet or dusty conditions or at full throttle. Consult your Honda Authorised Dealer for recommendations applicable to your individual needs and use.
Before every use
After 20 hours or 100 miles / 150 km
Every 50 hours or 300 miles / 500 km
Every 100 hours or 600 miles / 1000 km
Every ATV owner sooner or later faces a breakdown. And it doesn’t matter if you decide to buy an inexpensive ATV or a branded device. Of course, this is an unpleasant situation, but most problems can be fixed by hand. So let's figure out what to do if the ATV does not start.
Constant driving to the limit and improper operation of the equipment often causes a number of breakdowns. Due to high loads, it can fail:
But most often, problems arise due to some trifle, such as low-quality gasoline, lack of oil or improper preservation of equipment.
The first thing a motorist needs to do if the ATV does not start or stalls is to check the gas tank. If the fuel is idle for a long time, it may evaporate, and if the tank is empty, gasoline should be added. But if there is fuel in it, it is advisable to drain it. Very often, low-quality fuel comes across, which after a while simply ceases to ignite.
Don't forget the oil. If a low-quality liquid was poured into the system, the device will lose dynamics and may even stall. This problem is especially relevant for four-stroke quads, since their power unit must literally “float” in oil.
Another reason why the ATV does not start is improper preservation of the equipment. Even if you leave the device for a day in the garage, it must be prepared for downtime, otherwise starting the engine will be a real test.
Preservation requires:
Many riders ignore this simple procedure, but this is the one that most often causes problems with starting equipment. For example, it is almost impossible to immediately start a “cold” engine. Therefore, the driver begins to methodically press the "start" button, and at this time the battery is discharged. After 10-15 attempts, the battery runs out, and it becomes unrealistic to start the equipment.
Important: In severe frost, it is imperative to carry out conservation of the ATV. If this is not done, condensation will collect at the bottom of the carburetor, and the quadric will have to “warm up” for several days.
ATV won't start due to starter or bad contacts. In this case, follow:
 If the problem is in the relay, then it must be removed, cleaned of corrosion and oxidation. After that, the contacts are lubricated with a special grease. However, if the damage is severe, it is better to replace the part.
 But what if the Chinese ATV won't start due to problems with the starter in the field or away from home? In this case, the rider needs to close the relay contacts with a screwdriver. Thus, the rider will be able to start the device bypassing the faulty starter.
No spark is another simple but annoying failure. It usually occurs due to damage to the coil or a break in the wires that go to the candle. Solving the problem is easy. The rider just needs to unscrew the candle, insert it into the cap, attach it with a metal part to the motor and press "start".
Even minor downtime can prevent the ATV from starting, especially if it has been improperly preserved. And in order to “reanimate” the equipment after the winter, you should:
Note: In winter or during the cold season, the rider is advised to open the choke to enrich the fuel mixture. This makes it easier to start the engine in cold weather. After the device has started, the damper must be returned to its original position.
06/16/2020 12535
Moscow:
1st Varshavsky proezd, 2s8
+7 499 500-97-34 Call me back