Fewer Repairs But More Critical
Tire repairs have been a basic component of a tire dealer’s business ever since the beginning of the tire industry. Car owners could count on making a tire repair on nearly every drive they took in the 1890s because tires weren’t sophisticated. In those days, the repairs were made by the car owner, for the most part.
Today, “flats” are virtually a thing of the past. Manufacturers make tires that are technologically advanced and can withstand most road hazards. The advent of the radial tire, a much sturdier design than the old bias ply tire, reduced the need for repairs and supplied more miles per tire. But these higher tech tires do receive injuries from road hazards such as nails, bolts and other sharp metal objects.
Because of their more sophisticated construction, however, when today’s tires are damaged and must be repaired, the repair can’t be done by the average driver. It can and should be done by a tire service technician who has been trained to do a complete, proper repair.
This article includes sequential photos that show the accepted industry standards of how a tire should be repaired. The repair procedures are for passenger and light truck tires, but are virtually the same for medium truck tires (except for Step 17, as noted). The photos also concentrate on a standard two-piece repair, with one photo showing a one-piece procedure – essentially the same as a two-piece with the one exception.
Getting Started
We recommend that all tires be properly repaired per guidelines by both the RMAand TIA, and demonstrated here. Repairs should be limited to puncture injuries of not more than ¼-inch (6mm). Don’t make repairs where the injury damage extends into the shoulder/belt edge area or where the injury extends at an angle into the shoulder area. If the injury does extend into the shoulder/belt edge, scrap the tire.
Proper tools and repair materials must be used; we have included a list of the basic tools in this article.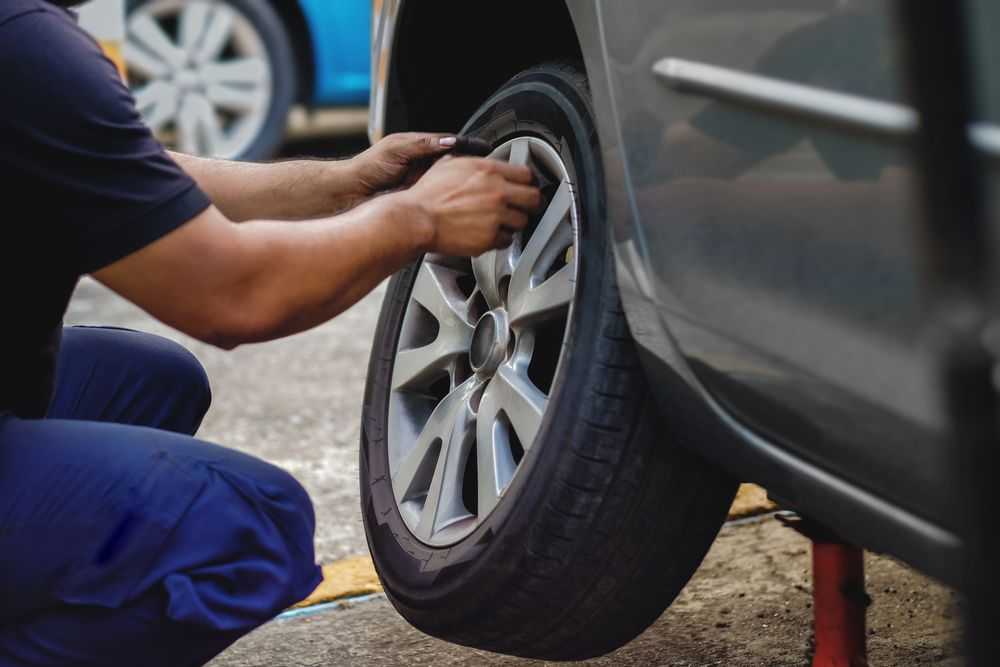
Improperly repaired tires can fail while in service, including tread-belt separations and/or detachments. These occurrences may cause an accident resulting in serious personal injury or death.
Remember that not all tires can be repaired. Specific repair limits should be based on recommendations or the repair policy of the tire manufacturer and/or type of tire service – service description, run-flat technology or commercial service applications, for example.
For all tires, repair units can’t overlap. The number of repairs should be limited first by the tire manufacturer’s recommendations and repair policy, then by the application and the tire’s condition as determined by the inspection process.
Some run-flat technology tires can’t be repaired. Technicians should consult tire manufacturers for their repair policies and, if applicable, for their recommended repair procedures.
Industry recommended repair methods include:
1. Two-piece plug and patch repair components.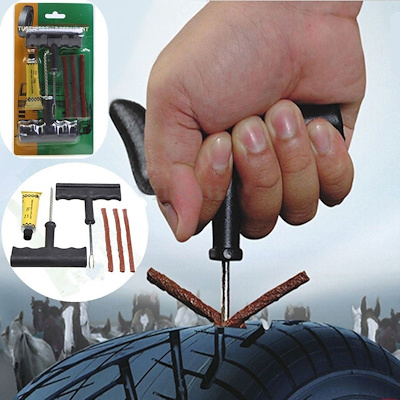
2. One-piece patch/stem combination repair units.
For punctures angled greater than 25 degrees, RMA recommends two-piece plug and patch repair components.
Never Means Never
An old phrase states, “Never say never,” but “never” is alright when repairing tires, according to RMA.
• Never repair tires with a tread puncture larger than ¼-inch (6mm).
• Never repair tires worn to the tire’s treadwear indicators or to 2/32-inch remaining tread depth in any area of the tread.
• Never perform a tire repair without removing the tire from the rim/wheel assembly and completing an internal inspection. Do not perform an outside-in tire repair or on-the-wheel repair; these types of products are not considered full, permanent repairs and should be restricted to temporary use only. It is essential that only a specially-trained person remove any tire from the wheel when it has been damaged or is losing air. A thorough inspection for any internal damage can then be made.
• Never use only a plug (stem) and never use only a patch to repair a puncture. The injury must be completely filled with a suitable vulcanizing material or a rubber plug/stem and a patch must be applied to the innerliner to prevent air loss.
• Never repair a tire that has an existing, improper (non-RMA) repair. The tire must be scrapped.
• Never substitute an inner tube for a proper repair or to remedy an improper repair.
• Never invert radial tires – and avoid excessive spreading of the tire or tire beads.
• Never buff the innerliner too deep, exposing the tire casing body (ply) cords. If this type of damage occurs during buffing, the tire must be scrapped.
For Safety’s Sake
Technicians should be aware of a few warnings communicated by RMA. As pointed out, tires must always be properly repaired as shown in the accompanying section with sequential photos. If improperly repaired, tires may fail in service.
When repairing a tire, adequate eye protection (goggles or face shields) should always be worn to prevent serious eye injuries. Ear protection should also be worn.
Permanent tire damage due to underinflation and/or overloading can’t always be detected. Ply cords damaged by underinflation or overloading may break and cause a “zipper” in the upper sidewall with instantaneous air loss and explosive force. These damaged tires should be inflated only when using a restraining device or safety cage that complies with OSHA regulations and an air line with a clip-on air chuck.
Products from different repair material manufacturers should not be mixed.
Step-by-Step Tire Puncture Repair Procedures
The following “how to” photos and captions show and explain accepted industry procedures for repairing tire puncture injuries. Additional information is available on RMA’s website – rma.org – and by requesting its Puncture Repair Procedures information, or by requesting information about TIA’s Basic Automotive Tire Service training series, which includes a module dedicated to puncture repair.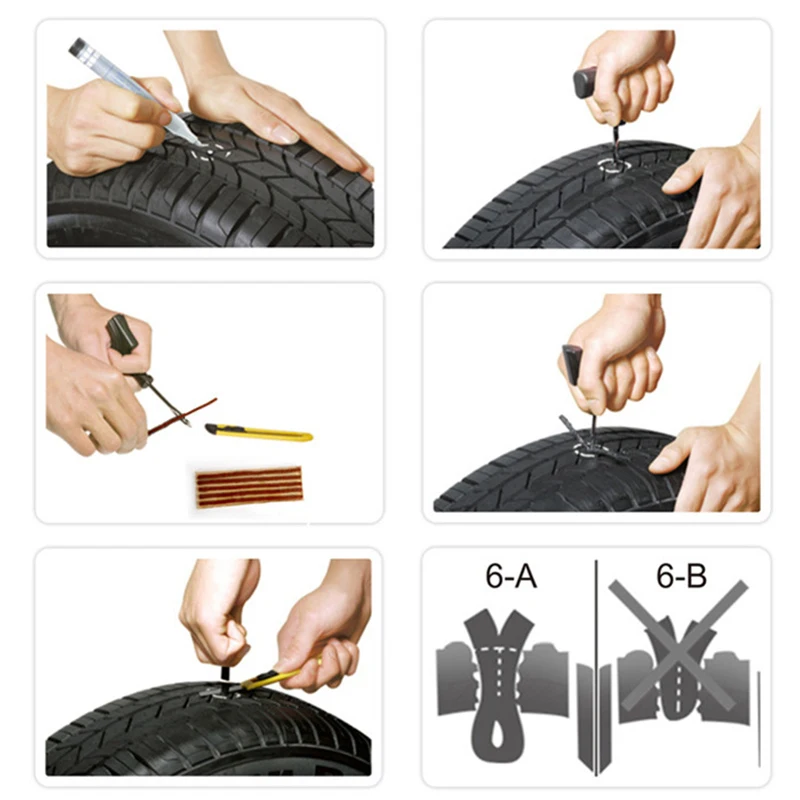
1. Consult information about repairability of tires.
2. Locate the injury and circle with a tire crayon. DO NOT INVERT RADIAL TIRES.
3. Remove the foreign puncturing object and probe the injury with an awl to determine the angle of penetration.
4. Clean the area around the injury with cleaner fluid and a scraper.
5. Using a low speed drill (max. 500-700 rpm) and a 3/16-inch tapered carbide cutter, ream the injury following the angle of penetration from the inside of the tire. Use proper eye protection.
6. Remove the poly from the plug stem. Hook the stem into the wire puller. Coat the entire plug with self-vulcanizing cement. NOTE: With one-piece repair units the patch section must be coated, as well.
7. While the cement is still wet, push the wire puller through the injury from the inside of the tire. Grasping the wire, use a steady pull until ½-inch of the gray rubber on the plug is exposed outside the tire.
7a. FOR ONE-PIECE REPAIRS: While the cement is still wet, insert the guide wire through the injury from the inside. Using pliers, grasp the stem behind the wire and pull until the patch is seated against the innerliner. Do not over-pull and cause the patch to dimple.
8. Using a flexible knife, cut the plug on the inside of the tire 1/8-inch above the innerliner. Be careful not to stretch the plug when cutting.
9. Making sure the bead arrows of the repair unit are pointing to the beads, center the proper size repair unit over the injury. Use a tire crayon and outline an area ½-inch larger than the repair unit.
10. Use a low-speed buffer (max. 5,000 rpm) and a buffing rasp to buff the plug and the outlined innerliner area. BE CAREFUL NOT TO BUFF THROUGH THE INNERLINER.
11. Use a vacuum to completely remove the buffing dust.
12. Apply a light coat of cleaner fluid to the buffed area, scrape clean and allow to dry.
13. Apply an even coat of self-vulcanizing cement to the entire buffed area. Allow cement to dry until tacky. Never use blow dryers, compressed air or heat lamps to facilitate drying. Drying time is affected by temperature and humidity.
14. When cement is dry, partially remove the poly backing from the repair unit, leaving just enough to hold the unit. Press the unit into place while removing the rest of the backing.
15. Stitch the repair unit vigorously from the center working outwardly. Use as much hand pressure as possible. Remove top cover film.
16. Apply repair sealer on the overbuff area, and over the edge of the repair unit.
17. Apply bead sealer to the bead of the tire before inflation to help prevent air loss around the bead. (NOT NECESSARYFORTRUCK TIRES.)
18. After inflating, cut the plug stem flush with the outside tread area. The tire is now ready to be returned to service.
Click on these links to download a full poster version of this illustrated two-piece tire puncture repair guide, as well as one that details single-piece tire puncture repair procedures.
After downloading, take the PDF file to a local office supply store (OfficeMax, Staples)or FedEx Kinkos location, where you can print out a full-color, 18×24-inch poster to hang in your tire service area and/or customer waiting area.
List of Basic Repair Tools:
Awl
White paintstick (truck tire)
Tire Crayon
Scraper
Safety Glasses/Shield
Low-Speed Buffer/Skiver
3/16-inch Carbide Cutter
3/16-inch Adapter
5/16-inch Adapter (truck tire)
Pulling Wires
Knife
Black Contour Cup – 60 Grit
Adapter with Spacer
Stitcher
When Not to Repair a Tire
• There is 2/32-inch or less of tread on any two adjacent tread grooves. The tire is not legal on U.S. highways.
• The tire cord or steel belt is exposed, there are flex breaks or severe sidewall abrasions.
• There is any evidence of a separation in the tread area or the sidewall of the tire.
• There is any evidence to indicate the tire has been run flat. Do not inflate, since inflation could result in serious injury. Demount the tire and inspect for innerliner damage.
• There are punctures or damage in the shoulder or sidewall areas.
• Never use any wheel with a rim that is bent, pitted from corrosion, cracked or worn. Remove rust, dirt and foreign materials from wheel/rim parts.
When ‘Always’ is right
• Inflate the tire to maximum allowed pressure. Do not overinflate.
• Check the surface and the valve for the source of the leak(s) by using water, soap solution or leak detector.
• Locate the injury and circle with a crayon.
• Remove the valve core to deflate the tire.
• Demount and inspect the inside of the tire on a well-lighted spreader for innerliner cracks, open splices, exposed tire cord or steel belts, broken beads or bead wires, bulges or blisters, or other interior damage. If any damage other than a ¼-inch maximum puncture injury in the tread is present, do not repair.
Final Inspection
The final inspection is your last chance to make sure a tire puncture repair job was done properly and within industry standards. A proper repair must completely fill the injury with a suitable vulcanizing material or rubber plug/stem and a patch must be applied to the innerliner to prevent air loss.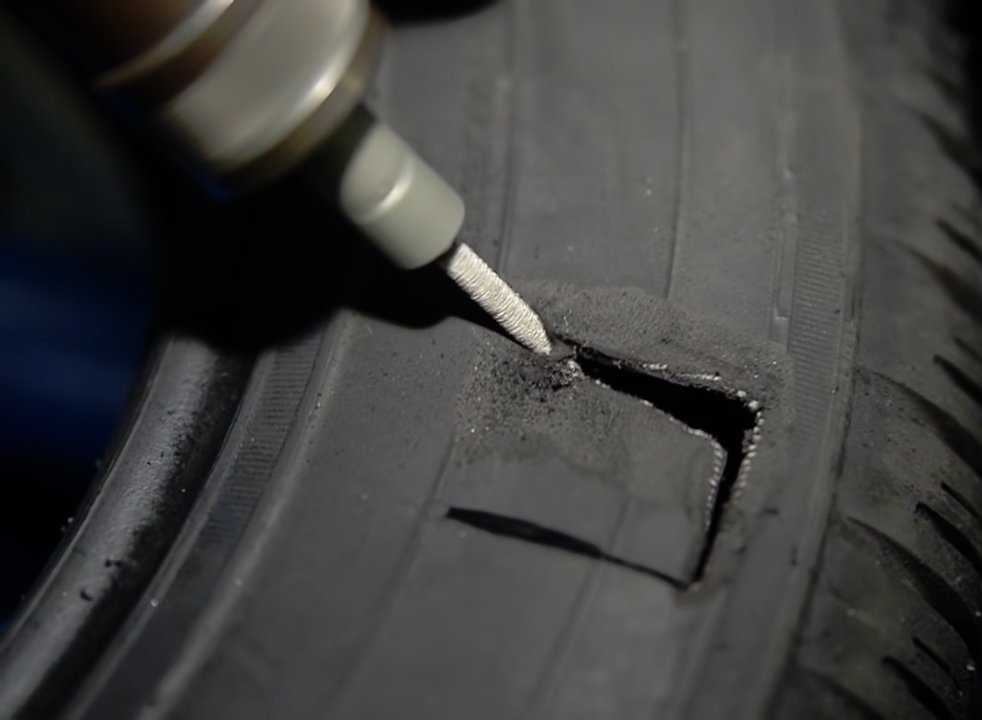
Inspect all of your repairs and rework, if necessary. After removing and inflating the tire/wheel assembly, inspect the assembly (tire/wheel/valve) for damage or leakage. Pay particular attention to the location of the repair, the beads and the valve. If the tire continues to lose air, it must be removed again from the wheel for a complete re-inspection.
Radial Section Repair
The procedures for repairing a more serious injury on a radial medium truck tire are notably different than when repairing a minor puncture. Section repairs may require special tools and repair materials, including strip gum rubber, an extruder, a spot curing press, specially designed repair units and more.
The process described here is very basic; special training is required to properly perform section repairs.
While the steps for probing an injury angle and buffing are the same, a grinding (skiving)step must be added to remove all damaged wires and the length and width of the damaged area must be measured to assist in selecting the proper repair unit.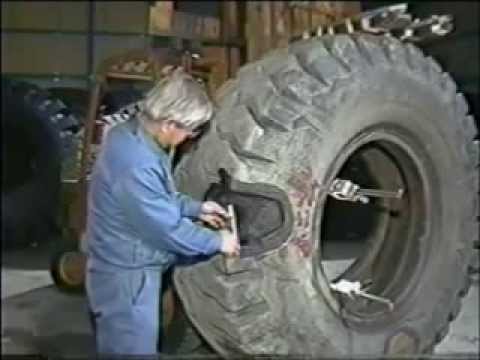
For crown repairs, skives should be a cupped “Y” type with a 90-degree skive through the wire belts and ply. Stitching should be done as in a regular repair prior to curing the repair and allowing it to cool.
Next, a cleaner fluid should be applied and the innerliner should be scraped clean. When placing the repair unit over the injury, center it with the bead arrows pointing directly to the beads. Using a tire crayon, outline an area one-inch larger than the repair unit.
Perform the buffing step, vacuum the dust and use a light coat of rubber cleaner fluid and a scraper to clean the buffed area. Apply an even coat of self-vulcanizing cement to the entire buffed area and allow to dry until tacky.
Make sure the tire is in a relaxed position. Partially remove the backing from the repair unit, leaving enough to hold without touching the back. Apply the patch and press down.Then stitch the unit, working out from the center. Use as much hand pressure as possible. As a final step, apply repair sealer to the over buff area and over the edges of the repair unit.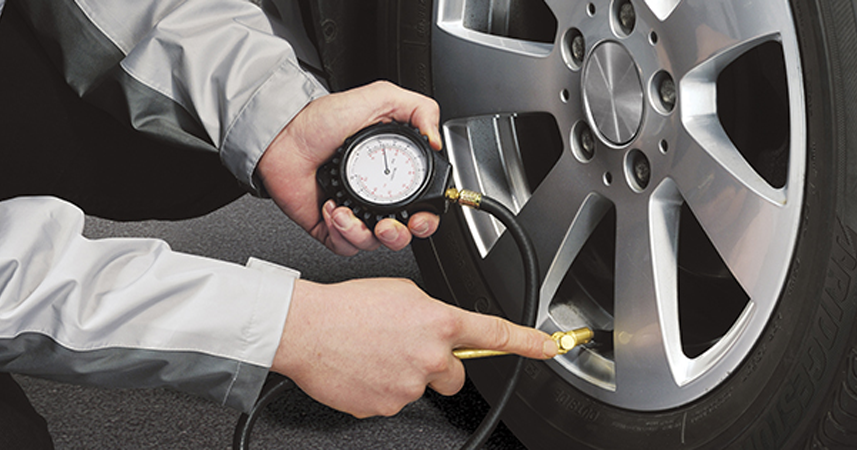
Disclaimer
Repairing a tire is serious business. The preceding article was researched and written using existing industry-approved procedures and material from both the RMA and TIA, and is NOTintended to be used as a substitute for proper tire repair training. The photos and additional information were supplied by Myers Tire Supply/Patch Rubber Co. The process shown here is consistent with those used by other major repair product makers, but consult their specific instructions before using. This information represents a consensus of tire industry experts. This article is meant for educational purposes and those who use the methods recommended are solely responsible for any injuries, deaths or losses resulting from their application.
The first, and most crucial step in any tire repair process is to completely remove any foreign material from the damaged area. Photos: Jim Park
The flat tire is arguably motoring’s oldest nemesis. Check out any film or photography from the early Automotive Age, and sooner, rather than later, somebody is going to roll their sleeves up and get to work patching a tire.
Early automotive tires were essentially scaled-up versions of bicycle tires. But they evolved quickly to meet the more rigorous demands put on them by early cars and trucks. Improvements to roads and highways made a big difference, too. So today, full-on tire failures are relatively rare compared to those early years behind the wheel.
But flat tires remain a serious threat for fleets today. And, of course, when flats do occur, they rarely happen in front of your local tire dealer’s store. And fixing a truck tire is a complicated, safety-focused affair. Unlike an enterprising passenger car driver, pulling out a set of tire plugs and setting to work just isn’t going to get the job done.
And, of course, tires aren’t cheap. Smart fleet managers understand that wringing every possible mile from a truck tire saves money. Which means that getting tires fixed properly after failures do occur is vital for both vehicle productivity and fleet profitability.
As with so many things in fleet operations, your drivers are your first line of defense when it comes to tire repairs. And this defense should begin every day with a thorough pre-trip inspection with a focus on good tire health.
The quickest and surest way to determine if there’s a slow leak in a tire is by checking tire pressure with an accurate, properly calibrated tire gauge. Unfortunately, many drivers still believe that whacking a tire with an ax handle is the only pressure check required. Tire experts maintain that hitting a tire with a stick does little more than confirm that there is, in fact, some air present in the casing.
The next best thing to putting a gauge on a valve stem is a careful inspection of all the visible tire surfaces. Drivers should visually inspect tires before and after a trip. And technicians should take time to look tires over during any maintenance checks.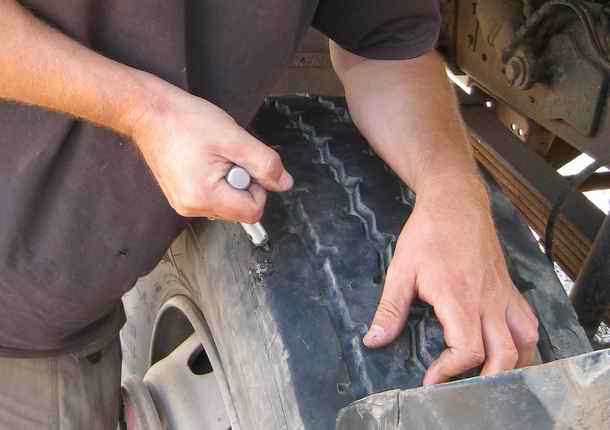 The focus should be any signs of impending tire failure, which generally shows up as “balloon” areas on the surface or sides of the tires, as well as any foreign objects protruding from those areas. If something is spotted protruding from a tire, check to see if air is leaking by putting liquid over the area in question to see if any air bubbles form. Soapy water is best, but good, old-fashioned spit will do in a pinch.
If you’re a technician and have the tire off the truck, there are more formal inspection guidelines to follow. According to the Rubber Manufacturer’s Association Truck and Bus Tire Repair Guidelines, prior to examining a tire, it should be placed in an approved safety cage and then inflated to recommended (normal operating) pressure. At that point, you can apply a soap-and-water solution to locate damage and any corresponding air leak.
“We always recommend tire technicians use approved tire repair units following recommended industry procedures, in accord with RMA guidelines,” says Brian Buckham, general manager, product marketing, Goodyear.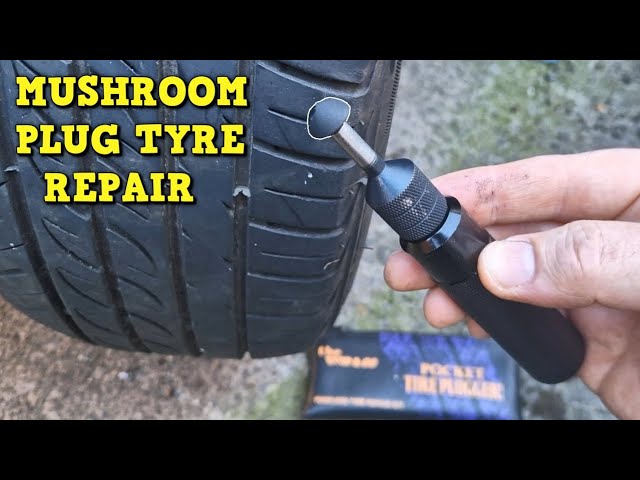 “The technology for repairing truck and bus tires is proven and has remained relatively unchanged for many years. These guidelines can help your technicians repair tires safely and effectively. If done correctly, a repair can last the remaining life of the tire.”
The basic technologies used in tire repair have been around for some time, notes Phil Arnold, field engineer, customer engineering support, Michelin Americas Truck Tires. “However, what has changed is an emphasis on proper training of shop technicians who perform the tire repairs.”
There are many industry guidelines available to help your technicians follow proper repair procedures. Arnold cites the Tire Rubber and Tire Repair Manufacturers Group, the American Trucking Associations’ Technology & Maintenance Council, and the Tire Industry Association, which all publish industry-recommended practices and methods for established tire repair methods as well as new reinforced shoulder repair processes.
Tire repairs aren’t time consuming, if you have the right tools ready to go. Remember, however, to never mix-and-match glues and patches made by different suppliers.
Once you have located an injury to a tire casing and a pressure leak, it’s time to go to work.
Tubeless passenger car tires today can be quickly repaired using rubber string “plugs.” But plugs aren’t robust enough for commercial vehicle repairs, which instead require both patching the inner casing and filling in the void created when the tire was punctured.
Robert Palmer, director of market sales engineering for Bridgestone Firestone, says technicians should begin by removing the penetrating object from the casing and then temporarily filling the disrupted area with a cured plug or filling material, capped off with curing repair gum. This will keep moisture out of the puncture, which can degrade both the tire casing and the puncture repair.
“Plugging a tire is a temporary measure to retain inflation pressure,” Palmer says. “A permanent repair is always required to ensure you get the full life out of the casing. Filling the injury with string plugs (plugging) is not considered a proper repair. Plugging does not restore the casing integrity and will lead to further degradation of the injury and casing over time. Filling and installing a repair unit is intended to last the life of the casing and restores the casing to be utilized in its original intended application.”
At this point you’re ready to apply a patch to the inner casing of the tire. Using a spreader, open the tire up so you can access the damaged area in the inner casing. Use a clean rag to wipe the puncture area down and remove any damaged tire sections or foreign objects. Use a wire brush or low-speed drill with cutter head to buff the inner casing area around the puncture. You want a “velvet” finish on the tire to give the patch and the cement a tactile surface to adhere to. Be sure to remove any rubber dust from the buffing process from the casing — but do not use compressed air to do so, as it often contains oil and other contaminants that can degrade repair patch integrity.
Flat tires never seem to occur in convenient locations. Luckily, many tire manufacturers today have quick-response, roadside assistance programs to help your truck get moving again.
Photo: Goodyear
At this point, the RMA cautions technicians to not mix-and-match patches and glues from different suppliers. Repairs are more effective and last longer if proprietary products are used throughout the repair process. With that in mind, select the appropriate size repair patch required to covered the damaged/prepped area inside the casing. Next, apply rubber cement to the buffed casing surface, then lay the patch down on down on top. Now buff the patch to ensure a good bond with the rubber cement and casing surface.
Arnold stresses that failure to take both steps — plugging the hole and patching the inner casing — can lead to issues with the tire down the road. “An inner liner which is not patched can result in a loss of inflation pressure, and an injury not filled may lead to moisture contamination of the casing, risking loss of tire endurance later,” he says.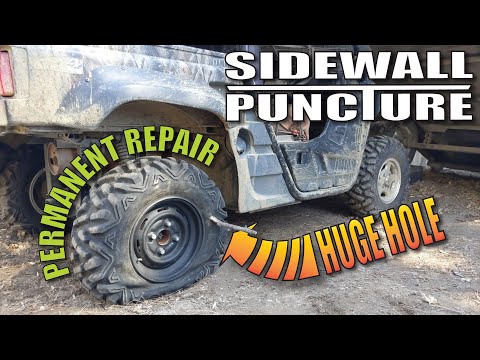
At this point you can reassemble the tire and rim. Next, inflate the tire in a safety cage to recommended pressure and check for leaks with soapy water. If no bubbles appear, the tire is ready to go back into service.
Fleets rely on a wide variety of tire types to get work done. And in most cases, tire repair procedures vary little from type to type. Palmer, for example, notes that wide-base singles and low-rolling-resistance tires are repaired in the same manner as conventional truck tires. “Some tire technicians say that wide single tires are actually easier to repair, as the increased width between the sidewalls and wider tread area make it easier to get inside the tire to perform the repair,” he says.
Punctured tires will remain a fact of life for fleets as long as there are rubber tires and debris in the road. And although repair methods have not changed much over the decades, good training and attention to procedures can usually return damaged tires to full service at a fraction of the cost of a new tire.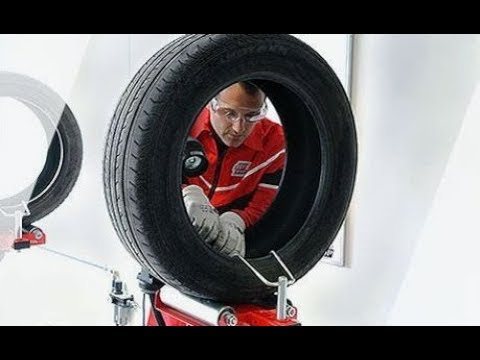
According to history, one day in 1888, English veterinarian and cyclist John Dunlop, tired of shaking through the countryside of Britain on molded rubber tires, glued a piece of water hose with a ring and pumped it up with a football pump - this is how the first pneumatic tire appeared.
History is silent when it was pierced for the first time - but most likely it happened in the same year. So the need for tire repair appeared simultaneously with their appearance.
Puncture required cut with burrOver the past 124 years, tire repair technology has been brought to almost perfection. For several decades (after tubeless tires in the vast majority have given way to tubeless ones), the procedure for repair has practically not changed.
This procedure is outwardly quite simple - and car owners (as well as part of the workshop workers offering this service) have the false impression that it is not particularly important to follow the prescribed technology exactly - they say, "it will do.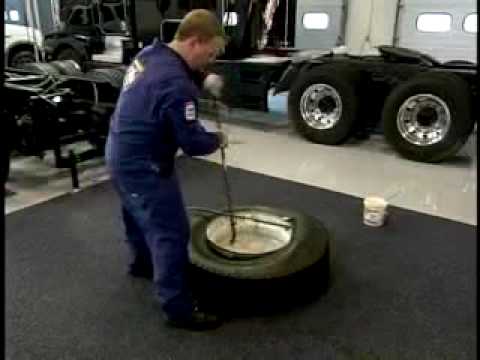 " And many "specialists" do not really know the technology. And therefore they sincerely believe: why do we need all sorts of "extra" actions? Why take the tire off the rim when you can keep the wheel off the car at all? The client is in a hurry - so you can plug a puncture (and a cut) with a cord, as they say, “on the go”. Does not poison the air, and everyone is happy. By the way, some workshops that promise “repair of punctures and cuts” do not have anything at all, except for cords and an awl for their installation.
In fact, each stage of tire repair technology is, as they say, "written in blood" - like military regulations and safety instructions. And this is not an exaggeration: what threatens a sudden rupture of a wheel at speed is not worth saying - if people do not die, then they are very lucky ...
We asked our expert, one of the heads of the Russian representative office of the German company "REMA TIP-TOP GmbH" Alexander Akhapkin, to talk about tire repair technology and those common mistakes (or even outright hack work) that car owners have to face.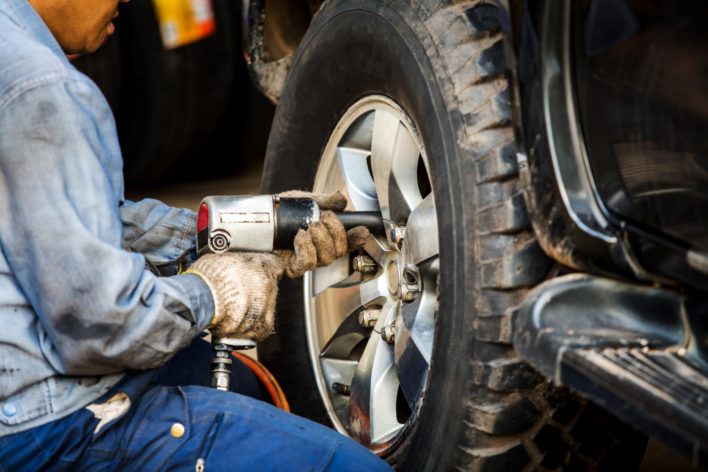
- Tire repair, in general, comes down to a simple and understandable action: you need to plug the resulting "hole" in it. It sounds simple - like the instructions for skydiving: stepped out of the plane and pulled the ring. Only now, no one jumps with a homemade parachute, especially one packed according to rumors and advice from neighbors. Although the consequences of such a jump and improper tire repair are quite comparable.
So let's go in order: how to do it!
So, the first step: determine the type of damage - is it a puncture or a cut?
The difference, of course, is in size. Roughly speaking, if no more than 1-2 cord threads are damaged, then this is a puncture. Anything more is a cut.
If it is a cut, it is important to determine its size. Tires have speed categories - and the higher it is, the smaller the amount of damage that can be repaired. For example, it is allowed to repair the tread of a category Q tire (not higher than 160 km/h) if the damage is not more than 20 mm. If the tire category is S (up to 180 km / h), then the size of the permissible damage is not more than 12 mm. And on a category H tire (up to 210 km / h), only a puncture with a diameter of not more than 3 mm can be repaired.
In general, damage limits depending on their location, size and speed category of the tire are given in special tables RemaTipTop, compiled according to the results of tests and tests.
When repairing with a cord, it is necessary use adhesiveFor example, regarding damage to the shoulder of a category Q tire (up to 160 km/h), repairs are allowed if the “injury” does not exceed a diameter of 8 mm. And damage to the sidewall can be repaired if it is no more than 35 mm long (along the side height) and up to 20 mm wide.
Second step: what kind of repair is needed? To get there - or capital? The fact is that the most common repair of a puncture with a cord is actually exclusively temporary - just to get to the station and overhaul the tire. And often the car owner asks to fix an expensive tire with a cord, which he puts on an expensive car - and stops there. And at the stations they “go forward” to him: they say, the consequences are at the expense of the customer ...
But even with such a repair, some "masters" manage to cheat. The cord, before placing it in the puncture, is not even smeared with glue. There is a category of cords made of "raw" rubber (they are also called "snotty"). And it is mistakenly believed that glue is not needed for them. No - it's a must!
In addition, when repairing with a cord, it is necessary to form a hole with a burr to enter the repair material. And this is very often not done (on the principle - and so it will do!). For ten kilometers, maybe it will “get off” ...
Step three: puncture overhaul, after which the tire will reach its physical wear.
Fungi are installed at "vertical" punctures Here the choice of repair tactics depends on the location and area of damage. If the puncture axis runs perpendicular to the tread surface, then it is preferable to seal it with a fungus. If the puncture axis runs at an angle of more than 12 degrees from the surface, then a plug must be used.
Tire repair fungus is preferred, but if the puncture is at an angle, the fungus head will not be able to fit snugly against the inside of the tire. And over time it can come off - which, of course, is unacceptable.
In principle, all actions of the wizard when using both fungus and cork are the same. The puncture is drilled with a burr with a diameter of 3 mm or 6 mm. The repair area from the inside of the tire is processed with a roughening tool - this is done so that the glue applied to the fungus cap or patch (if cork is used) firmly adheres to the surface of the tire.
But this is followed by an outwardly simple but obligatory operation - the dust formed after drilling and roughening is carefully removed with a brass or coconut brush, and then vacuumed. Moreover, simple “blowing” or brushing with a rag is unacceptable!
Processing with a special solution - required! Then the repair area is smeared with glue (the Germans call it "cement" - that's what it says on the containers with it. In fact, this is a high-tech adhesive system) and a fungus or cork is introduced into the hole - from the inside of the tire! Moreover, until the moment of installation, it is impossible to remove the packaging from the fungus or cork - it can be easily removed when they are introduced into the hole to be sealed. After installing the cork, its excess is cut off - and the repair area is smeared with glue. A patch is applied on top.
Next, the fungus cap or plaster is rolled on. And it remains only to cut off the excess fungal stem or cork from the outside of the tire.
It is very important to use materials from only one company for temporary repairs with a cord and a major fungus or plug! The fact is that the adhesives themselves are spilled: there are those produced on the basis of hydrocarbons, and there are those based on trichlorethylene. In addition, adhesives from different companies, even on the same basis, differ in composition. And therefore, in case of confusion, a reliable connection will not work - at best, it will last for some time. But - a little time ...
Fourth step: overhaul of large damage. Let me remind you that damage that exceeds a puncture, but does not exceed the maximum allowable, is considered large. With such damage, the tire is only scrapped - it is no longer possible to achieve the necessary reliability.
The technology of such a repair is simple - but there are no "extra" steps and steps in it. Outside, the place of damage is cut "under the funnel" - part of the damaged rubber is removed, the remains of the cord. From the inside, the place under the patch sticker must be roughened.
The plaster is a high-tech articleThen the dust must be carefully removed after processing with a vacuum cleaner - and this operation must not be skipped!
Next, the “funnel” is treated with a special solution: in the case of using the “Tip Top” technology, this is “MTRThermopress”.
And filled with raw rubber of the same brand as on the tire - heated strips or a special extruder.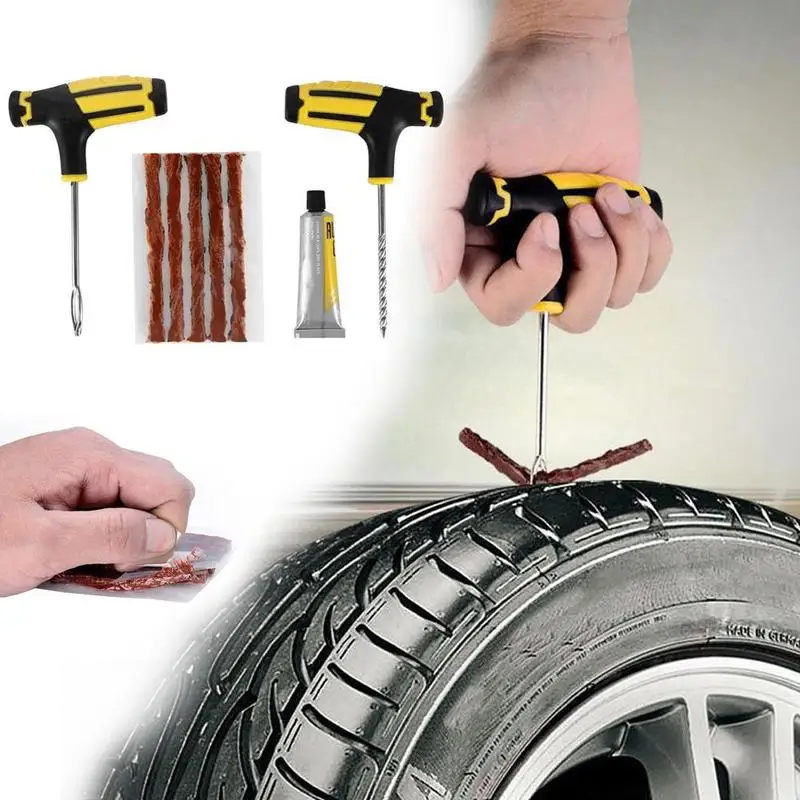 Raw rubber is treated with the same solution. And immediately closed with insulating foil for subsequent vulcanization.
Please note - do not skip a double treatment with mortar, nor cover the vulcanization site with foil!
A plaster is applied from the inside of the tire to the damaged area. And be sure to roll with a special rolling - this stage also cannot be skipped.
Something about Band-Aids: Don't try to save money by replacing your branded Band-Aid with the first piece of rubber you find! In fact, a patch is a rather complex rubber product reinforced with synthetic or steel threads that coincide with the direction of the tire cord threads.
Patches are produced separately for bias and radial tires. For their correct orientation (it is very important!) Arrows are applied on each of them, which are directed to the sides. You cannot cut the patch "to size" - it cannot be cut at all due to the complex internal construction of the cords. Companies produce several sizes of patches - and you need to choose from them using the Type Top damage table.
Naturally, the use of patches and adhesives with which they are glued, produced by different companies, is unacceptable - “cement” is applied to the surface of the patch, which needs to be smeared on the surface from the inside of the tire: only in this case the connection will be reliable and durable.
Step five: vulcanization. In order to vulcanize a “sandwich” of raw rubber, a tire and a plaster, it must be heated. But the problem is that vulcanizers, whose power allows you to warm up the entire volume of the repaired area, are expensive and consume a lot of electricity. In addition, they are bulky - the area of \u200b\u200bthe heating plate must exceed the size of any patch. So not every workshop can afford such a vulcanizer.
There is another solution - the so-called "two-stage" repair method. This is when a vulcanizer that is more affordable and consumes less electricity is only the site of damage. Its size is not enough to vulcanize the connection of the patch and the tire.
But that's okay - there is an effect called "cold vulcanization". The BL adhesive and the coating of the plaster from Tip Top are just capable of such a "cold" vulcanization.
However, if after a one-stage - “hot” - vulcanization, the tire can be mounted on wheels and installed on a car, then after a two-stage one (when only raw rubber warms up, and the patch is glued “cold”), you will have to wait at least 24 hours before mounting. It is these days that make up the second stage - the time is required for the cold polymerization of the connecting layer to be completed.
So, to summarize, the “main secret of tire repair” is not in some particularly complex nuances of the technology - it is simple. The secret is in the accuracy and meticulousness of following simple instructions. In which, I repeat, there are no “extra” stages
tire service
02/22/2018
Despite the objective importance of the spare tire, not all drivers always have it with them. Some do not carry a spare tire out of hope or belief that their tires are invulnerable. Others deliberately take this step, as they stocked up with a special tool in advance, which, if necessary, can eliminate a tire puncture along the way. What else can be used and how to do it right? Let's figure it out.
Contents of :
Conventionally, all methods for express tire repair can be divided into two categories:
Consider ways to restore a damaged tire on the road. The first three methods are temporary. The latter, with the right approach, allows you to completely restore the tire.
 e. preventive). A special sealing compound is pumped into all four undamaged tires. While driving, it is inside the wheel in liquid form. If the tire suddenly loses its tightness, then this composition, leaving together with the air, clogs the slot in a few seconds. This method is relevant if you have a long trip under time constraints.
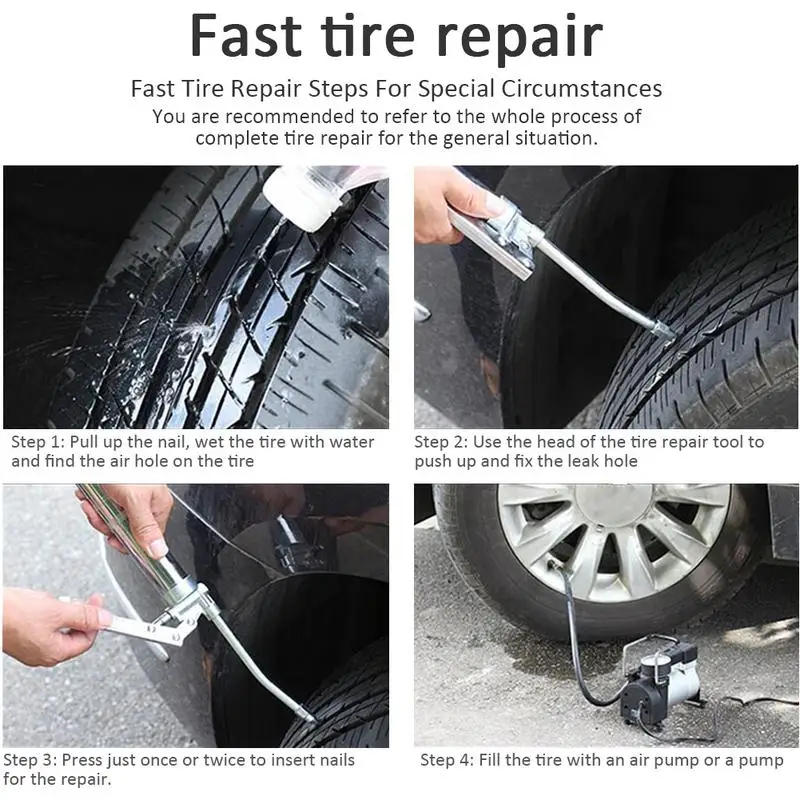
After removing the foreign object, the hole is processed with an awl with abrasive edges: this tool must be inserted into the puncture and cleaned and worked out several times with intense reciprocating movements. Then the raw rubber tow is removed from the package and inserted into the eye of the second awl so that both ends are the same length. The hole in the tire and the raw rubber is treated with an activator. Next, the awl is inserted into the puncture in such a way that small ends of the tourniquet, about a centimeter long, remain outside. After 5 minutes, the excess remaining on the surface is cut off. This method can also successfully eliminate small side cuts.
There is a technique that allows using wire and several bundles of raw rubber to get rid of even extensive side damage to tires. However, it is quite difficult to implement and not every driver will be able to implement it.
Consider a few well-known tools that are most widely used to repair punctures:
 It works in the same way as most sealants: the container is thoroughly shaken, after that a hose is attached, and the contents from the container are completely pumped into the tire. The maximum diameter of the repaired hole is 4.5 mm. This is almost always enough to repair punctures caused by nails and screws.


/cdn.vox-cdn.com/uploads/chorus_asset/file/11461305/2665991.jpg.jpg)