By Tom Morr, automedia.com
Difficulty: Difficult
Estimated time: 240 minutes
Most people think that wheel alignment is best left to the professionals. This is true in many respects, but some alignment specs are easy to check yourself, and toe is one aspect of alignment that can be checked at home. This can come in handy after replacing steering or suspension components so that the vehicle won't be wildly out of adjustment for the trip to the alignment shop, or at the very least provide a better understanding of the alignment process.
Factors affecting wheel alignment
In theory, all four wheels should be perpendicular to the ground and parallel to each other. When the vehicle starts pulling to one side – or after a sharp impact with a curb – most drivers suspect that the wheels might be out of alignment. Irregular tire wear, vibration and odd handling characteristics are other clues.
The three factors that affect alignment are toe-in, camber and caster. The first two can easily be checked at home.
Toe-in
Car front tires are slightly pigeon-toed to intentionally place a very slight load on the wheel bearings. Typical toe-in specs vary from one-thirty-second to one-eighth-inch, depending on the vehicle. Check a service manual for your car's acceptable range.
The best tip-off to a toe problem is a saw-tooth wear pattern that's equal on both front tires. If the tread blocks point toward the frame, then toe-in is excessive; pointing outward indicates too much toe-out.
Toe-in spec-check and adjustment are shown in the accompanying photos. Although no specialized tools are necessary to check toe, companies such as Eastwood, JC Whitney and Harbor Freight sell tools specifically for this purpose.
Two things to remember when measuring and adjusting toe: First, true spec is measured midway up the tires. If the car's body makes this impractical, take the front and rear measurements one-quarter of the way up the tires, then double that to get the true toe as it would be in the center of the tires. Also, an off-center steering wheel can sometimes be corrected by adjusting one tie-rod more than the other. (Steering wheel position has no effect on your final alignment.)
Camber
Camber is the measurement of tire lean in degrees. If the top of the tire tilts inward, the vehicle has negative camber; outward lean is positive camber. Most newer vehicles have slightly negative camber to improve stability and handling.
Two indicators of camber problems are the vehicle pulling to one side (the one with more positive camber or possibly less air in the tire) and uneven tire wear across the tread. Camber is easy to check with an angle finder and a straight edge, ideally one that's the same length as the wheel diameter so that tire sidewall bulge doesn't interfere with the straight edge.
Many front-wheel-drive cars don't have camber adjustments, and out-of-spec camber here often indicates bent or worn parts. On vehicles that have adjustable camber, the job can involve adding shims between the control arms and frame and turning cam bolts. Many people prefer to let an alignment shop make these adjustments, particularly if their car has independent rear suspension.
Caster
Caster is the angle of steering pivot in degrees. Just as water-skiers lean backward for stability, most vehicles are designed with slight negative caster – the upper ball joint is to the rear of the lower ball joint (similar to the front wheels on a shopping cart).
A clue to caster problems is the vehicle pulling to one side (the one with less positive caster). Heavy steering and wheel hopping over bumps are signs of too much positive caster, and light steering but excessive wander are clues of too much negative caster. Aligning to spec usually involves repairing or replacing chassis parts, so the average motorist is probably better off leaving caster corrections to the pros.
Taking a few minutes to check your alignment will make your tires last longer and your vehicle handle better. Even if you choose to have a shop align the vehicle, you'll have a better idea of the problem – and knowledge normally equals power.
| How-To - Chassis and Suspension
Most gearheads understand the basic definitions of caster, camber, and toe, but when it comes to actually measuring or setting these wheel-alignment specs, the easy solution is to bring the car to a professional shop. For cruisers where an alignment is a set-it-and-forget-it proposition, that's probably OK. But if you enjoy the satisfaction of knowing how to do it yourself, or if you expect to be making enough alignment changes that taking your car to a shop every time would be expensive and impractical, you'll benefit from adding alignment skills to your mental toolbox.
Car Alignment Explained
Aligning a car may seem like one of those voodoo sciences that makes no sense if you've never actually seen it done, but as we learned by doing in preparing this article, the process is really quite straightforward if approached logically.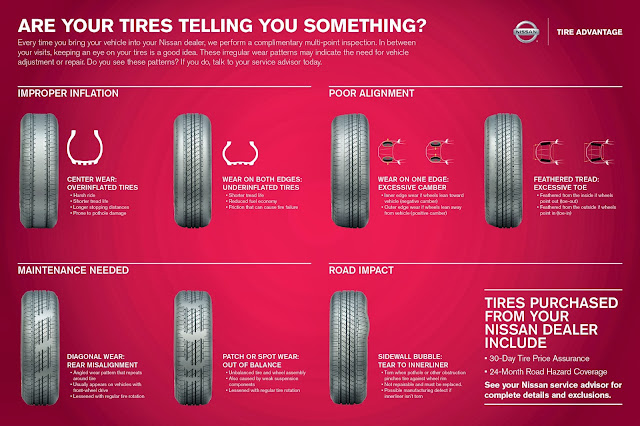 The most difficult and time-consuming part of the process is setting up your equipment to get accurate, repeatable results. Most critical is having a flat, level spot to work from, and as you'll read, we've come up with a simple way to accomplish that so you can set alignment in your garage, shop, or even at the racetrack.
Although a bit more advanced and requiring more expensive tools than a basic alignment, we've also included information on measuring and adjusting bumpsteer and scaling and corner-weighting a car-techniques that are critical to properly setting up any race car or high-performance street machine for optimum handling.
Even if you're not racing, having all your car's wheels pointed in the right directions is a good idea, and you might be surprised at how much better your car drives after being aligned, not to mention the fact that your tires will probably last longer once you learn how to do your own alignments. Even if you just want to set it and forget it.
Knowing your car's weight is handy, but knowing how that weight is balanced is critical for a race car and can be measured easily with the Longacre Accuset scale system, which costs about $1,100. If you don't need this advanced data, you can still use the information here about how to level the scales before moving on to the basic at-home alignment procedure in the following pages.
For accurate corner weights, all four scale pads must be on a level plane because variances are read by the scales as a change in corner weight. We made a simple scale-leveling system using an inexpensive laser level and a carpenter's universal square. The laser beam is focused on the universal square, which is set on each scale pad. The square is marked in inch increments, and each pad is shimmed to the same height.These diagrams show the before-and after results of corner-weighting our Mustang.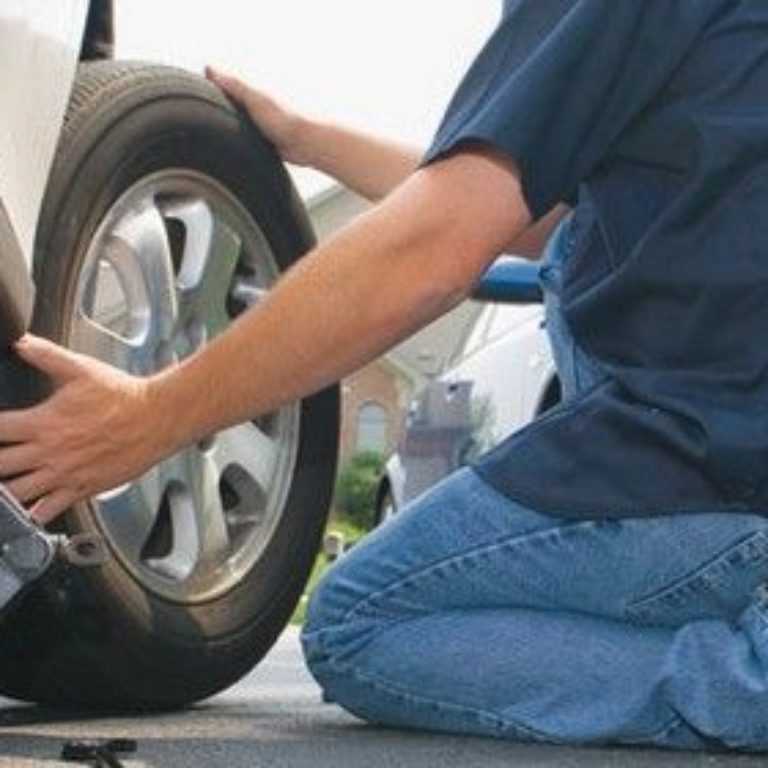 Making a 1/2-inch ride height adjustment to the left rear resulted in a 1.1 percent increase in cross-weight to 49.2 percent, which represents 0.8 percent of reverse wedge. Notice that the left, rear, and total weights did not change. For more information on balancing the car's weight per wheel, see Marlan Davis' story "The Science of Scaling Your Car" in the Sept. '03 issue, or on the This Month page of HOTROD.com right now.
Scaling Tips* Always measure cross-weights with the car in race-ready condition with all fluids full and driver weight accounted for.
* Develop a settling routine to use after each weight adjustment, either by rolling the car back and forth onto the scales or jouncing the suspension. Verify your procedure by weighing the car, jacking up one corner, and rechecking the corner-weights after settling. If the corner-weights vary, there is still some bind in the suspension. Refine your settling procedure until your results are repeatable before making any changes.
* Disconnect front and rear sway bars to eliminate the effect of sway-bar bind.
* Remember that weight jacking cannot shift weight from front-to-back or left-to-right. Only physically moving or adding weight can change the distribution within the car. (Small differences are the result of rounding.)
Your First AlignmentWith some patience, it's actually very easy and cheap to set your wheel alignment at home. This page introduces you to the tools and basic terms you'll need to know. Refer to the previous section about scaling and cross-weighting to learn how to level all your wheel pads before you begin your alignment.
A set of jackstands, a few loose floor tiles, some heavy fishing line and weights, a steel ruler, two sections of electrical conduit, a laser level, a freestanding square, an inexpensive Maximum Motorsports caster/camber gauge, and a few other odds and ends are all the tools you need to perform highly accurate alignments at home. Altogether, this equipment costs less than $200, and used properly, it can produce results as accurate as the best alignment shop in town.
Alignment TermsAckerman Effect: Also called toe-out on turns, this occurs when the steering angle of the inside tire is greater than that of the outside tire when the wheels are turned. Ackerman is desirable because it helps the front end turn in to the corner.
Camber: The degree of deviation between the top edge of the tire and a true vertical line running through the center of the wheel. If the top of the tire tilts inward as seen from the front, camber is negative; if it tilts outward, camber is positive. A tire's traction is always greatest when the largest part of its contact patch is in contact with the road surface, and static camber can be dialed in to keep the tire perpendicular as the chassis rolls in a turn. Excessive camber results in accelerated wear on the inner or outer shoulders of the tires, but most street cars can benefit from up to 1-1. 5 degrees of negative camber.
Caster: The deviation in degrees between an imaginary line running through the upper and lower ball joints and a vertical line running though the center of the wheel hub to the center of the tire's contact patch on the ground. If the imaginary line tilts to the back of the vehicle as viewed from the side, caster is positive; if it tilts forward, caster is negative. High amounts of positive caster cause the wheels to try to center themselves as the vehicle moves forward resulting in higher steering effort.
Cross-Camber: A side-to-side difference in camber settings. Many circle-track cars are set up to make lefthand turns with positive camber on the inside wheel and negative camber on the outside wheel.
Cross-Caster: A side-to-side difference in caster settings. Up to a half-degree more positive caster on the passenger side is often used on production vehicles to compensate for the effect of crowned pavement and keeps the vehicle from pulling to the outside edge of the road. Many oval-track racers run even higher amounts of cross-caster on the outside wheel to help the car turn down to a lefthand corner.
Toe Angle: Toe angle is the difference in track widths between the leading and trailing edges of the tires. If the track is wider at the front, the wheels are toed-out; if the track is narrower at the front, the wheels are toed in. Toe-in is used on most drag and production cars to compensate for slack in the steering components so the front wheels track straight ahead under forward thrust. Toe-out is often used on road-race cars to improve corner-entry turn-in, but excessive toe-out can cause dartiness on straightaways and tire wear.
Very accurate toe measurements can be achieved by the string method, which involves stretching a perfectly squared rectangle of string around it to create a known point from which to measure. The simple-to-build rig consists of two lengths of 3/4-inch electrical conduit cut about 6 inches wider than the track width of the car, with holes drilled for the string to pass through on each end. The conduit is supported at each end of the car by a set of adjustable jackstands (we use screwdrivers to keep the conduit from rolling off, as seen in the photos) and a length of 60-pound-test fishing line is strung along each side of the car at the same height as the hubs. The string is squared by using a steel ruler to take measurements from fixed points on the chassis, such as the center of the wheel hubs or a machined flat on a wheel, and then sliding the conduit side-to-side until the string is an equal distance from the reference point on each side of the car. Note that the front and rear measurements may be different due to variations in track width, but the conduit ensures that the strings always remain parallel to each other. It will take several minutes of walking around the car making smaller and smaller adjustments until you get the string square.
 Record the measurements to speed up the process the next time. This will also help identify bent chassis parts in the future.
Tips on Setting Alignment* The effects of the various alignment settings interact, so adjust caster and camber first. Toe must be set last.
* If you run out of adjustment range, you may have to make compromises on caster and camber to get the specs equal side-to-side.
* Always work from a level surface to avoid introducing error into your measurements. For example, tilting the front or rear of the car up or down can affect caster measurements. Tilting it side to side can affect the camber readings.
* Center the steering wheel before measuring and setting the toe, and make all adjustments without moving it.
Camber measurements are easy with this inexpensive, yet highly accurate, caster/camber gauge from Maximum Motorsports, available for about $60. To use it, steer the wheels straight ahead (which is easy to get perfect if you have strung the car), then hold the gauge firmly against each wheel and turn the knob until the bubble level is centered. Each mark on the knob represents 1/8 degree of camber (clockwise for positive camber, counterclockwise for negative). That's it. Our road-race Mustang is set up with about 3 3/4 degrees of negative camber per side.
Measuring CasterTo measure caster, you must steer the wheels right and left to record the camber change at each end of the arc with the gauge. Alignment shops use turntables with degreed scales, but you can be just as accurate with a set of homemade turntables made from two floor tiles or thin pieces of sheetmetal.
Caused by the control arms and steering linkage traveling through arcs with unequal radiuses, bumpsteer results in the undesirable effect of the front wheels steering themselves without driver input as the suspension compresses and rebounds. The result forces the driver to make additional steering inputs to keep the car turning in the desired direction, especially in tight corners as the car's suspension rolls while cornering. The problem is noticeable on stock-suspended cars that have been lowered, but it's prevalent on street rods with fabricated front suspension.
Measuring and correcting bumpsteer is relatively simple if you have the right tools, such as this bumpsteer gauge from Maximum Motorsports.Bumpsteer Tips* Always set toe and caster prior to bumpsteering a car because caster affects the height of the steering arms, which in turn affects the bumpsteer measurements.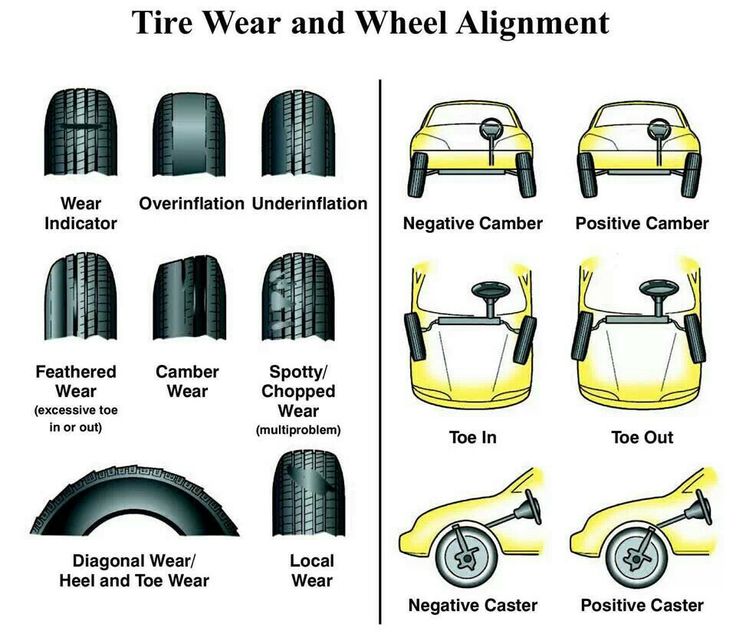
* Shoot for zero toe-in and no more than 0.015-0.020 inch of toe-out on bump, especially in the first inch of travel.
* Some toe-out on the inside tire in rebound can help corner entry by creating an Ackerman-like effect as the car turns in.
Big Thanks To:We couldn't have written this article without expert help and advice from Maximum Motorsports owner Chuck Schwynoch, who trained us during several phone conversations and trips to local racetracks. Although primarily known as late-model Mustang suspension specialists, Maximum Motorsports also sells several inexpensive alignment tools, including the caster/camber and bumpsteer gauges we used.
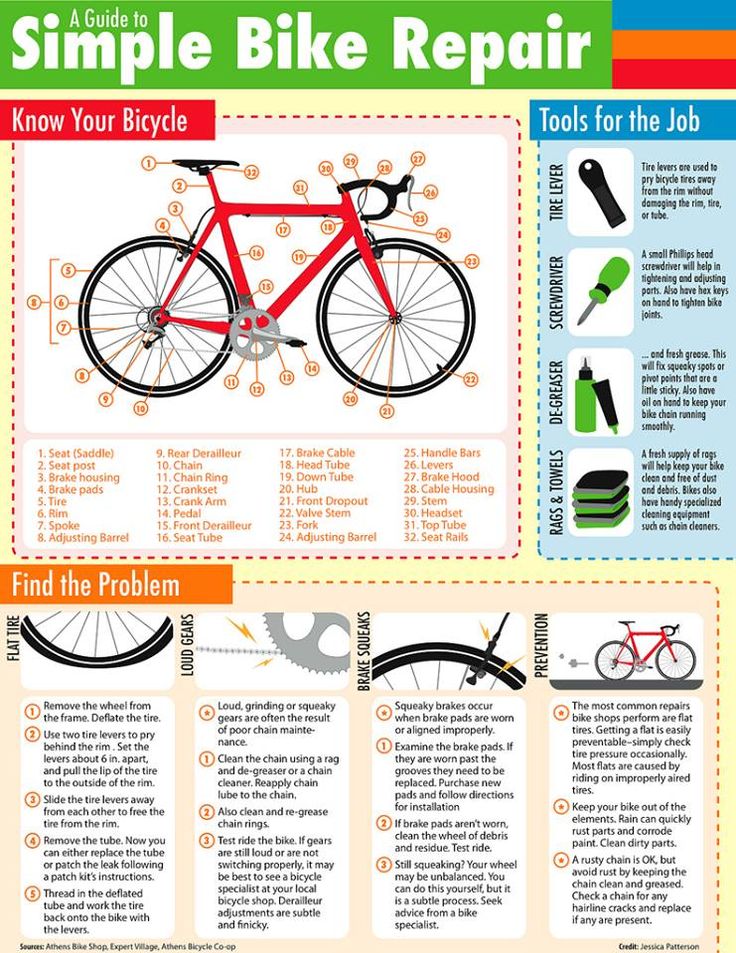 This problem is "not carefree" for an experienced cyclist, but can put a novice cyclist in a very difficult position. It’s good if you find a breakdown at home and you can give the bike for repair. In any bicycle workshop, within a maximum of an hour, the figure eight on the bicycle wheel will be removed for you. The cost of this type of service averages from 50 to 200 UAH, depending on the curvature of the wheel. But if this problem arose in the field, or you often encounter it, then this article will help you fix it yourself, without anyone's help.
 Contents of the guide:
It doesn't matter if a bend has formed on the front or rear wheel, it is equally dangerous not only for the bike, but also for your health. It should be understood that the use of a wheel with a bent rim is fraught with:
Prevention of the occurrence of "eight":
You should pay attention to the fact that if you prefer an aggressive driving style and are accustomed to passing obstacles at maximum speed, then the adjustment should be carried out at least once a month.
The most important tool in this business is a spoke wrench, with which you can adjust the degree of tension of the spokes on your bike. In the absence of this, you can use pliers, but in this case there is a high chance of stripping the thread on the spoke. It is best to choose a wrench specifically for the size of your bike's spokes, and not its universal counterpart. Also, in order to fix the figure eight on a bicycle wheel, you will need a marker or chalk to fix places with deformation.
Mention should also be made of the so-called "force method" of bicycle wheel alignment.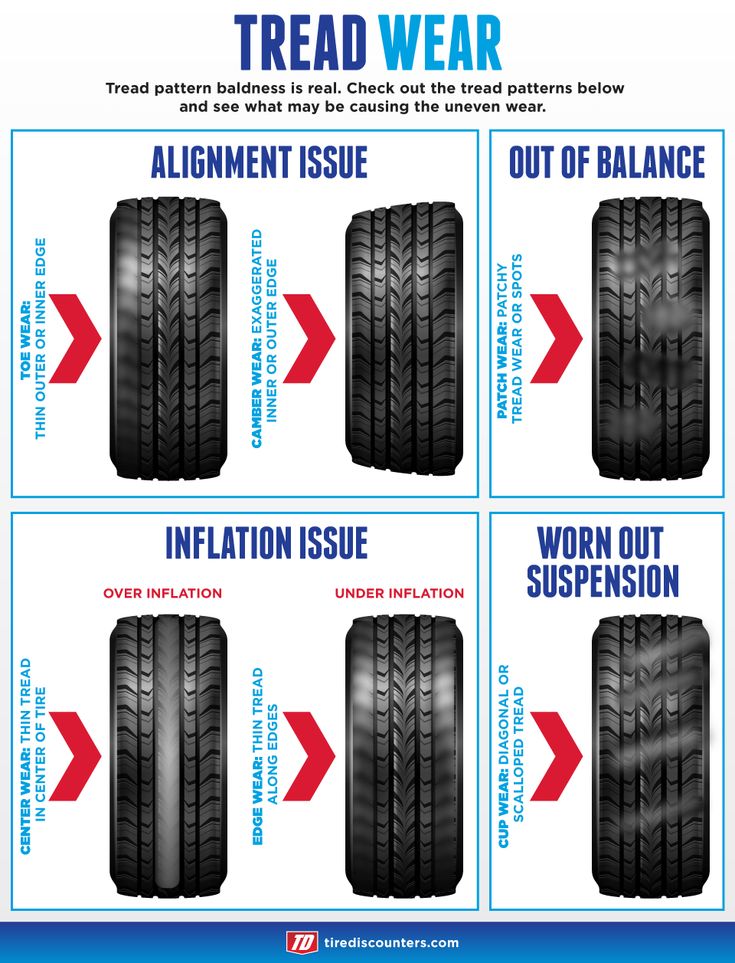 In this case, you need to put the wheel with the curved part on a flat hard surface and press hard on it. The main disadvantage of this approach is the high risk of ruining the wheel.
Many motorists know that you need to adjust the wheel alignment on your car, but not everyone understands what it is in general and what it is for. Meanwhile, these are very simple concepts, but at the same time very important. Understanding this and even making these adjustments yourself is not so difficult. This can be useful if there is no service station nearby - this is where these adjustments are usually made.
Independent creation of the angles of inclination of the front wheels. In short, these are the angles of inclination of the front wheels in the vertical and horizontal plane. They are not parallel at all, as many believe, but are located at an angle. This allows you to solve several problems at once during the operation of the car:
All these troubles occur precisely because of incorrectly configured wheel alignment and camber. Therefore, any motorist should not only know what it is and why it is needed, but also how it is done.
Camber is just the angle at which the wheels are vertical. They do not stand perfectly flat, but should tilt with the top edge inward or outward. This ensures more even tire wear. If the top edge of the wheels is pushed outward, then this is called positive camber. When, on the contrary, the upper edge is littered towards the center of the car, then this is negative camber.
Toe is the angle at which the wheels are located relative to the longitudinal line of the car. If you look from above, you can see that they are not parallel, and their front edges seem to be brought together a little closer than the rear ones. It also ensures even tire wear and more stable driving dynamics, especially when cornering. The convergence of different cars should be different:
The wheels straighten out and become parallel while driving. But with proper adjustment, the car is more stable, can align and drive smoothly on its own. It also goes through turns much easier.
Caster is the angle of the kingpin. It can be seen if you look at the front shock absorbers - they do not stand strictly vertically, and the axis is moved forward somewhat. This parameter is not adjustable, but set by the manufacturer. The role of the caster is also important - this angle provides greater stability in dynamics and makes it easier to control. Therefore, even on bicycles, the fork of the front wheel has a bend or slope, and the axle is somewhat forward.
 Therefore, it will be useful for you to learn how to check the wheel alignment yourself, especially since there is nothing complicated about it.
 In car services for these adjustments, there are usually special stands where the work is done quickly and efficiently. More advanced computer stands in this regard, on which higher accuracy is achieved, but these are not available everywhere. You can adjust the alignment with your own hands, without complex technology - you need a flat place with a viewing hole and some simple tools that any motorist has.
The working area must be level and not sloping. Need a viewing hole. The car must be parked so that the wheels are aligned. From the tools you will need:
Please note that this work is done with a perfectly serviceable running gear - so that there are no broken bearings, shock absorbers, etc. Otherwise, the wheel play will not allow adjustment, and after repair it will still have to be repeated.
Do-it-yourself camber and toe adjustment is better to start from the first one, especially since it is simple:
The distance difference is the camber indicator. For a rear-wheel drive car, it should be within 1-3 mm, and for a front-wheel drive car, from -1 to +1 mm. For greater measurement accuracy, you need to roll the car so that the wheels turn 90 degrees and measure again. If the numbers differ, then proceed to work:
Then put the wheel back on and do the same for the other one. As practice shows, it is quite possible to correctly make the collapse and convergence by such a manual method, and the accuracy is no worse than on a computer stand. When this technique did not exist, every motorist knew how to adjust wheel alignment at home.
This work is more convenient to do in the inspection hole. The wheels must be placed as evenly as possible, and the steering wheel must be fixed. For greater accuracy at the threshold level, it is better to stretch the cord around the entire perimeter of the car - this will help to better align the wheels. Now you need a telescopic ruler:
Now you can appreciate - the difference in the gap in the front and rear positions should be between -1 and +1 mm. relative to zero. These are normal indicators. If they differ, it is necessary to adjust the length of the tie rod in the desired direction. Keep in mind that rear-wheel drive and front-wheel drive vehicles have different toe-in. With such simple methods, you can adjust the wheel alignment with your own hands. This does not require any special tools. At home, with due care, the result is no worse than at the service station, and now you know how to set the correct camber and convergence yourself.