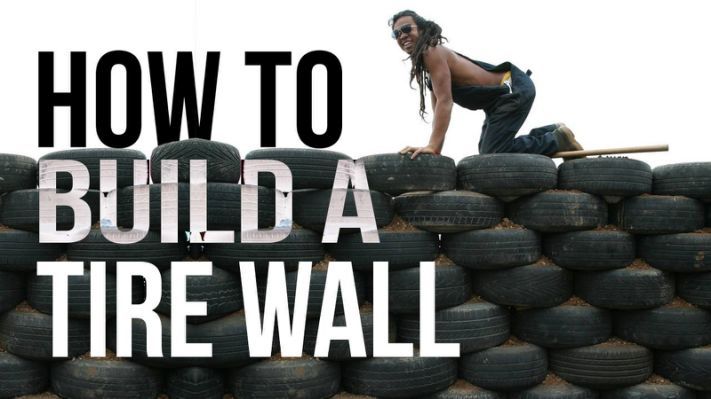
The use of tyres as a tool for construction is just the next step in the evolution of the wheel. Tyres have long been a menace to dispose of off since they are not biodegradable, they are big and are everywhere. In America alone there are 300 million tyres disposed every year, out of those 20%, or 60 million do not have any market, they are stockpiled or end up in landfills. The use of tyres as building materials solves two problems at once, disposing some of the 60 million tyres, and reducing the environmental and financial impact of building a home.
The basis for the use of tyres as construction material was its quality as a heat conductor. In fast moving vehicles, such as race cars, tyres may actually conduct/ transmit enough heat to spontaneously combust. When used as a foundation for homes, tyres act as heat sinks. This simply means that they transfer heat from high temperature to a lower temperature.
Heat is removed from inside the house to underground. This is especially useful in tropical climates. There are two alternatives on how to use tyres in construction. The first method is Rammed Earth Construction and the other is Tire Bale Construction.
Rammed Earth Construction
In this method, recycled tyres are filled with compact soil to form what is referred to as rammed-earth bricks which replace traditional wood framing used in most American households. From the time of the Romans to modern sky scrapers soil has been the main building material whether clay or sand. The main aim of using soil for construction is to ensure energy efficiency by conserving heat in winter and remaining cool during the summer. In rammed earth construction tyres soil is packed tightly into the tyre frame using a cardboard sheet on the bottom.
Typically, a 4,000-square foot house can use 2,000 tyres. In Earth ships, the gaps in the frames due to the cyclical shape of the tyres are filled with other recyclable materials like glass/plastic bottles or aluminium cans.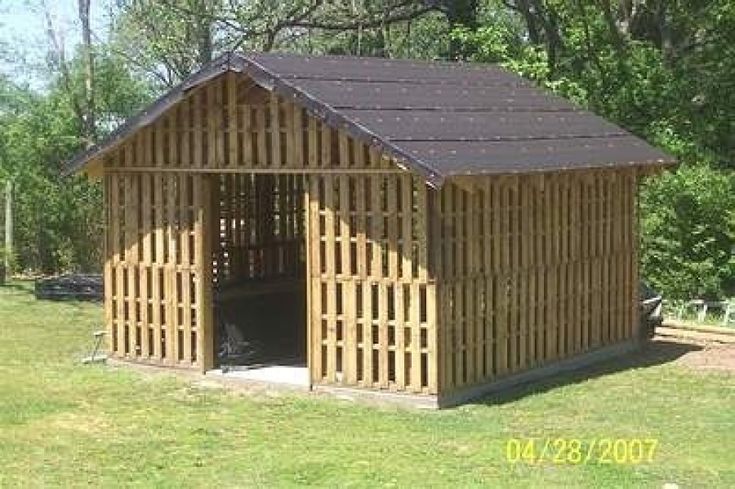 Earth ships are a concept first developed by Michael Reynolds in 1970 where houses are made using only recycled and naturally occurring materials. The idea has taken off in recent years with a lot of people looking to build earth ships as second homes.
Tire Bale Construction
Tire bales are used an alternative way to utilize tyres as a recyclable construction resource without the labour-intensive process of packing 2,000 tire bricks. A tire bale consists of about 100 compacted tyres made into a square brick. It weighs approximately 900 kilograms. Construction using tire bales utilizes thousands of these compacted tyres, a lot more than the rammed-earth method. The tire bales frame the outside walls of the house stacked like bricks to cover the whole house.
The walls of either method is smoothed over with cement then layers of plaster or stucco are added to finish.
Tire Building Codes
The tire building codes provide the baseline for determining whether a building built from tires is safe.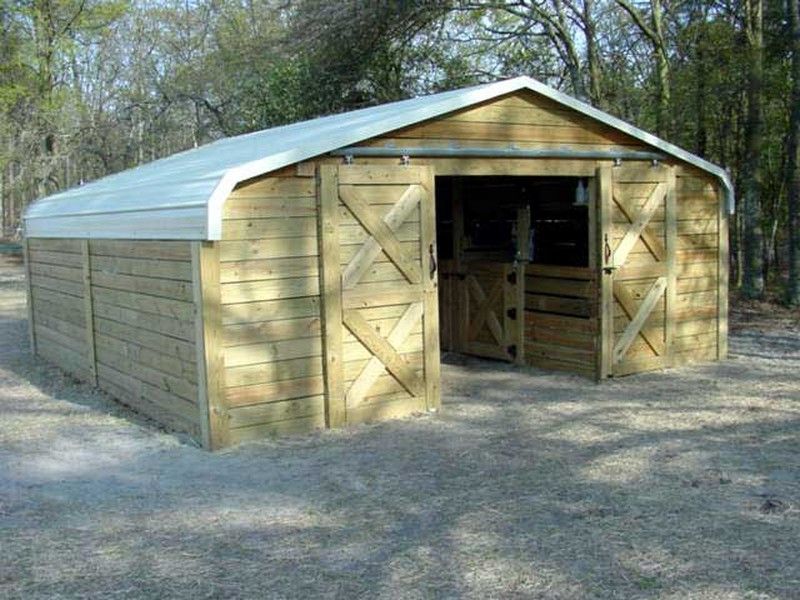 It is for both the builder and the inspectors to ensure a good construction. The walls of these buildings are the only unorthodox aspects of these buildings and thus covered by these codes. The roof and floors are covered in the uniform building code.
These are some of the highlights of the construction code for building using tyres.
1. Tires 13 inches in diameter are the smallest tires that can be used while 16 inches are the largest.
2. The first layer of tires must be larger in diameter than all the tires making up the wall. No tire in the wall should be larger in diameter than the tires in the wall. Walls over six layers should have ground tires with larger than 15 inches’ diameter.
3. All load bearing walls eight layers or higher built with earth rammed tyres should have a continuous bond beam to connect adjacent non-load bearing tire walls.
4. Every opening in earth rammed tire walls should have concrete half blocks on each side of the opening.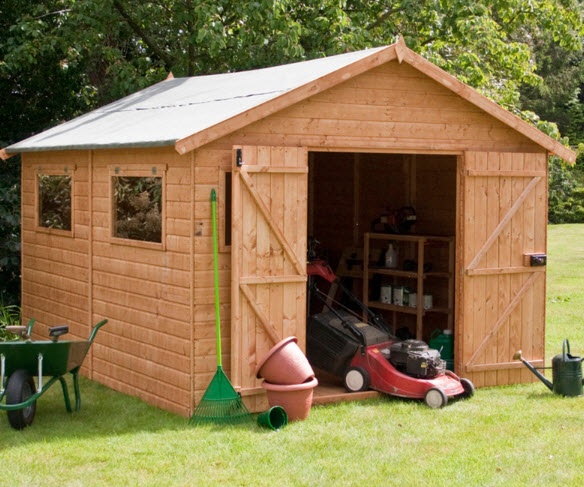
5. Earth rammed tire structures over two stories should be designed by a licensed architect.
6. Earth rammed tire walls are not sensitive to expansion/ contraction of cracks hence no limit is placed on the length of the walls
7. Earth rammed tire walls which form an integral part of the house have a maximum set height of 10 feet.
8. Joints and connections in tyre built walls should have overlapped tyres and connection methods in order to avoid overlapping of stacked joints.
They are only guidelines right now and are still subject to evolution or amendment since it is still a new method of construction. More guidelines can be found on Earth ship Volume I and II.
Advantages of Tyre Construction
There are numerous advantages of construction using recycled tyres. The main advantage obviously is that this method is very cheap or in some cases free.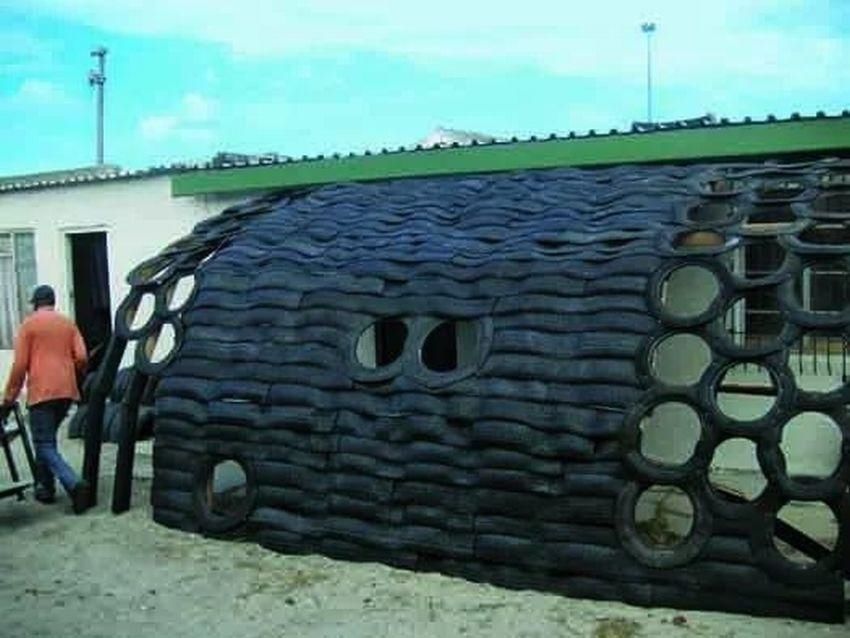 This greatly reduces the cost of owning a home in these economic times. It is good for the environment. Utilizing tyres that would have eventually ended up as waste materials goes a long way in waste management and environmental conservation. Buildings constructed using tyres also conserve and increase energy efficiency by providing high levels of thermal mass without destroying the environment. There is minimal waste material in the construction process and these materials may be utilized in the construction when constructing earth ships. Tyres are strong and durable making the buildings constructed disaster resistant, particularly for weather emergencies.
Disadvantages of Tyre Constructions
Building with tyres is a very labor intensive process with very heavy bricks to carry during construction. Old tires do indeed give off the gas but they need to be exposed to light in order to be broken down. In tire bales constructions, the tires are covered by stucco or plaster hence not exposed and no gas is emitted. Tyres are highly flammable but the structures built are not prone to fire risks since they have thick walls and a plaster layer cutting off oxygen and providing fire resistance. It is evident that there are little drawbacks to using tyres in your construction.
By reusing tyres which would have been a waste as materials for construction and the resulting decrease in artificial energy consumption, the strain to the environment is reduced while providing a comfortable and affordable home.
Updated: Mar. 20, 2019
Next Project›
Photo: Courtesy of Country Woman Magazine
Recycle old spares into pretty conversation pieces that look anything but tired.
By the DIY experts of The Family Handyman Magazine
 -diameter openings (see note below project directions)
Photo: Courtesy of Country Woman Magazine
1. Apply primer to exterior of tires. Let dry. Spray-paint exterior of tires. Let dry.
2. Lightly sand wood circles and wipe with a dry rag. Apply one coat of stain on each side. Let dry.
3. Trace a circle onto foam pad, using wood circle as a pattern; cut out. Center foam circle on back of fabric; mark a circle 10 in. larger all the way around. Cut out fabric circle.
4. Turn over edge of fabric circle and sew a 3/4-in. pocket all the way around for the elastic. Attach a safety pin to one end of elastic; thread elastic through pocket. Remove pin.
5. With edges even, stack foam circle on top of one wood circle. With right side up, center fabric circle on top of foam. Pull fabric around the sides of the stacked pieces, and pull the elastic tight, making fabric taut on top. Tie ends of elastic together and cut excess.
6. Draw a square on one side of remaining wood circle so the four corners touch edge of circle. Drill a 3/8-in. hole through the wood 1/2 in. from each corner. Attach casters at holes.
7. Drill two holes for 4-in. screws through wood circle with wheels, positioning the holes on opposite sides of the circle. Place wood circle on bottom of a tire, then drill through holes and tire. In each hole, insert a 4-in.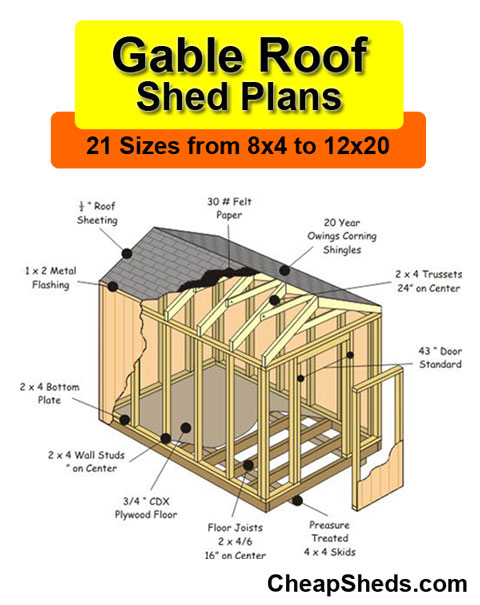 screw from the wood through the tire and secure tightly with nut.
8. Use drill and remaining two screws to attach tires so wheels are at the bottom. Place cushion on ottoman.
NOTE: If needed, scrub tires with a grease-cutting cleaner before applying primer.
Plus, check out this amazing armoire to craft center project also done by Country Woman Magazine.
Photo: Courtesy of Country Woman Magazine
This story originally appeared in Country Woman Magazine.
Originally Published: April 10, 2018
ⓘ
Content
since you can get a considerable amount of old tires in the nearest service station and, moreover, completely free of charge.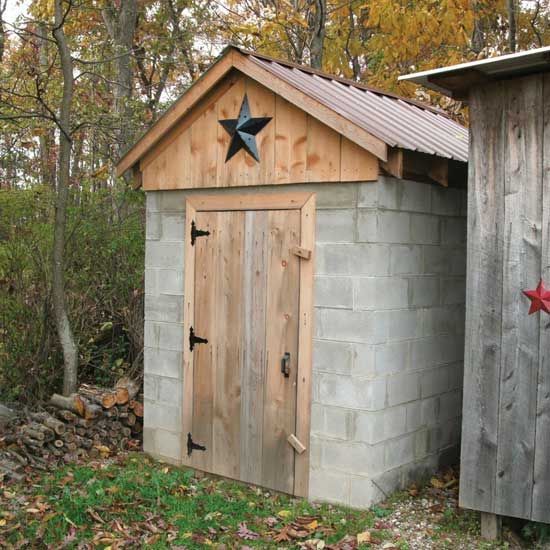 Not everyone knows about the existence of such a kind of foundation for construction, and many of those who have met this information tend to think that this is someone's joke. No, it's completely serious. Such a foundation has all the qualities of classical solutions in the construction of a foundation for construction.
back to contents ↑
Firstly, materials are saved, which is obvious.
Secondly, the tire material - rubber, is an excellent waterproofing against the penetration of excess moisture. Thirdly, the tire foundation is a very durable structure precisely due to the strength of the tires. Again, rubber allows you to smooth out uneven deformations that occur with fluctuations in air temperature.
And, finally, during the manufacture of the base for construction in areas where the level of seismic activity is increased, it is automobile tires that will become a saving “pillow” from the appearance of cracks in the walls.
Another plus is the fact that it is even easier to make a foundation from tires with your own hands than other types of foundations for construction. To do this, you do not need to have a special education or many years of experience in the construction of various kinds of concrete structures in the form of a foundation.
The only feature that requires attention from the performer is the need to ensure that the tires are on the same level, otherwise there is a risk of distortion.
The foundation on tires has practically no functional flaws. But the physical properties of this material can be called a clear disadvantage - when exposed to high temperatures, rubber releases rather harmful substances. But this is unlikely to affect the decision to use this kind of foundation for construction, since it is enough to simply provide for such a possibility and exclude it when erecting the foundation structure.
back to contents ↑
Despite the fact that this type of structure has recently begun its introduction into the construction industry, however, the foundation of automobile tires already exists in two variations:
It would seem that it is very easy to create a foundation on tires with your own hands. And by and large, this is indeed the case, however, if a number of rules and recommendations are not followed, you can only waste time. And even the booth for the dog in this case will not stand idle long enough.
back to table of contents ↑
If one is determined to build a Tire Foundation for a house, this issue should be studied in more detail. The pioneers who applied this method in practice planned to build the simplest buildings, such as a barn or a bathhouse. But even if the load is minimal, it is necessary to observe a number of melts. The foundation of the tires for the gazebo is the simplest task, since in this case the stress on the structure at the base will be even less, that is, it is practically absent.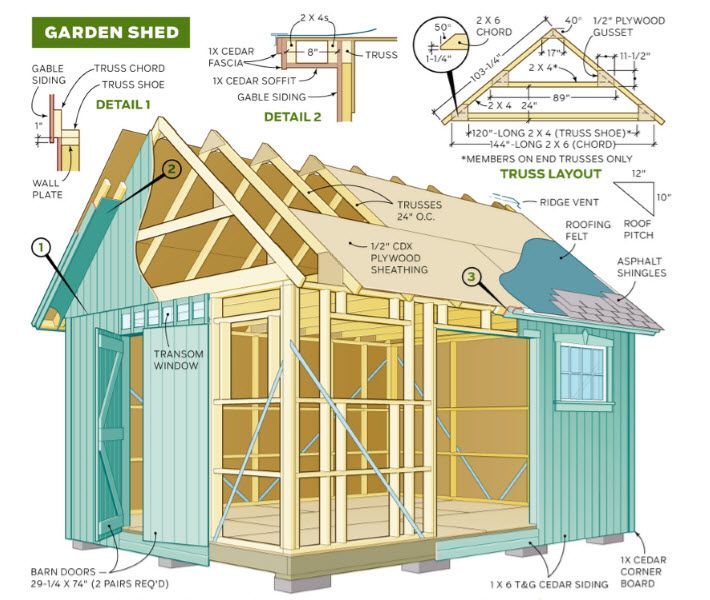
Seeing such a picture, when buildings on a foundation of simple car tires stand and do not fall for a long time, some daredevils began to make attempts to build light one-story houses. And even later, builders appeared who are not afraid to use such a base for construction for two-story buildings. However, such a risk is useless, so the opinion was formed that the foundation of tires for a bath (or light houses) is most suitable.
If we consider the option of using tires as a base for a future slab, then it is necessary to first clear the site, that is, remove the surface layer of soil, sod, and then level it.
Whether it is a foundation for a bath of tires or for any other building, the tires are laid in two layers. It is recommended to use tires from heavy vehicles.
Next, it is necessary to lay soil inside the formed column. This is not done to the edge, but only 80% of the volume of the tire. A small margin will avoid swelling of the soil in the cold season.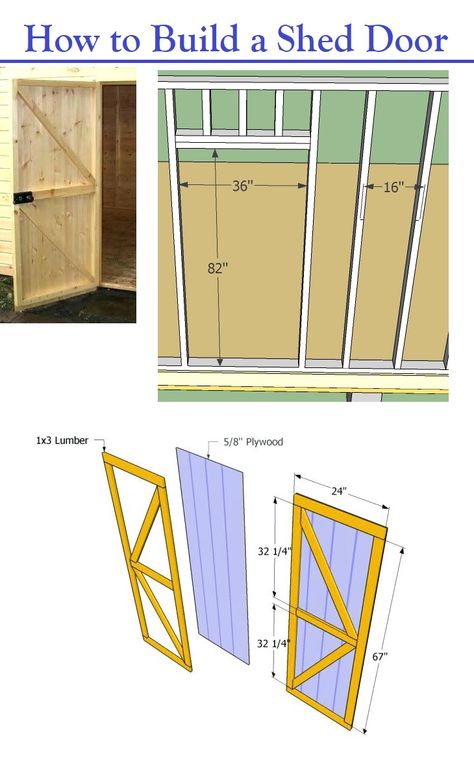 Roofing material is laid on top of these supports. It is allowed to use linoleum as an alternative. This is necessary to provide a more even surface for pouring concrete. In addition, the use of roofing material will save on waterproofing material.
When deciding how to make a foundation from tires, you need to consider that in this case formwork is also needed. And as a reinforcement along the perimeter of the future foundation, a metal corner is installed. The last step is directly pouring concrete.
If you need to build a foundation for a shed from tires, then you can get by with an easier option - from supports that are installed at the corners of the building. At the same time, some people prefer to use not soil, but concrete as filling, and in addition to reinforcing the structure. This will increase the strength and stability of the tire supports. This option will require preparatory work.
So, first you need to lay waterproofing material on the bottom of the support, then fill the tires with crushed stone.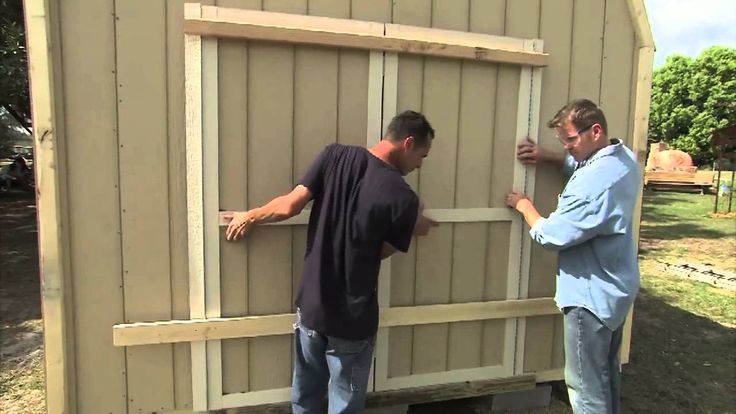 This is done in layers, each layer must be compacted, and in addition to that, it must also be moistened. The filling of the supports from the tires occurs until a distance of about five centimeters remains to the surface. After the concrete has been poured, it is necessary to level its surface. For this purpose, a regular board is quite suitable.
 When installing tires, you must constantly check them for even horizontal lines.
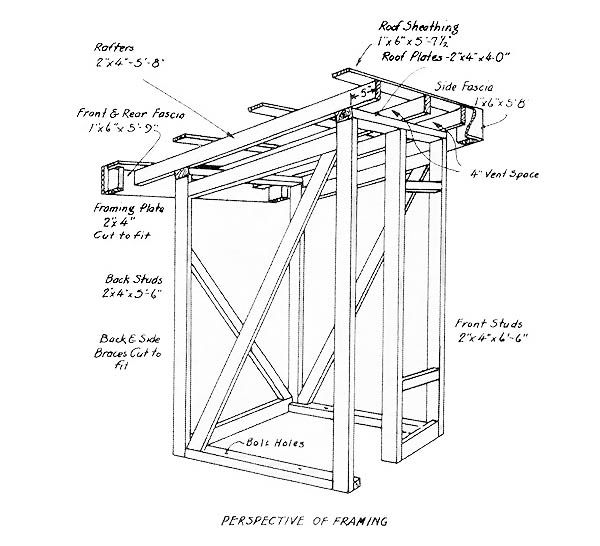
 How to build a barn with a shed roof with your own hands?
In the country house, you can't do without a barn, in which you can store all gardening equipment, a hammock and light furniture. There is also a place for winter supplies in it. At the same time, it is not necessary to build an overall structure: everything you need will fit in a small shed with a pitched roof.
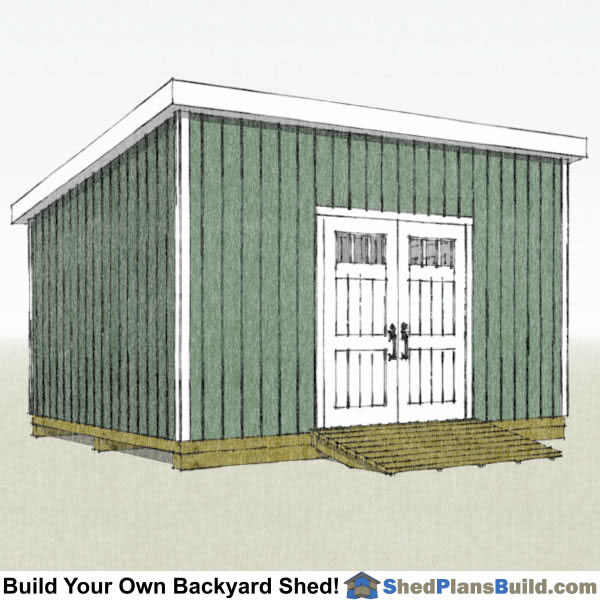
Shed with shed roof is easy and quick to erect. It can either be built from improvised materials, or you can purchase everything you need at a hardware store, paying a reasonable price for it. This small building reliably protects home belongings from the vagaries of the weather, and even a non-professional can mount it.
Such a barn has a number of disadvantages when compared with a building with a gable roof.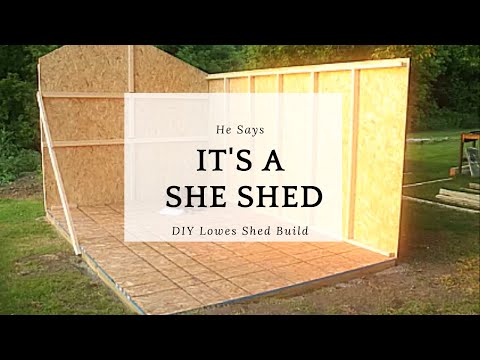 So, a shed roof can be blown away by a strong gust of wind, so build a structure behind the house or attach it to your country house for greater reliability.
A shed roof will not allow building an attic space, and the building itself often does not look very attractive. Modern finishing materials will help to fix the matter, with the help of which you can fit the building into the overall design of your site.
First of all, find a place for future construction: it should be located either on the edge of the summer cottage, or close to the house, and for it you should choose areas that are the least suitable for agricultural work.
It can be either a space remote from the house or a heavily shaded place. It is important that it is located near the main front of the work: this will allow you to quickly get and remove the necessary inventory. If possible, place the building on a hill, which will provide additional protection from water and extend its life.
A barn with a lean-to roof will organically fit into an existing or projected complex of country houses. The future utility room should not interfere with the passage of vehicles and your movements around the site. For the construction of a barn, special agreements are not required, but the construction must comply with sanitary and fire safety standards.
According to SNiP, the distance from your building to the house on the neighboring plot is at least three meters. If you plan to place any living creatures in the annex, keep the barn at a distance of four meters from the neighbors. The barn should be located a meter from the nearest outbuilding and shrub plants, two from medium-sized and four from tall trees.
When you decide on a place, make a drawing on paper or a 3D project on a computer in order to best imagine the dimensions of the future building, divide it into several functional rooms, and determine the layout of the power grid. The optimal size of the structure is considered to be 3x6 parameters - even such a modest area will allow you to place not only an economic unit inside the barn, but also to equip an outdoor shower or a summer kitchen.
If the area allows, build a larger shed - 4x6 or 4x2. The spacious structure is a great solution if you want to house animals or poultry in it. If breeding of living creatures is not provided, the building will accommodate both country equipment, and any functional room such as a shower or kitchen, and pickles will freely take up space on the shelves.
During the design phase, determine what materials you will need for construction. After all, the cost of future construction depends on them. A budget option is a wooden or metal frame structure.
In the first case, the frame is made of timber, which requires treatment with special antiseptic agents. In the second - from more durable steel profile pipes that need anti-corrosion treatment after installation.
Whatever your preference, you'll need planks, siding, or trapezoidal sheeting to cover your building. The indisputable advantage of the frame structure is not only the speed of installation and long service life, but also the ability to transform the barn by replacing the sheathing without touching the frame.
The most popular buildings are made from such improvised materials as boards and wooden beams. A frame is constructed from a bar, sheathed with boards. The result is a lightweight, but short-lived structure, the service life of which is five to six years at most. The building should be constantly updated and monitored for its condition.
If you need a reliable, durable and fireproof structure, give preference to fundamental brick buildings. The creation of such a change house will cost a pretty penny, but it will serve more than one generation.
Instead of expensive bricks, it is also acceptable to build from more budgetary foam and cinder blocks. Compared to brick buildings, they weigh less, have greater strength and heat capacity. Walls made of blocks "breathe" no worse than wooden ones, and they are also safe and non-toxic.
The only drawback of a block shed is its unsightly appearance, which can only be corrected by decorative finishing materials such as brick, siding, plaster, and natural or artificial stone.
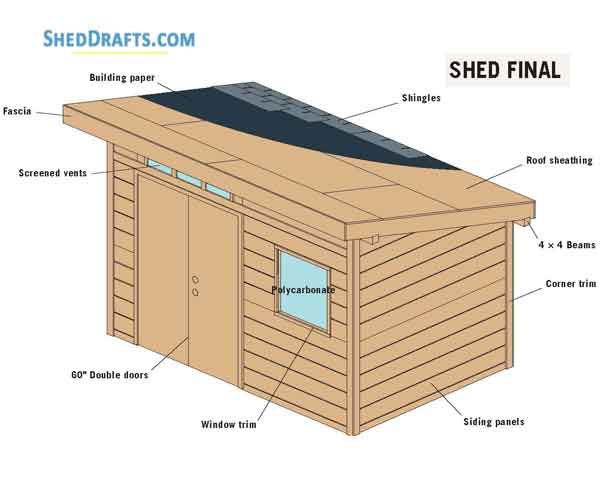
Once you have decided on the material for the walls of the barn, proceed to the choice of roofing building material, which determines the angle of the roof slope. So, the angle of inclination for a soft roof is 5 degrees, corrugated board - 8, metal tiles and piece roofing material - 25 and slate - 20-35 degrees. The angle of inclination below the specified values \u200b\u200bis not done, otherwise it will lead to roof leaks and damage to the property stored in the building.
For roofing, it is acceptable to use monolithic polycarbonate sheets with such properties as high impact resistance, light transmission and resistance to any vagaries of the weather.
UV protective coating will extend the life of this material, and thermal expansion is considered its main disadvantage. This phenomenon occurs on hot summer days when the sun burns through the roof. To avoid deformation of the material, leave a small gap when tightening each fastener.
Rolled roofing material is considered the cheapest option for roofing. It is easy to install and is designed for roofing of any complexity. But it does not look aesthetically pleasing, and it needs to be laid in several layers. For example, with a roof slope of up to 15 degrees, four layers of roofing material will be needed. If the angle of inclination is up to 45 degrees, the roofing material is laid in three layers. Ultimately, "layering" affects the cost of building materials.
Necessary calculations have been made, materials have been selected. It's time to proceed directly to construction work, because it is quite possible to build such an extension as a shed barn with your own hands. To understand how best to do this, consider the construction process in stages.
Let's start with the foundation. The columnar foundation is designed for lightweight structures (especially often it is equipped for frame buildings). For its device, it is necessary to mark the ground with a rope and pegs. Holes are dug around the perimeter and in the corners at least 50 centimeters deep. A layer of sand and gravel is poured at the bottom of each hole. Then one of the types of pillars made of brick, concrete, asbestos pipes from 150 mm in diameter, PVC pipes and even railway sleepers are installed. Pillars made of pipes should be poured with concrete, and brick and block supports with a porous surface should be treated with mastic or any other water-repellent agent.
For the installation of a strip foundation around the perimeter of the future building, they dig a trench 25-40 cm wide and 40-60 cm deep (taking into account the depth of soil freezing in the cold season). Then sand, crushed stone and gravel are poured onto the bottom of the trench, which should be carefully compacted, plank formwork is installed, reinforcement is fixed and concrete is poured. After that, the foundation is left alone for two to three weeks, they wait until it hardens, and then proceed to the next stage of construction work.
In addition to the well-known types of foundations, it is also possible to build a base from car tires. In addition to sheds, pavilions, saunas, garages and even summer kitchens can also be built on tires. At the same time, the constructed structures should be light and small-sized, since the construction of large objects on such a foundation can lead to unpredictable consequences.
In general, tires are a budget and affordable material that is easy to install. It does not allow moisture to pass through, protects the building from cracking, and also dampens soil vibrations, which makes it indispensable in any seismically unstable area.
Tire foundations can be columnar or monolithic.
The first is installed as follows:

Recessed or raised monolithic tire foundations are ideal for areas with high water tables.
Equip it like this:
After arranging the foundation, they begin to create the lower trim, made from a bar with a section of 100 by 100 or 150 by 150 millimeters. To do this, the ends of the timber should be chopped off using the “half-tree” method and connected with metal staples.
The next step is to assemble the frame: to make it, install vertical racks and align them with a building level. The installation of the front wall is carried out so that the desired angle of inclination of the roof is obtained. Racks should be strengthened with temporary slopes and at the same time outline the location of future windows and doors, so that later you do not suffer with cutting them out.
Then the floor joists should be mounted on the frame, attaching them at intervals of 60-120 centimeters. The floor is laid with edged or specially grooved boards.
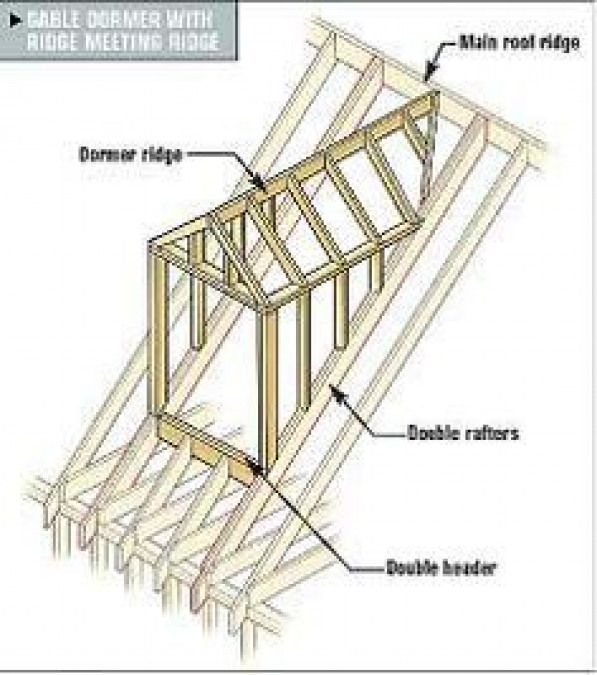
After that, floor beams (the so-called upper trim or Mauerlat) are installed on the supports and the roof is mounted:
 Often this parameter does not exceed 400-500 centimeters.
Construction completed. It remains to install doors and windows, as well as treat the shed with protective equipment and sheathe it with any finishing material to give the building an aesthetic appearance.