If you frequent a forum owned by car owners, you might have come across the term “Tire stretching”. What does it mean? And why would people want to stretch the tires?
Here’s everything you need to know about stretched tires.
Page Contents
Stretching a tire sounds very obvious as to what it is. You essentially stretch a narrow tire over wide wheels.
The question that you might find yourself asking is if it’s safe to do so? As you know, every component of a car is specifically designed for that car’s model.
Not every car component you’ll find in your local shop is going to be appropriate for your car.
It is also told to never stray past what has been recommended by the manufacturer. So, how are stretched tires different? And are stretched tires safe?
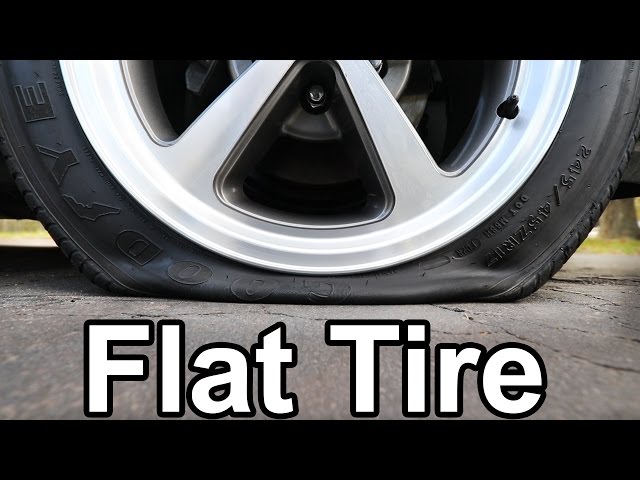
The problem usually happens when you over-stretch the tires. It can increase the risk of potential blowouts or deflating tires.
With that out of the way, you don’t have to worry about your safety if you follow the proper guidelines.
That means staying within the recommended range of tire stretching.
If you go over and beyond, you can end up in trouble by increasing uneven tire wear and lowering the durability of your tires overall.
The answer isn’t as straightforward as you might have hoped.
There’s a reason why stretching a tire has become so popular. The numerous benefits that come with this, such as better appearance, act as the main incentive for people to stretch a tire.
But, when it comes to the technical side of things, you’ll find that stretching a tire makes it more vulnerable to damage.
That’s because a stretched tire no longer has the same sidewall set up as a normal tire and hence, will not be able to withstand as much pressure as before.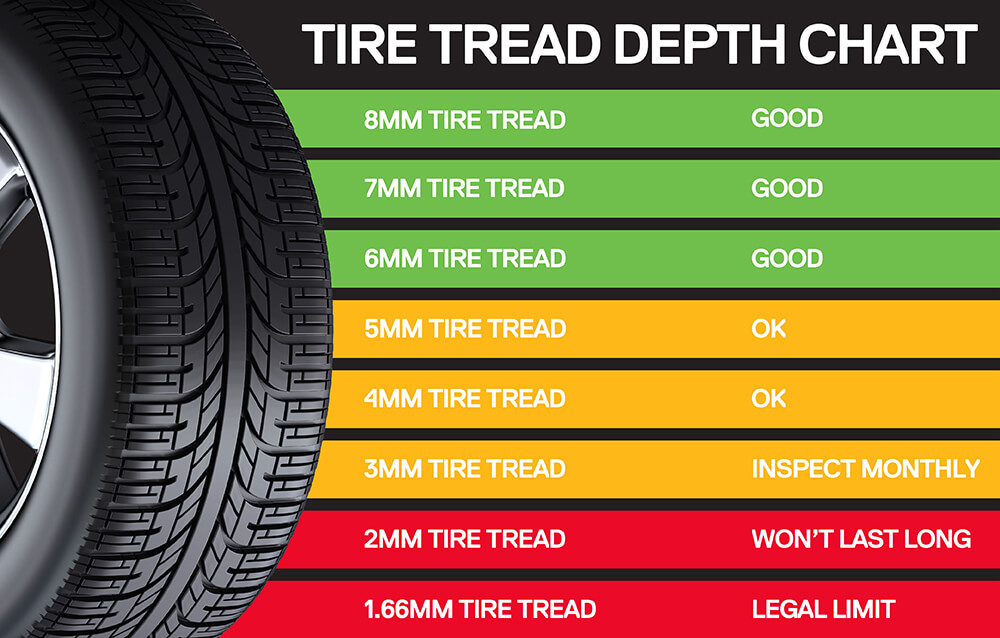
The main reason behind people stretching their tires has to do with improving the appearance of their car.
You shouldn’t underestimate the appeal of your car looking remarkable.
Besides this, an added benefit of stretching your car’s tires is that the wheel doesn’t rub against the fender.
This also contributes to the stretched tire by providing a better contact patch.
As much as you want, there are some situations where you’re absolutely advised against stretching your car’s tires.
for example, if you’re someone who frequently travels through rough terrains and on harsh road conditions, you should stay away from stretched tires.
As mentioned before, stretched tires are far more vulnerable compared to the average tires you can find in your local auto shop.
These tires can easily get damaged.
Moreover, stretching a tire exposes the rim. This can be very dangerous. Similarly, high-performance drivers are also recommended to avoid using stretched tires.
The best way to stretch your tires is also the most commonly used technique.
This involves using fire to stretch the tire. As a tire is made of rubber, the fire helps stretch the material to cover the rim.
However, this isn’t the preferred method for beginners as it requires highly technical skills to accomplish.
Before you begin, be fire to understand that stretching a tire can be dangerous and should not be done at home.
Calculating tire stretch is difficult.
You can’t always be sure about the calculation as everyone has different definitions. However, the following is a common system used for most wheel setups.
The system divides the stretch into different stages to break the process down.
This guide applies to wheels from 13” to 23”. As stated, you don’t really have to worry about the diameter while you calculate, what you need to focus on is the width and height of the tire.
The system uses different stages to calculate the perfect tire stretch. The following takes a close look at them.
Before we get into the nitty-gritty of stages, here’s a baseline that you can work through.
Consider a tire of 255/35 on an 18×10. 10 inches is equal to 254mm. This stands as the perfect fit for the width of a 255-section tire.
On the other hand, that 35” sidewall is almost perfectly identical to an up and down sidewall on a ten wide.
From here, we’ve set up a baseline that you can use to determine the stages of the stretch, such as using either the aspect ratio or going down the tire size to get the stages.
Essentially, stage 0 acts as the perfect neutral spot for you to calculate the stretch.
What you need to know before you begin is that the section changes are to be measured in intervals of 10 while on the other hand, sidewalls change is measured in intervals of 5.
This is considered a mild stretch but is the maximum limit allowed on the road because it falls at the highest-level tire manufacturers recommend.
Generally, you won’t feel any performance difference with a stage 1 stretch but some people claim that this calibration stiffens the sidewall which results in more feedback for the driver.
The aesthetics, however, will be a bit different when you go for a stage 1 stretch.
The tires will be inside the fender and your sidewall will be a little stretched with an angle.
The stage 2 stretch is a solid stretch that gives off a maximum angle of the sidewall without exposing the edge of the wheel.
While it’s not allowed, you can drive in road traffic with a level 2 stretched wheel but with some discomfort.
Your ground clearance and the overall driving experience would have a negative impact with a stage 2 stretch and you won’t be able to go to very high speeds.
Finally, the stage 3 stretch is the full stretch where the entire rim is exposed to the road. With stage 0 as the baseline. A full stage 3 stretch reduces the tire size by three units.
For your and everyone else’s safety, it’s important that you don’t take stage 3 tires in regular traffic because of the associated risks.
The biggest risk is the tire slipping off. With stage 3 stretches, you also significantly increase the risk of damaging your rim because of contact with the ground.
Beyond stage 3, it’s possible to further stretch your tires but that is never recommended. It will be as if the tire isn’t on the rim at all because that would lead to the maximum reduction in the sidewall height.
It’s not recommended, especially if you are a beginner, but you can stretch tire at your home as well.
Anyone experienced would be way over their head when it comes to safely stretching the tires, but it’s better to still cover all the basis to help you make an informed choice.
Here’s what you need to do.
 Congratulations, you’re done now!
The above process may seem simple but note that you are dealing with flammable material. The rubber in tires is also flammable, so you can start a fire.
Even if you don’t see it, too much flame can also damage your tire. Stretching tires is already a risk, so you shouldn’t take it anymore.
That’s why it’s always better to get your tires stretched by a professional instead.
As its name suggests the negative tire stretch is the exact opposite of the regular tire stretch. In this case, you fit a bigger tire on a smaller rim which increases the performance at the expense of the looks.
In the case of a negative stretch, step 1 is the only viable option. Any further than that, your driving experience deteriorates significantly and makes it harder for you to control the car.
Stretching the tire is your choice. There are some aesthetic advantages of doing that, but the overall risks make it not worth it for many drivers.
Whether you want to stretch your tires or not depends on your preference, but one thing is certain.
A car with stretched tires will definitely turn some heads.
We hope this guide was able to give you the basics regarding stretched tires and help you make an informed choice.
You can choose to stretch your tires but you better be very careful and should be ready to invest in a new set of tires sooner than expected.
tuning blog 1 April 2021 Tips, products, information & Co., Tuning Wiki
If you are interested in a new set of rims and do not necessarily have a typical standard size such as 7,5j x 17 inches in mind, you may already have heard of the term Tire stretch / tire stretching belongs. But what does Tire Stretch / Tire Stretching actually mean? With regard to the topic, the information in advance, many possibilities in this area are only "outside“The STVZO allows.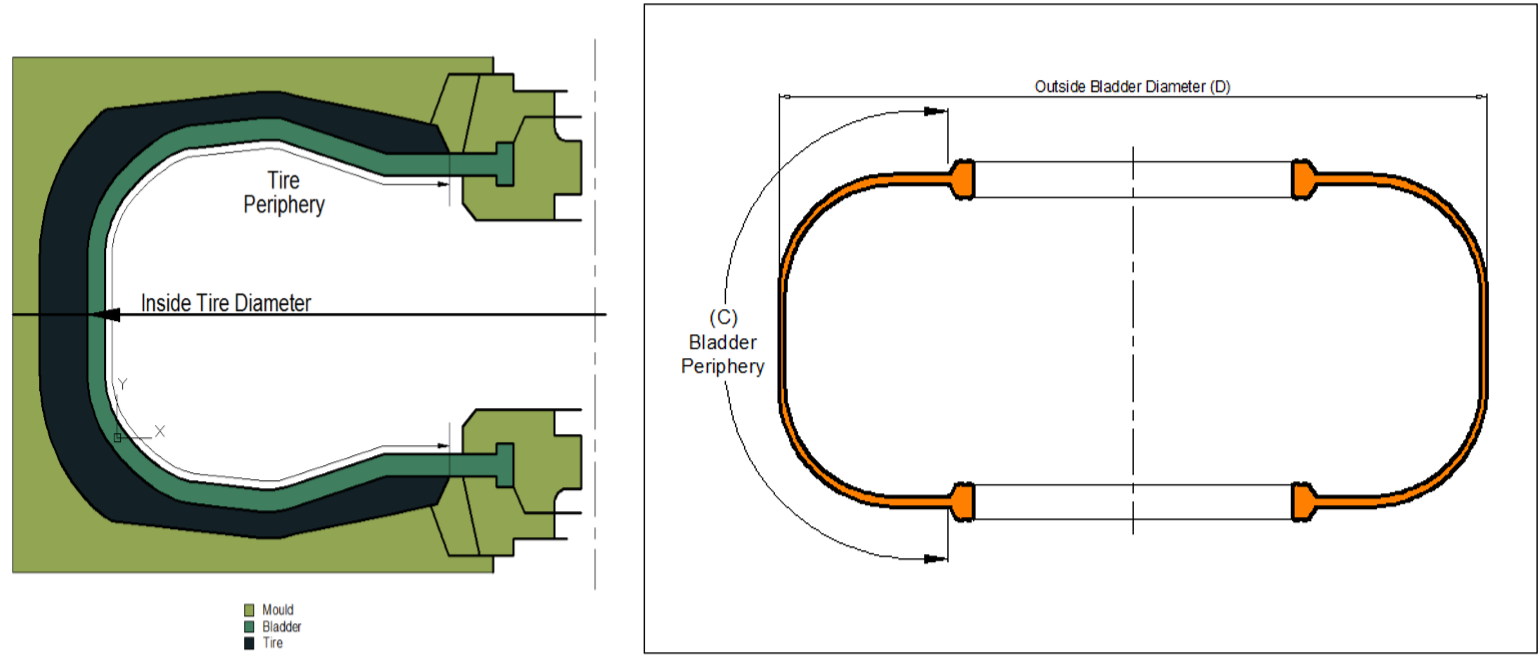 But only as an indication and not as a flat rate! If there is a corresponding tire approval from the tire manufacturer, nothing speaks against one legal use. Mentioned in the release is the corresponding tire size for use on the rim. The exact dimensions are listed there. Incidentally, it is not the diameter that is relevant for the tire stretch, but the one Width, the Flank height and the Rim width. How do you get that stretch? Example: the tire has the dimension 255/35 R18 and the rim has the dimensions 10 × 18 inches. So the tire is 255 mm wide and the rim 254 mm. This format is known as level 0! Tire and rim are almost identical and the tire is very straight on the rim.
To achieve a tire stretch you can use the tire width and the Flank height to a certain extent "play". For example, do you want one Level 1 stretch then you pull a 10/18 R245 tire on the aforementioned 35 × 18 inch rim, or if you want to stay with the 255, then you have to Reduce flank height and put on a 255/30 R18, for example.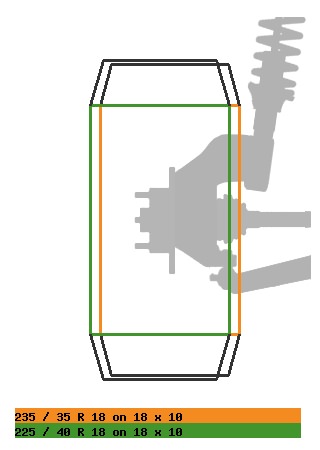 Both cases allow a stretch of the Level 1. This is a variant that is listed in most reports and therefore can also be used legally and looks good. To any Space problems in the wheel arch perhaps that is one way to fix it.
In principle you can reach that Level 2by taking the dimensions of the tire further down changed. Based on our 10 × 18 inch rim, for example with the tire format 235/35 R18, 245/30 R18 or 255/25 R18. The greater the changes, the greater the changes, of course Rolling circumference. However, this is crucial for the accuracy of the speed display and should must be strictly observed. You should also keep in mind that the tire wall always small becomes and with it the driving comfort and the ground clearance dwindle. Contemporaneous increased also the possibility in terms of Damage on the rim.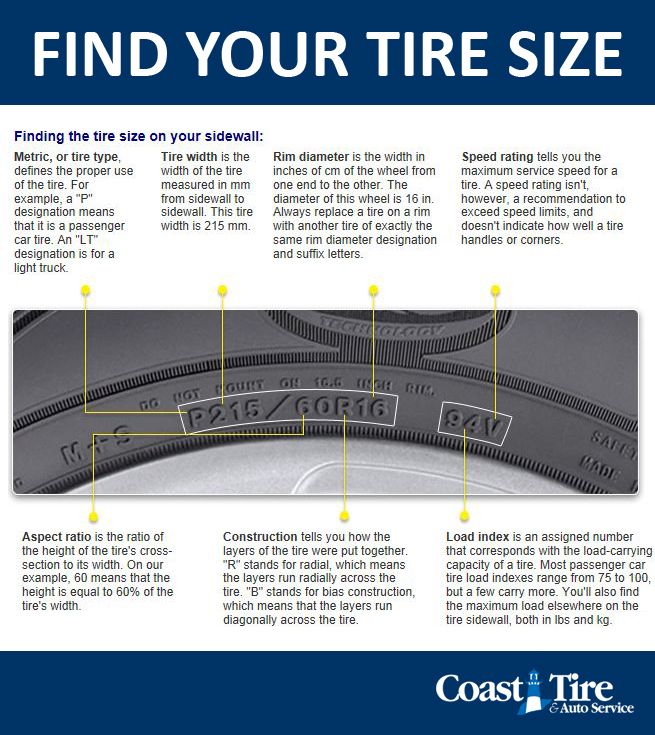 A possible one flank protection (Rim rib) on the tire then has hardly any effect.
Again and again starting from our 10 × 18 inch rim you reach the Level 3 with even further reduced dimensions from the tire. For example with 225/35 R18, 235/30 R18 or 245/25 R18. Level 3 reduces the tire size of level 0 by three units. At this point at the latest, the issue of permissibility in road traffic must be examined very carefully. Usually level 3 no longer in traffic usable because, apart from the scope, there is also the possibility of Slipping of the tire opens on the rim.
Would you like to go further and get one Level 4 tire stretch reach that is how one speaks of Japanese Sudani style. Here the tire is pulled so far apart that the flank height is barely there and the rim flange partially touches the road. Level 4 is reached with accordingly strong reductions in tire width / sidewall height.
If you attach particular importance to high performance, you should make sure that the tire is on the rim can move. This can be achieved with a "negative tire stretch". This can be achieved by starting from level 0 (Example: 255/35 R18 and 10 × 18 inch rim) the dimensions of the tire are not reduced, but increased. Here it goes into the minus range. For example Step 1: 265/35 R18 or 255/40 R18 on the 10 × 18 inch rim. Step 2 is correspondingly higher but for the racetrack then already no longer suitable. Here the tire becomes unstable and the driving behavior deteriorates significantly. It also looks ugly. And that too Rolling circumference is to be observed here again. The whole topic is well explained again in the following video by West Berlin Customs, from which we also have our information.
PS: Incidentally, you can reach all levels, even if you leave the tire the same, but change the width of the rim accordingly. So 12 × 18, 13 × 18 etc. As mentioned, the diameter plays not matter!Sudani style
We hope that you have received our information report on the topic / term Tire stretch (Other terms / keywords are: negative tire stretch, negative tire stretch, negative tire stretch, negative tire stretch, wheel stretching, wheel stretching, tire stretching, tire pulling, tire stretching, stretch tire, stretched, stretching, level -1 stretch, level -2 stretch , Level 0 Stretch, Level 1 Stretch, Level 2 Stretch, Level 3 Stretch, Level 4 Stretch, Level Principle, Level Principle, Sudani Style, Tire-stretch, Tire Stretching, Tyrestretch) from the Autotuning category. Our goal is to have the largest German-speaking tuning lexicon (Tuning Wikipedia) and to explain tuning technical terms from A to Z easily and understandably. We are therefore expanding this lexicon almost daily and you can see how far we have already come HERE see. And soon the next one will be Tuning scene concept illuminated by us. There's a theme that not can be found in our Wikipedia? Then send us an email at [email protected] and gives us the term. We will write a suitable article as soon as possible. PS. By the way, you will be informed about new topics if you have ours Feed subscriber.
But of course tuningblog has countless other articles on the subject of cars & car tuning in stock. Do you want to see them all? Just click HERE and look around. We would also like to provide you with news aside from the tuning. In our category Tips, products, information & Co we pick up contributions from car or accessory manufacturers. And also our category Test sites, laws, offenses, information has almost daily new information for you. Here are a few topics from our tuning wiki:
"Tuningblog.eu" - we keep you up to date on the subject of car tuning and car styling with our tuning magazine and we present you the latest tuned vehicles from all over the world every day. It's best to subscribe to ours Feed and will automatically be informed as soon as there is something new about this post, and of course also to all other contributions.
An injury to a cyclist is like a first love, sooner or later it will come, and it’s always “when you don’t expect it at all.” Abrasions, sprains, fractures, chronic injuries and related diseases are inevitable in almost any sport. What kind of injuries are most prone to cycling enthusiasts, how to minimize their risk and what to do if trouble has already happened - we figure it out in the article!
Riding a bicycle is far from the most anatomical and familiar activity for our body. A bike is a high load on the back, legs, shoulder girdle, lungs, heart and blood vessels, the vestibular apparatus, the brain, which is forced to constantly analyze the situation and make decisions. Add to this fatigue, high speed, other road users who do not always behave adequately, bad weather, well-being, mood - and now an injury looms on the horizon.
Naturally, the musculoskeletal system of the cyclist is exposed to the greatest risk.
Injuries to the ligaments and tendons of the knee joint, meniscus account for about 15% of all cycling injuries and rank second in frequency after bruises and abrasions. The knees are the weak point of most modern people, with our sedentary sedentary lifestyle. Rare shock overloads, aggravated by a violation of technique and neglect of warm-up, often lead to serious injuries.
Chronic diseases of the spine, especially the lumbosacral. Features of the athlete's landing, coupled with hypothermia of the lower back during the ride, lead to radiculitis, osteochondrosis, spondylosis and spondylarthrosis - a change in the functions and position of the vertebrae.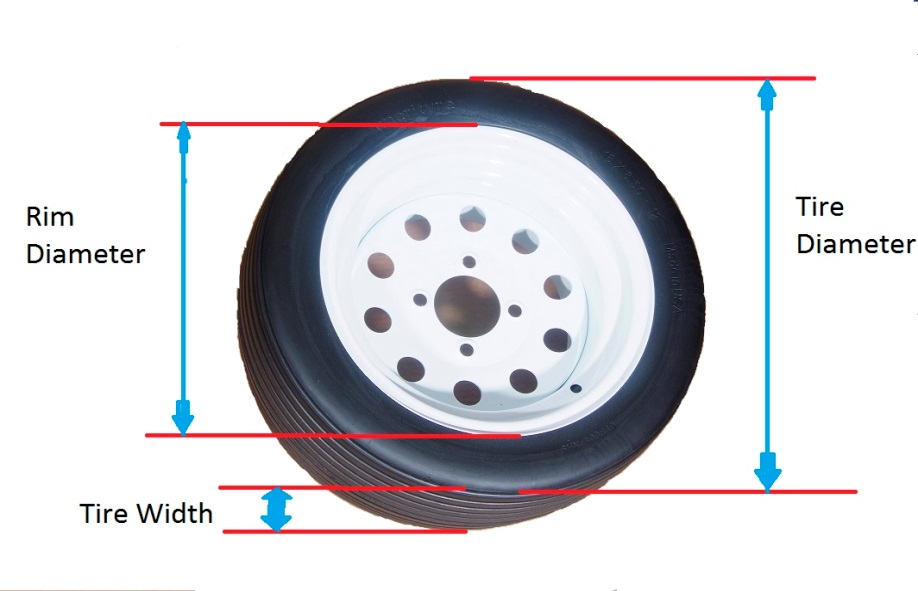
The lower part of the legs is also at high risk. Large loads, coupled with improper pedaling technique, can lead to chronic myositis and myoenthesitis of the calves, paratenonitis of the Achilles tendon.
Clavicle and acromial region (complex of tendons, ligaments, bones and muscles around the shoulder). Among fans of aggressive MTB riding, there is even a joke that the collarbone is a consumable that will break sooner or later. Fracture of bones, complex dislocations and bruises occur mainly when falling from a bicycle - the athlete instinctively tries to slow down with outstretched arms.
Injuries and diseases of the wrists, palms and fingers are not uncommon. They also happen during falls, in addition - the hands are overworked due to the same grip on the steering wheel, when shaking is transmitted to the same zones for a long time.
The groin area suffers from an incorrectly selected and / or adjusted saddle, as well as during a hit on the frame during heavy braking. Such injuries can have dire consequences for the athlete's genitourinary and reproductive systems.
Naturally, you can not 100% prepare for force majeure. All that is in our power is to minimize the risk of its occurrence and consequences. And for this you need:
1. Correctly set up the bike;
2. Prepare your own body;
3. Get good equipment.
As already mentioned, a bicycle, especially a modern one, is not the most anatomically correct sports equipment. However, it is possible to make the bike match the biomechanics of our body as much as possible.
The saddle height should be adjusted so that the heel of the fully extended leg rests on the pedal. In this case, when pedaling with the toe, an angle of approximately 150⁰ is formed - the most gentle for the ligaments and the knee joint. To combat overtired knees, don't forget the "light foot" technique as well - shifting gears so that your legs have to work all the time, but without undue effort.
Adjusting the length of the saddle will help to avoid pain in the lower leg and knees, and injuries associated with it. In the position of the cranks strictly parallel to the ground, the knee should be on the same vertical with the axis of the pedal - in this case, the load on the legs is minimal. This adjustment is especially important if the bike is not exactly the right size for you.
To minimize the negative impact of the saddle on the hip joints, arteries and genitourinary system, it is necessary to choose the right saddle. There are special anatomical saddles with a notch in the middle. But even an ordinary saddle, if chosen correctly, will not critically affect the blood flow in the groin - for this, its width must correspond to the distance between the ischial tuberosities of your femur (for each person it is individual) + 5 cm.
The angle of the saddle is also important - beginners are advised to install it horizontally - this position will prevent back and lower back pain.
Unpleasant sensations in the shoulder girdle and arms will reduce the adjustment of the fit and height of the steering wheel. If, while driving, your hands rest firmly on the steering wheel, they will inevitably get tired, and vibrations when hitting pebbles and mounds will be transmitted to the shoulders and neck, as if along tightly stretched wires. Hence - fatigue and, again, injuries. The steering wheel should be held gently but confidently, the arms should be slightly bent at the elbows.
To avoid sore wrists and palms, install the brake levers correctly. They should be tilted 45⁰ to the ground so that the wrist joint stays extended. It also does not hurt to periodically (at least once every 15-20 minutes) change the position of the hands on the steering wheel. For this, curved or “horned” handlebars are optimally suited.
You can read more about bike adjustment in the corresponding article.
Probably everyone understands that sitting on the stove for thirty years, and then jumping into the saddle and going on a hundred-kilometer voyage is not a good idea. Even regular cruiser riding still requires some preparation. And the more aggressive the style, the higher the speed, the more difficult the terrain, the longer the race, the better the preparation should be.
Like any physical activity, cycling needs a mandatory warm-up. As experienced athletes say, it is better to warm up and not work out than to do the opposite. In almost any sport, a sharp load on unheated joints and muscles increases the risk of injury, shocks the body and eliminates the entire positive effect on health.
Even before a short bike ride, you should definitely devote at least 5-10 minutes to exercises on the most loaded parts of the body. Charging should include rotational movements of the joints: elbows, shoulders, neck, ankle, knee, hip, pelvis, 15-20 rotations in each direction. You can supplement the warm-up with squats, forward and side bends, lying twists, leg swings to the sides and forward. It is also useful to walk around the room in single file, perform several static (plank, side and reverse plank) and breathing exercises - for example, "vacuum".
Warming up causes a rush of blood to the organs of the musculoskeletal system, prepares the body for further stress, allows you to gently “switch” from sedentary work or rest to a sports mode. Warmed muscles, tendons and ligaments become more elastic, resilient - they are ready for more serious loads. For example, studies have shown that simply rotating the ankle joint before a run reduces the risk of twisting the foot by 25%, and this rule fully applies to the bike.
After the trip, you should also not immediately flop on the sofa - take another 10 minutes to stretch. Stretching allows you to lengthen “clogged” and contracted muscles, normalize blood flow, relax joints after exercise, and, which is especially important for beginners, reduces subsequent soreness. You can use any stretching exercises or yoga asanas - you should not get carried away too much, you need to stretch to a slight pain or tingling, without swinging, for 20-30 seconds for each muscle group. In the future, you will be able to reach deeper and longer. Stretching should be supplemented with hanging on the horizontal bar - it perfectly relaxes the spine and removes the consequences of axial load from it, which is especially important for people with back problems, of which the majority
For people who ride often and for a long time, especially over rough terrain or for speed, a simple warm-up is no longer enough. They, like any athletes, are encouraged to simultaneously engage in other types of physical activity. Cyclists are especially helped by complex coordination sports that involve the maximum number of muscle groups, both large and small.
Trampoline - improves coordination and functioning of the vestibular apparatus;
Martial arts provide a comprehensive development of the whole body, increase strength, endurance, teach you to make quick decisions. And also in many types of wrestling they teach how to fall correctly, which is extremely important for cycling;
Swimming - has a positive effect on the spine, develops the respiratory system, small stabilizer muscles, which are important for maintaining balance;
Workout is coordination, aerobic endurance, strength and agility.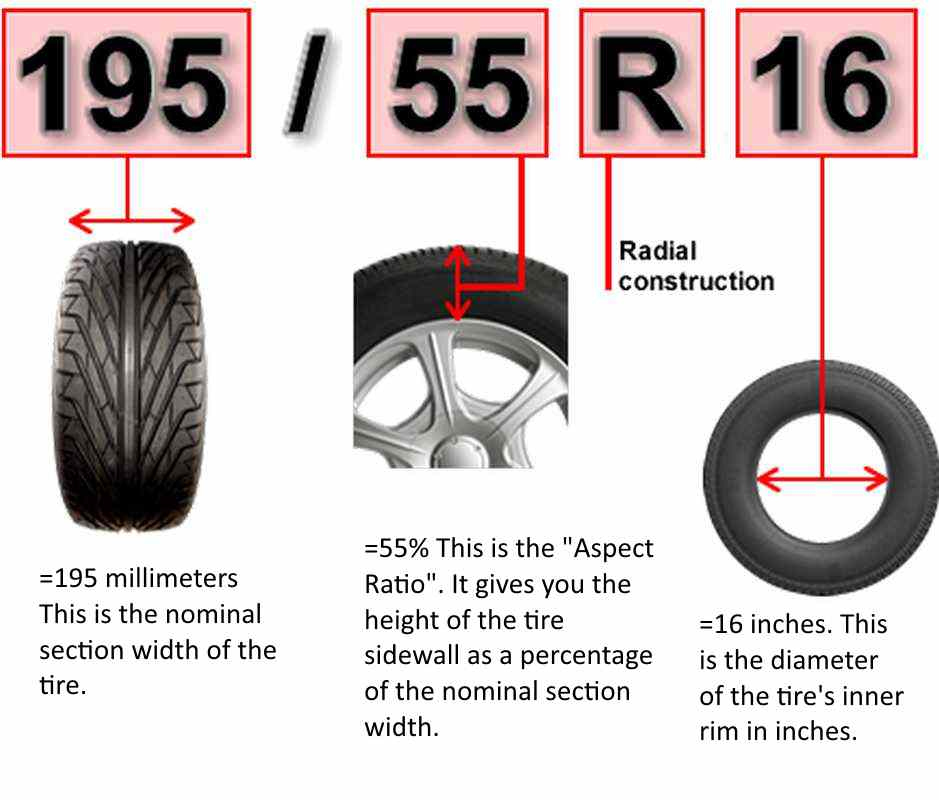 Classes on the crossbar give a load on the upper body, which almost does not work in cycling, which allows the body to develop harmoniously, and also positively affect the spine, which somehow suffers when riding.
Classic classes in the gym will also not be superfluous. Attention should be paid to various types of hyperextensions, deadlifts and leg exercises - multi-repetition, but with small weights that put less stress on the joints, as well as basic exercises on the upper body to eliminate asymmetry.
As already mentioned, the helmet - the main element of protection for the cyclist. Of course, it is not necessary to pull on a motorcycle full-face, but at least a simple bowler hat must be on your head even during a short calm trip, because we are talking about health and life!
Another basic piece of equipment is gloves. They improve the grip of the palms on the steering wheel, resist slipping, which is especially important during rides in the summer heat, allow you to steer and brake more confidently, which directly affects the risk of injury.
You should also pay attention to your clothes. Plain cotton shorts and T-shirts may be more pleasant to the touch, but quickly get wet with sweat, become heavier and restrict movement. In addition, natural tissues contribute to the occurrence of irritations, especially in the groin and armpits, on the nipples in men - up to furunculosis. Such problems cause discomfort, pain, greatly distract from cycling and can lead to injury.
Wear volatile synthetic clothing that fits you. In the cold season, cycling shorts should be changed to breeches or leggings, instead of a T-shirt, take a long-sleeved T-shirt, if necessary, add everything with this fleece and membrane jacket, balaclava. Bright reflective clothing makes you more visible to other road users, which reduces the risk of accidents.
Pedaling over rough terrain, crosses require more serious protection - there are special bicycle “armor” for sale for almost all parts of the body, made of light and durable materials. It will protect the athlete from abrasions, cuts, bruises, and in some cases from dislocations or fractures.
Also, do not forget to check the serviceability and charging of the flashlight and flashing beacons before leaving - you can never be sure that you will not stay on the trip longer than planned. And, in order to be completely safe, you should take at least a simple first aid kit with painkillers, hydrogen peroxide or chlorhexedine, bandages or dressing kits, aspirin (in case of sunstroke) and elastic bandages.
Ride your bike with pleasure and stay healthy!
Many cyclists waste money replacing tires that still perform well just because they are old or have discolored sidewalls. When to change bike tires?
Contents of the article
 4 How to extend the bicycle tire service life
 If you want to put new tires on just because the old ones look ugly, then it's your money and your business. If you care about safety and functionality, there are only two reasons to replace old tires.
1. In the case where the tire tread is so worn that there are many punctures from small pieces of glass and the like, or the tire carcass is exposed from the rubber.
2. The carcass of the tire has damage, which is manifested in the fact that the tire has bumps and bumps on the surface, or the tube is squeezed through the tire.
Cracked tread is not dangerous. Small punctures in the tire caused by nails, spikes, or small pieces of glass are also harmless, since the tire does not need to be sealed.
Experienced bicycle mechanics pay great attention to the placement of the brand. A simple rule for tires is to place the stamp near the spool, facing right. This is justified by the fact that, knowing the standard sign when mounting tires, it is easier to detect a spike or a piece of glass, guided by the location of the hole in the removed chamber. There is common sense in this and placing a stigma according to a certain principle is a sign of qualification and a good attitude to business.
Read more When to change bicycle tires
Bicycle tire failure due to complete tread wear is considered normal. But, very often it happens much earlier. The main factors that affect its durability and premature wear:
— proper preparation for operation;
- tire load control;
- maintaining optimal pressure;
- observance of the braking mode;
- road conditions;
- weather and climatic conditions;
- temperature range;
- storage conditions.
Bicycle tire wear is a complex and multifactorial phenomenon and is the result of physical-chemical and physical-mechanical processes occurring in it. Under the influence of physical and mechanical processes on the tire, its abrasion, breakdowns, punctures, carcass ruptures, carcass delamination, etc. occur. Physical and chemical processes occurring in the material from which the tire is made largely depend on the conditions in which it is located:
- too low and high temperatures;
- light;
- high humidity;
- increased oxygen content.
Read more Bicycle tire wear
Bicycle tire damage can be classified as follows:
Damage caused by wear.
Damage caused by external factors (cuts).
Minor damage (breaks and punctures).
Bicycle tire wear
Bicycle tire wear is a rather complex process. It is generally accepted that the main wear of the tire falls on the place where it touches the ground. But, wear also occurs at the points where the tire contacts the wheel rim, especially when riding on tires with low pressure. This phenomenon must be monitored in the same way as the tread, because a heavily worn tire side surface is much less noticeable than a worn tread.
In addition, the surface of the tire can be quickly rubbed off by poorly adjusted v-brakes or poor quality rims with sharp edges. As a result of damage, the sidewall of the tire is bursting from the inside with a chamber and a “hernia” will occur.
Read more Bicycle tire damage
To prolong the life of your bike tire, you need to follow a few simple recommendations.
Mounting and dismounting of tires must be carried out carefully and accurately. No extra force should be applied to the side surface of the tire. The tool (blade) must be free of burrs and cutting edges.
Correct fitting of the tube to the tire is very important. Excessive expansion of the bladder, as well as wrinkling of the bladder due to insufficient expansion, can cause the bladder to rupture and cause damage to the inner surface of the tire.
Before inflating the tire, the tube valve nut, if any, must be tightened and tightened during inflation.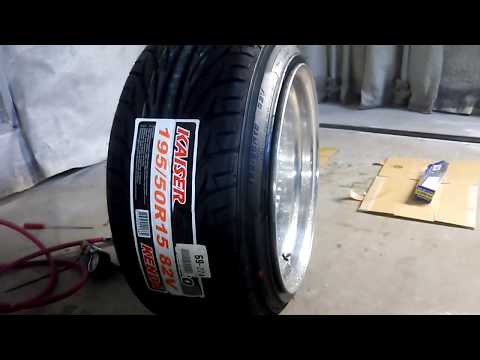
Inflation pressure should be maintained according to tire load and road conditions. No need to save time and inflate tires in a timely manner. In hot weather, the internal pressure in the tire increases, so it is necessary to release excess air in time.
Read more How to extend the life of a bicycle tire
The main materials for bicycle tires are compound and rubber. Natural rubber is made from rubber, which is extracted from the sap of rubber trees. But, due to the fact that this method of obtaining rubber is very expensive and is simply not enough for all trees, synthetic rubber is used to make bicycle tires, from which oil-petrol-resistant rubber is produced, adding soot to it, followed by vulcanization.
The amount of filler affects the properties of the rubber. With too much of it, the properties of rubber deteriorate, such as wear resistance, although its cost is much reduced.
How to check the quality of a rubber tire
It is necessary to look at the overall quality of the tire - the presence of excess rubber influx, the curvature of the tire, the quality of the bead cord.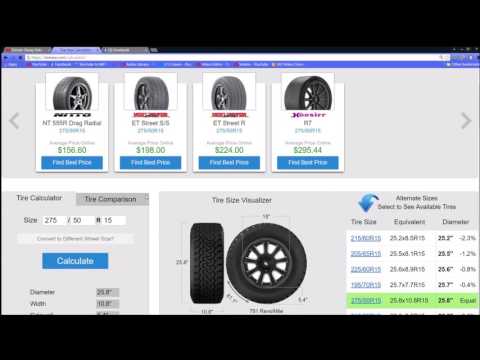 You should not use curved tires, with “accordions” and folds, and those with a bent bead cord. These defects are not corrected when the tire is inflated.
If you run a dry finger over the surface of the rubber with strong pressure and a noticeable dark mark remains on it, then there is too much filler in the rubber and such rubber will not last long.
Read more Checking the quality of a bicycle tire
In order to ride a bicycle safely and efficiently in winter, it is necessary to use special tires. As winter tires, off-road tires with a high and rare tread pattern or studded tires can be used. It all depends on the condition of the road. Tires with an aggressive pattern can be used on snowy roads or off-roads with snow. When driving on ice, icy roads or dense snow, studded tires are indispensable.
As with a car on a bicycle, unlike non-studded tires, studded tires need to be run in. Manufacturers of studded bicycle tires recommend running them in for 40-50 kilometers on paved roads.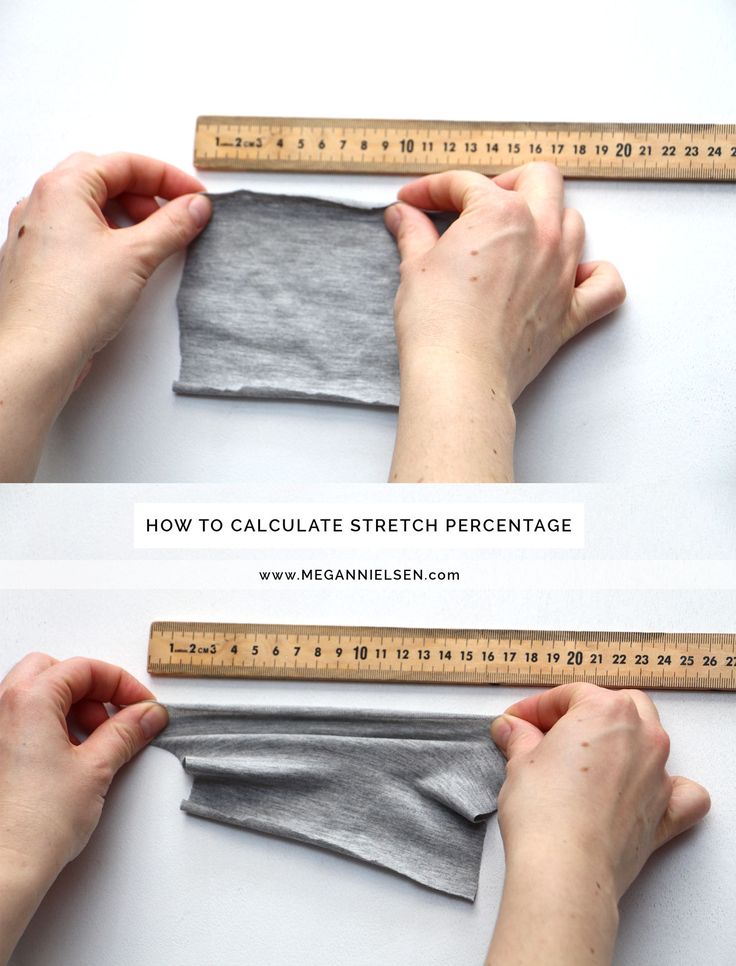 In this case, sudden braking and acceleration should be avoided.
In order for the studs to take their place in the tire, you must first brake gently. Even with careful use of studded tires, some studs can be lost due to friction. This is acceptable and does not affect the overall performance of the tire.
Read more Breaking in studded bicycle tires
As a general rule, bicycle front tires last three times longer than rear tires. This is because the rears carry much more weight than the fronts. The second reason for increased rear tire wear is that the rear wheel of the bike is the drive wheel. The wear bias is even greater on bikes that use rear brakes.
Very smart and practical cyclists (forgive them), and sometimes even “professional” bike mechanics (but they don’t), can’t think of anything more original to deal with the above phenomenon, how to rearrange bicycle tires in places.
That is, they install a less worn tire from the front wheel to the rear, and a rear tire that lives out its last days on the front wheel.