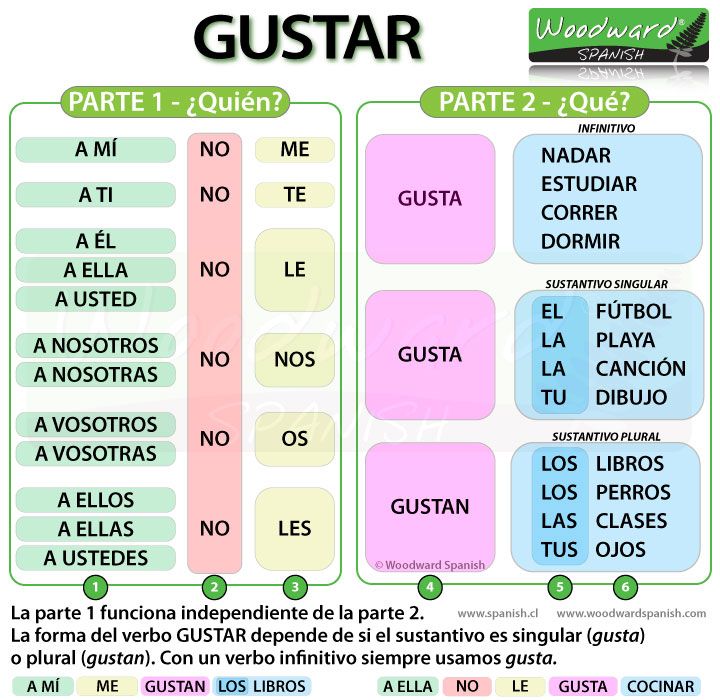
Search
How To Change Launcher On Android Tv And Which Ones- Advertisement -
The same as happens on mobiles and tablets, where anyone can customize their interface by downloading a launcher, Android TV also allows you to install these applications. They are not very popular, but there is more than one good example. We highlight our favorites.
Having Android on the TV allows mobile apps and games to run on a bigger screen. And if said Android is Android TV use from the remote control is significantly improved, also the compatibility of all applications. Even for launchers: there is the option to exit the default interface, customizing it with another aspect and use. Let’s see how to install them and which ones are the most recommended.
- Advertisement -
Android TV is still an Android even though it is adapted to television, so there is no faster way to change the interface than do the installation of a launcher and choose that it opens by default instead of the one that comes by system. Although that yes, not in all the devices with Android TV it is so simple.
- Advertisement -
The steps to change launcher on Android TV are as follows:
This is the most common, but it is not always so simple: It is likely that the manufacturer of your device does not allow to apply another launcher by default. In that case you can try the following:
- Advertisement -
What are you still unable to change the launcher? It is time to get involved with a somewhat more complicated process and can damage your Android TV: you have to remove the default launcher from the system. To do this, carry out the following process, always having previously installed one of the launchers that we recommend:

 In the event that ‘USB debugging’ does not appear active: this way it is also activated wirelessly.
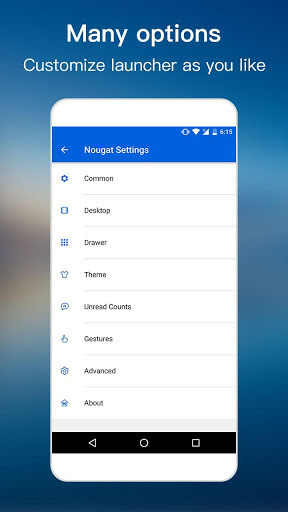
Once you have the option to change the launcher on Android TV, let’s see which are the most recommended.
It is a somewhat outdated app since it has not been updated since 2018 (the paid version since 2019). Still, it’s a good replacement for the original interface if you basically need access to the applications you have installed. In addition, ATV Launcher allows you to apply widgets, it can show the covers at the start of compatible apps, it allows easy access to all installed Android apps (not just those specific to Android TV) and it has support for wallpapers.
ATV Launcher is available in two versions: one free and one paid (3.19 euros). Our recommendation is that you try the paid one: it is more up-to-date and works much better. In the event that you are not convinced you can always return it within two hours after purchase.
In line with the previous app, with Top TV Launcher 2 it is possible adapt the screen appearance while maintaining the Android TV aesthetic. The launcher allows you to customize the grid, change the wallpaper, cards can be designed from photos and icons and it also supports widgets.
Top TV Launcher 2 is a paid application (3.09 euros), although there is a trial version with which to check that everything works correctly before paying.
If you don’t have a Chromecast with Google TV you can install its launcher. It is an interface that should be reaching the rest of Android TV, but it is not yet found by default in all of them. And you can anticipate: install it by following the following tutorial.
We use cookies to ensure that we give you the best experience on our website. If you continue to use this site we will assume that you are happy with it.OkPrivacy policy
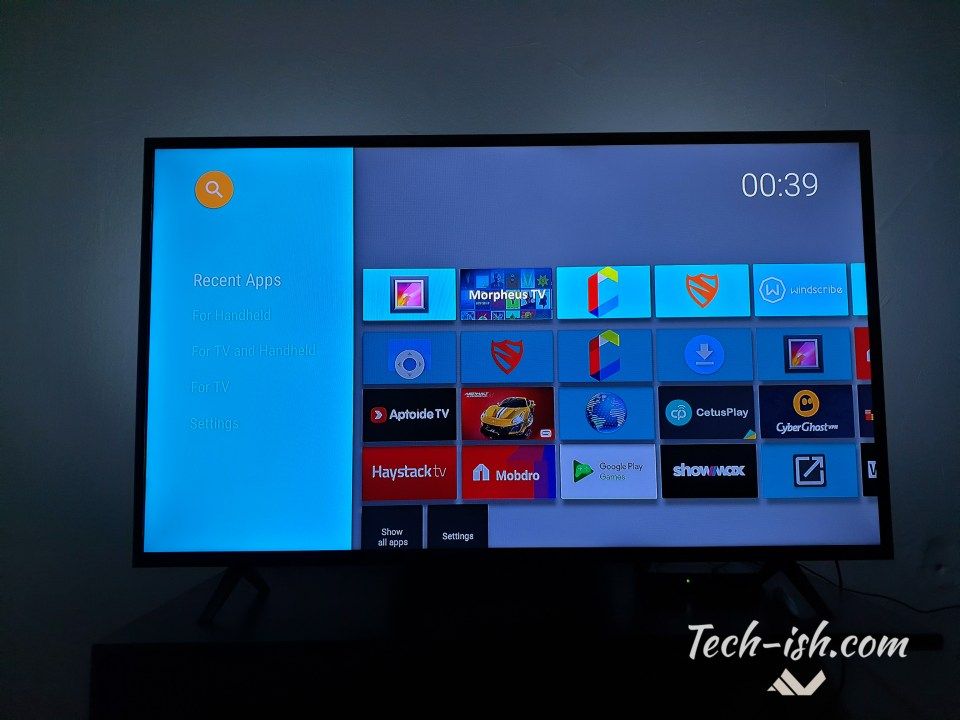
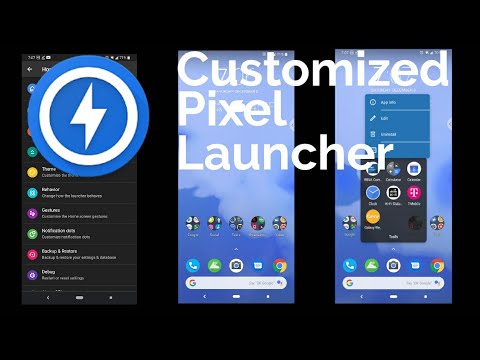
This step-by-step tutorial will show how to install and use the best Android TV launcher available in 2022 which is called ATV Launcher.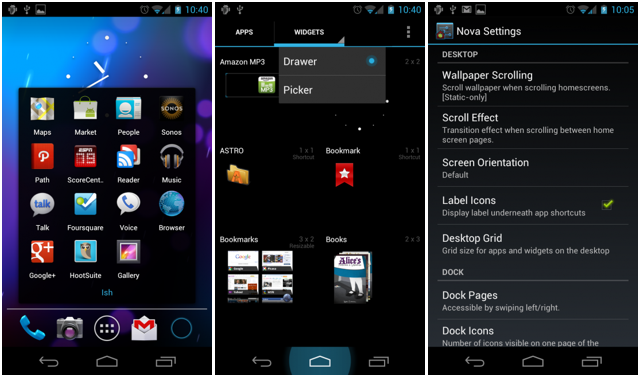
Your Android TV box makes it convenient to stream movies, TV shows, news, sports events, and live TV using different apps.
It comes with a built-in launcher that unfortunately isn’t the best to use when watching on your device.
The good news, however, is that you don’t have to sacrifice your entertainment pleasure with the current launcher you have.
That’s because there are launchers that you can download so you can customize the home screen’s settings.
The ATV Launcher app is used to organize the apps and other elements on your device’s home screen.
This is similar to the Wolf Launcher and Leanback Launcher for those familiar with custom launchers.
If you’re finding the current launcher on your Android TV Box difficult to use, this app will likely work for you if you want an alternative menu layout that you can easily configure.
Third-party launchers don’t work very well with Amazon Fire TV devices. These are best suited for generic Android TV Boxes running stock Android.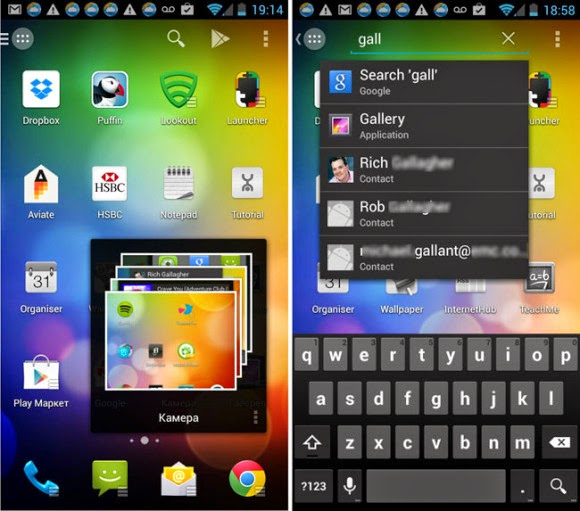
Table of Contents
With ATV Launcher, you can do the following:
IMPORTANT: Some of the functionalities in this tutorial are only available with the ATV Launcher Pro version. TROYPOINT suggests downloading the free trial version first so that you can assess if it loads properly on your Android TV box. Unfortunately, not all Android TV Boxes allow for 3rd party launchers.
In addition, the following apps mentioned below are available for installation through the Aptoide App.
Aptoide and tons of other streaming/tech applications are provided in the TROYPOINT Rapid App Installer. With this tool, you can install the best apps with the click of a button.
Below, you will find a screenshot guide on how to install and use ATV Launcher.
In this example, I’ve used the X96S Android TV Stick to navigate through the Android TV box. You can read more about this device on my previous post below:
X96S Android TV Stick – Firestick Replacement?
Step 1
On the Google Play Store, type in “ATV Launcher.”
This app comes as a free download. However, I have upgraded to the ATV Launcher Pro version in this example.
Step 2
Click INSTALL.
Step 3
Click INSTALL again and then OPEN when installation is complete.
YOU'RE BEING WATCHED...
Your online activity is logged by your Internet Service Provider, app/addon devs, and government through your identifying IP address.
Stream anonymously by using Surfshark VPN.
Surfshark will encrypt your connection to the Internet and mask your identifying IP address so you will become anonymous.
Your identifying IP Address is currently 73.10.164.28
Surfshark backs their service with a 30-day money back guarantee.
Surfshark allows you to use your account on unlimited Internet-connected devices
CLICK FOR SURFSHARK DISCOUNT
Step 4
The new launcher will load.
Step 5
Go to Settings > More settings.
Step 6
Click Apps & notifications.
Step 7
Click ATV Launcher.
Step 8
Set it to Home app. Sometimes this is set as a false positive so you need to click it.
Step 9
Click Home app.
Step 10
Select ATV Launcher.
Step 11
Click the Back button on your remote.
Step 12
Depending on the device that you are using, you may not get into the Home Settings screen to set the default home app. This is the case for me on the NVIDIA Shield TV. Once I restart the shield after opening the ATV Launcher, I am presented with the following prompt:
Step 13
After you see this, make sure that the ATV Launcher is clicked and then the ALWAYS button at the bottom. This will set the ATV Launcher as the default launcher.
NOTE: If the ATV Launcher locks up or something isn’t working properly, unplug the power from your device, let it sit for a few seconds and then plug it back in. And then turn it back ON to make sure that everything is loaded properly.
Step 14
Replace the background by launching ES File Explorer.
Note: ES File Explorer is not longer available in Google Play Store but you can install this app with the TROYPOINT App by way of Rapid App Installer.
Step 15
Click START NOW.
Step 16
Under Tools, click Download Manager.
Step 17
Click the + New icon.
Step 18
Type in the URL in the Path field “https://tryopoint.com/atvbg“. This is the TROYPOINT background but you can choose any image that you would like to serve as your background image.
Step 19
Type in a name for your source. In this example, “bg” is used.
Step 20
Click DOWNLOAD NOW.
Step 21
Once the download is complete, you may now leave ES File Explorer without having to open the file or folder.
Step 1
On the home screen, you may now highlight any shortcut. Hold down the OK button of your remote to show the Application Menu. This will be used the customize the various items within the launcher.
Step 2
Click Launcher Settings.
Step 3
Click Wallpaper.
Step 4
Click Select Wallpaper.
Step 5
Click ALLOW.
Step 6
Click the Internal Storage menu item.
Step 7
Select the Download folder.
Step 8
Select the background file.
Step 9
Click the Home button on your remote. The new background should show up on your home screen and the screen has refreshed.
NOTE: The size of the background should be 1920 x 1090 px for better resolution.
Step 10
On the top of the screen are three empty boxes where you can install various widgets into this area.
In this example, I’m going to install the IPVanish widget.
NOTE: Here’s an exclusive IPVanish VPN discount for TROYPOINT visitors and subscribers.
IPVanish VPN Exclusive TROYPOINT Discount
Step 11
Highlight the empty space at the top left-hand corner.
Step 12
Hold down the OK button on your remote to reveal the Widget Menu.
Step 13
Click Pick Widget.
Step 14
Select the IPVanish widget. This will be available once you download the app from the Google Play Store.
Step 15
Tick the box beside Always allow ATV Launcher to create widgets and access their data then click CREATE.
Step 16
The widget is now added to the top section.
Step 17
Move over to the middle widget area and hold down the OK button on your remote and click Pick Widget.
Step 18
Click another widget. In this example, I’ve selected CPU Monitor.
The widget is now added.
Step 19
Repeat the same process to add a third widget. In this example, I’ve selected WeatherBug.
Step 20
WeatherBug will ask you to configure the settings.
Step 21
Click SELECT WIDGET BACKGROUND COLOR.
Step 22
Pick a color.
Step 23
The preview will show on the WIDGET PREVIEW bar.
Step 24
Select a location for your widget. In this example, I have already set up “Chicago, Illinois.”
The widget is now added.
Step 1
To make the widget sizes similar, highlight a widget.
Step 2
Hold down the OK button on your remote to reveal the Widget Menu and select Scale Content.
Step 3
Use the left and right arrows on your remote to make the widget smaller or larger, respectively.
Step 4
Click the Escape or Back button to return when done.
Step 5
The widgets should now have almost the same size.
Step 6
Do the same process for the other widget.
Step 7
If it doesn’t scale the same way, click the Escape button, and hold down on the OK button.
Step 8
Select Launcher Settings > Sections > Widgets.
Step 9
Under the Section: Widgets area, adjust the height.
Step 10
Go back to the home screen by clicking the Escape button several times.
The widgets should now have almost the same sizes.
Step 1
If you would like to add more widgets, go to the Section: Widgets area and add more rows and columns.
Step 2
You may notice too that the apps adjust in size when you adjust the number of columns.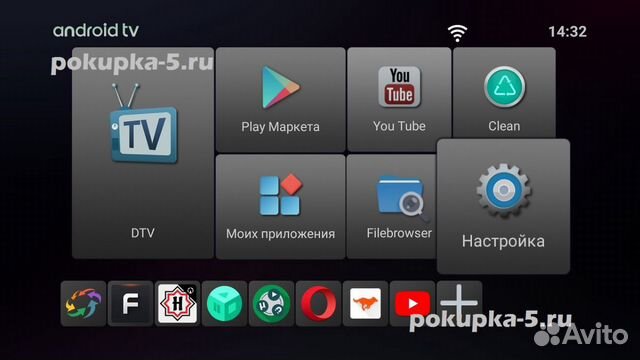
Step 3
You may also configure the title, orientation and sorting of the apps.
Step 4
You may also hide apps by clicking Hidden Apps and selecting apps that you don’t want to show up on the screen.
Step 1
Highlight an app.
Step 2
Press the OK button then select Move.
Step 3
Move the app to your preferred location using the left and right arrow buttons on your remote.
Step 4
Press the OK button.
Step 1
To create a folder, highlight an app, press the OK button on your remote and select Create Folder.
Step 2
Type in a folder name and click Apply.
Step 3
The folder will appear on the list of apps.
Step 4
Highlight an app, hold down on the OK button and select Move To Folder.
Step 5
Select the folder.
Step 6
The app is now moved to the folder.
For more tech and streaming tutorials be sure to sign up for the TROYPOINT Advisor with updates weekly.
This Advisor provides all the best cord-cutting tips to get the most out of your favorite streaming devices and more. CLICK HERE or link below for TROYOPINT Advisor Subscription:
TROYPOINT Advisor
Android TV Launchers are used to configure a new interface on your Android device.
The best Android launcher is ATV Launcher which we show installation and setup instructions for in this guide.
Yes. This app is absolutely free to use and install.
There are tons of popular Android devices including NVIDIA, Chromecast with Google TV, and MECOOL.
This page includes affiliate links where TROYPOINT may receive a commission at no extra cost to you. Many times, you will receive a discount due to the special arrangements made for our visitors. I will never promote something that I personally don't use or recommend. Purchasing through my links directly supports TROYPOINT which keeps the content and tools coming. Thank you!
How to adjust the carburetor on an ATV? What to pay attention to? What are the signs of misuse of the device? About this today in our article. Using the proposed instructions, you will be able to set up the carburetor step by step without the help of specialists.
For stable operation of the ATV, it is necessary that the engine receives the optimal amount of combustible mixture corresponding to its rev range. Otherwise, the following problems may occur:
What needs to be applied in this case:
Important! Carry out tuning only when the carburetor is cleaned outside and inside, as well as when the engine is warmed up to operating temperature.
 1 until it stops. Wait for the gasoline to merge completely, and tighten screw No. 1 back.
Note. The location of the bolts on each carburetor model may vary, so read the instructions that came with your machine.
1. Start the ATV and test ride. Wait until the engine has completely cooled down.
2. Check the condition of the spark plug. To do this, unscrew the cap and inspect the candle.
What to look for:

3. Unscrew the needle cover at the top of the carburetor. Pull the needle. This is the main element that regulates the supply of fuel to the combustion chamber, since the needle is connected to the gas trigger. When the trigger is pressed, the needle rises, slightly opening the hole for supplying the fuel mixture. This directly affects the growth of power and speed of the ATV.
4. Remove the cable, then press the needle to pull it out. The needle has 5 grooves and a retaining ring. By default, it is set to medium. The lower the retaining ring is located, the higher the needle is raised, which means that a lot of gasoline and little air is supplied. Accordingly, the higher the ring - the less gasoline and more air.
5. Reposition the circlip in the desired direction to optimize carburetor performance. Insert the needle into place.
6. Start the engine and press the throttle trigger. With proper adjustment, the engine should not stall from a sharp pressure.
And remember, you should resort to adjusting the needle only as a last resort, when adjusting the quality and quantity screw does not bring results.
The performance of a four-wheeler depends on the correct level of gasoline in the carburetor.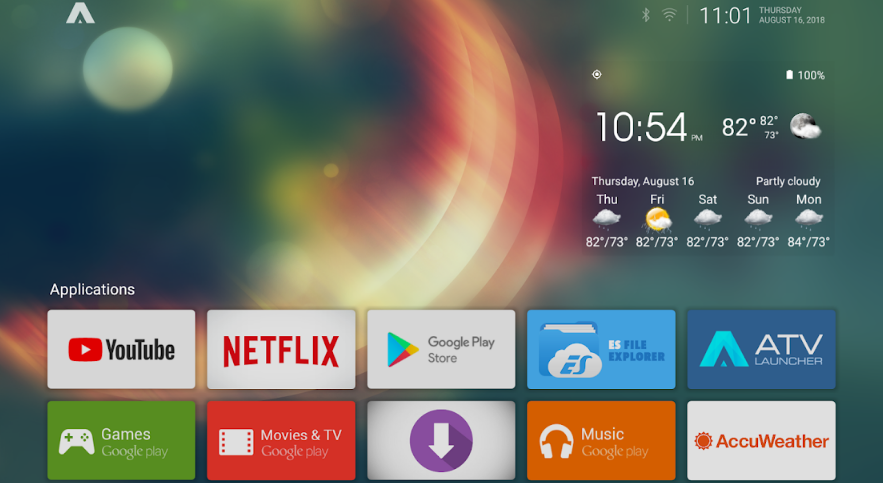 Excessive amounts will flood the candles, spill onto the ground and lead to unnecessary expenses. If there is too little fuel, the engine simply will not start.
How to optimize the fuel supply

The operation and life of the engine directly depends on the quality of the fuel mixture. The carburetor is responsible for the preparation of the composition, but after prolonged use of the equipment, the settings “go astray”. This results in:
 Traction can disappear for one or several seconds. But the most unpleasant thing is that such failures occur sequentially, which significantly interferes with speed gain.
 Many riders who decide to buy an inexpensive ATV simply do not spare the technique and ignore this procedure. But even if you plan to change your device in 1.5-2 years, adjustment is needed. The reason for this is increased fuel consumption. A quad with an untuned carburetor "eats" 30-40% more gasoline, and these are tangible costs.
So how do you adjust the carburetor on a Chinese ATV? For this you need:
 The procedure is performed using a special screw, which is responsible for the quality of the composition and the number of revolutions.
 However, it is important to remember that all adjustments are made only with a "clean" carburettor. This means that the rider needs to remove all the dirt from the node and flush the system to remove condensation and sediment from it.
Note: The engine must be warmed up to operating temperature immediately before adjustment.
To set the carburetor idle speed, the float chamber must first be cleared of fuel. To do this, start the ATV, close the fuel cock and wait until the machine stalls (5-10 minutes). To speed up the process, you can take a little ride on the quadric. Of course, gasoline can be drained, but in any case you will have to warm up the device, so the first method of "removing" gasoline is more effective.
Then:
Read the manual before adjusting the carburetor on a 125cc ATV to be sure. Remember that the location of the bolts is different in different devices, so read the documentation in advance.
To evaluate the quality of the fuel composition, make a test run. After that, unscrew the candle, and evaluate its condition. If it is:
Also look out for these "symptoms": damaged tip (failed electrode), oil deposits (damaged rings and caps), chips and inclusions (a sign of motor failure).