Ask a question, get an answer ASAP!
☰
×
GET A QUOTE
| Save Big on Auto Repairs | Get a Quote |
Tire valve stems are the valves located in a vehicle’s wheel where the tires are inflated from. They contain a spring loaded valve core that seals itself using the air pressure inside of the tire. Over time valve stems may get old, crack, become brittle, or begin to leak, causing larger problems with your tire and your driving experience.
When valve stems begin to leak, the tire will no longer hold air. Depending on the severity of the leak, the tire may leak air slowly, or in more sever cases not hold air at all, warranting replacement of the valve stem.
In most cases the the fastest way to replace a valve stem is to take it to a tire shop and have them remove the tire and replace the valve stem using aid of a tire machine. However, for instances where this is not an option, a tire can be removed and the valve stem changed manually. In this step by step guide we will cover how to remove a tire from a wheel manually, using a tire iron, to replace the valve stem.
Materials Needed
Step 1: Loosen the lug nuts. Loosen the lug nuts of the wheel from which the valve stem is going to be replaced.
Step 2: Raise the car on jack stands. Set the parking brake, and then raise the vehicle and secure it on jack stands.
Step 3: Remove the wheel. Once the vehicle is raised, remove the wheel and set it flat on the ground with the outside of the wheel facing up.
Step 4: Deflate the tire. Remove the cap from the valve stem, and then remove the valve stem core using the valve stem removal tool to release the air from the wheel.
Once the valve stem core is removed the tire should deflate on its own.
Step 5: Separate the tire’s bead from the wheel. Next, use the sledgehammer to break the tire’s bead free from the wheel.
Hit the sidewall of the tire using the sledgehammer in the same place until the bead breaks loose.
When the bead breaks loose you may hear a crack or popping sound, and you will see the inside lip of tire visibly separate from the lip of the wheel.
Once the bead has been broken, continue around the tire with the sledgehammer until the bead is completely broken all the way round the tire.
Step 6: Lift the lip of the tire up from the wheel. Once the tire’s bead has been broken, insert your tire iron between the edge of the rim and the inside lip of the tire, and then pry upward to pull the lip of the tire over the edge of the wheel.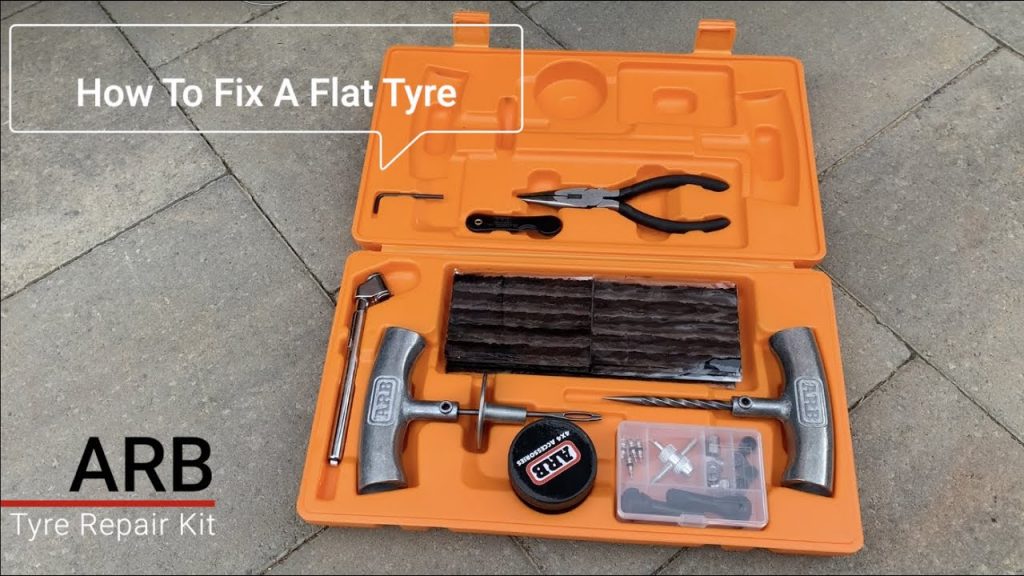
Once you have pulled the lip of the tire over the edge of the wheel, work the tire iron around the rim until the entire lip of the tire is off the rim.
Step 7: Remove the tire. Grab the tire by its removed lip and pull it upward so that the opposite lip that was at the bottom of the wheel is now touching the top edge of the rim.
Insert the tire iron in between the the tire’s lip and the edge of the wheel and pry upwards to pull the lip over the edge of the rim.
Once the lip is over the edge of the rim, work the tire iron around the edge of the wheel until the tire is removed from the wheel.
Step 8: Remove the valve stem. Once the tire is removed from the wheel remove the valve stem. Use the needle nose pliers to pull the valve stem free from the wheel.
Step 9: Install the new valve stem. Take your replacement valve stem and install it from the inside of the wheel. Once it is in position use the needle nose pliers to pull it through into place.
Step 10: Reinstall the tire. Reinstall the tire onto the wheel by pressing it down over the the rim until the bottom bead clears the edge of the rim.
Then press the side of the tire down underneath the edge of the wheel, tuck your tire iron in between the lip of wheel and the bead, and then pry the bead over the lip the of the wheel.
Once the bead clears the lip of the wheel, work your way round the entire wheel until the the tire is completely installed on the wheel.
Step 11: Inflate the tire. Once the tire has been re-installed onto the wheel, turn on the air compressor and inflate the tire to the correct specification.
For most tires, the recommended pressure is between 32-35 pounds per square inch (psi).
Step 12: Check for leaks. Once the tire is properly inflated, double check to make sure that there are no leaks of any kind, and then reinstall the tire onto the vehicle and lower it off of the jack stands.
For most cases, the easiest course of action to replace a valve stem would be to simply take it to a tire shop, have the tire removed with a machine, and then have the valve replaced.
However, in the instances where that is not an option, a valve stem, and even a tire, can be removed and replaced manually with the correct tools and the correct procedure. If you find that there is a leak or damage in the tire and not just the valve stem, you may want to replace the tire entirely.
Tires
wheels
The statements expressed above are only for informational purposes and should be independently verified. Please see our terms of service for more details
4.2 Average Rating
Service Hours
7 AM - 9 PM
7 days a week
Phone Number
1 (855) 347-2779
Phone Hours
Mon - Fri / 6 AM - 5 PM PST
Sat - Sun / 7 AM - 4 PM PST
Address
We come to you at no extra charge
Guarantee
12-month/12,000-mile warranty
Our certified mobile mechanics perform over 600 services, including diagnostics, brakes, oil changes, scheduled mileage maintenances, and will come to you with all necessary parts and tools.
Get a fair & transparent quote instantly before booking.
Earn up to
$70/hr
Apply Now
Our certified mobile mechanics make house calls in over 2,000 U.S. cities. Fast, free online quotes for your car repair.
GET A QUOTE
GET A QUOTE
How to Do a Tire Safety Inspection
Car tires are a big part of staying safe on the road. Check tire inflation, tread depth, and sidewalls to make sure they're in good shape.
How to Replace the Rear Hub Bearing on a Ford Explorer
Wheel bearings allow the car's wheels to give you a smooth ride. A howling or grinding noise is a sign that your hub bearing should be replaced.
What are the Best Car Tire Brands to Buy?
Car tires come as all season passenger tires, summer passenger tires, on-road light duty truck and SUV tires, and off-road truck and SUV tires.
Steering wheel vibration over 60 mph
Hello. This vehicle should not shake like this when driving at high speeds. If it only occurs at higher rates of speed then it either has a warped front hub assembly or it may have a problem with the alignment....
Car stalls when stopped, steering wheel locks up
Yes, this is a common problem with CX-9. Carbon deposits can build in the throttle body (https://www.yourmechanic.com/article/symptoms-of-a-bad-or-failing-throttle-body) causing a restriction in airflow and reaction time of the throttle plate causing stalling with no Check Engine Light or no diagnostic trouble...
How can you tell if my tires need to be rotated?
Hi, thanks for writing in. If it has been more than 5000 miles, then it is time. Also, you can take a look at the front and rear tires and move your hand over top of the tires in one. ..
..
Services
Estimates
Cities
Maintenance
Our service team is available 7 days a week, Monday - Friday from 6 AM to 5 PM PST, Saturday - Sunday 7 AM - 4 PM PST.
1 (855) 347-2779 · [email protected]
Read FAQ
GET A QUOTE
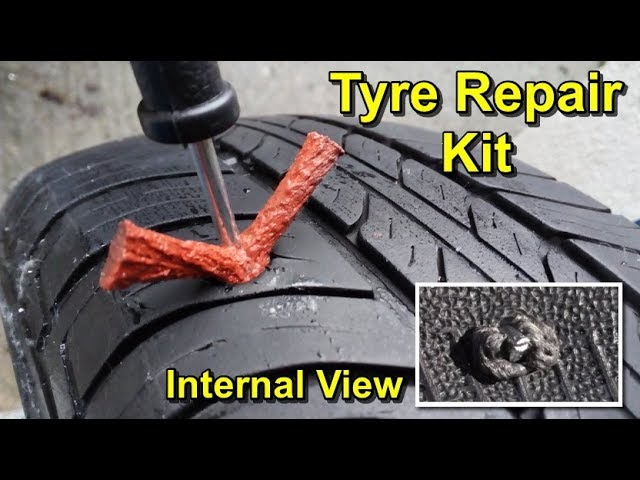
“A tire only loses air if it’s punctured.” This is a common misconception that we have all had or heard and yet the reality is quite different. Indeed, a tire can lose air even without a puncture, as for example in the case of a crack in the valve that is used to inflate your tires. A punctured valve is difficult to detect, and not taking care of it in time can have real consequences for your tire, but also (and above all!) for your safety. Blackcircles Canada, your online tire specialist, offers below a complete guide to the causes and consequences of a punctured valve, and how to repair a leaking valve stem.
A valve is a pin located on the outside of the tire, through which the tire can be inflated/deflated. It has a mechanism consisting of a spring-mounted valve that closes tightly with the air pressure inside the tire. Over time, the stem valve may become brittle and cracked, which may increase the risk of air leaking through it.
When the stem valve leaks, the affected tire is no longer able to retain air. Depending on the extent of the damage, the air will leak out slowly or more quickly. In both cases, the valve must be replaced.
If the air leakage is slow, you will be subject to the problems encountered by drivers driving with underinflated tires. Internal damage that can shorten the service life of the tire by up to a quarter, increased fuel consumption due to higher rolling resistance: the tire will damage faster, and your energy-efficiency will be significantly lower. The tire will also have poorer traction and the stability of your car will be reduced when cornering, not to mention the more pronounced deformation of the tire that increases its internal temperature, which can cause it to burst. Finally, an under-inflated tire increases the risk of hydroplaning. Tire pressure is thus very important!
First of all, make sure it is the tire valve stem that is leaking. To do so, there’s a very simple trick! Apply a mixture of water and dishwashing soap to the valve with the cap removed. If bubbles start to appear, your valve is leaking. If this is not the case, and there is a definite air leak, it will be located elsewhere on the tire.
Step 2: Gather the right tools before you start!Before you begin, make sure you have all the necessary equipment to complete the replacement of the faulty valve stem.
For this, you will need the following:

You are now ready to start the process!
Step 3: Loosen the nuts on the wheel you are going to work on.To do so, use the wrench mentioned in the previous step to loosen each of the lug nuts holding your wheel in place. Do this while the car is still on the ground.
However, for certain models of vehicles, it is possible that the wheel nuts have an anti-theft ring. If this is the case, you’ll have to use the appropriate special key to remove the locking nut(s).
Step 4: Raise your vehicle with the jack and then remove the wheel.First and foremost, make sure the handbrake is applied so that your vehicle is completely immobilized. Then, use your jack to lift your car. Be sure to position it on the right part of the chassis so that the car is properly supported. This will prevent any damage to the car and any bodily injury. Once your car is lifted, secure it on jack stands. Unscrew the wheel bolts completely, then remove the wheel. Finally, place the wheel on the ground flat, with the outside of the wheel facing up.
If you have not already done so, remove the valve cap. Then remove the valve stem core using the valve stem removal tool to release the air from the wheel, which should normally deflate completely on its own.
Step 6: Separate the tire’s bead from the wheel.For this step, use the sledgehammer in the following way: hit the tire sidewall with the sledgehammer in the same spot until you hear a crack or popping sound, and see the inside lip of the tire visibly break loose from the rim. This means that the tire has been successfully detached from the lip of the wheel.
Once the tire bead has been broken, continue hitting with the sledgehammer around the tire to detach the sidewall around the entire circumference of the wheel.
Step 7: Remove the tire from the rim.Once the sidewall of the tire is separated from the outer edge of the rim around the entire circumference of the wheel, insert your tire iron between the edge of the rim and the inside lip of the tire, and then pry upward to pull the lip of the tire over the edge of the wheel. Once you have pulled the lip of the tire over the edge of the wheel, work the tire iron around the rim until the entire lip of the tire is off the rim.
Once the sidewall of the tire is completely above the wheel, grab it by its removed lip and pull it upward so that the opposite lip that was at the bottom of the wheel is now touching the top edge of the rim. Use your tire iron again by inserting it between the tire’s lip and the edge of the wheel and pry upwards to pull the lip over the edge of the rim. As before, work the tire iron around the edge of the wheel until the tire is removed from the wheel.
Step 8: Remove the defective valve stem and replace it with the new one.Once the tire is separated from the rim, it is time to remove the valve stem. To do this, first pull out the valve stem free from the wheel using the needle-nose pliers. Once this has been done, install the replacement valve stem from the inside of the wheel. Once it is in position, use the needle-nose pliers again to pull it through into its right place on the wheel.
Once the stem is in place, it is time to put the tire back on its rim. To do this, start by pressing the tire down over the rim until the bottom bead clears the edge of the rim. The aim here is to return the lower sidewall of the tire to its original position on the wheel.
Then press the upper sidewall of the tire down underneath the edge of the wheel. Then tuck your tire iron between the tire sidewall and the rim edge and use it to make the opposite movement to the one you used to pull the tire sidewall out of the rim. Once the bead clears the lip of the wheel, use the tire iron to work your way round the entire wheel until the tire is completely installed on the wheel. Then inflate it to the correct pressure using the air compressor.
Step 10: Make sure there are no other leaks, and mount your wheel back on!Once the tire is inflated to the correct pressure, check for other leaks. If all is well, mount the wheel on your vehicle and bring it down by lowering the level of the jack stands until the repaired wheel touches the ground and you can safely remove them.
Ultimately, it is very important to make sure your tires are free of air leaks to maintain proper air pressure at all times. In the case of a slow air leak, the consequences can be dramatic. If the air leak is due to a faulty tire valve, you will definitely need to replace it. You can either follow the above procedure on how to repair a leaking tire valve or take it directly to a specialist. If, on the other hand, you need to change the entire tire, consult our selection of tires adapted for your car directly online on our website!
Tire Installation 101: When and how to change your tires?
Modern passenger cars are equipped with tubeless tires. Tires with rubber chambers inside are extremely rare today, only on super-budget vehicle options. Car owners have long appreciated all the convenience and benefits that tubeless tires have. Unlike chambered rubber, they keep air in the wheels by being sealed to the rim. The tightness of tubeless tires is ensured by a two-millimeter layer of rubber applied to the tire from the inside. It is he who prevents the passage of air. The coating of soft rubber layer provides tightness at the junction of the tire with the rim of the rim. The tire bead sits on the so-called rim shelf, which is equipped with a special rounded ledge. Thanks to him, the tire is securely connected to the wheel rim, and complete tightness of the joint is achieved. A tubeless tire is filled with air through a valve installed on the rim, on its rim.
Why did tubeless tires become so popular that they gradually replaced tubed tires? First, tubeless tires are much lighter.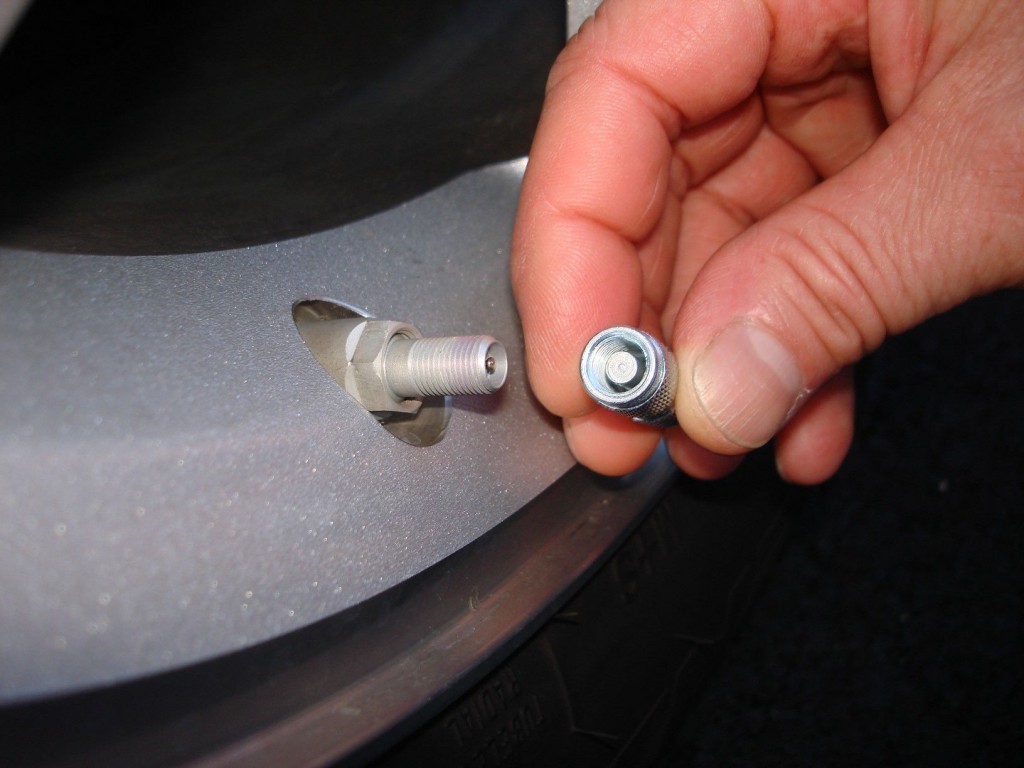 This is a very important and great advantage, because heavy weight enhances the inertial movement of the wheel when driving on, to put it mildly, imperfect road surfaces, which we still have much more than smooth autobahns. As a result, this affects the condition of the chassis, accelerates its wear. In addition, tubeless tires do not heat up during driving in the same way that chamber rubber heated up, in which the inner cylinder rubbed against the tire while driving. Such friction led to its rapid wear, and also increased the likelihood of tire rupture during movement. When a tube is punctured, the tube tire loses air very quickly, since it escapes not only from the puncture site, but also through leaky tire beads that do not fit snugly against the rim shelf. In addition, if such a tire is punctured, you will not be able to stop the car immediately, it will travel more than a dozen meters by inertia until it comes to a complete stop. During this time, the tube and the tire can be damaged more thoroughly, the rubber of the inner cylinder will “chew”.
 With tubeless tires, this option is excluded. Even if a puncture occurs, thanks to the tightness of the chamber and its periodic pumping, you can get to the tire service.
Tubeless and tube tires also differ in how they are mounted / dismantled. If chambered rubber can be freely disassembled or, conversely, installed at home, then such a number will not work with a tubeless one - the risk of damaging the side flanges is too high, damage to which will lead to depressurization of the tire. Due to the peculiarities of installation and dismantling, many motorists find it impossible to repair a tubeless tire with their own hands, especially on the road, not in a comfortable garage, but on the side of the road. And in vain. Of course, it will not be possible to completely eliminate the problem at a professional level without special equipment. But to make sure that the damaged tire still travels, and sometimes not only reaches the tire fitting center, but goes more than one hundred kilometers after an impromptu repair, is quite realistic.
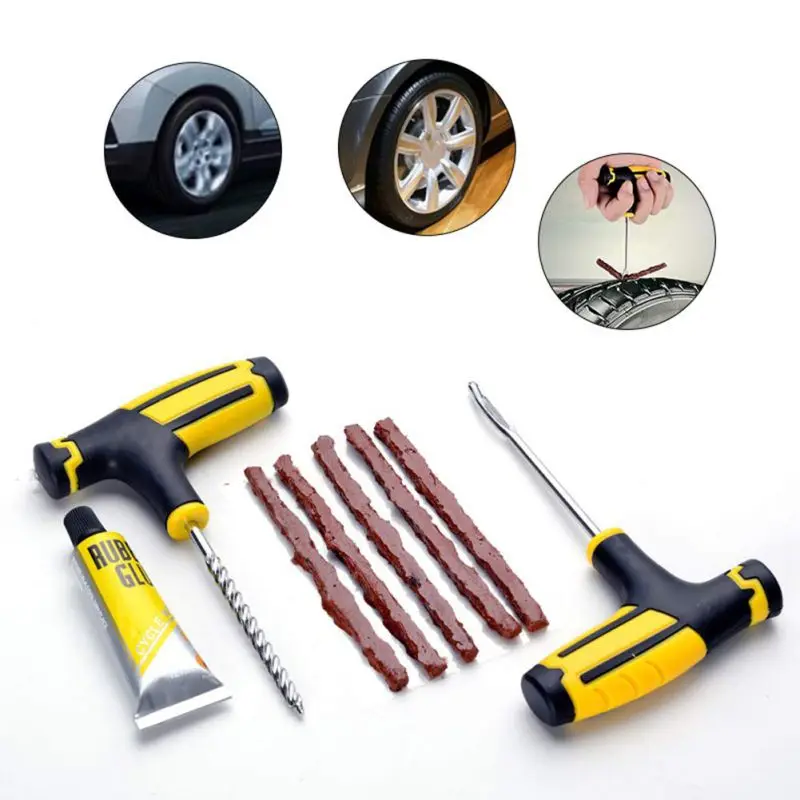
To do this, use special tire repair kits, which can be purchased everywhere today by going to any car shop. Better yet, buy everything you need to repair a tubeless wheel yourself separately and always have it ready. By doing this, you will save some money, which is always nice. The fact is that manufacturers of ready-made repair kits, in an effort to make their kits more expensive and solid in appearance, include in them both really useful tools and materials, as well as those that you can easily do without. Using repair kits or separately purchased harnesses and tools, you can repair tubeless tires not only for cars, but also for trucks. This can also be regarded as one of the advantages of tubeless tires over tube tires. It is much more difficult to repair it with a puncture. It is necessary to disassemble the wheel, remove the chamber, find the puncture site, and then degrease the working area, cut out the patch, and seal the rubber balloon. After drying, the camera is installed in place, and the wheel is beaded. With a tubeless tire, everything is much easier.
RUNWAY Tubeless Tire Repair Kit, 7-Piece
If you find that your car's tubeless tire wheel is damaged, first assess the severity of the situation. If, in your opinion, you can do without repair, having reached a reliable tire service on periodic pumping of the wheel, then it’s better to do so. Tubeless tires were designed to hold air even with foreign objects sticking out of the cord. But do not forget that riding with a nail or other object in the tire causes the puncture to gradually expand and the tire around the damaged area begins to gradually collapse.
But, if it so happens that the damage to the wheel received on the road is too extensive, the chamber does not hold air and it will not be possible to complete the journey while inflating the tire, you need to choose the best method of temporary repair and start it immediately. A tubeless tire is repaired in the following ways:
When choosing a repair using a tourniquet, you need to decide what type of material will be used.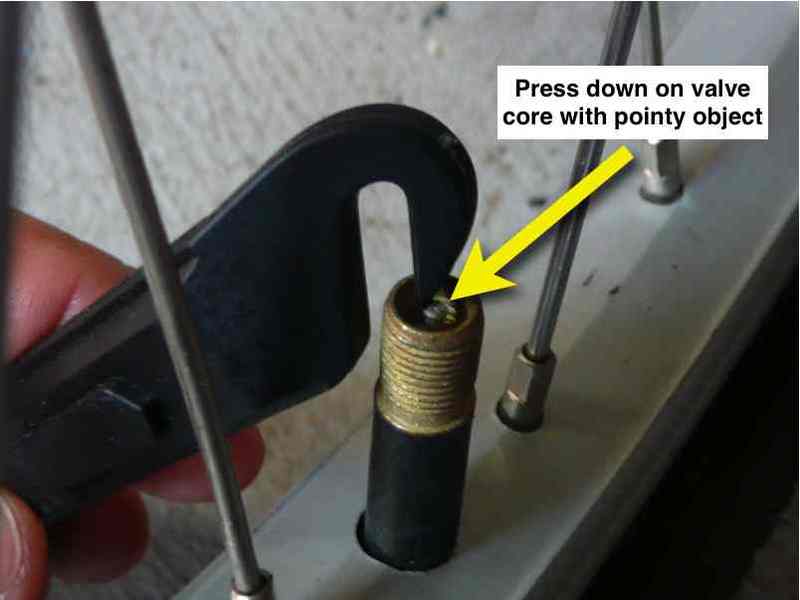 The harness can be cord or rubber. Let's consider both of these options.
Wheel repair kit, 6 pieces
Cord harness has found wide distribution as a repair material for tubeless tires. With this harness, you can carry out repairs in any conditions: on a city street or on the side of a country road. It is a strip of high-strength nylon, which is richly impregnated with high-quality rubber-based adhesive. Such harnesses are supplied to the domestic market by many manufacturers, they have certain differences in technical characteristics and cost. But all cord harnesses are installed according to the same type of scheme:
First of all, they find the place of damage and mark it with wax crayon or another marker.
Remove the item that damaged the tire if it is stuck in the cord.
Then you should check the tire pressure, it should not fall below 0. 5 atmospheres.
Take a spiral awl and use it to determine at what angle the tire is damaged.
Apply vulcanizing glue to the awl.
Using the awl inserted into the puncture, coat the puncture site with glue in the most thorough way, for which you need to rotate the tool lubricated with it clockwise. Perform this action three times - lubricate the awl and insert it into the puncture, then leave the tool in the cord for the time being.
In the meantime, select the desired harness and carefully remove the protective film from it.
Insert the tourniquet into a special needle, focusing on the center.
On both sides, cover the surface of the tourniquet with vulcanizing glue.
Remove the helical awl from the tire where you left it at the puncture site.
Install a pen with a needle and a tourniquet placed inside into the puncture.
By pressing the handle, install the needle with the tourniquet into the puncture, advancing to the stop at a given angle.
Remove the pen with the needle from the puncture site without rotating it.
Carefully cut off the parts of the tourniquet sticking out on the surface.
Then you need to determine how tight the tire is repaired. This can be done with the help of a special liquid, which is used to determine the puncture site. If, after applying such a liquid, no air bubbles appear, then the tire is temporarily repaired and can be used further. If air bubbles appear, try installing an additional tourniquet in the place of damage to the tire.
This method of temporary repair is inexpensive, but it has proven its effectiveness more than once. A tire repaired in this way without repair will serve you for a long time - up to 6 months.
A rubber harness costs more than cord, but it is also more reliable. They install it in much the same way as the cord one, but there are still some differences. For example, when installing a rubber band, do not use an awl in the form of a rasp, since it can damage the rubber band during installation. In addition, the rubber band must be attached to the adhesive specified by the manufacturer in the instructions for the repair kit.
Raw rubber band for repairing RUNWAY tubeless tires, 5 pcs
In this case, an anchor is a special type of bundle, one end of which ends with a small patch. The anchor is installed in the same way as other types of harnesses, but in addition, it glues the puncture site with an internal patch. To do this, the tourniquet is pushed inward, and then pulled a little in the opposite direction. Anchor can only be installed using a special cutter with a diameter of 6 mm. It is purchased separately from the set. But your efforts will surely be crowned with success, because the anchor is considered the most reliable option for repairing a tubeless tire with a harness. But with the help of harnesses, you can not repair side punctures. And in any case, even if the repair is successful, it is necessary in the coming days to choose the time to visit the tire service. Remember that prolonged use of the harness will cause irreversible damage to the tubeless tire. And until the problem is fixed, constantly monitor tire pressure.
The second option for repairing tubeless tires involves the use of sealant. This option cannot be called optimal, but it has become widespread, since tire repair in this way is carried out very quickly, literally in a matter of minutes. And the result of its implementation is guaranteed to allow you to get to the intended purpose of the trip, without first stopping by the tire service you met along the way.
The sealant is very easy to apply. In this case, it is not necessary to remove a nail or other object from the cord, due to which the tire was damaged. Simply attach a bottle filled with sealant to the valve on the rim of the wheel and see that the contents of the bottle are pumped into the wheel. Keep in mind that repairing a tire with sealant will significantly disrupt the balance, so choose a moderate speed. But on the other hand, repairs with the help of a sealant are easy, simple and very fast. You can use it even while standing in a traffic jam.
Today, you can easily buy different types of sealants. The most widely used gel, liquid, aerosol formulations. Gel ones are good because they can be used all-season, both in the summer heat and in the cold season. But at the same time, they significantly worsen the balance of the wheel. Liquid sealants are highly reliable, but they are not very convenient to use. Aerosol compositions make it possible to restore the performance of the wheel without a jack and a pump. But in the cold winter period, they will not work. If we compare the restoration of a tubeless tire, carried out with the help of sealants and harnesses, cord or rubber, then the latter are considered the preferred option, since they provide a fairly high quality of the repair performed with their help.
As you can see, do-it-yourself tubeless tire repair is possible, albeit temporary. You just need to stock up on funds for its implementation, without delaying the purchase of harnesses or sealant, because a lot of trouble awaits us on the roads. Meet them fully armed and quickly solve the problem. For guaranteed success, you must strictly follow the recommendations given by the manufacturer of repair materials in the instructions for use.
A tubeless tube can bleed air through a valve, the rubber of which becomes covered with through cracks over time. Usually, having such a problem, you need to go to a tire shop or disassemble the wheel yourself to insert a new valve from the inside of the disk.
In fact, if you make a couple of devices, you can change the nipple in literally 20 seconds, and without removing the splint.

The cone tube is made from sheet steel. Its segment is wrapped in a cone so that the smaller diameter corresponds to the hole in the disc for installing the nipple, and the larger diameter slightly exceeds the cross section of the valve base. The outer seam of a cone twisted from a sheet is strengthened from above by welding.
The hook is made from a thin steel rod. Outwardly, it resembles an ordinary screwdriver, but with a curved end. It must be equipped with a handle for convenient and safe operation.
The pusher is made in the same way as the hook, but a metal cap for the valve must be soldered to its end. You can simply take a tube of a suitable diameter and cut an internal thread in it so that it wraps around the nipple. This tool must also have a handle.
Additional liquid soap required. In order not to carry the entire bottle, it can be drawn into a medical syringe.
Start by placing the machine so that the valve is at the bottom. The hook is used first, the end of which must be lubricated with liquid soap.
The tool is inserted into the base of the valve on the disc, and thanks to the lubrication, when pressed, it penetrates the wheel. Having caught on the base of the nipple, it should be removed.
Now you need to remove the cap from the new valve and screw on the plunger instead. Soap lubricates the hole on the disc, the base of the valve and the inner surface of the cone tube.
Next, you need to place a new valve in the cone, the result is a kind of syringe.
It is better to wrap the pusher handle with a cloth so as not to hurt your hand. The base of the cone is attached to the hole on the disk. By pressing on the pusher, you need to push the nipple, pressing it until it leaves the cone, passing into the disc seat, which will be accompanied by a characteristic click of the straightened rubber.


.jpg)