By
John Mahoney
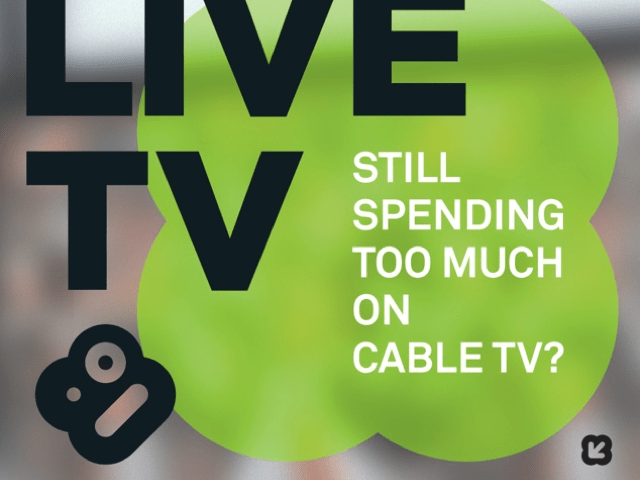
Comments (12)This is a guide that, if followed, will unchain your Apple TV from its cruel iTunes tether, turning it into the useful living room conduit of music, video and web-based content it should have been all along via the media center software Boxee. Boxee can be installed fairly easily via the ATV's USB port to bring Hulu and Comedy Central streaming, playback of any video or music file anywhere on your network in virtually any file type imagineable, and a bevy of internet A/V sources like Flickr, Last.fm, NPR and BBC podcasts and tons of others-all upping the usefulness and fun of Apple's notoriously underachieving box by a factor of 10, easily. If you have an ATV, Boxee is a must-install, and it's 100% free. Let's get started.
The stock Apple TV has never been able to decide what it's supposed to do. Is it a device to store all your videos? Its built-in hard drive would suggest yes, but the fact that everything needs to be piped through iTunes makes this a hassle if you store your videos in any other way. And why are we downloading and storing anyway? Streaming is the way things are headed, and for streaming, Apple TV doesn't make a ton of sense, especially when a box a quarter its size and a less than half its price can bring Netflix's massive library into your living room with zero download delays and zero added cost, soon in HD, even.
Aside from adding the golden goose of Hulu streaming, Boxee's other main advantage is freeing your Apple TV from its direct connection with your iTunes library. No longer will it be necessary to convert all of your video files into iTunes compatible formats to get them to your TV-Boxee will let your Apple TV read just about any video codec you can throw at it (full list of codecs here - only thing it chokes on is 1080p video; 720p works fine) from any computer or network-attached storage device on your network, or read files off the Apple TV's own hard disk-all while leaving the default OS untouched and 100% functional. So let's do this.
What You'll Need:
• Apple TV with software version 2. 0 or higher
• A USB flash drive 512MB or larger
• ATV USB Creator [download: 1.0.b7 version - Mac only, for now]
• An invite into Boxee's semi-public alpha (use this link especially for Giz readers to jump the line a bit)
Prepare Your USB Drive
Just like the iPhone, the Apple TV is basically an OS X computer (running a 1GHz Intel processor), so Boxee installs just like a regular desktop app in the Applications folder, which is hidden normally. Why Apple hasn't opened up the Apple TV to third party developers is anyone's guess, but thankfully, with a prepared USB stick it's all pretty painless.
1. After unpacking the ATV USB Creator application, start it up with the USB flash drive you intend to use mounted. Select "ATV-Patchstic" as your installation option and "Boxee for Mac" as the installation type. At the bottom, select the BSD location of your flash disk. You can find this with System Profiler under the USB section (probably a good idea to unmount any other USB drives so you don't accidentally wipe them).
2. Click "Create Using ->" and your USB stick will be formatted and loaded up with the appropriate software.
3. Power off your Apple TV (by unplugging it), drop your USB patchstick into the ATV's USB slot, and plug it back in. You'll see Tux and a bunch of code streaming on your screen as the software installs.
4. When it's done, remove the USB stick and restart the ATV.
Download Boxee via the Boxee Launcher
5. The USB patchstick installs a launcher that can then pull down the latest version of Boxee from the web. The first thing you'll want to do, then, to ensure you have the latest version, is update the launcher itself. Go to the new option "Boxee" in the ATV menu, choose "Update" and then update the Launcher.
6. Now, go to the new Boxee menu and choose "Update" -> "Boxee alpha..." to pull down and install Boxee itself. Once it installs, select "Boxee" from the new menu "Boxee/XBMC" menu to start it up.
Configure Boxee
7. Enter the user account you registered on boxee.tv (via our invite link above). Boxee also adds some nifty social networking features-if you have any buddies also using it, you can see what they've recently watched, added to their collections, or recommended to you via Boxee's home screen.
8. First thing you'll want to do once you're in is make sure Boxee displays perfectly on your screen. Settings are accessible by pressing "left" on the ATV remote at any time, so go to "Settings - Appearance - Video Calibration..." to set overscan and sizing options.
Add Your Sources
Right now, under the "Videos" menu, you can browse and stream the complete offerings from Hulu, Comedy Central, Revision3, and a ton of other web video sources. But Boxee really shines when it can play your media files from anywhere on your network.
Add an SMB Share
This can be a network attached storage drive (you've read our guide for getting the best NAS setup, right?) or simply a shared folder on a Mac or PC on your network (to share a folder in OS X, enable File Sharing in your Sharing settings, enable SMB shares under "Options" and add your media folder. Boxee will then auto detect your shares.
9. In Boxee's Settings menu, select "Media Sources and Applications -> Network Sources" and choose "Add New Source." Select your share in the menu that comes up and mark it wither Video, Music or Photos. Boxee will now monitor this folder and add any TV shows and movies it recognizes (complete with cover art, episode descriptions, and the like) to the main videos menu (Boxee's full of little surprises like this). It won't catch everything though, so you can always access your added folders manually by choosing "Sources" under the main Video menu.
Access Apple TV via SSH For Copying Media Files
Aside from streaming from SMB shares, Boxee can also of course play files stored locally in its own file system. You can connect to the Apple TV via SSH/SFTP for copying files directly over your network and accessing your Apple TV's main file system.
10. In an FTP program like Transmit or Cyberduck (but using SFTP), connect to appletv. local with the username and password both set to "frontrow" - this will log you in to your Apple TV's file system, which has a structure exactly like OS X's. You can also connect via SSH from the terminal if you prefer the geekier side.
11. In the folder /Users/frontrow you will find folders labeled Movies, Music and Pictures. Any media added to these folders will be automatically recognized and playable after copying.
Torrent RSS
Yeah, Boxee can also download Torrents. It comes with a listing of public domain movie and TV Torrents under the "Public Torrents" source, but you can also have your Apple TV download whatever Torrents you want.
12. To add a Torrent to Boxee's download manager, simply copy the .torrent file to the Users/frontrow/Library/Application Support/BOXEE/UserData/Torrents folder using the SFTP technique above and it will immediately begin downloading. Awesome.
Uninstalling All Traces of Boxee
Should you want to wipe your machine totally clean of any Boxee related tinkering, it's easy. Fire up a Terminal and type in the following commands, each on their own line:
ssh [email protected]
sudo rm -rf /Applications/Boxee.app/
sudo rm -rf /Applications/XBMC.app/
sudo rm -rf /System/Library/CoreServices/Finder.app/Contents/PlugIns/XBMCLauncher.frappliance/
rm -rf /Users/frontrow/Library/Application\ Support/BOXEE/
rm -rf /Users/frontrow/Library/Application\ Support/XBMC/
What's Next For Boxee
Boxee is on the move. Over the course of three alphas I've used (I can't believe this is alpha software) over only the last month or so, this thing has improved by incredible bounds-interface is getting better, weirdness and inconsistencies getting less common, all good signs.
Eventually, Boxee wants to be in set top boxes and on every platform (Windows is coming before the end of the year)-since it supports practically every audio and video codec known, it's aiming to be the Firefox of multi-platform connected AV setups, featuring plug-ins and add-ons of its own. It doesn't support DRM of any kind, so don't hold your breath for Boxee to be picked up by any of the majors. Fine with me.
Feature wise, Netflix streaming (yessss) and ABC.com are first on the Boxee folks' list.
Boxee's an open source app, so its forums are a lively place to ask for help and suggest more features to the main developers, who hang out there often. If you run into any bumps, that's the place.
lazo696
#1
ill try and help out
Decibel
#2
I believe i have found some useful information at http://forums. boxee.tv/showpost.php?p=182137&postcount=6 However I will tell you this method is incomplete. I did not have root access after i went through this process and was unable to transfer the Boxee.app back to the ATV.
I have just started over from Factory Restore and plan on using ATVFlash and try again. I’m hoping that I will have root access afterwards, but I just don’t know enough about it yet. Perhaps I don’t have root because I changed the root password and forgot before the factory restore, but I would think that would have restored all of that. Once I have completed the install tomorrow, I will post step by step on these forums.
jacobthai
#3
what if i use window ? i dun have mac
nadirmh
#4
Hi , I followed the instructions and got boxee under application in nitotv.
how can i get it to main menu?
it keep crashing as well…
thanks
lazo696
#5
Installing boxee on ATV 1st Gen
I finally decided to bork my ATV and start over to see if boxee beta can be installed on the atv even though Launcher will no longer download and install. The good news is that I was able to install boxee relatively easily. Instructions are in my signature, the big difference is that you ned to manually install the boxee.app into the root /Applications folder NOT ~/Frontrow/Applications.
You may need to update permissions, but I can and will post instructions to this thread later tonite.
I still suggest you use XBMC, but for those who love boxee beta, its good news.
Update: Overview (Detailed are in my signature)
 - Once restore update to 3.0.2 via GENERAL>UPDATE SOFTWARE.
If you receive a permissions issue, ssh in and issue the following;
sudo mount -uw /
sudo touch /.readwrite
sudo sync
Try again. Should be 775 or 777.
You can install Flash from Nito. Install XBMC. You can Run Boxee from within Launcher. It will create its own userdata folder.
Its a good idea to have the recovery.dmg installed within Nito and install OS.dmg. In order for flash to be installed from nito, you need to have the coreaudioframework bits installed, which are thankfully provided by the recovery.dmg that gets installed from within nito.
dont forget to do the permissions part you can use winscp(its for windows) you login in with your ip address and the user name frontrow password
frontrow then the boxee app has to be in your root folder then right click the boxee app and set premissons to either 775 or 777 then it will upload the boxee app to the right spot and then you can launch boxee threw the launcher there isnt no more a boxee menu its in the launcher menu
http://www.colinwaddell.com/index.php?option=com_content&view=section&layout=blog&id=6&Itemid=55
Decibel
#6
Finally success. I’m not sure where my glitch was but I have finally got it all worked out. This process is from scratch so I will start from a fresh factory restore. It shouldn’t be too hard to start later on if you don’t feel like the restore.
Boxee Install on AppleTV (1st Gen - White)
First things first, lets get that ATV write enabled, saving you a lot of hassle in the end. This only needs to be performed once.
Make ATV drive write enabled:
Tools/Downloads needed for this project. These links are also included as the steps requires them, but I like to download it all at once before the project requires them.:
Boxee:
Cyberduck: http://cyberduck. ch/ - NOTE: Now featuring a Windows client
Note: Method 2 is for those who wish to start all over from a fresh install and get Boxee in the process.
Method 1: Manual install
1. Download the latest Boxee Beta from http://goo.gl/nGrI1 (Dropbox link, Mirrors to come) on PC/Mac
2. Using Cyberduck (or other SFTP client) (http://goo.gl/wXIrl) login to ATV
3. Upload Boxee.app to ~/ (This is the Users/Frontrow directory)
4. Open Terminal or other SSH app and type the following (without quotes)
5. ssh [email protected]
6. Enter frontrow as the password
7. sudo mv ~/Boxee.app /Applications/
8. Enter frontrow as the password
9. Restart Finder or Reboot (unplug ATV...plug in ATV)
Method 2: From Scratch - Factory Restore
1. Press and Hold - and Menu buttons on Apple Remote until Amber light flashes, then release.
2. Once ATV boots, select your language and then select Factory Restore
3. Now that you are fresh, select Settings and then Update your ATV
4. Once updated proceed with the ATVFlash Process:
5. Download the latest Boxee Beta from http://goo.gl/nGrI1 (Dropbox link, Mirrors to come)
6. Using Cyberduck (or other SFTP client) (http://goo.gl/wXIrl) login to ATV
7. Upload Boxee.app to ~/ (This is the Users/Frontrow directory)
8. Open Terminal or other SSH app and type the following (without quotes)
9. ssh [email protected]
10. Enter frontrow as the password
11. sudo mv ~/Boxee.app /Applications/
12. Enter frontrow as the password
13. Restart Finder or Reboot (unplug ATV...plug in ATV)
That did it for me! I hope this helps others.
KenyonQuak
#7
Great help folks. Thanks. When the brand new product called Boxee TV has been released on the market, I found it worth looking for. My expectations have been met and I really love my new TV right now. It saves me a lot of penny in paying my monthly cable. Read more here…
declan353
#8
I have tried all the steps above but I cant ‘SUDO’ those commands to my apple tv??? How? I have Cyberduck and I can connect to the ATV1 but how do I run the commands? Is it through a seperate program??
billjaber
#9
in terminal
New questions Unanswered questions Categories Ask a Question Look for answer
All questions
9OSX Support 0002 Apple TVDo I need it?
So before proceeding to JailBreake your iTV, let's look at the pros and cons that it gives. To begin with, let's start with the cons... there are none. Like the iPhone jailbreak, hacking the Apple TV is an absolutely completely software procedure, completely reversible, with the subsequent possibility of resetting to factory settings. Moreover, if everything is done correctly, you do not even lose the warranty. Yes, iTV used to be hacked by replacing the HDD, for which it was necessary to open it and pervert with the hardware itself, risking breaking something. That was earlier. Now, the Apple TV firmware itself is used for hacking, since in fact it is a stripped-down version of Mac OS X, which even saves most of the file base, which you just need to turn on using a fully automated bootable flash drive.
Let's see what we get after this procedure.
Video
Now you can forget about three hours of encoding just downloaded movie.
Your Apple TV now understands DivX, Xvid, AVI, WMV, RMVB and other popular formats and codecs.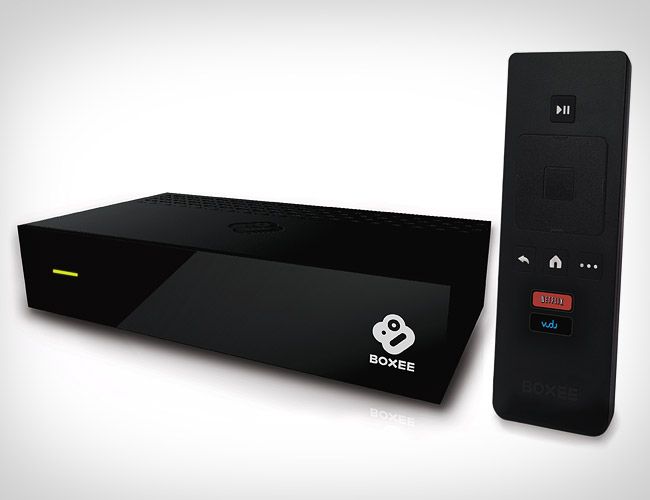
DVD
Now you don't have to look for your favorite disc on the far shelf.
Store your entire DVD collection as disc images on your Apple TV.
Playlists
Movie marathon all night long? Or your favorite collection of videos?
With the help of video playlists, they will become a reality.
USB
Not enough space? A friend dropped by with a new Flash movie?
The USB input on your iTV is now suitable for connecting external HDDs or flash drives.
SSH
No more dependence on iTunes.
Wi-Fi now supports FTP, SFTP, SSH and SMB protocols
Applications
Extend the functionality of your Apple TV with apps.
Even FireFox, EyeTV and Mobile Air Mouse are available on iTV
Loop™
Controlling your TV has never been easier.
Get 100% control over it with Loop™.
RSS
Stay up to date with the latest news with RSS on your iTV,
And be the first to know about what's new in our forum by simply enabling this widget.
Plugs
Connect everything you need and remove the excess.
Plugins in your iTV under your control.
JailBroken!
What we need :
-Flash drive from two hundred megabytes to two gigabytes (I do not advise anymore)
-aTV Flash for your Win|or|Mac operating system
----------- ---------
Step #1
--------------------
Download the file for your operating system and install it, no perversions . For Windows, just run the exe file or extract the archive (for the portable version). For Mac OS X, drag the folder with the program to the Applications folder.
Now let's start creating a bootable flash drive. We connect the drive to a PC or Mac and turn on the program.
--------------------
Step #2
(Windows)
----------------- ---
First, the program will prompt you to select a Flash drive for recording. Choose - click Start.
Now she will need the original Apple TV firmware of the latest supported version (now it is 3.0.1),
you can either specify the path to it on your hard drive, or ask the program to download it.
Once the firmware has been modified and written to disk, your bootable Flash will be ready.
Usually it takes from 7 to 15 minutes (depending on the hardware and flash drive)
--------------------
Step #2 )
--------------------
Similar to Windows, first we will decide on which flash drive we will write the files to.
As soon as you select the drive,
the program will prompt you to choose which patches will be included in the aTV package.
I advise you to always set the standard dial.
Additional patches are not always needed. most of them are rarely used or replaced by patches of the standard set,
but if you use services like Jaman or Loop, bet on your health.
The program will prompt you to specify the path to the firmware, or download it. Actually - Choose or download.
After the firmware file is loaded, the upgrade and copy operation will begin.
As soon as it ends, the program will let you know.
If right after that you get an error like:
Don't worry, it's all right - just a flash drive with firmware is not supported on Mac OS X, so it will swear at it.
--------------------
Step #3
--------------------
Now let's go directly to your Apple TV, first we need to update to the latest firmware (of course, provided that the flash drive is made specifically for it) This is done through "Apple TV Settings" --> "Basic"
Once updated, turn off iTV and insert our USB flash drive into the USB port on the back panel.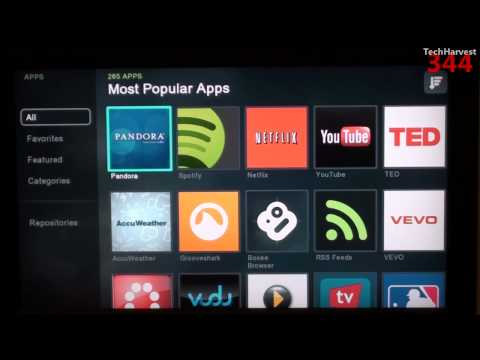
Now you can turn on your Apple TV - the installation will start automatically. The aTV Flash logo and firmware upgrade process will appear. After a few seconds, the process log will notify you that the installation is complete. Turn off the Apple TV, remove the USB flash drive and turn it on again.
The final stage of the installation will begin, at the end of which the iTV will reboot itself, after which the normal menu of your Apple TV will appear.
Conclusion
Before we start using our iTV at 120%, let's do a little test. Go to "Maintenance" --> "Settings" and select nito Smart Installer, it will automatically check the USB input for HDD and Mouse\Keyboard support, AFP and SMB protocol, and support DVD discs. The process must be performed once, so we can restart the Apple TV and delete this service.
I also advise you to update all plugins, this can be done in "Maintenance" (Maintenance) --> "Manage Plugins" (Plugin Management).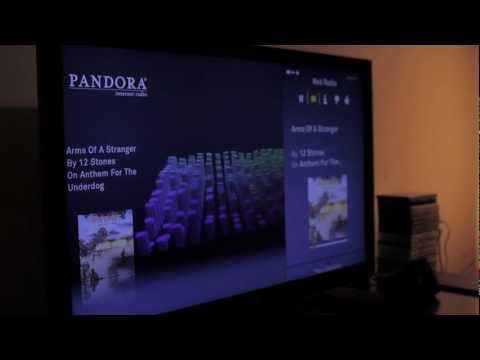 If you have installed XBMC & Boxee services, be sure to update them before starting them for the first time.
That's it. You can enjoy your jailBroken Apple TV.
Section: OS X Support Author: JagdCrab
June 25, 2022, 08:49
Subscribe to question
Buy advertising
Makovod - Makovod.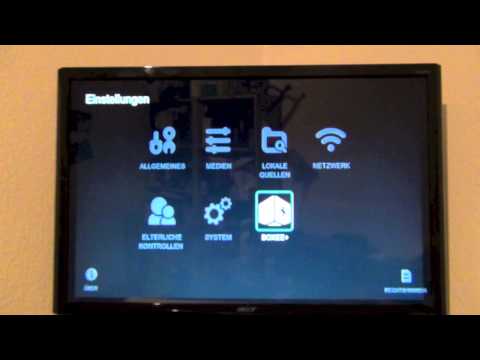 Issue 3: How to run an application on a Mac multiple times
Matt Reeves' new Batmobile is the brand new car of the new Batman
iGuides Blog Questions Answered (UPDATED)
Samsung Phone: Top Samsung Smartphones of 2019 Ranked
android secure smartphone Games Smartphones
DOOGEE V20 smartphone
I want to tell you how I made a media player for myself based on the old Apple TV of the first generation. The device turned out to be completely suitable for my requirements.
Description of the standard configuration of the set-top box:
Processor: 1 GHz Intel "Crofton" Pentium M
Memory: 256MB 400MHz DDR2 SDRAM
Storage: 40 or 160 GB hard disk
Graphics: Nvidia GeForce Go 7300 with 64MB VRAM
Connectivity: Wi-Fi (802.11b/g and draft-n), 10/100 Ethernet
A modified build of OS X v10.4 with Front Row stretched over it was installed as the operating system.
This configuration was not enough to play small 720p videos, most video files even in this format were unwatchable. Ordinary films of size 1.4 - 3 Gb and a little more were played with a bang. For 2007 it was cool, but now it's not the case at all. The system is very weak.
Yes, and all that could be done with the set-top box itself was to buy / rent movies, watch trailers, later the function of viewing content from Youtube in low quality was added. It was possible to synchronize content with iTunes, the data was stored on the hard drive.
It was impossible to stream content from devices via AirPlay, if I'm not mistaken, to the first Apple TV. I don't remember exactly.
There is a cooler and a hard drive inside, so the set-top box made quite a noticeable noise, it was very well audible at night. Sometimes I had to turn off the console before going to bed.
The device itself is quite beautiful and ergonomic, convenient remote control, has all the necessary outputs - RCA (sound and video), HDMI, SPDIF, USB (only for service use, it was impossible to connect disks).
This is what the device looked like before intervention:
What was done:
1) The operating system has been replaced. Once upon a time, the brave guys made an atv-bootloader that allowed you to boot Linux on this set-top box, and then a young guy Sam Nazarko made a ready-made operating system based on Ubuntu with XBMC, which was easily installed on an Apple TV. This miracle is called Crystalbuntu. The project has a website and a large forum where problems and wishes are discussed. Here are the source files.
The same person builds Raspbmc for Raspberry.
The first version was on Ubuntu 8.04 and kernel 2.6 . About a year ago, test builds appeared on 12.04 and the kernel 3.2.27 , and then the full version Crystalbuntu 2 came out. Installation comes down to connecting a flash drive with an image and rebooting. You can install the system on the same flash drive without touching the internal hard drive, or you can install it on the internal hard drive. The second way is better, the system will work faster.
The installer itself partitions disks, configures the system, downloads the latest version of XBMC and the necessary libraries.
After installing Linux, the set-top box became much faster, 720p videos began to play better, but still, in most cases, the power was not enough to play more or less decent content.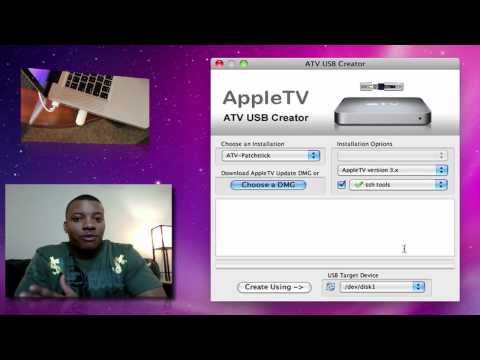 Now you can watch videos from network drives, connect external drives, watch videos from the Internet directly.
XBMC has opened many new possibilities for the set-top box, a huge number of plug-ins are available, convenient to use, looks more beautiful.
2) Removed all noisy elements - cooler and hard drive, booting from a flash drive was used, the set-top box became inaudible, absolutely. There is no need to worry about cooling, the regular cooler did not do much. Nothing bad has happened over the years.
3) Added hardware video decoder . Broadcom has an amazing BCM970015 Crystal HD card. The decoder can easily handle the decoding of huge 1080p video files. This board has replaced BCM970012 and can handle H.264/AVC, MPEG-2, VC-1, WMV9, MPEG-4, DivX®, Xvid, AVS and also Flash video in hardware.
With it, you can watch videos of any quality, the set-top box plays 30-gigabyte movies without problems. It became possible to watch content directly online - there are a huge number of plug-ins for this in XBMC. YouTube videos are played in any quality.
The card is inserted instead of a Wi-Fi card (of the same manufacturer - Broadcom :) ) into the mini-PCI slot. This deprives us of wireless communication, if necessary, you can use an external card via usb.
4) Installed SSD . From a USB flash drive, the set-top box works fine, but still not as fast as it could. After replacing with an SSD, the difference is very noticeable, it loads and works very quickly, all menu transitions are very smooth, there are no more delays associated with the file system.
The set-top box has only an IDE connector (44-pin), so it was more difficult to find a suitable drive. On eBay you can find a 2" 5 IDE SSD drive that would replace the old one, but the choice has become even better - a DOM drive. This is a board with soldered memory modules, which is inserted directly into the IDE connector. Such boards are used in all kinds of embedded solutions - cash registers, machine tools, etc.
We need about 2Gb of memory for the finished operating system, so the Kingspec 8Gb disk was enough. I still had to connect it through a cable, and not directly to the board, because the lock on the IDE connector turned out to be turned in the wrong direction for me and the board did not fit into the power supply. It was necessary to immediately check, but the connection through the loop suited me.
5) Purchased a new remote control . The first set-top boxes had an old plastic remote control. The new consoles are solid aluminum, very beautiful, outwardly more suitable for the console. Although, as it turned out over time, it is more convenient to use the old plastic one.
This is what the device looks like after intervention:
(on the left - this is the SSD)
All my media content is stored on the NAS, which, like the set-top box, is connected to a gigabit switch via ethernet, the network speed is enough to write to the NAS and read HD movies from it with the set-top box, never there were problems. XBMC can read from any source - NFS, SMB, FTP, UPnP, you can take content from several sources.
It turned out to be very pleasant to be able to watch content directly from the Internet. We have sites ex.ua and fs.ua in Ukraine, for which there are XBMC plugins. I haven’t downloaded TV shows and many films for a long time, everything can be found there, the Internet speed is enough to watch movies in HD quality without downloading. Links to your favorite series are easily added to "Favorites" directly from the plugin, then easily selected before viewing from the XBMC menu.
More goodies:
Works AirPlay , there are a bunch of applications for controlling XBMC using a smartphone. There is also a very nice thing - a browser plugin that allows you to send a video from YouTube directly to the console. There are plugins for IPTV.
Seppius-xbmc-repo plugin repository for the Russian-speaking population has been added, it has a huge variety of plugins - online series (sites with thousands of series), online TV, radio, video jokes, sites for learning . ..
..
Yes, and in the standard XBMC list there are plug-ins for every taste - TED Talks, game channels, VimCasts (Vim lessons), Mosfilm archive ...
Installed MPD . The music ball is mounted to the Apple TV directly from the NAS and added to the MPD. Now all home computers can play music over the network. The sound system is connected to the set-top box, so now you do not need to bother with choosing the sound source on the speakers, all the music is collected in one place.
Regarding the overall system load. The processor frequency is automatically adjusted from 600 to 1000 MHz, when watching most movies, the frequency does not rise above 600 MHz , while the processor is only half loaded on average.
Here is the system load when viewing a 9Gb file, 720p, average CPU load ~45%
Here is when viewing a 15Gb file, 1080p, average CPU load ~ 70%. The processor frequency is still 600 MHz.
There is not much memory in the system, so just in case, 1Gb of memory with SSD is allocated for swap.