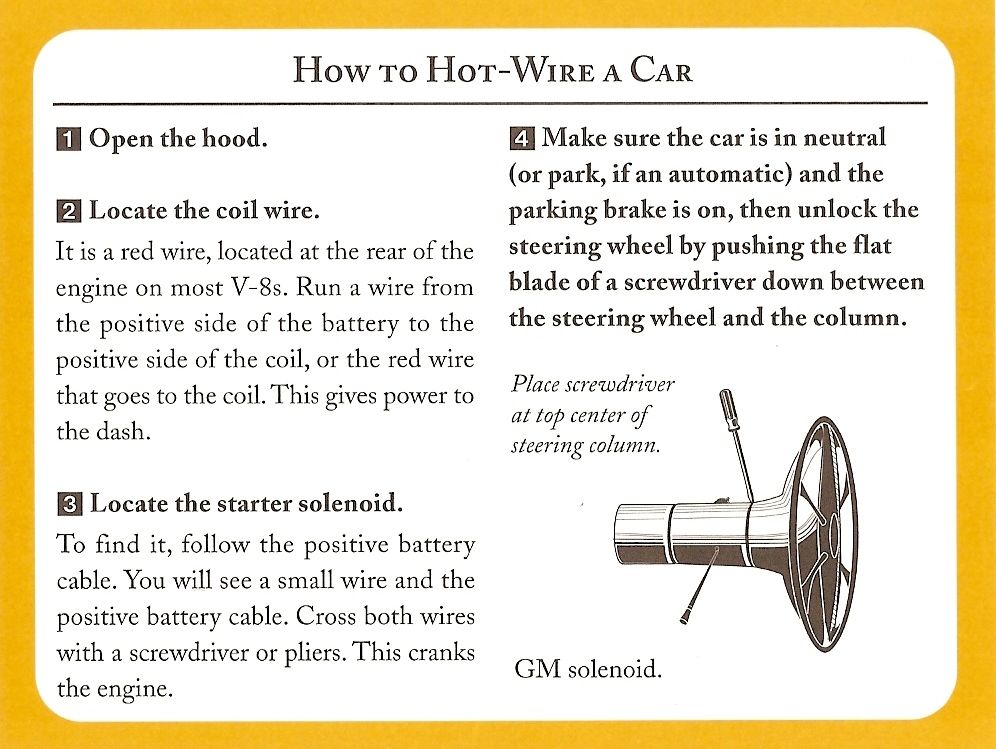
Don’t let losing or forgetting your ATV key stop you from enjoying your quad. In this article, I’ll show you a few ways to start your ATV or UTV without the key. You can do any of these methods with basic hand tools found in most garages.
Your ignition switch is simply a break in a circuit telling your electrical box when it’s ok to start or not. When there’s no key in the ignition, no power can be sent to the rest of the needed components to start the engine. There are some pretty simple ways to get around this though.
Of course the easiest way is if your machine has a pull start or kick starter on it. A lot of the newer quads being made don’t have this functionality anymore unfortunately. If you do have this option, simply unhook the ignition switch from the cdi or electrical box. That way the engine will start without needing a key inserted, then start the engine.
This method may work without a pull start or kick start if you can push your machine to a good pace and pop it into gear. Your other options are:
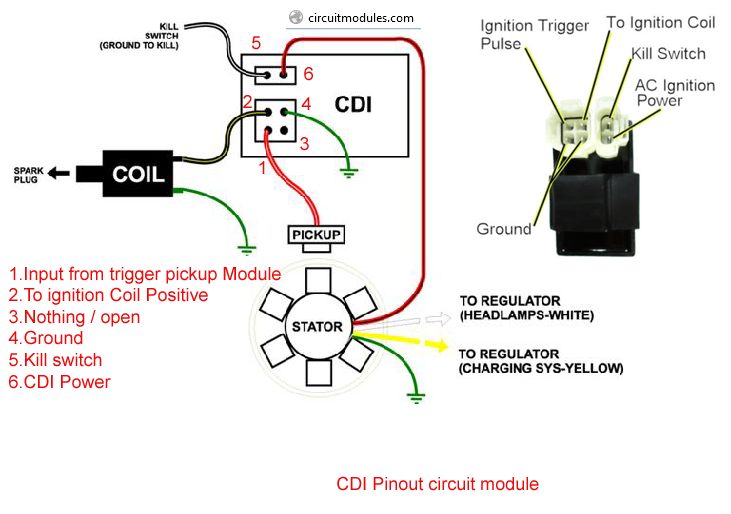
This is my preferred method to starting an ATV without the key. Most ignition switches will only have two wires going into it. On wire is sending power in, and the other wire sends power to the electrical box if the key is inserted. Telling the machine that it’s ok to start.
Simply remove the ignition switch from the equation. You can disassemble the switch or just cut the two wires leading to it. Be sure to leave enough slack in the wire just in case you want replace the ignition switch later on.
Now connect the two wires and your electric start should work like always. Remember to connect the wires on the side leading to the engine not the side leading to the ignition.
You have to remember to disconnect the two wires when you’re done riding or you’ll drain the battery dead. I would recommend you put a simple switch here in place of the ignition, a simple on/off switch will work perfect.
Some of the newer quads have more than two wires coming out of the ignition switch, not to worry. A lot of times there will also be a ground wire or something like that. The two wires you should focus on are red and black. Cut those two wires and tape them together. Make sure you tape together the ends of the wire leading to the engine not to the ignition.
You may also see a black with white stripe and green wire. These two wires are shorted together when the key is in the off position. You will need to open that short by cutting the black with white stripe wire and tapping off the end.
Once the black with white stripe is cut and taped, and the red and black wires and spliced together and taped. You should have power to your quad as if the key was turned on. You can use your normal electric start and everything the way it is.
Remember to disconnect the black and red wires when you’re done to avoid killing the battery. You could also tape the black with white stripe wire back together to prevent anyone from easily starting the quad.
This doesn’t work on all ATVs, only machines with an electric start option only. Your solenoid should be near your battery and wiring harness. On some quads you have to remove a side panel to access it.
Your solenoid will have two main wires coming out of it and possibly some other smaller ones, we only care about the two big wires. You need to lay a wrench or something metal across the two connectors of the main wires. Then, you should be able to start the quad.
I don’t use this method myself because you have to be real careful the wrench or piece of metal is not touching anything else that could short it out. If you accidentally touch the frame or something when doing this, you could cause damage to your electrical parts of the engine.
Desperate times call for desperate measures, and that’s what this method is. This trick is mostly used by thieves, so if you’re driving around the trails with a screw driver sticking out of the ignition and get stopped by trail enforcement, be ready to get asked some questions.
Basically you just hammer a screwdriver into the ignition and turn it on as if it were the key. The screwdriver will brake the pins in the lock allowing you to turn the ignition on.
I don’t recommend this method because you could damage the ignition and not get the quad to start anyway. And even if you are successful, you’re now riding around with a screwdriver sticking out.
This is obviously the best method in the list. Of course if you forgot your key and you’re already way out on the trail, then there’s no way you can order a part and do the replacement. This is more for someone who lost their key, or broke their ignition trying the screwdriver method.
Here’s a decent Replacement Ignition Switch found on Amazon to help get your search started. If you can find a replacement from the manufacturer for your specific machine, that would be the best route, but probably a lot more expensive.
One thing I want to mention is that it’s always best practice to tape up any wires you cut and exposed. You may have gotten the hotwire job done correctly, but if any of those wires hit the frame and short out you could have bigger problems.
Leave enough slack in the wires to work on them again later on. Try to avoid cutting the wires to the ignition real close to the ignition itself, or somewhere that makes it hard to get to the wires. You may want to work on it later on, like putting in a new ignition switch or on/off switch.
Don’t tell everyone how easy you hot wired your quad and how you did it. Maybe you’ll be safe to do this, but I lean a little more to the cautious side when it comes to my machines.
Sharing is caring!
James Milford answered
If you have lost the keys to your 4-wheeler and need to start it, there is a method you can use to get it started quickly. Just make sure that the 4-wheeler belongs to you as hot-wiring a vehicle that does not belong to you could result in a long stint in the local jail. There are also other alternatives to getting your 4-wheeler going again if you're not comfortable fooling with electrical wiring.
Simply cut the wires that are attached to the ignition switch first. Then you'll need to find the key hot wire, that wire is most often colored red, and the wire that connects to the coil. Place a three-way pull-apart butt connector on the wire ends and then touch the ignition wire to the three way connection. After you have started the bike make sure to tape up the ignition wire so it does not touch anything else and short out.
To get your 4-wheeler started in a less dramatic way, call your local locksmith. The fees will vary but expect to pay at least $25 for a locksmith to come out to your location and craft a new key for you. It will only take about thirty minutes or so, and as soon as you get your new key immediately go and make a copy of it so you won't be stuck in this situation again.
Another thing you can do to get your 4-wheeler rolling again is to go back to the dealer where you brought the vehicle. Many dealers will be able to get a new key for you for a small fee, and once again, the first thing you should do as soon as you get a new key is to make a copy or two of it so you don't find yourself in this situation again down the road.
thanked the writer.
blurted this.
Anonymous answered
There are usually 4 wires to the ignition switch. 2 of them(usually red) start it, and the other 2(usually black or brown) will kill it. Touch two wires together till the neutral light comes on(make sure it is in neutral first). When you see the light come on twist those together and start it. If you hear or see a spark and smoke, those aren't the right wires. Probably the 2 red ones will work depending on what kind of 4wheeler you have
thanked the writer.
blurted this.
Anonymous answered
I do not now how to Hotwire a 4 wheeler
thanked the writer.
blurted this.
Taani Joest answered
How to hot wire a predator 50 with a picture?
thanked the writer.
blurted this.
Anonymous answered
Yeah its easy you need to do is cut the wires on th bottom of the switch find the key hot wire and the wire that energizes the coil place a three way pull apart butt connector on the wire ends then find the ignition wire when you want to start the bike touch it to the three way connection. Make sure you can put the ignition wire up so it wont touch anything
thanked the writer.
blurted this.
Anonymous answered
There's nothing hard about it. I hot-wired my friend's banshee today because I wanted to ride and he lost the key. We simply cut all 4 wires to the ignition and wired them all together. The fourwheeler didn't want to start at first because it has been sitting for about 2 years but after a lot of kicks, it started up.
thanked the writer.
blurted this.
Anonymous answered
It is to hard a car is a lot easier
thanked the writer.
blurted this.
 03.2020 ,000 , on a steep slope or when making a sharp turn. Due to the high center of gravity, small width and short wheelbase, the equipment easily stands on 2 wheels. At the same time, a fall, even at low speed, threatens with fractures. Therefore, after buying an ATV, you need to familiarize yourself with the basics of control.
To start an electric start engine, turn the ignition key to the ON position, press the brake and press the green electric start button for no longer than 5 seconds.
ATVs usually shift automatically—the shift lever is used to shift up, down, neutral, reverse, and select park mode.
To start or increase speed, you need to press the thumb of your right hand on the throttle. The gearbox must be in the “H” or “L” position. The middle finger of the right hand rests on the front brake lever while driving, and the middle and index fingers of the left hand rest on the rear brake lever.
Also on the steering wheel there are buttons for turning on the four-wheel drive and locking the differential. Four-wheel drive will be needed when driving off-road, slippery roads, transporting goods and towing. A differential lock is needed so that the wheels of the ATV spin synchronously - for example, it will help to drive out if one of the wheels is stuck in the mud, and the second remains on a stable surface. When the lock is off, in such a situation, only the wheel that is stuck will spin.
Whether it is possible to turn on the four-wheel drive and blocking on the go and at what speed - should be indicated in the instruction manual. At the same time, regardless of the model of the ATV, the lock cannot be turned on after a jam, since the differential gears must engage without load.
1 - ignition key. 2 - starter button. 3 - light switch. 4 - signal.
1 - throttle lever. 2 - switch 2WD / 4WD. 4 - fuse.
1 - throttle lever. 3 - 4WD / LOCK differential lock switch. 4 - fuse.
Standing up makes it easier to avoid tipping the ATV by shifting your body weight. There are 3 main racks:
The worst variant of the stance is when the back is tense, the person leans on his hands, and his legs are straight. In this case, the body does not absorb shocks and shocks, and the bones, intervertebral discs and joints experience a strong load. In addition, control over technique worsens and fatigue increases.
middle rack
A-pillar
rear pillar
Climbing involves shifting into low gear, landing in the front strut and moving at medium engine speeds. It is impossible to sharply press the gas when driving up a slope or mountain - there is a risk of rolling over.
When stopping in the middle of a hill, start carefully, as a sudden start will be followed by tipping over. If the ATV rolls backwards, you need to press the front brake lever, and after stopping, turn off the engine, put the equipment on the handbrake, turn around manually, slide down and try again.
To descend, you need to take the rear rack and shift into a lower gear. In order not to roll over, brake should be simultaneously front and rear brakes. To avoid skidding, you can not change the trajectory of movement and speed abruptly, as well as brake too hard. It is better not to touch the gas lever when descending.
To drive downhill, shift into low gear and shift your body weight towards the top. Don't hit the gas hard and don't brake hard. You can also fall when making a sharp turn. If the slope is steep and the ground on it is slippery, it is better not to risk it.
To enter a tight turn, lean on the outside footrest and tilt your upper body inward. On slippery surfaces, shifting forward will improve handling, and shifting back will improve the grip of the drive wheels with the road.
Before driving into deep mud, you need to make sure that there are no logs, large stones and other obstacles in it, and the soil is not marshy. You should drive smoothly, without sharp pressure on the gas lever. At a slow speed, high engine speeds should not be allowed - the wheels will begin to slip and dig deeper.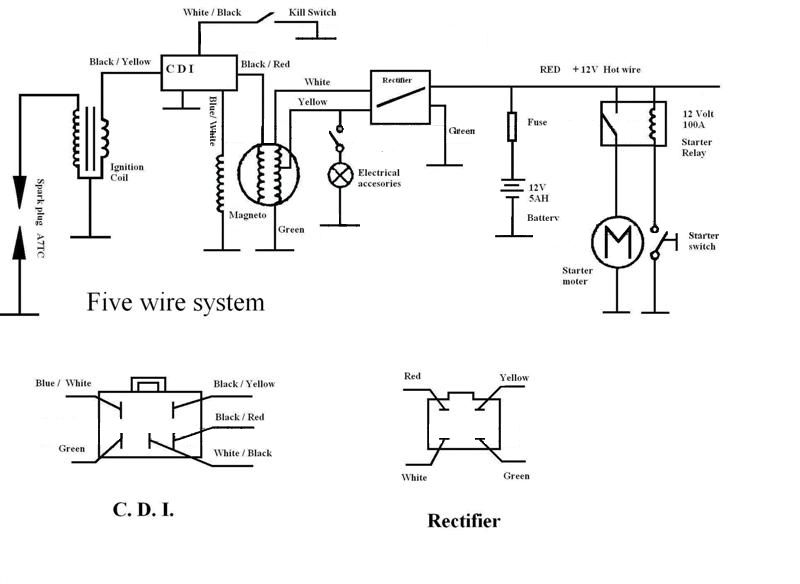 If the ATV has sunk deep into the mud, after releasing it, you need to dry the brakes with a few clicks on the levers.
To estimate the trajectory of the ATV in advance, you need to look into the distance and not fix your eyes on any one object.
It is not necessary to drive into steep mountains and hills unless absolutely necessary, because if you lack experience, you can, for example, press the gas too hard or allow the engine to stop - both errors lead to a rollover.
ATV requires special equipment. It will protect against getting wet, hypothermia, wind and dirt, and will also reduce the risk of injury after a fall or collision.
How exactly does an ATV winch work? The winch consists of 3 main parts: in the center there is a drum with a cable, on one side of the drum - an electric motor, on the other - a gearbox. A shaft passes through the drum, which transmits rotation from the motor to the gearbox.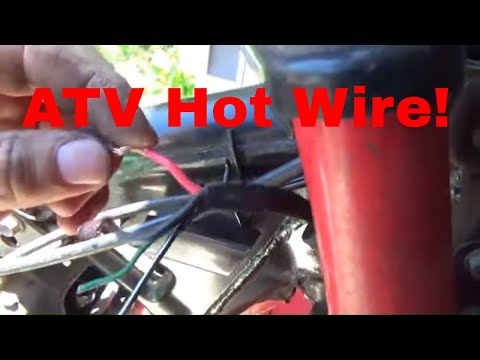 The gearbox contains planetary gears, usually 2 or 3 stages. The gearbox reduces the speed of rotation, and thereby increases the tractive effort. Then the rotation from the last stage of the gearbox is transferred to the drum. A winch is a fairly simple device, but also a powerful and incredibly useful tool for off-road vehicles.
The winch is attached with a platform. If you already had a winch, then you already have a platform, if not, then you need to buy a platform separately. Here are they are .
Mounting is simple, all ATV and UTV winches have standard mounting dimensions. There are only two standards: ATV winches (narrow drum) and side winches (wide drum).

So the question “Will such and such a winch fit my quad” almost always has an affirmative answer if you have chosen the right traction.
We have already somewhat limited the choice of the winch by its mounting dimensions. Now let's talk more about traction.
Pull on winches is measured in pounds (lbs). Pulling force is always specified in the winch model (for example, Superwinch Terra 35 is 3500 lbs). 1 lbs = 0.45 kg . That is, a winch with a traction of 3500 lbs is 1588 kg.
The pulling force of the winch depends on the power of the motor, the gear ratio of the gearbox and the diameter of the drum, taking into account the number of coiled turns of the cable. A winch with a powerful motor does not always have the best traction. A bit of math to understand:
I hope everything is clear with the dependence of traction and speed on the motor and gearbox. As for the diameter of the drum with a cable, if the cable is completely wound on the drum (large overall diameter), then the speed increases and the thrust drops, if the cable is completely unwound and the winch winds the first or second layer, then the speed is not high, but the thrust is maximum. It is on the first turn that the manufacturer indicates the pulling force of the winch in the model name.
By the way, many mistakenly believe that tractive effort is some kind of force that is measured in a horizontal plane. This is not true! If you hang a weight scale between a tree and a winch, then the scales will show at a maximum load of 1500 kg, if you have a winch with a pulling force of 1500 kg. It makes no difference in which plane the winch works, if it works in a vertical plane, it must lift a load of 1500kg.
Forget (if you knew) the rule of jeepers that the weight of the car must be multiplied by two and we get the desired winch traction. ATVs burrow harder relative to their weight, and even a winch with three times its mass will not save.
 In addition, some of the winches have a not very reliable design - when the motor and gearbox are combined and are located on one side of the drum, and on the other side it is just metal wall. Such a winch is only suitable for lifting the blade and will help in the household, it will not last long on the road.
This topic always provokes heated debate. My unequivocal opinion is better than synthetics.
A synthetic (also called Kevlar) cable is more convenient, it does not shoot when it breaks, you can work without gloves, it can be repaired in case of a break, it does not sink, it is light, etc.
Synthetics require a little more attention than steel.