If you want to prolong your ATV’s engine life (and you do!), follow the manufacturer’s recommendation and change the oil and filter at the recommended intervals. An oil and filter change is one of the services we offer here at DaSilva Motorsports. The cleanest, easiest, and fastest way to take care of this routine maintenance is to simply make an appointment to bring your machine into the DaSilva Motorsports service department at our two locations in Moultonborough and Hampstead, New Hampshire.
However, if you like to get down, dirty, and do-it-yourself, here’s some quick info. Performing routine maintenance is an excellent way to become better acquainted with your quad, which is a good thing.
If it’s your first time changing the oil on this specific machine, we suggest that you read your manual carefully. Find a video or written tutorial online that depicts your specific ATV, so you don’t confront any surprises.
Preparing for an Oil and Filter ChangePrepare for the job by reading your owner’s manual and getting the recommended oil, a new filter, and a pan to catch the old oil. Gather your tools, including a socket that fits your oil drain plug, a compatible breaker bar, and any special tools required to remove and install the oil filter. Rely on your manual for the correct interval of oil changes. Typical recommendations are about every 100 hours of use, or at least once per year.
Warm the EngineThis job should be performed on an engine that is warm but not hot. Suspended particles settle when the oil is stone-cold, and you want them circulating so you can get rid of them. Plus warm oil is more fluid and drains faster and more completely. Run your cold vehicle for about ten minutes, turn it off, and it’s ready for the oil change.
Access the engine according to your manual. With most ATVs, you’ll remove the seat of the ATV; pull a latch to unfasten nearby tabs; snap off the panel on the right side of the machine; and remove a cover. This will reveal the oil filter and dipstick. Before removing the dipstick, clean around the area to reduce the chance that grit and dirt will fall into the engine. Remove the dipstick and clean again, carefully.
Drain Old Oil and Remove FilterPlace your pan below the oil drain plug, remove it, and let the oil drain completely into the pan. Transfer the used oil into a sealed container for proper disposal. Now remove the old filter.
Replace Filter and OilPut the drain plug back, and tighten it to the prescribed torque. Take the new oil filter, put some oil on the O-ring of the new filter, and screw it on by hand. Tighten it with a wrench, but not too tight. Add the prescribed quantity of the recommended oil.
Once you’ve completed your oil change and filter change, turn on the engine and let it idle. Make sure the oil pressure light goes out, which may take 30-60 seconds. If the light stays on, there’s a problem. Turn off your engine and investigate the situation. When the light goes off, check the oil level with the dipstick. Add more oil if necessary, and then replace all the parts and you are ready to roll!
If you’re the DIY type, we support you! Check out our parts department, and talk to us if you need advice. If you’d rather spend your precious free time on your vehicle instead of under it, let us take care of maintenance for you at DaSilva Motorsports, with two locations in Moultonborough and Hampstead, New Hampshire.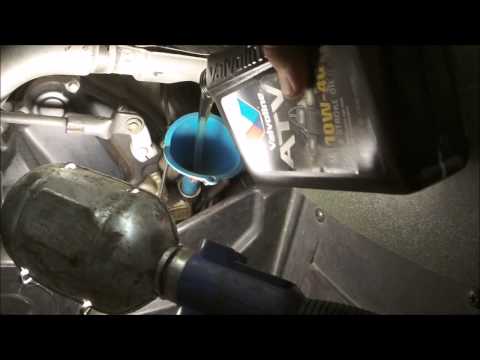
Carrying out some periodic maintenance on our recreational vehicles is an integral part of the care we must provide to keep them in good mechanical health. Even if many enthusiasts keep this task for their trusted dealer, a large majority of them prefer to do this maintenance themselves.
It should be kept in mind that we do not all have the same level of competence in the mechanical field and that for some people, an oil change is a simple and easy operation, while for others, this action can be a mountain of questions. For those of you in the second category, we will take the opportunity to simplify the steps to demonstrate how easy you can achieve them. After that, you will be able to brag to all your friends about your great mechanical exploits!
Why do I need to change the engine oil?
Over time, the fast-moving parts break down the oil and reduce its ability to absorb heat and lubricate the engine. For that reason, your vehicle needs to have its oil changed! If you keep using the same oil, your machine has good chances of overheating or even seize. Fresh oil from an oil change allows the engine to run smoother, cleaner, and longer.
How often should I do the oil change?
It depends on many factors, such as the type of vehicle you drive, how often you run it, and if you use your machine intensively. To avoid confusion, manufacturers have created standardized intervals based on traveled distance in kilometers. Each manufacturer makes its own intervals, and you will find the ones specific to your vehicle in the owner’s manual. However, changing the oil at shorter intervals will never hurt.
Pouring oil lubricant motor car from gray bottle on isolated white backgroundWhich oil grade to use?
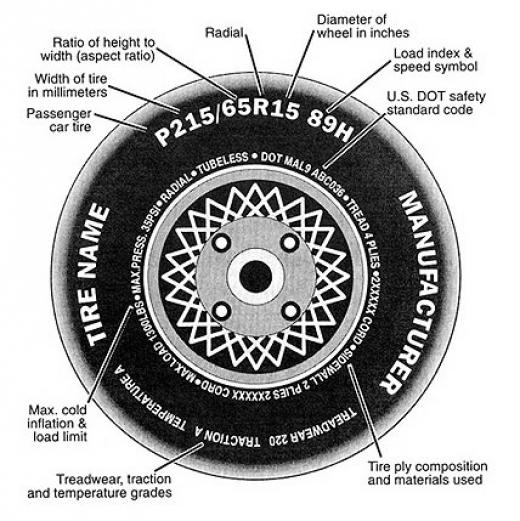
Engine oil viscosity refers to the ease with which the oil flows at a specified temperature. Light oils have a lower density and pour more easily at low temperatures than thicker oils, which have a higher viscosity. Light oils reduce friction in engines and help engines start quickly in cold weather. Thick oils are better at maintaining film strength and oil pressure at high temperatures and loads. To find out the exact oil grade for your vehicle, refer once again to your owner’s manual, or ask your representative at the parts counter at your dealership for advice. Follow these guidelines, and you will also know the correct engine oil capacity for your vehicle. Several manufacturers provide complete kits to facilitate the oil change operation, including the exact quantity of oil, the perfect grade, the appropriate filter, and everything you need to accomplish this task.
What is the oil filter used for, and is it necessary to replace it?
The oil filter is an essential component of any vehicle. Never underestimate the importance of its function. The reliability and life expectancy of major engine components depend on the quality of the oil delivered. The oil filter removes debris and contaminants and ensures that the engine is always supplied with clean oil.
Contaminated oil can cause significant engine components to fail, resulting in high repair costs as some major parts may require replacement. High-quality oil should always be present in the engine. It is crucial to maintain the efficiency and quality of the lubrication of your vehicle’s engine. Therefore, filter replacement is essential for this purpose and is an integral part of a complete oil change.
Changing Engine Oil and Filter on a Can-Am Defender:
First, it is essential to understand the components that are specific to each vehicle. Their locations vary but are relatively similar. For our demo, we are fortunate to have a Can-Am Defender with a tipping rear bed that clears the engine bay and gives us all the space we need for an easy and straightforward oil change.
1- Warm up the vehicle engine:
It is an excellent idea to run your vehicle a few minutes beforehand. The primary function of this is to warm up the oil to increase its fluidity. The oil will drain easily and more rapidly.
2- Raise the vehicle:
This step is optional, but it will make this maintenance much easier if you have access to a mechanic’s hydraulic worktable. Otherwise, it is no big deal as draining the oil is an easy job anyway. Just be sure to place the vehicle on a level surface.
3- Raise the rear cargo bed:
In our case, to get the maximum space to perform the task, it was necessary to tilt the rear cargo bed up. It was also needed to remove the metal pin connected to the cylinder to tilt the bed backward to increase clearance.
4- Remove the oil drain plug:
This step is the messiest of the process, so you should prepare yourself for any eventuality. Get an oil drain pan designed for this purpose nearby. Locate the oil drain plug under the vehicle and proceed to loosen it with the appropriate tool. When you can manually turn it, i.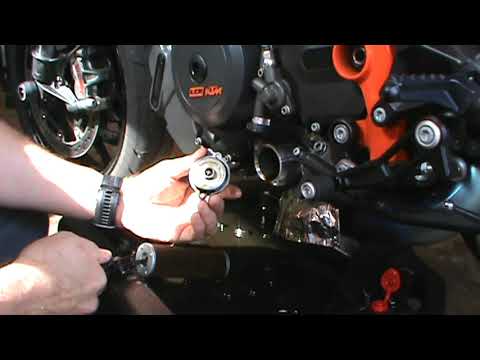 e. without the tool, place the drain pan directly under this location and fully remove the plug to drain all the engine oil.
5- Inspect the drain plug:
While the engine oil is draining, take a moment to check the drain plug sealing washer and replace it if necessary, as this is what prevents potential oil leaks. Wipe the plug with a clean cloth and, at the same time, check for the presence of metal particles, which would be an indication of premature wear of the mechanical components.
6- Reinstall the plug:
When the engine oil has completely drained, proceed to reinstall the drain plug on the engine. Be careful not to over tighten it.
7- Remove the oil filter:
In the case of the Can-Am Defender, the oil filter is inside the engine. You have to locate 3ea. 8mm bolts and fully loosen them, remove them, and then remove the oil filter cover. When removing the old filter, take care to have previously placed a container under the engine in this location, as oil could leak out.
8- Replace the oil filter:
Be sure to replace the cover gasket provided in the BRP XPS kit specifically designed for an oil change on a Can-Am Defender. Apply a thin film of grease to the filter gasket using your finger. Place the filter against the cover and insert everything into the engine space designed for this purpose. Reinstall the 8mm bolts and retighten.
9- Add fresh engine oil:
Remove the oil dipstick and, using a funnel, pour in the recommended amount of engine oil. Put the dipstick back in place when finished.
10- Check the oil level:
Run your vehicle for a few minutes to let new engine oil flow. Shut off the engine, remove the dipstick, wipe it off with a clean rag, and put it back. Remove it again and ensure that the oil level is between the “min” and “max” marks on the gauge.
11- Put the cargo bed back in place:
Put back in place the previously removed cylinder pin connecting the lift cylinder to the tilt bed.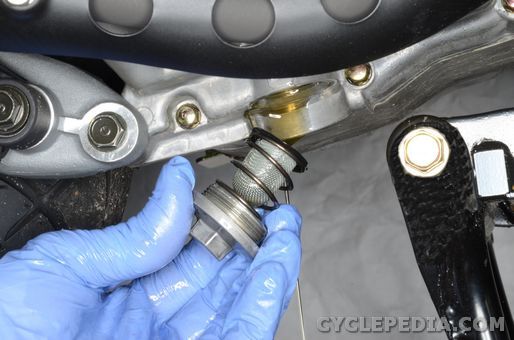 Lower the cargo box down until it engages.
In conclusion, remember that if you follow these easy steps, your vehicle will have its engine oil replaced adequately, and your engine will have a longer life. Also, keep in mind that your oil change his not finished until you have disposed of the old oil and filter in the collection points specially designed for this purpose, as this will help preserve the environment for future generations.
Some motorcycle owners think that ATV service is just changing the engine oil. But this is far from true. An oil change is just one of many ATV maintenance items. In order to properly perform ATV maintenance, it is necessary not only to replace consumables that have expired, but also to diagnose all components and parts, adjust the gaps and stroke of the moving parts of the chassis and engine.
In order to properly service the ATV, we need
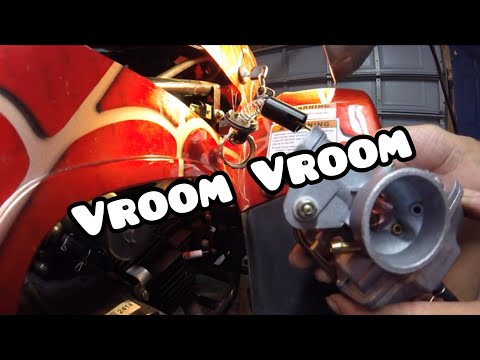
to install it on a flat horizontal surface. Free up space around the ATV so that it would be convenient to work. Let's start by flushing the carburetor. How we do it: we start the engine and warm it up for 3-4 minutes, then when the ATV is running steadily at an open throttle, you can start flushing the carburetor. To do this, you need to disconnect the air intake pipe. The most effective flushing agent is ABRO (spray). At the same time, we press the throttle stick to raise the engine speed to 4000-5000 and inject ABRO into the carburetor through the air intake pipe. Flushing must be done 2-3 times for 3-4 injections. Then we install the pipe in its place and while the engine is hot, we proceed to change the oil in the engine. Prepare in advance the dishes into which you will drain the mining. It is most convenient to adapt an empty plastic oil canister with a capacity of 4 liters for this, while cutting out the upper part around the perimeter where the used oil will drain. When everything is ready, we substitute the container for testing under the engine.
 where the drain plug is located. We unscrew the plug, while being careful that the sealing washer located on the plug does not fall into the oil, since it will be very inconvenient to get it out later. At the same time, when draining the oil, you need to unscrew the filler cap, which is usually a dipstick for measuring the oil level in the ATV engine. If an engine with a volume of 300 cubic meters or more, then an oil filter is installed on such an engine, it must also be replaced. Using a special puller, unscrew the oil filter. When all the used oil has drained from the engine, screw the drain plug back into the engine and proceed to install the oil filter. This requires a new filter must be filled with oil at least 1/3 and the sealing rubber ring should be lubricated with the same oil so that when the filter is tightened, the ring does not bite, as a result of which there will be an oil leak. Then we screw the new oil filter into place and tighten it strongly, but not with a puller, but by hand.
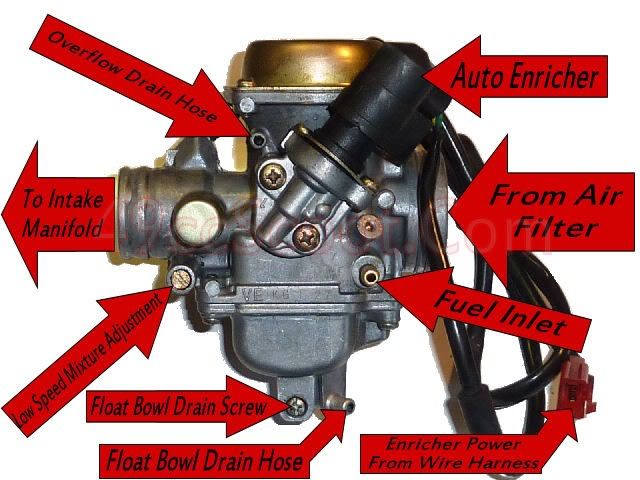 After making sure that the filter is tightened to the end, you can loosen it a little, by 1-2 mm, this is done so that the oil filter sealing ring fits better to the engine crankcase. When the filter is in place and the drain plug is tightened, you can pour oil into the ATV engine. How much oil to fill, see the instruction manual for your ATV or the level that the dipstick is. After making sure that the level of the filled oil is correct, we start the engine and let it run for several minutes, while checking whether oil is leaking from under the filter. Next, we turn off the engine and after 2-3 minutes we again check the oil level in the ATV engine. As a rule, the level becomes lower, as the oil is distributed throughout all channels of the engine. We add to the required level and this stage of changing the engine oil on the ATV can be considered completed.
We proceed to the replacement of gear oil in the gearboxes of the front and rear axles. We also substitute a drain container under the drain plug and unscrew it from the gearbox, in order for the gear oil to flow out of the gearbox faster, you need to unscrew the filler plug. There is a gear oil level check hole on the ATV gearbox. A screw is screwed into this hole. When pouring oil, unscrew it and pour oil into the gearbox until the transmission runs out of it. As soon as the oil has gone out of the control hole, this means that you have filled the required level into the gearbox. We screw in the control screw and this procedure can be considered complete. The procedure for changing the gear oil is the same in both ATV gearboxes.
Next, the maintenance of the ATV proceeds to the stage of replacing the "consumables", which include the fuel filter, spark plug and, if necessary, brake pads. Next, maintenance of the air filter on the ATV. If the filter consists of a foam element, it must be washed in a saturated soapy solution with warm water, then rinsed, wringed out and squeezed thoroughly and dried well. After drying, the air filter element is impregnated with a special liquid for treating filters, but it can be impregnated with liquid synthetic oil, after which the filter is squeezed out well. Then we install the air filter in its place, start the ATV for 2-3 minutes and let the engine idle.
Let's move on to the diagnosis and maintenance of the ATV suspension. To do this, we need to alternately hang out the front and rear axles of the ATV using a jack or lift. Let's start with the front suspension. When the wheels of the ATV are hung out, we need to grab the wheel at the top and bottom with our hands and shake it up and down. With this action, we check the serviceability of the wheel bearing. If there is no play, then everything is in order - the bearing is serviceable. Next, we grab the wheel with our hands on the left and right and move it left and right with short movements and observe the steering rods, they should move with the wheel and not hang out in the steering tips. If everything is in order, go to the rear suspension. Here you need to check the serviceability of the wheel bearing in the same way as before. Having finished with checking the chassis, we need to syringe the silent blocks on the ATV.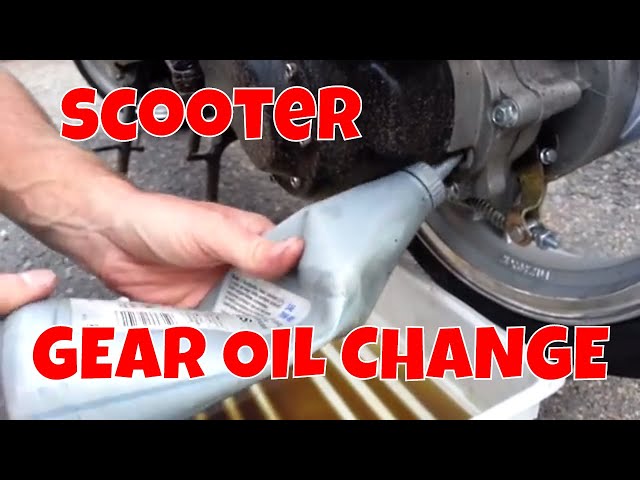 The most suitable for this is graphite grease. It does not lose its properties for a long time in any temperature conditions.
When servicing the ATV, it is also necessary to check the coolant level in the cooling system. To do this, unscrew the radiator cap and look at the fluid level. Don't forget about the expansion tank.
In this article, we briefly wrote about ATV maintenance. In fact, this process is more complicated and time-consuming, so if you do not have the necessary tools and experience, we recommend contacting an ATV service center.
In this article, we'll cover the maintenance features of 125cc 4-stroke gasoline engined ATVs for kids and teens. see the MOTAX family, using the MOTAX T-REX SUPER LUX ATV as an example.
 Drive chain maintenance
 To change the engine oil you will need:
1. Used oil drain container (can be made from an old plastic canister by cutting off the side).
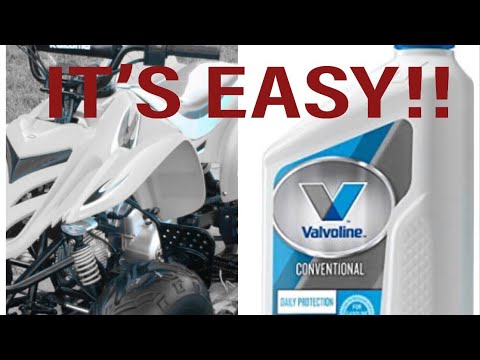
2. Four-stroke ATV engine oil (we recommend using oil of the MOTUL line).
Please note that it is not permissible to use oil intended for automobile engines, since the gearshift mechanism and clutch are in the same oil bath with the engine and for their proper operation a certain set of additives is required, which are not found in automobile oil.
3. 17mm socket wrench or wrench.
The 125cc MOTAX T-REX SUPER LUX power pack has a 0.7L oil fill tank.
The ATV engine must be warmed up to operating temperature before changing the oil. Since the oil sump of the gearbox and engine is combined, it is recommended to ride the ATV forward and in reverse gear. This must be done so that the oil becomes more liquid and fluid, and the wear products that may have been deposited on the inner walls of the crankcase and the mechanism become suspended and mixed with the oil.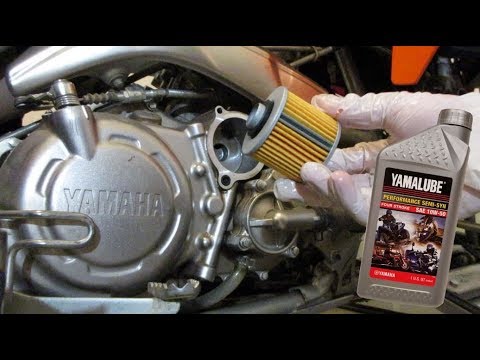
Don't be alarmed if the oil you drained from the ATV's power unit is dark in color. During operation, the oil darkens, which indicates that it works and protects the engine from wear.
In order to drain the oil, it is necessary to unscrew the drain plug located at the very bottom of the engine crankcase. Do not confuse this plug with the chain tensioner bolt, which is installed next to it, in the left side cover of the motor.
It must not be unscrewed during this operation.
Unscrew the drain plug (in our case, the drain plug is green, see the photo above), having previously moved a container under the ATV to drain the used oil. Let the oil drain completely.
While the oil is draining, unscrew the oil dipstick, which simultaneously functions as an oil filler plug and leave it in place without removing it
below
In this case, the used oil will drain off without residue.
After the old oil is completely drained, screw back the oil drain plug
Be careful not to use too much force when tightening the plug, as this could damage the threads in the aluminum crankcase of the ATV engine.
New oil can now be added. The ATV's engine is equipped with both a dipstick and a viewing window on the bottom of the engine.
It is better to focus on the viewing window. The oil level should be approximately at the top of the oil.
The engine is splash lubricated, too much oil is better than too little. The ATV engine is equipped with a breather at the top, the excess will come out through it without damaging the gaskets and seals. Of course, you should not get involved in overflowing oil into the engine either. Oil should be poured through the hole in which the oil dipstick is installed
After the oil has been filled, screw the dipstick back into place. Start the engine and let it idle for about 30 seconds. Stop the engine, let the ATV stand still on level ground for about 30 seconds. If the oil level has dropped, the oil must be topped up.
If the level is correct, you can proceed to the next stage of maintenance work.
Almost all 2017-2019 ATVs a serviceable foam rubber filter is installed for cleaning the air entering the carburetor.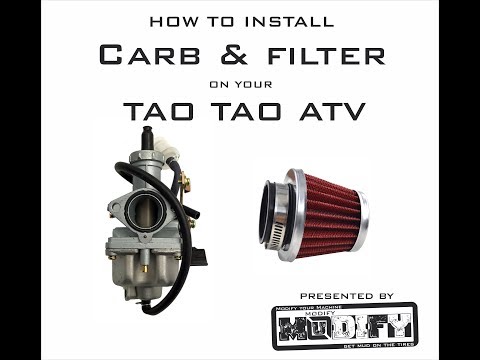 If the filter element is intact, not torn, then it is allowed to simply rinse it without changing it to a new one.
The first thing to do is disconnect the filter from the ATV carburetor.
Filter, worm-drive clamp, Phillips screwdriver required for removal
Loosen the clamp and tighten the air filter
The MOTAX uses two types of filters. Foam rubber, as in the photo above and a filter with a metal mesh. The principle of their maintenance is similar, the used ATV filter must be washed and then impregnated with a special oil, such as MOTUL.
To wash the filter element, you can use both special liquids (for cleaning carburetors) and ordinary liquids - gasoline, kerosene, diesel fuel, water from Fairy for washing dishes.
The filter must be washed carefully to avoid damaging the filter element.
After the filter has been washed, it must be dried and soaked in oil. Oil penetrates through the pores of the filter element, lingering in them, thereby helping to trap the smallest particles of dust and dirt. It is necessary to impregnate the filter evenly, without gaps. Any, even the smallest gap, is a weak point through which dirt and dust will surely get into the engine, subjecting it to premature wear
After oil is applied to the filter, you need to take a regular plastic bag, put it on the filter and rub the applied oil on the surface of the filter element.
The oil is now evenly distributed over the surface of the filter element. No gaps or voids.
Reinstall the filter, leaving the filter bag in place for now to avoid getting your hands dirty. Before installation, it is recommended to lubricate the rubber seat with engine oil
Tighten the clamp with a screwdriver
Remove the bag from the filter. Done - the air filter has been serviced, you can proceed to the next stage of the ATV maintenance work.
NGK C7HSA Spark Plug
Requires 16 Spark Plug to ignite mixture on MOTAX ATVs with 125cc engine
MOTAX T - REX SUPER LUX0003 Remove the spark plug cap from the spark plug, put the cap on the spark plug and turn it counterclockwise. Install the new spark plug in reverse order. We tighten the candle with sufficient force, but at the same time carefully so as not to break the threads in the head of the engine block. The applied force on the key should be smooth and moderate. After the spark plug has been replaced, it's time to service the ATV's suspension. The MOTAX ATV's suspension joints are equipped with grease fittings that are designed to force grease into the ball joint using a special grease gun. The same grease fittings are provided to lubricate the steering shaft and rear swingarm ATV's suspension requires a special grease gun and grease for the pivot joints. Any type of grease gun can be used, but we find the most convenient gun with a flexible nose, designed to work with hard-to-reach suspension grease points MOTUL Tech Grease 300 is an excellent lubricant.0003 Once the syringe is ready for use, put its head on the grease fitting of the suspension assembly to be lubricated injected with a syringe can damage them. Wipe off excess grease with a rag or rag and put a protective cap on the grease fitting All suspension units equipped with grease fittings are sprayed in this way. To lubricate the steering shaft, put the syringe head on the grease fitting it is equipped with. passed through the entire node and is no longer required. To service the ATV's drive chain, jack up the rear axle of the ATV so that the wheels turn freely in the air, but the ATV maintains a stable position. mud. For this work, you can use the special tool MOTUL or regular gasoline and a brush. It is better to install a pan under the ATV so that the remnants of the old grease and cleaning agent flow into it. The chain should be thoroughly rinsed from the inside and the outside by turning the ATV wheel and thereby shifting it Apply new lubricant only on a dry, clean surface, so after washing the chain should be wiped with a rag or rag Please note that the ATV during the performance of these works, for safety reasons, it must be de-energized. Be careful not to get your hands between the drive chain and the star. ATV chain can be lubricated with any lubricant specifically designed for this purpose. Chain lubricant is sold in aerosol cans. We recommend using MOTUL C3 off Road Lubrication should be applied on the inside and outside of the chain, on both rows of links. A chain tensioner is installed on MOTAX ATVs. This assembly is flushed and lubricated during maintenance along with the chain Pull the roller down and loosen the chain with one hand, check for slack with the other by pressing the chain from the bottom up If the chain slack is more than 1.
 In order to control the supply of oil to the lubricated unit, we recommend that you keep your fingers free from the syringe on the rubber boot. Thus, it will be possible to feel when the lubricant passes through the swivel and its excess begins to come out. At this point, the injection of lubricant into the joint must be stopped
  To do this, you can use the same canister that was used to drain the used oil from the engine.