Please enable javascript to view the website ..
Repair help > Riding Mowers & Tractors repair > Riding Mowers & Tractors repair guides
January 1, 2015
Lyle Weischwill
This step-by-step riding mower repair guide shows how to replace the rear tire on your lawn tractor or riding lawn mower if the tire is too damaged to repair. Installing a new rear tire is relatively easy and requires just a few tools and a manufacturer-approved lawn mower part.
Use this repair guide and video to replace the rear tire on Craftsman, MTD, Husqvarna, Murray, Troybilt, Toro, Snapper, Yard-Man, Weed Eater, Ariens, John Deer and Southern States lawn tractors and riding lawn mowers.
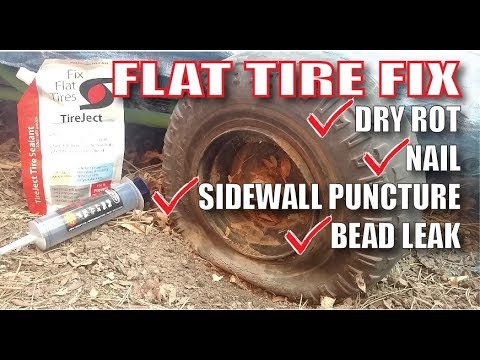
If the tire just has a puncture in the tread, you can fix it with tire sealant. The video How to Repair a Riding Lawn Mower Tire shows how.
Quick links
Tools required
Floor jack or bottle jack
Jack stand
Slot screwdrivers
Pry bars
Pliers
Valve stem core removal tool
Liquid detergent
Water
Wood blocks
Work gloves
Safety goggles
Compressed air supply
Anti-seize compound
Repair difficulty
Time required
60 minutes or less
Repair difficulty
Time required
60 minutes or less
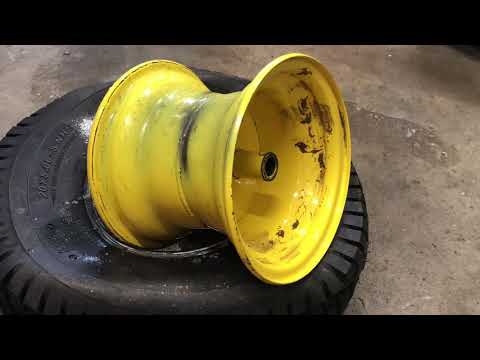
Replacing a rear tire on a riding lawn mower
This video explains how to replace the rear tire on a riding lawn mower.
01.
Park the riding mower on a level surface and set the parking brake.
Turn the ignition switch off and remove the key.
Wear work gloves to protect your hands and safety goggles to protect your eyes.
Lift the riding lawn mower hood and disconnect the spark plug wire.
Lower the tractor hood.
Tip: Disconnect both spark plug wires if your engine has 2 cylinders.
PHOTO: Disconnect the spark plug.
02.
Block the front tires to keep the riding mower from rolling.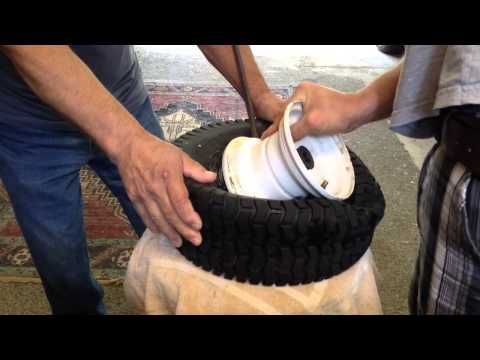
Position the jack under the frame and jack up the riding mower to raise the rear wheel.
Place a jack stand under the frame to support the riding mower.
Remove the jack.
PHOTO: Jack up the riding mower.
03.
Pull off the axle cover.
Remove the retaining ring and then pull off the washer.
Pull the tire off the axle.
Remove the square key.
PHOTO: Remove the rear wheel.
04.
Remove the valve stem cap.
Remove the valve stem core, which lets any remaining air out the tire.
Break the tire bead and pry the tire off the wheel rim on one side.
Pry the tire off the rim on the other side.
PHOTO: Break the tire bead and pry the tire off the rim.
05.
Clean the wheel rim.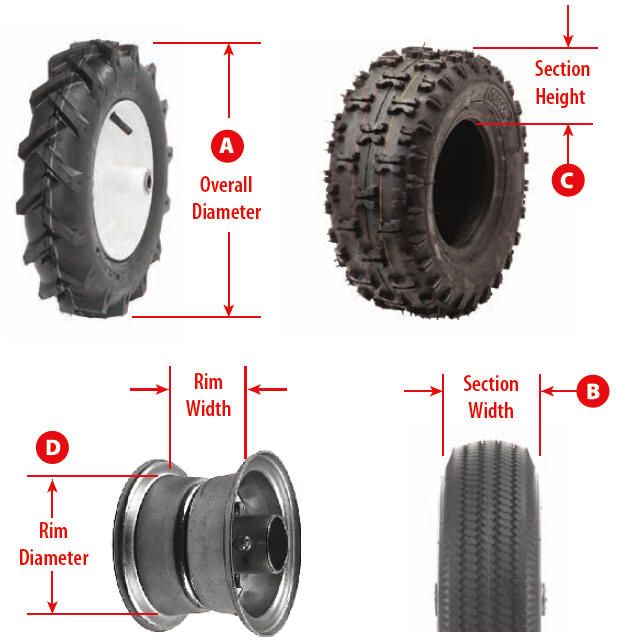
Lay the new tire flat on a work surface.
Lubricate the top tire bead with liquid detergent.
Pry the rim into the top side of the tire.
Flip the rim and tire over.
Lubricate the tire bead with liquid detergent.
Pry the remaining side of the tire onto the rim.
Warning: Use blunt tools to pry the tire to avoid damaging the tire bead.
PHOTO: Pry the new tire onto the rim.
06.
Fill the tire with air to seat the tire bead.
Reinstall the valve stem core.
Fill the tire fully with air.
If the tire doesn't fill with air, install ratcheting tension straps around the outer edge of the tread on each side of the tire.
Tighten the straps to force the beads outward.
Fill the tire with air to seat the tire bead.
Reinstall the valve stem core and fill the tire with just enough air to keep the beads seated.
Carefully release the tension straps and then remove the straps.
Tip: If the tire didn't fill with air, install a ratcheting tension strap around the center of the tire tread, tighten the strap to force the beads outward, and fill the tire with air to seat the tire bead. Carefully release and then remove the strap.
PHOTO: Seal the bead to the rim.
07.
Slide the wheel on the axle and line up the key slots in the rim and axle.
Apply anti-seize compound to the square key.
Push the key into the rim.
Reinstall the washer and snap the retaining ring onto the axle.
Push the axle cover onto the wheel.
PHOTO: Lubricate the square key.
08.
Push the jack under the frame and raise the riding mower.
Pull out the jack stand.
Lower the riding mower to the ground.
Remove the wood blocks from the front tires.
PHOTO: Lower the riding mower.
09.
Raise the tractor hood.
Reconnect the spark plug wire and lower the hood.
Tip: Reconnect both spark plug wires if your engine has 2 cylinders.
Warning: Undertaking repairs to appliances can be hazardous. Use the proper tools and safety equipment noted in the guide and follow all instructions. Do not proceed until you are confident that you understand all of the steps and are capable of completing the repair. Some repairs should only be performed by a qualified technician.
Choose a symptom to see related riding mower and lawn tractor repairs.
Main causes: punctured tire or inner tube, leaky valve stem, damaged wheel rim
Read moreMain causes: worn or broken ground drive belt, bad seat switch, transaxle freewheel control engaged, transaxle failure, dirty carburetor
Read moreMain causes: shift lever needs adjustment, neutral control needs adjustment
Read moreMain causes: worn or broken blade belt, broken belt idler pulley, blade clutch cable failure, bad PTO switch, damaged mandrel pulleys
Read moreMain causes: damaged cutting blade, worn deck pulley, damaged mandrel pulley, loose fasteners on mower deck components
Read moreMain causes: engine overfilled with oil, leaky head gasket or sump gasket, damaged carburetor seals, cracked fuel pump, broken fuel line
Read moreMain causes: clogged carburetor, damaged flywheel key, dirty spark plug, stale fuel, improper valve lash, engine needs a tune up
Read moreMain causes: faulty battery, bad alternator
Read moreMain causes: unlevel mower deck, dull or damaged cutting blades, worn mandrel pulleys, bent mower deck, engine needs tune up
Read moreThese step-by-step repair guides will help you safely fix what’s broken on your riding mower or lawn tractor.
January 1, 2015
Lyle Weischwill
Your mower can’t run on a damaged rear tire. Here’s how to install a new one.
Repair difficulty
Time required
60 minutes or less
Read moreJanuary 1, 2015
Lyle Weischwill
If a blade on your mower is dull or bent, replace it following the steps in this repair guide.
Repair difficulty
Time required
30 minutes or less
Read moreJanuary 1, 2015
Lyle Weischwill
Help your mower run better by replacing the fuel filter during your riding mower's annual tune-up.
Repair difficulty
Time required
15 minutes or less
Read moreUse the advice and tips in these articles and videos to get the most out of your riding mower or lawn tractor.
August 6, 2020
Lyle Weischwill
Learn how a blade removal tool makes replacing the blade easier and safer
Read moreApril 9, 2019
Kim Hillegass
Keep these 6 things on hand to keep the mower season running smoothly.
Read moreMarch 1, 2016
Lyle Weischwill
Learn how to use a battery charger if your mower battery is dead.
Read moreDishwasher
Shop Frigidaire FFBD2406NB9B dishwasher parts
Dryer
Shop LG DLGX2502V dryer parts
Electric Wall Oven
Shop Bosch HBL8650UC/10 electric wall oven parts
Parts
Repair Kit 35791R 2302860783BLACK LOWER OUTER DOOR ASM WB56X33052Dishwasher Water Inlet Guide Assembly 4975DD1001A partsWasher Motor Stator WPW10419333 partsRefrigerator Can Rack WP13005401SP partsGrill Drip D WR17X23167 partsRefrigerator Door Assembly ADD74296601 partsSlinger Vane 905006MAWasher Outer Rear Tub Assembly DC97-19681A partsHome Electronics Shield 126-02036Elliptical Resistance Motor 241949 partsDishwasher Spray Arm, Lower WD12X10244 partsSpark Plug 715811
Rear-Engine Riding Mower
Shop Snapper 301016BE rear-engine riding mower parts
Repair
Gas Grill Not Hot Enough
Side-By-Side Refrigerator
Shop GE GSL25JFPEBS side-by-side refrigerator parts
Posted by Nicole Wakelin Know How
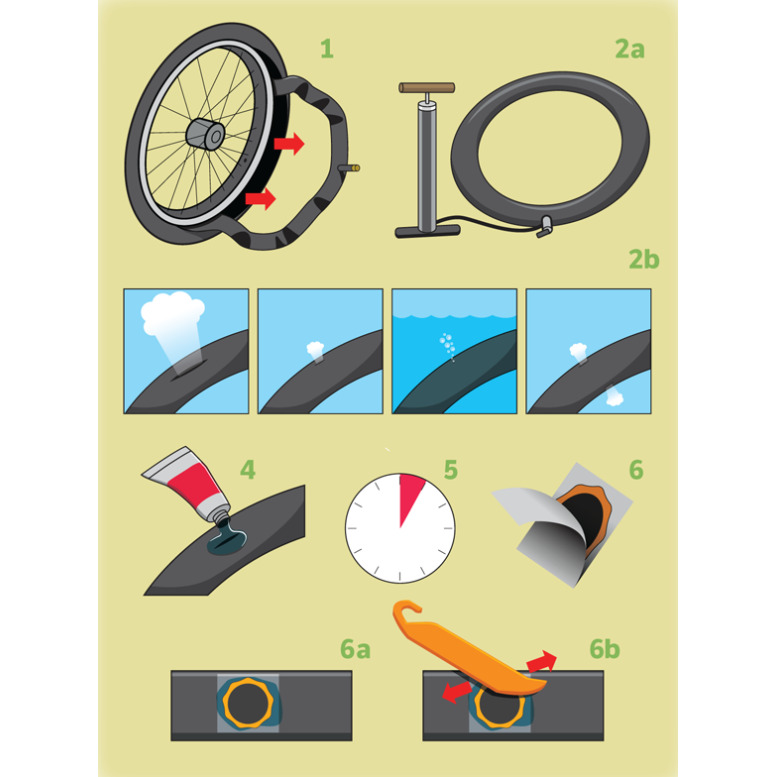
Knowing how to replace a tire tube comes in handy when you need to fix a flat on a wheelbarrow, snow blower or lawn mower. It’s not hard to do, and it’s something even a novice can manage. Here are the steps you’ll need to replace a tire tube, as well as some additional tips.
Make sure you’re in a well-lit area with a level surface and you have eye and hand protection. When you’re dealing with a piece of inflated rubber it’s possible for items to go airborne as you work, and there might also be dirt or other debris stuck in the treads that could scratch your hands. Once you’re ready, remove the tire. Next let any remaining air out of the tube by either removing the valve stem core, or simply pressing on the valve core until the tube is completely deflated.
How to Remove the Tire from The RimYou’ll need oil and two tire bars for the job. Start by spraying the rim and seal with oil, and then let it stand for a few minutes. Next, slide one tire bar between the rim and the tire near the stem. Use the second tire bar to slowly pry the tire over the rim, going around the circumference.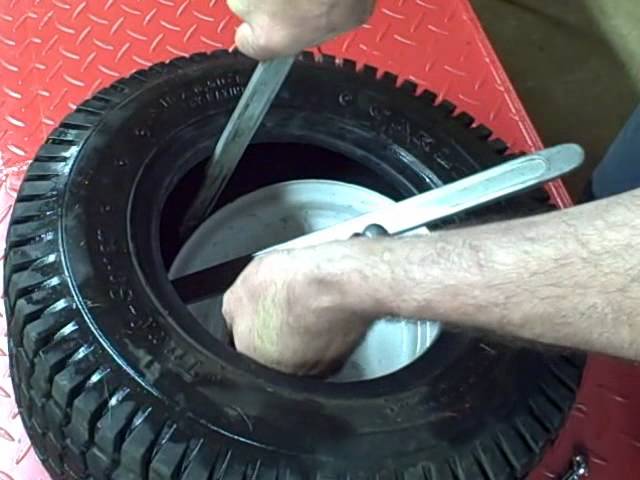 You don’t have to remove it completely. You just need one side free so you can reach in and remove the damaged tire tube.
To insert the new tube, carefully slip the stem through the hole in the rim so you don’t damage the stem. Put the stem nut on the stem, which should help keep it from slipping as you slide the tire back into place.
Now it’s time to break out the tire bars again. Use one tire bar to pull the tire back over the edge of the rim, and then use the other tire bar to slowly, and carefully, slip the tire into place. Make sure that it’s lined up correctly, and double check that you haven’t snagged the tube in the process. Take your time to avoid damaging the tube.
Once the tire is back in place, all you need to do is inflate it, and you’re ready to go. Replacing a tire tube is something anyone can do with only a few tools, some oil and a little effort.
Check out all tire tube repair products available on NAPA Online or trust one of our 17,000 NAPA AutoCare locations for routine maintenance and repairs.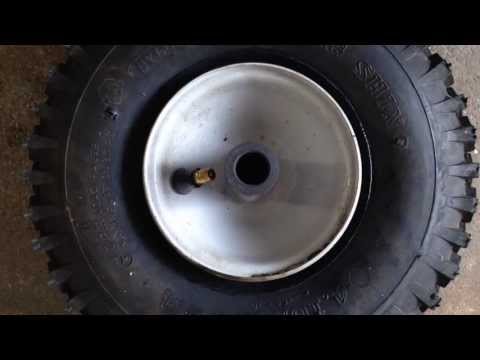 For more information about tire tube repair, chat with a knowledgeable expert at your local NAPA AUTO PARTS store.
Categories
Know How
Tags
flat tire, flat tire repair, lawn tractor, riding mower, snow blower, tire care, tire maintenance, tube, valve stem
Nicole Wakelin covers the automotive industry as a freelance journalist for a variety of outlets. Her work includes news pieces, podcasts, radio, written reviews, and video reviews. She can be found in The Boston Globe, CarGurus, BestRide, US News and World Report, and AAA along with lifestyle blogs like Be Car Chic, The Other PTA, and She Buys Cars. She is active on social media with a large following on both Twitter and Instagram and currently serves as Vice President of the New England Motor Press Association.
Regular use of the lawn mower requires not only care for it, but sometimes repairs. In many cases, you can restore the performance of the lawn mower yourself. Husqvarna produces three types of lawn mowers - electric (powered by a 230 V household power supply), battery and gasoline. The first two types do not require gasoline and are easy to operate and maintain. But they also have problems with mowing the grass.
1. Lawn mower motor does not turn on. The engine is started with a single ON/OFF key on the control panel. If the engine is not running in the ON position, the battery may be discharged or there may be no mains power. The battery status will be shown by the battery level indicator LED and if it is low, it will need to be recharged. In the network model, use a multimeter or an indicator screwdriver to check for voltage at the power cord jack. If it is missing, the cable itself is checked, which must be de-energized. After replacing the damaged section of the cable and checking the voltage, you can get to work.
2. Irregular motor operation. Check for contacts that may have oxidized and become poorly conductive.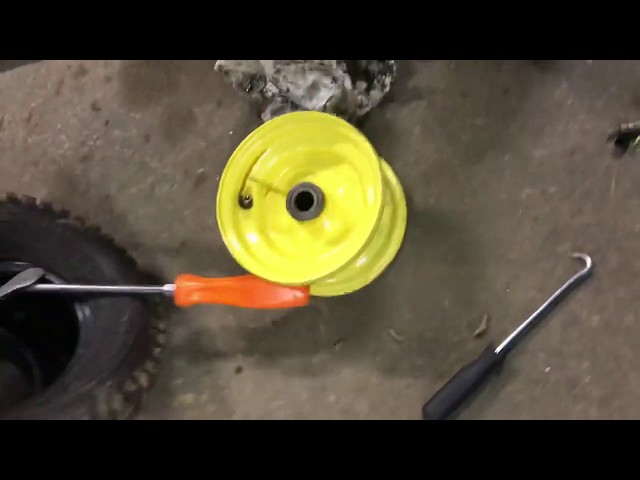 Contacts should be cleaned with sandpaper and degreased. Then a special conductive grease is applied to the contacts, which will protect the contacts from oxidation.
3. Reducing the speed of rotation of the knives. When mowing long grass or hard grass, the cutting attachments can become clogged with grass. Remove the battery and disconnect the network cable. Take a small stick and clean the area around the knives from the compressed grass.
4. Poor mowing. The grass is not cut, but knocked down with knives. This indicates that the knives are dull. Completely turn off the power supply and remove the lawn mower blades. We fix the knife in a vise and sharpen the blades with an abrasive bar. Blade sharpening angle 25 - 30°.
Gasoline powered lawnmowers most commonly experience problems common to all internal combustion engines.
1. The engine does not start. Is there fuel in the tank? If there is, then the fuel mixture must correspond to the proportions of the manufacturer. Then we turn out the spark plug.
• Wet spark plug (splashed with mixture). This indicates an excess of fuel mixture, due to incorrect carburetor settings. The candle should be thoroughly wiped, and pull the starter cord several times with the candle turned out. This will clear the combustion chamber of excess mixture. Carburetor adjustment is carried out in accordance with the Operation Manual (section "Maintenance. Carburetor").
• dry plug. The fuel mixture does not enter the carburetor. So the problem is not the ignition. We check the candle for the presence of a spark and if it is, then we check the fuel supply. With a weak supply or its complete absence, we replace the fuel filter, which is removed from the gas tank through the filler hole.
• Spark plug covered with soot. Incorrect carburetor setting or incorrectly prepared fuel mixture. The turned-out candle is cleaned with an awl and sandpaper. The space between the central electrode and the threaded part is cleared with an awl.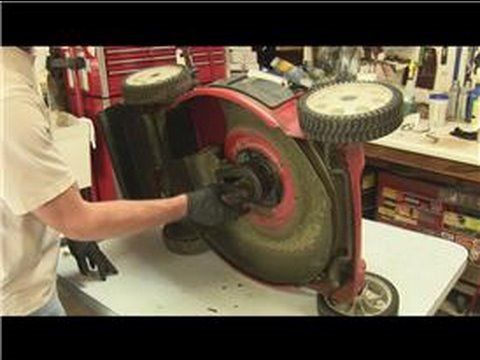 The side electrode is cleaned with sandpaper. Set the spark gap (gap) between the central and side electrodes. The gap is in the range of 0.5 - 0.65 mm. A damaged sealing copper washer should be replaced. Putting a tip on the inverted candle and pulling the starter, check for a spark. If there is no spark, the candle is replaced with a new one and if the spark does not appear, check the high-voltage wire.
2. No required power. If the engine does not develop enough power, then it is most likely that the necessary pressure is not created in the engine cylinder for combustion of the fuel mixture. Most likely, the reason lies in the wear of the cylinder-piston group - the piston, piston rings or crankshaft liners. For a more accurate diagnosis, a compression gauge is inserted into the candle hole and with its help the compression pressure is measured. If the pressure is lower than required, then the piston group must be replaced.
3. Engine smokes. If the engine runs normally at low speeds, but smokes and stalls at high speeds, then the problem may be in the muffler. It should be removed and the spark arrester mesh cleaned with a metal brush. It is advisable to wash the muffler with a special detergent, dry it with a hairdryer and put it in place.
4. The motor is overheating. Long-term operation with a clogged air filter results in insufficient air intake. Remove filter and blow out with clean air. Put the filter in place. In case of severe wear and damage, the filter is replaced.
Simple advice. The lawnmower is a long-life gardening machine, and following the "Maintenance Schedule" (see the Lawnmower Owner's Manual) will help to avoid breakdowns and other problematic issues.
Go to Husqvarna lawn mowers
Garden trimmers have completely replaced most other devices. They allow you to level the overgrown lawn, put in order the flower beds and paths. Most often, a trimmer with a fishing line is used for domestic needs. Trimmer heads with fishing line are available today for almost all models, they are very common and relatively inexpensive. But when mowing tall grass, it wraps around the spindle, which greatly complicates the work process and accelerates tool wear. Therefore, experienced gardeners choose trimmer discs. To decide which discs are right for you, you should evaluate the nature and duration of the work ahead.
The choice is great today. Big and small, plastic and metal, made in various variations, they are ready to perform a wide variety of tasks and save the garden from invader weeds. Of course, plastic ones are disposable, but can be a convenient option for jobs where high strength is not required.
If you are using a trimmer with a telescopic handle, only plastic blades or fishing line may be used. This requirement is due to safety regulations. A metal disk on a trimmer shows itself much better in work, that is, a metal head with a variable number of blades. They will cope with thickets of old weeds.
Don't buy a trimmer blade in the original shape. Often this is just a marketing ploy aimed at increasing sales, and not a necessity at all. The shape as well as the number of blades can be important for specific tasks such as hay making. If you want to deal with an area completely overgrown with weeds, and only a light and not too powerful trimmer from the equipment, then perforated blades made of hardened steel will help out.
These types of blades have a sharp knife edge. This is by far the most common type of metal blade and often comes standard. If you need to change the disk on the trimmer, then you should pay attention to this particular group. There are an almost endless number of knife blade shapes, but what they have in common is that they are usually stamped from thin sheets of steel.
The most common is the star shape with three or four cutting edges.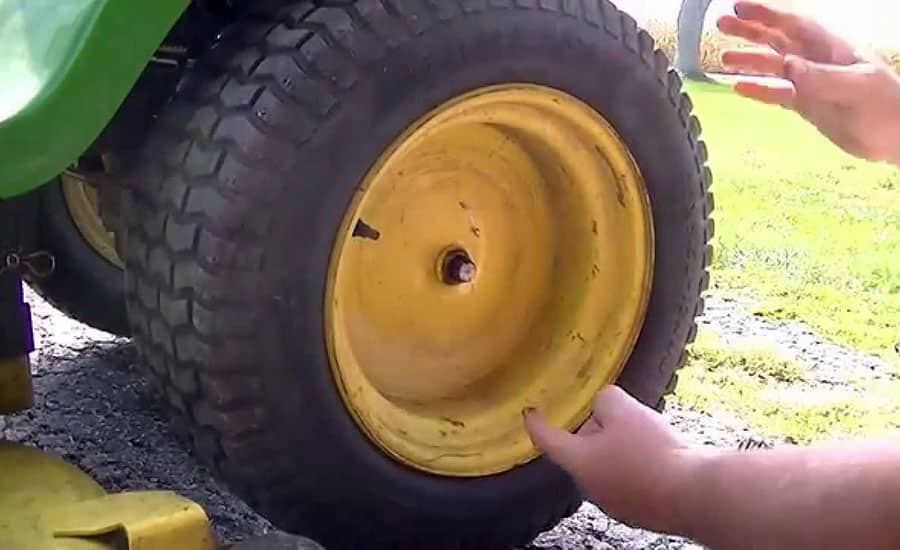 They are relatively cheap and are good for cutting grass, but lose effectiveness quickly as the blade gets dull.
It is important to understand that only the sharp edge of the blade is used when cutting grass. Therefore, trimmer discs must be selected based on the amount of work. If you have to work with thickets of coarse weeds, then the maximum cutting surface is required, then the weeds will not be wound on the gearbox and the work will go faster.
Different blades are better for different types of vegetation, so it makes sense to have several options and change them as needed. Again, rectangular and star blades are best for mulching because these blades have the most area. The more rounded shape with much shorter blades is practically useless when mulching.
These types of blades have sharpened teeth around the edge of the blade. All of them have a round shape with a different number of teeth around the perimeter.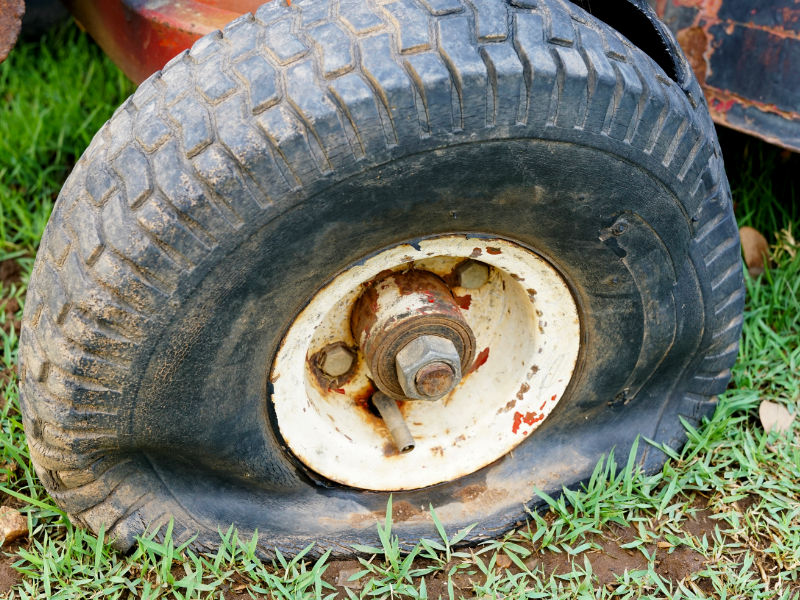 These teeth may be part of the blade and have a curved offset for blade clearance, or have chainsaw-type blades or riveted to the blade. Most of them today have tungsten tips.
These blades are more efficient in cutting because the cutting edge is around the outer surface, so there is more actual contact with the material being cut. This is useful when dealing with old, lignified weeds. But there are also disadvantages. They are generally more expensive due to their more complex shape and require additional machining to bend, sharpen, or attach additional pieces. Since the cutting edge is on a point, it is subject to more impact and wear.
Most of these blades are extremely good at cutting horizontally. Usually cut any vegetation with a diameter of 50 to 60 millimeters. When using a blade with multiple teeth, you need to consider that they require much more power and torque to move, and therefore they are more suitable for powerful machines.
In many reviews, you will read that the more teeth, the better, in which case the trimmer will cope with any task. But if you want to get maximum efficiency from power and high speed, then the opposite rule works. The fewer teeth, the better.
Or it has become unusable due to long-term (incorrect) use. Replacement discs are always available in sufficient quantities in specialized stores, it will not be difficult to find them. In this case, you can choose and put exactly the same, or pick up something with different characteristics. Which knives are better can be understood from the information provided above and after consulting with the manager when making a purchase. Usually they are aware of all the new products and are well versed in the issue.
Since changing discs is not a problem, it can be done at home, on your own and fairly quickly. All you have to do is follow the simple instructions. If you are replacing your head outdoors, lay out a piece of tarp or an old blanket. This is necessary in order to easily see a small tool or nut if you suddenly drop it.
Selecting and changing a disc on a trimmer does not require professional training, equipment and a lot of free time.