Home »
Misc »
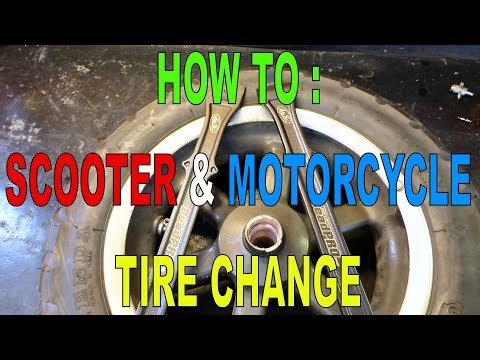
How to remove scooter tire from rim
How to remove scooter tire from rim
tire changing tips
NEW Mopeds
and Scooters |
PRE OWNED mopeds
and scooters |
Things to
know
before buying |
Parts &
accessories |
Technical
Advice |
About
Us |
Need Pick-up
for Repair? |
Site
Map |
Home |
Installing
a Tire
Tips
on
tire and tube replacement for mopeds
Mopeds
with
single-
sided swingarms that have one side of the rim exposed do not require
rim
removal to change the tire or tube.![]() these models include Razz, Elite E,
Elite SR, Express NC50, Kasea, FA50, QT50, Zuma, and many others. It
may
be necessary to loosen the muffler mount or completely remove the
muffler
to get enough room to slide the tire or tube out. Shown is a Spree with
the muffler removed.
<< Return to
Tires Page these models include Razz, Elite E,
Elite SR, Express NC50, Kasea, FA50, QT50, Zuma, and many others. It
may
be necessary to loosen the muffler mount or completely remove the
muffler
to get enough room to slide the tire or tube out. Shown is a Spree with
the muffler removed.
<< Return to
Tires Page
<< Reurn to
Advice Page
|
|
| Tire |
Instructions
|
|
|
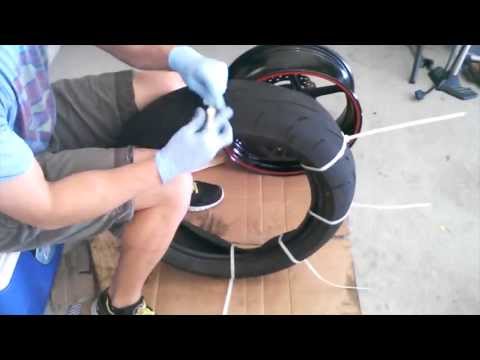
First,
remove the nut holding the valve stem.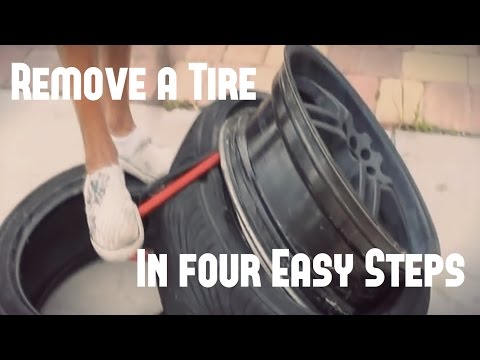 |
|
Push the bead of the tire loose
from the rim all the way around, on
both
sides.
|
|
So it falls loose from the rim
|
|
Always start removing the tire at
the valve stem. Insert tire
iron
and carefully pry tire over rim while holding opposite hand down on
tire
to keep it in the center valley of the rim.
|
|
The tire does not stretch- you must
get slack by having the tire bead
in
the lowered center portion of the rim to be able to pry it over on the
opposite side of the wheel. Here you can see my left thumb holding the
tire bead in the center, while the right pushes the tire iron
down. Here you can see my left thumb holding the
tire bead in the center, while the right pushes the tire iron
down.
|
|
While holding the first iron in
place, install the second as close as
possible
to the first, to pry over another "bite" |
|
Repeat taking the smallest "bite"
at a time, all the while holding the
tire bead down into the center of the rim. |
|
After the first few inches, the
rest of the bead should lift over quite
easily. |
|
When the side is off the rim,
remove the tube.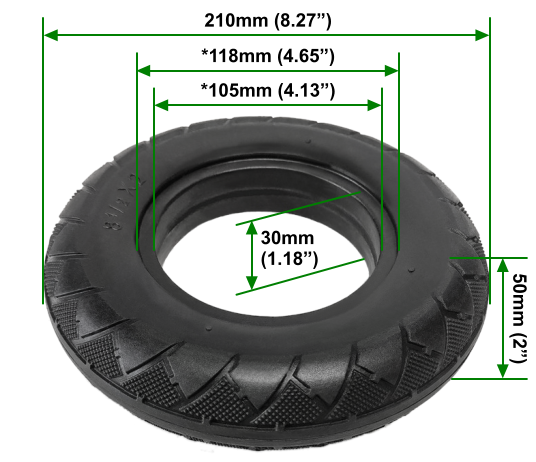 If
your
tire is in good shape, check the inside carefully for dirt or objects
sticking
in the tire. It is not required to completely remove the tire to
replace
the tube. If
your
tire is in good shape, check the inside carefully for dirt or objects
sticking
in the tire. It is not required to completely remove the tire to
replace
the tube.
|
|
To finish removing the tire, insert
tire iron from the backside and
through
to the edge of the rim, then pry the tire over. |
|
Keep the tire bead in the center of
the rim! |
|
Move the tire irons apart while
prying to force the tire off the
rim |
| |
Or give it a few blows to speed up
removal |
|
This is the dropped center of the
rim.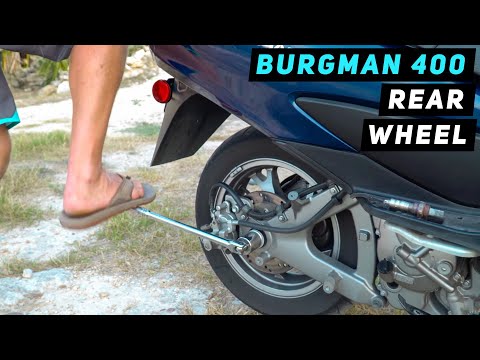 All rims have this, unless they
are "split", and can be taken into two pieces. All rims have this, unless they
are "split", and can be taken into two pieces.
|
|
This is the tire "bead", there are
very stiff wires wrapped around here
to give strength to the bead, so it does not stretch and blow off the
rim. |
| |
This is a alignment line to make
sure the tire is centered properly on
the rim. It should be the same distance to the rim all the way
around.
|
| |
To reinstall, set the tire over the
rim edge |
| |
And pry it on with an iron, then
hold the iron in place |
| |
While you use the other iron to get
another bite |
| |
When one side
is on, insert the tube,
putting the stem through the hole
first, then putting the nut on loosely.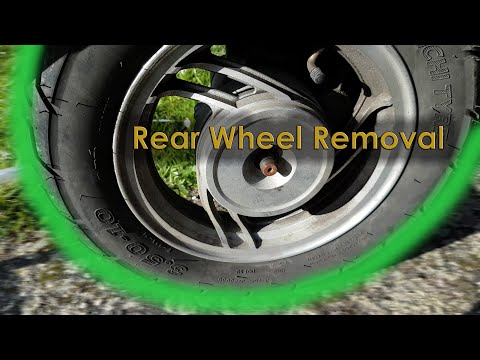 (about 1/2 way) (about 1/2 way)
|
| |
Get the tube in all the way, be
sure it is not twisted or folded. |
| |
Push the tire down toward the
center, just to the side of the valve
stem.
When prying the tire over the rim, the valve can cause interference
with
the tire bead in the rim center, making it hard to pry the tire over.
The
area over the stem should be the last part pried over.
|
| |
Holding the tire down toward the
rim center with one hand, use the
other
to pry the tire over. This is a critical moment, when many times the
tube
is pinched and ruined. Note that when the tire iron is forced down the
tip of the iron is able to snag the tube inside and pinch it against
the
rim. You must avoid this by not pushing the iron down any further than
needed to get the tire over the rim. This is a critical moment, when many times the
tube
is pinched and ruined. Note that when the tire iron is forced down the
tip of the iron is able to snag the tube inside and pinch it against
the
rim. You must avoid this by not pushing the iron down any further than
needed to get the tire over the rim. |
| |
Continue prying the tire over,
taking small bites, always keeping the
opposite
side bead pushed down into the center of the rim to allow slack.
|
| |
The last bit should be right over
the stem. This should be easily
pushed
on by hand. |
| |
The tube will try to get pinched in
here, between the tire and rim.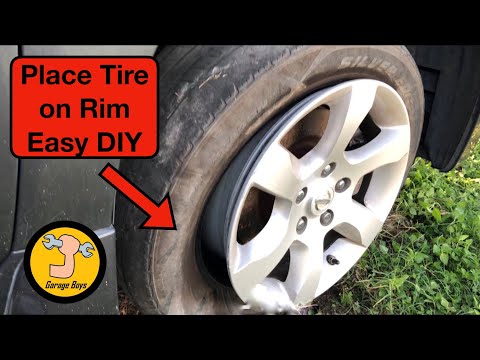 Be
carefull! Be
carefull! |
| |
The stem should be straight
when tire is inflated. Check around
the
rim/bead area to be sure the tire is centered properly.
|
| Do
not
tighten
the stem nut with a wrench.
Finger
tight is ok. after inflating the tire, let the air out to allow the
tube
to relax and center itself in the tire. Then reinflate to proper
pressure. |
The
front
tire needs to be removed for
repair.
The axle must be removed to take out the wheel, take note of any
spacers
and the position of the speedometer cable drive. Replica Watches Use caution when
putting
the speedometer drive on the wheel when you are putting it back
together.
There is a tang sticking out on the drive that must be aligned with the
notch in the wheel that turns it. There may also be a tang that is
aligned
to the fork leg to keep the brake backing plate from spinning. Replica Watches Use caution when
putting
the speedometer drive on the wheel when you are putting it back
together.
There is a tang sticking out on the drive that must be aligned with the
notch in the wheel that turns it. There may also be a tang that is
aligned
to the fork leg to keep the brake backing plate from spinning. |
|
|
Scooter Therapy Inc
12 North Few
Street | Madison,
WI
53703
toll
free
1-800-411-1543
| local
1-608-255-1520
fax
1-608-255-1587 | E-mail
|
Scooter Therapy
Inc
12 N. Few
St Few
St
Madison, WI
53703
toll
free 1-800-411-1543
local
1-608-255-1520
fax
1-608-255-1587
E-mailHours: M-F,
9-6 Saturday, 10-3 CST VISA,
MASTERCARD, DISCOVER, AMERICAN
EXPRESS & PAYPAL accepted
BEST QUALITY Genuine Scooters
(Feel the
Love!) KYMCO
(Choose your own path! *Prices
listed DO NOT include shipping and
handling fees.
Most shipping is by priority mail.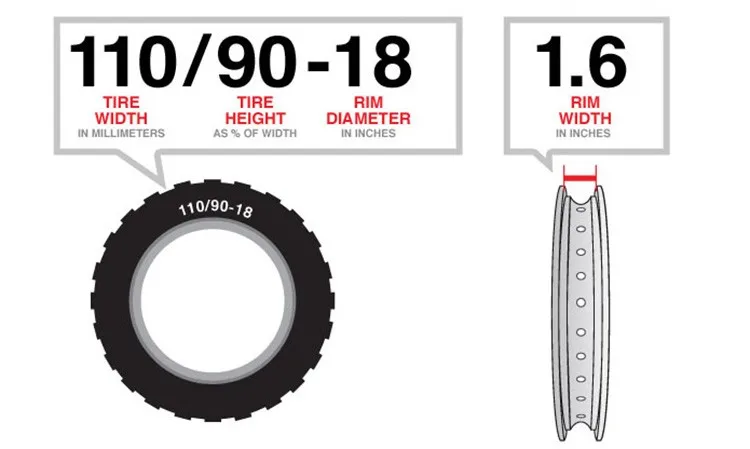 copyright
(c)
2000
Scooter Therapy
inc.
|
|
How Do I Change My Scooter Tire?
Scooters are available in an infinite combo of outputs, drive types, capacities, and sizes. This technical blog about Scooter Tire Replacement is aimed at helping new scooter owners understand the theory behind different tire applications. Some scooters have solid rubber tires, some have urethane wheels, and some have pneumatic tires and tubes. You have to tap into your inner mechanic and get your hands dirty, as scooter tire replacement can be very simple, or extremely difficult and meticulous.
Scooter Tire Replacement is a Regular Maintenance Task
If your scooter requires a new tire or wheel you will need to know how to repair or switch tires. You will have to familiarize yourself with your scooter type and application and apply your scooter model to this general theory about changing wheels, and tires.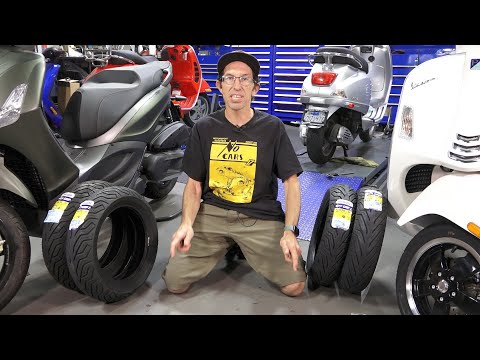
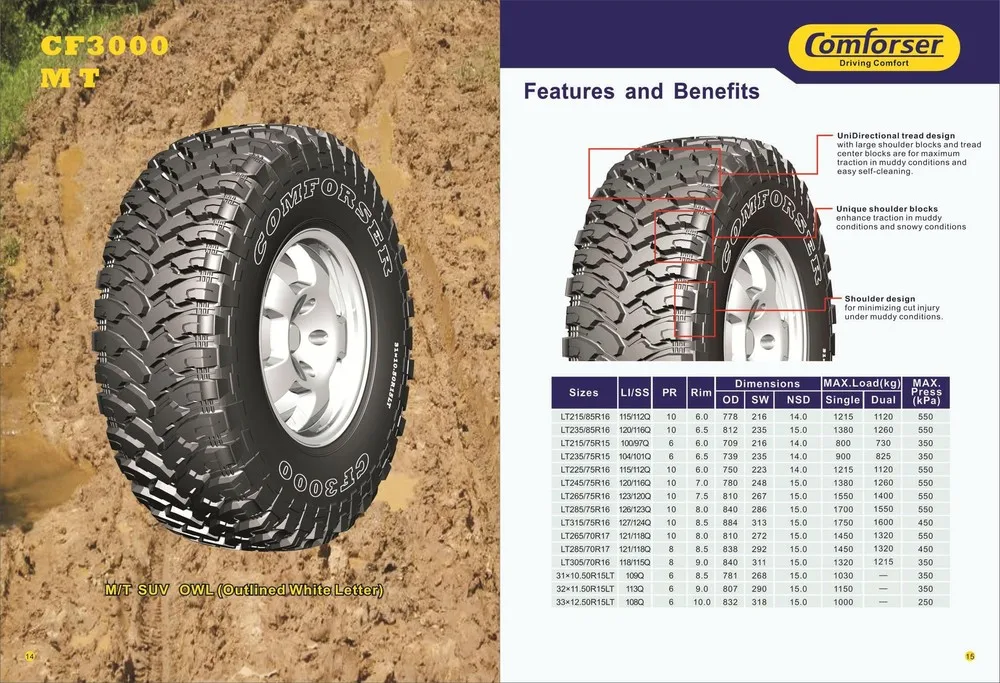
Scooter Tire Breakdown: Size, Compound, Style, Type, and Specific Applications
- Pneumatic Tires, Tubes, and Rims (Separate items come together to make a wheel)
- Solid Rubber Tire With Plastic Hub ( two piece, Hub and Tire, solid compound with no air inside)
- Urethane One Piece Wheel (Razor Scooter tires, or similar urethane wheel/hub combo)
Assessing Your Scooters Tire Type and Inspecting for Wear, Damage, Balding, or Punctures
Your Scooter tires will generally be pretty obvious, and if one or both tires goes flat they become much more obvious;). Tires that have tubes and a multi piece rim are the simplest because the tire has the size on the side. Solid rubber tires are usually one size only (6"), and the Razor type wheel, or Urethane wheel is generally 100mm, and comes with everything to bolt up and ride.The common wear signs are balding, puncture or slit, dry cracking, or flat spots. These are common, but anything is possible. Sometimes a repair of a tire will suffice, and other times a full replacement will be required. This is your call.
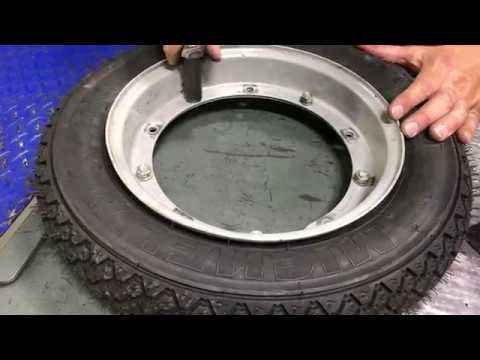
Changing Pneumatic Tires, Tubes, and Rims
The most extensive scooter tire to change is the Pneumatic tire, because the whole wheel needs to come off and be taken apart. The wheel itself unbolts to split in to two pieces. In some cases the Disk brake will be part of the wheel assembly. The mechanics are simple, but the work is meticulous.
Changing Solid Rubber Tire with Plastic Hub
Mostly found on Go-Ped Scooters, the solid rubber tire and plastic rim/hub are very easy to change. If your old tire is useless, then you simply cut it off with a knife or scissors, and disregard the tire. Place the new tire on the ground, and se the hub in the center of the tire with a little water and step on the rim. The rim will sink into the Solid Rubber Tire and you are good to go.
Changing Urethane One Piece Wheel
The urethane one piece wheel (commonly found on razor push scooters) is the easiest to change because you simply replace the whole wheel.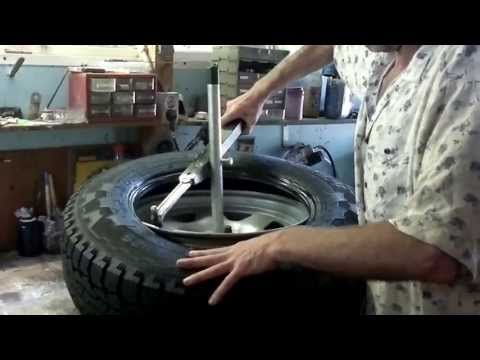 You will just have to take the old wheel off and replace with the new complete unit.
Where Do I Purchase Replacement Tires, Wheels, Tubes, and Tire Repair Kits
There are some great Online Electric, Gas, Push, and Mobility Scooter Parts Stores that specialize in universal parts for most scooters. Check out the tire section of our parts department for a wide variety of options.
How to change a tire on a scooter - Scooter Expert
During the operation of the scooter, tire replacement becomes commonplace. This is inevitable and you can carry out the replacement both independently and in any tire changer in your locality. In fact, doing it yourself is not as difficult as it might seem at first glance.
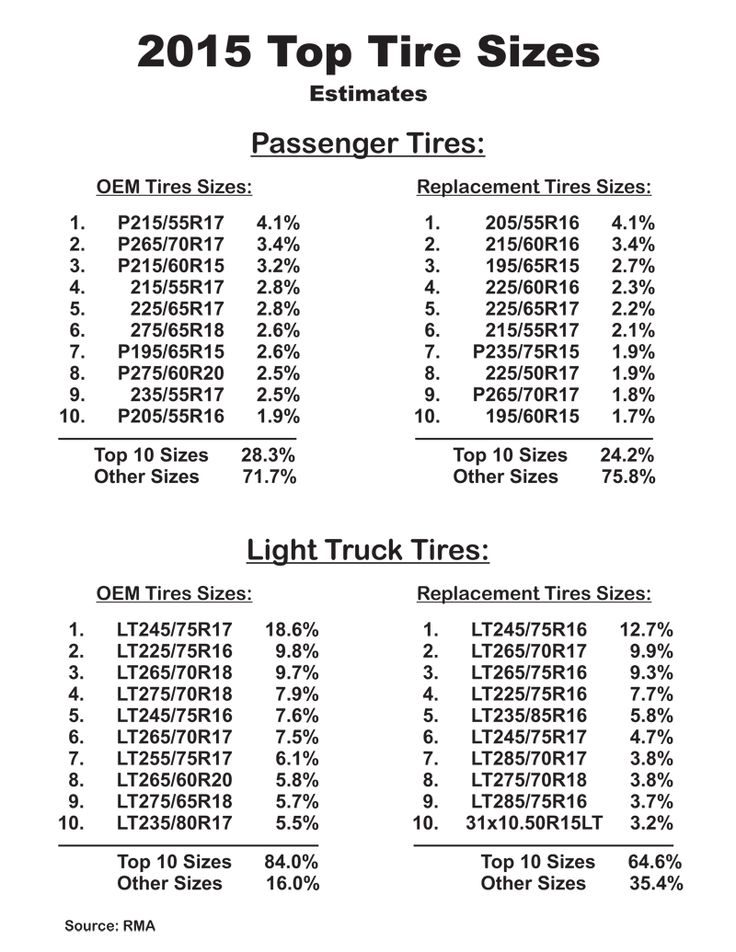
When to change a tire on a scooter
- Tread height is less than the stated minimum limits for motorcycles and mopeds (usually 0.8 mm according to traffic regulations, but may vary by country).
 The tread depth is measured using a caliper or depth gauge in the part most subject to wear.
 - The tire has mechanical damage that violates its integrity.
- Tire has cracks that appeared from "old age".
- Tubeless has numerous punctures and skips in places where punctures are repaired with “laces”.
- Various swellings and bumps that appeared during operation due to the supply of excessive pressure (recall that tires are allowed to be inflated at a nominal pressure of not more than 2 Atm.). Bumps can also appear as a result of a blow.
- Other damage.
All this obliges you to take care of the purchase of new tires, dismantling the old and proper installation of a new tire in a timely manner. Let's see how to do it right. nine0003
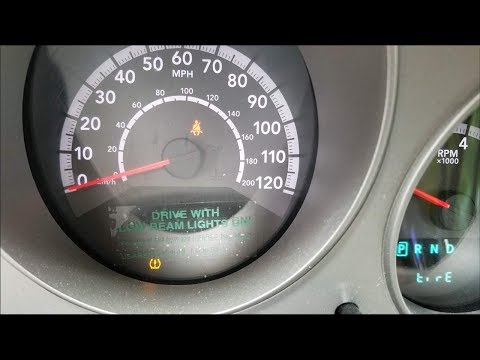
How to change a tire on a scooter, step by step guide
- Place the scooter on the center stand.
- If you don't know how to remove the wheel you need, check out the following tutorials:
How to remove the front wheel of a scooter.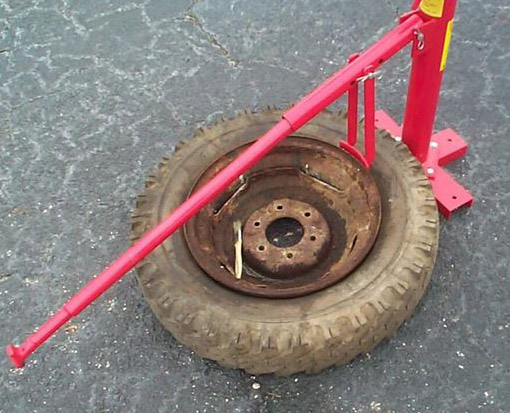
How to remove the rear wheel of a scooter. - So, the wheel is in our hands. Remove the cap from the valve and unscrew the spool. We need to depressurize the tire.
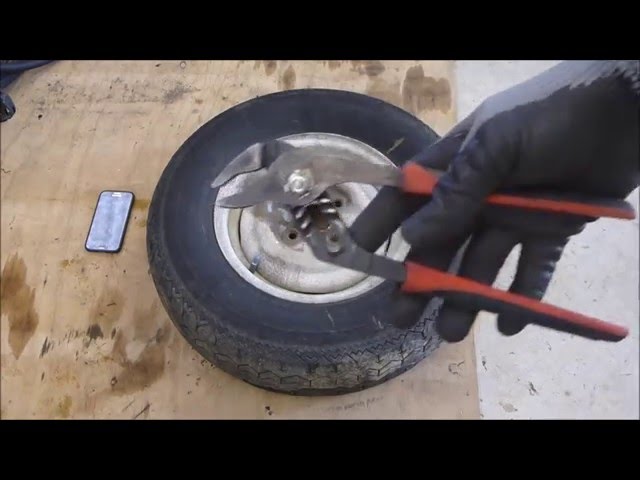
- Tire beads usually fit well in the seats. They are not always easy to besiege. We will need two hammers, one of which must be of this type:
We bring the wedge-shaped part (in no case should it be sharpened) to that part of the tire that is located at the disc bot itself (carefully, it is important not to damage the disc) and apply overthrow blows with a second hammer. Strikes must be confident. After one of the sides settles from the seat, it will be easier to besiege the rest of the circumference. - Now you need special mounting blades. If you think that you can remove the tire with a large screwdriver, as you did earlier with bicycle tires, you are mistaken. Tire changers only. You can buy them at any auto parts and tool store. From the side opposite to the valve, we insert two blades at a distance of 10 cm from each other and bring the tire rim out.
 nine0014
 - Now smoothly bend the entire radius.
- The tire can be chambered and tubeless. In the first case, we need to remove the camera. To do this, remove the air supply valve from the hole in the disk and remove the chamber itself.
If the tire is tubeless, the valve does not need to be touched. - Remove the tire from the rim.
- Now you need to install a new tire. If a tube is used in the tire, we put one side of the tire on the disk, then we put the tube into it, after sprinkling it with talc. The valve must clearly fit into the hole without distortion. After that, you need to carefully flare the tire with the same mounting blades. If the camera is not in use, skip the installation process. nine0014
- Now an important point. In a tubeless tyre, the tire cannot be properly seated without a compressor. It is important to supply a large amount of air in a short period of time. If a chamber is used, it can be pumped up with a conventional pump to the required pressure (usually up to 2 atm.
 for the rear wheel and 1.75 for the front wheel).
 - Check the fit of the rim on the rim. Check for leaks at landing sites.
Pro tire pressure
It is important to remember that there are no specific tire pressure standards. It is better to follow the manufacturer's recommendations for each specific scooter model. In the cold season and in the presence of ice on the road, tire pressure should be reduced, but in no case should it be increased above the recommended values.
How to disassemble a wheel on a scooter (photo and video)
Among inexperienced owners, the question often arises about how to properly disassemble and then bead a tire on a scooter. The work is simple, but it has a number of nuances. nine0003
If a number of recommendations are not followed, a perfectly suitable tire can be easily damaged. Even if the current tire is in a deplorable state, and there is no point in putting it back, it is still important to do it correctly without damaging the disc.
Reasons for disassembly
Contents
- 1 Reasons for disassembly
- 2 Sequence and features of work
- 2.1 Disassembly with tie-downs
- 3 Wheel assembly
- 3.1 Wheel beading (video)
Practice shows that scooter owners have to remove the tire for the following reasons:
- the old tire is in poor condition, cord threads are visible in some places;
- the tire is broken, it is necessary to restore it;
- the chamber has burst, due to which it needs to be replaced;
- A "ghoul" has appeared on the surface.
Sequence and features of work
It is easier to repair the wheel yourself when another tube is available. It is quite difficult to seat a tubeless tire without leaving gaps - a sharp increase in pressure is required, which only a high-performance compressor can generate.
But if you still have to change the tires, you can use the "folk method". After unscrewing the nipple, pour some gasoline inside. After shaking the wheel, set fire to the steam coming out through the hole. There will be a small explosion, due to which the sidewalls settle on the rim. nine0003
Regarding safety, this procedure is not capable of breaking the tire, since it has a good margin of safety. But this should not be done in the garage, moving away from the cans of gasoline for a long distance, so as not to provoke a fire. Such manipulations are not recommended to be performed with a new instance, since unburned gasoline will remain inside. Wear from it will accelerate several times.
Rear-mounted tires are more prone to wear and punctures as they carry approximately 70 percent of the weight. The reason is simple - the driver's body is located closer to the rear than to the front. nine0003
To remove the rubber, all the air must be released and the side cord removed from the rim. The work is difficult, because it cannot be done manually. If there is a vise in the garage, press the rubber with them.
If these are not available, it is allowed to lightly run a car wheel onto the surface. Moreover, it is better to use light vehicles - and a truck or jeep is able to bend the disk, after which you will have to purchase a new one. You need to stomp on the sidewalls, pushing them to the central part of the rim. You can use a simple shovel by inserting the point between the tire and the rim and applying pressure to move the edge of the tire. nine0003
For dismantling, it is recommended to use narrow pry bars. The use of thick, wide vehicle mounts causes additional difficulties when working on a small diameter wheel.
Alternatively, long high strength screwdrivers can be used. If it’s uncomfortable to carry mounting tools with you, any owner will always have a pair of screwdrivers.
Beading is carried out from the nipple. Starting from the opposite side, the nipple will not allow the wheel to sink inside the rim. If you see that something is preventing the sidewalls from peeling into the middle, determine the cause and get rid of it. nine0003
You should not rely on your own strength, because you can easily break the tire cord. And if you have a lot of strength, the rim itself will break. To disassemble the tire using narrow screwdrivers or pliers, the worn part should be held in a special depression on the rim.
Before dismantling the rear wheel on a scooter, always remember the distance between the screwdrivers - it should be a maximum of two to three centimeters.
It is recommended to disassemble the wheel so that the rim is on the ground with the side in the working position near the muffler. This should be done because, with careless dismantling, scratches will not be very conspicuous, because. silencer covers them. nine0003
When replacing an old tire that will not need to be reassembled, lubricate the bead with soapy water or oil. This will greatly simplify and speed up the replacement process. Oil can corrode the tire, so treat the surface with a degreaser before starting installation.