This guide will tell you how to replace/install an ATV winch cable or synthetic winch rope, step-by-step.
The basic procedure for replacing an ATV winch line is about the same, whether you are:
The only real difference is how you attach the cable or rope to the winch drum (step 7), and what fairlead you should use.
Time consumption: 10-20 minutes from start to finish.
Mechanic skill level required: Low. If you know how to change a tire, you will be able to do this job.
Page Contents
Before you begin disassembly, make sure you have the proper tools and supplies at hand.
By now, you have probably decided whether you wish to install a new winch cable or a synthetic winch rope. If not, I recommend that you take a look at this post where we compare steel cables vs. synthetic ropes for ATV winching.
Some synthetic winch ropes come with an unfinished end where you have to splice the end loop yourself. However, most winch ropes on the market today come with an end loop straight out of the box. A metal thimble-insert makes the loop extra wear-resistant.
I recommend that you get a rope that comes with an end loop. It will save you time as well as reducing the risk of splicing the rope incorrectly. Therefore, this guide will not cover how to make an eye splice.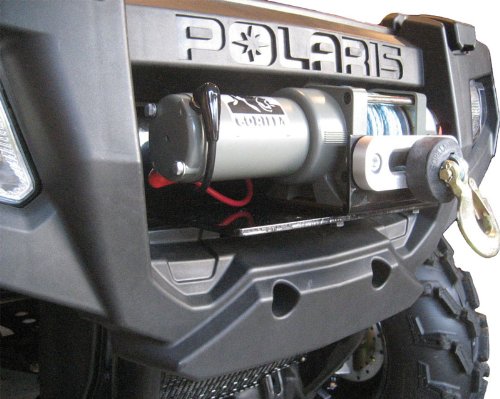
The type of fairlead you should use depend on whether you choose a steel rope or a synthetic cable.
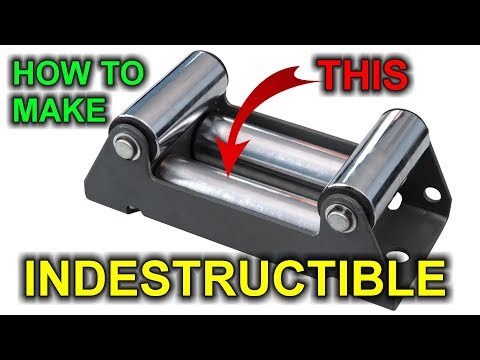
With a steel winch cable, you should always use a roller style fairlead or a cast steel hawse. The steel cable will wear down a softer aluminum hawse fairlead in no time.
With a synthetic winch rope, you may use either steel roller fairleads or an aluminum hawse. A cast-iron hawse does not have a smooth enough surface and will prematurely wear the rope. An aluminum hawse, however, is much smoother, which makes it ideal for synthetic ropes.
Steel roller fairleads work fine a well, as long as the rollers are not damaged or too corroded. The rollers must overlap in the corners where they meet or you may get binding issues that will damage the rope. Most newer steel roller fairleads have overlapping rollers, while non-overlapping rollers is more common on older models.

Now that you got all the gear and tools you will need, you are ready to begin replacing the cable.
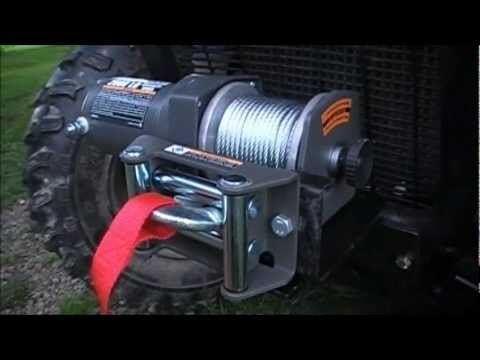
Remove the locking pin (usually a split-pin) and the bolt that connects the hook with the eye loop. This allows you to remove the fairlead. If the hook is in good shape, you will be reusing it with the new rope or cable.
Whether your existing fairlead needs replacing or not, you will most likely have to remove it to access the winch drum. It is held in place with two bolts, one on each side. Loosen the bolts and put the fairlead to the side for now.
On the side of your winch, you will find a switch that disconnect the winch motor from the cable drum. This is the free spool position, which enables you to unspool the winch cable by hand.
The design of this switch varies from manufacturer to manufacturer. On ATVs, a rotary-style knob at the very end of the winch is the most common.
On Warn winches, you should turn the knob clockwise until you hear a click, or until you can’t turn it any further without applying force. If you twist the knob too far, you need to disassemble the knob to get it working again.
With the knob in the free spool position, the drum should spin freely. In cold weather, however, the grease inside the winch gears may create some drag. But you should still be able to turn the drum by hand; it will just require a bit more pulling-force.
Make sure you use a pair of gloves for this step, especially if you are removing an old steel cable. The small metal burrs of a frayed cable are not going to be gentle with bare hands.
Grab the old line and pull on it so that it unspools. Pulling it by hand is better than using the winch motor to unspool the line. If it’s bound-up somehow, unspooling with the motor may only make it worse. So if you are able, unspooling by hand will work the best.
The end of the line is likely mounted to the drum. There is a number of ways to how this is done. Here are the most common methods for mounting a steel cable to the winch drum:
The cable goes through a hole in the core of the winch drum. An Allen set-screw is retaining the cable in the hole. Loosen and altogether remove the set-screw to release the cable. Take note of with hole the cable is threaded into the spool through. You must thread your new rope or cable the same way.
The cable goes through a hole in the winch drum core. At one end of the hole, there is a wedge-shaped slot that fits a loop of cable as well as a metal locking bead.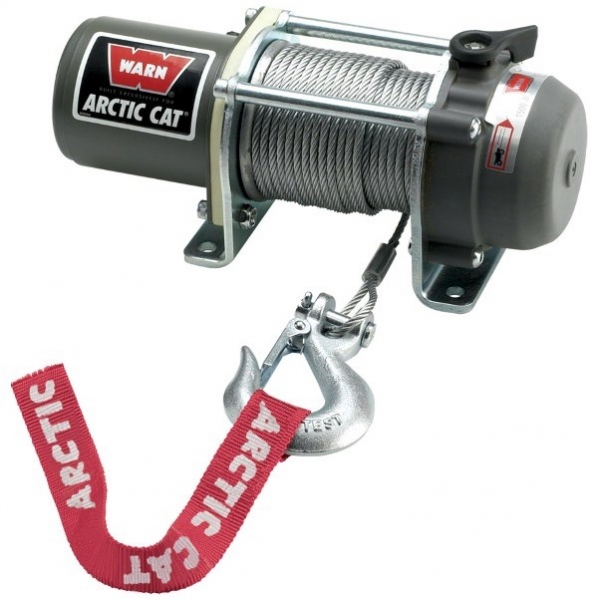 The bead helps tighten the loop when you pull on the cable.
To remove it, push the cable from the opposite side of the loop. This will release the bead so that the cable can be pulled out of the drum.
Older ATV winches often attached the cable by using a screw to the sidewall of the winch drum. This method is not that common nowadays, but you may run into it if you are replacing the cable of an older ATV.
If you’re replacing a worn synthetic rope, any of the methods above may have been used to hold the rope in place.
In adition, there is the method I will be recommending in this post, where you feed the rope through the hole in the winch drum core and make a knot around itself.
Its a good idea to take a photo of the knot before untying it. The hardest part of installing a new rope is to make a proper knot.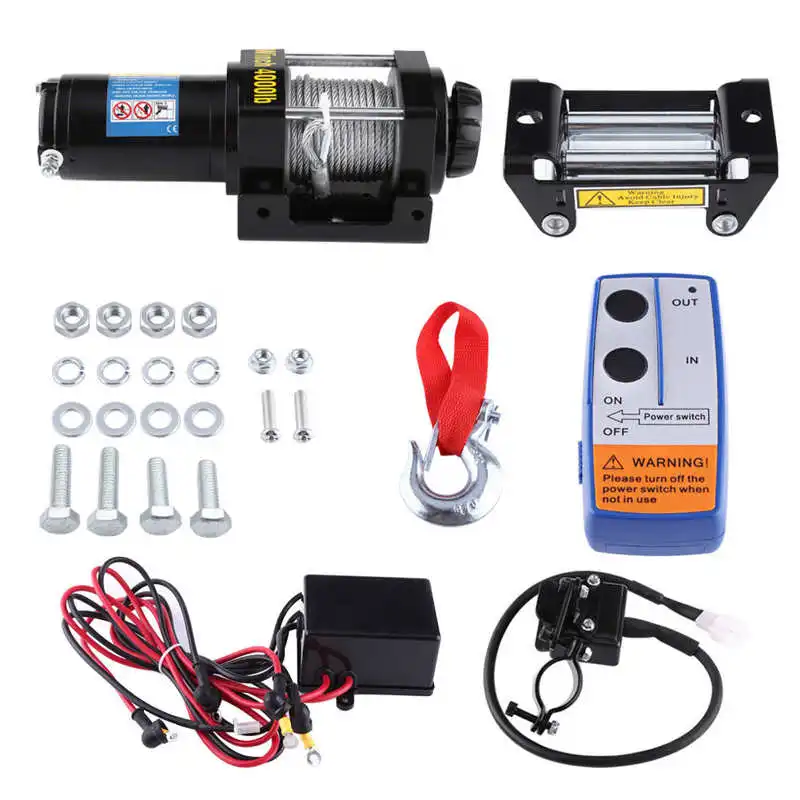
In step 7, I will show you how to create a knot like this.
Steel cables have been known to damage the winch drum or the fairlead rollers. Now is a good time to inspect them both.
Any sharp eges has to be adressed before you install your new rope, or your rope will get damaged. Use a file or a piece of sandpaper to file down any burrs or grooves to a smooth surface.
This step depends on what style of winch drum you have, and whether you are installing a steel cable or synthetic rope.
If your winch drum has a hole and an Allen set-screw, thread the end of the cable into the hole the same direction as your old cable was sitting. Lock it in place by tightening the Allen screw snug.
If the drum has the loop-and-metal-bead style locking mechanism, the procedure is not that different.
Feed the cable through the hole of the drum in the same direction as the old cable. Let a few inches of cable go through the spool. It should be enough to create a loop. Bend the cable into a U-shape, and let is slide back into the slot on the winch drum.
Insert the metal bead inside of the loop before you tighten the cable by pulling on the long end. Tighten as hard as you can so the cable sits firmly.
With synthetic ropes, it’s not that you can’t use the set screw or metal wedge method to mount the rope, but there are better ways that will make an even more slip-proof installation.
The method I find work best, and what many manufacturers recommend, is making a knot that tightens as you put tension on the rope. Here is how to do it:
The winch drum mounting-hole is a bit off-center.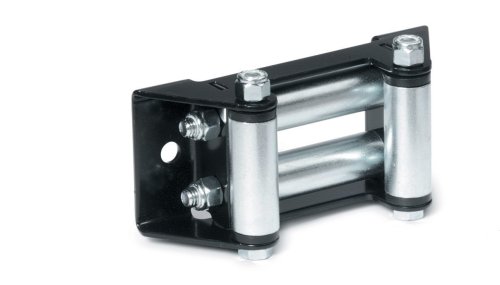 You need to make sure the drum is positioned correctly so that the rope will begin wrapping around the thickest part of the drum when you spool in. Which position is correct depends on which way the drum turns when you spool in.
Feed the free end of the rope through the hole, with a few inches of rope sticking out the other side of the drum.
Rotate the spool 180 degrees upwards so that the short end of rope points towards you. If the hole is positioned at the bottom, see step 1 above, you need torotate the spool 180 degrees downwards instead.
Grab both the short and long end of the rope.
While holding both ropes, rotate the spool back down 180 degrees. Again, if the hole through the drum was positioned near the bottom after finishing step 1, you will now need to rotate the drum up instead. The end result should look the same regardless of which direction your winch turns; the knot will just be upside down.
The shorter length of rope is now creating a loop of rope around the spool. Allow a little slack, thread the shorter end of rope from the outside and in underneath itself to make a knot.
Tuck the shorter length of rope under it’s own loop to create the knot.
The shorter length of rope should now lay across the spool.
Tighten the knot by holding the shorter length of rope with one hand while pulling on the longer length of rope with the other.
Slide the knot all the way outwards on the spool. You are now ready to begin reeling the rope back onto the spool.
Turn off the free spool knob by rotating it in the opposite direction from what you did earlier. This will engage the winch motor so that you can spool the new rope or cable on to the winch drum.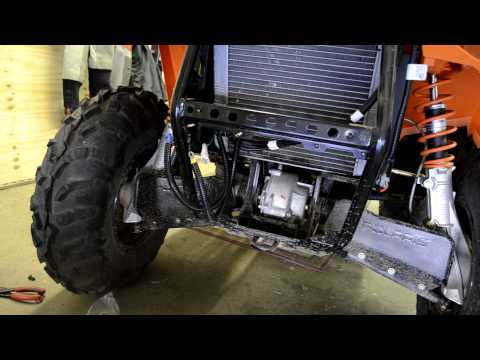
From this point on, make sure you keep your hands at safe distancefrom the winch as you will be using the winch motor to spool the new rope or cable on to the drum.
The winch-line must be kept under constant tension as you spool it on to the drum. Otherwise, it may get jammed between lower layers of rope when you use the winch later on.
You will also need to guide the rope so that it spools neatly. Guide the rope at a steady pace from one side to the other. You should get a flat and even layer of rope across the full width of the drum.
If you have a remote, it is possible to do this step alone. But it’s easier to get the rope to wrap neatly if you get help from a friend.
One person should operate the winch controls while the other guide and keep the rope under tension.
Lay out the winch line before you start spooling. This will reduce the risk of tangling the rope.
Start spooling from the knot-side and work your way to the other side of the drum. Each rope winding should be touching the previous one.
This is how it should look like after half a turn.
This is how it should look like after one whole turn.
Then after two turns.
Continue winding until you get a flat layer of rope across the whole width of the winch drum.
When you reach the edge, it’s time to turn back and lay a new layer of rope across the drum. Make sure you maintain a steady pull on the winch line and continue untill all of the rope or cable has been spooled on to the drum.
Use the same method to spool a steel cable if that is what you are installing. Make sure to use gloves.
Start at one end of the drum.
And work your way across the width of the drum in a flat, smooth pattern.
In this photo, I’m using this method for installing a synthetic winch rope on my father’s new Textron. The steel cable had to go.
Thread the cable through the fairlead and mount the fairlead using the proper hardware.
Make sure the winch line won’t be scraping against the fairlead mounting plate. There should be at least 1/4″ clearance between the fairlead openings and the edges of the mounting plate.
If you are replacing your steel roller fairlead with an aluminum hawse, you may or may not not be able to use the same mounting hardware.
Therefore it is always a good idea to have a look at your mounts before buying the new hawse to make sure it will fit. It’s much easier to choose a different model with a slightly different design than to struggle with bolts that don’t fit.
To protect your fairlead from beeing damaged, it’s recommended to install a rubber bump stop. They are especially important if you are replacing your steel rollers with a softer material aluminum hawse.
If you don’t have one right now, just skip this step for now, but make sure you add one later.
Rubber cable stoppers are a cheap way of protecting both your winch and winch hook.
Install the winch hook, and you are done. Make sure you bend the split pin so the bolt won’t fall out.
You are now done replacing the winch cable or rope of your ATV.
When you perform this job, it’s recommended that you perform a couple of quick and easy maintenance steps while you are at it. These will help prevent some of the common issues you may run into while operating your winch later on.
Corroded or loose terminals on your winch are a common cause of a winch that will not work. It’s also a common cause of a battery that keeps draining. In this post, I take a look at other possible reasons for a battery that keeps going dead.
Disconnect both terminals and remove any dirt or corrosion using a copper wire brush or some fine sandpaper. Repair or replace any damaged wire or connectors before you reconnect the connectors to the terminals.
It is not uncommon that a winch bolt or two may break or come loose. Now is the perfect time to make sure all bolts are in place and in good shape. Replace any missing or broken bolts with correct spec new ones.
If your steel winch cable keeps getting flat spots and breaking even under very little stress, it’s a good idea to replace it with a synthetic winch rope. Also, replace the roller fairlead with a hawse fairlead to go with the synthetic rope. This setup will last a lot longer.
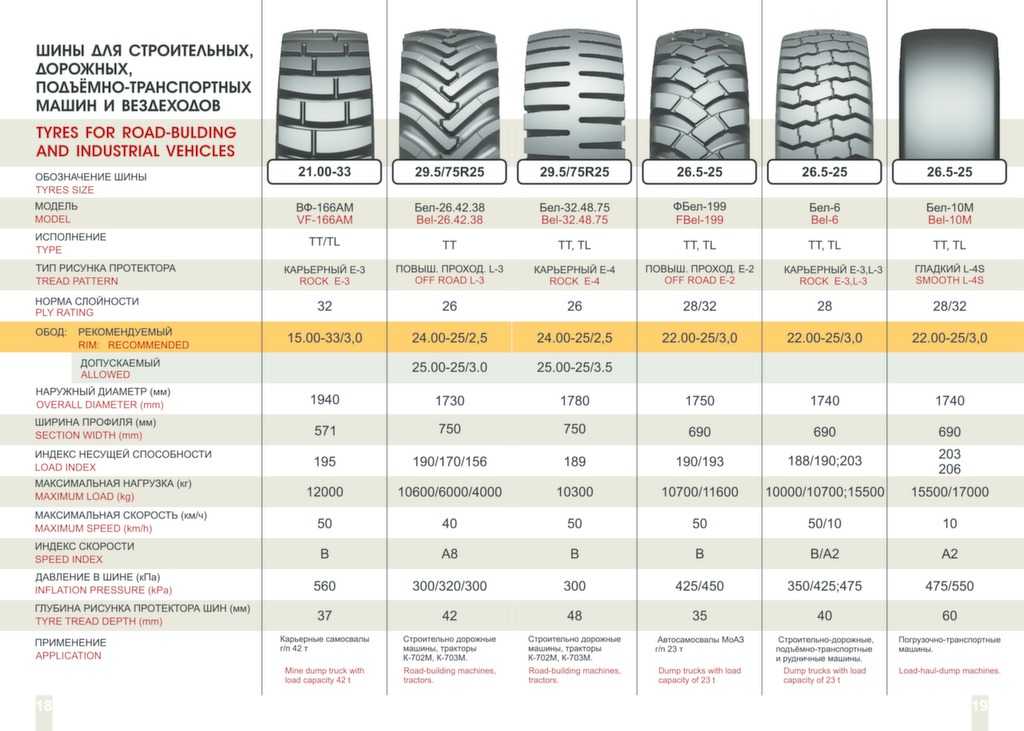
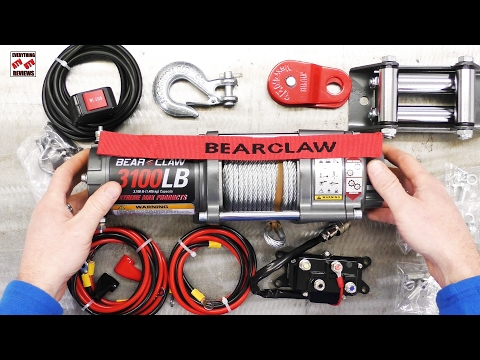
The cable should be rated at least double the pulling capacity of your winch. Do not get a rope or cable that is too thick as it will reduce how much you are able to fit on the spool. Typical synthetic rope size is 3/16 inch (5mm), while steel wires generally are slightly smaller with a size of 5/32 inch (4mm). Typical ATV winch cable length is 50 ft. (15m).
Installing a new fairlead needs to be completed before spooling the rope on. Aluminum hawse fairleads work very well with synthetic winch lines as they provide a smooth surface that will not damage the rope. Many cast steel hawse fairleads do not have a smooth enough surface for synthetic rope and are not recommended. Steel roller fairleads are perfectly fine to use, just make sure that the rollers are smooth and not burred or gouged. Also make sure that the rollers overlap each other as some older roller fairleads do not have overlapping rollers and have a gap in the corner of the fairlead. A winch line could get caught in this gap during use and get damaged.
Regardless of the fairlead type, you want to assure that there is enough clearance between the opening of the fairlead and the edges of the mounting plate. As shown in the diagrams above, we recommend at least 3/8" to 1/2" of clearance. Without this, the winch line can get cut on the sharp edge of the fairlead plate.
Before removing the old line from your winch, take a look at how it was attached to the drum. Most off-road winches will have a threaded hole on the drum flange that you attach a wire rope or synthetic winch line to with a button head allen bolt. Other winches, such as the Warn Zeon series or 8274 have different methods. Take a look at the different styles below to properly attach your winch line to the drum.
The Superline (8mm and 10mm) and Classic (8mm, 9mm, 11mm) winch line have a small-diameter Dyneema loop spliced to the drum end of the line that you use to attach to the winch drum. The provided drum kit includes a 1/4-20, M6 and 5/16-18 button head allen bolt for use with different drums. Choose the one that fits your drum and attach the line as pictured below. If you are using the 1/4-20 or M6 bolt, use the provided nylon washer to get some extra grab on the drum attachment.
The Superline XD winch line has a Vectran loop sewn on the drum end of the line that you use to attach to the winch drum. The provided drum kit includes a 1/4-20, M6 and 5/16-18 button head allen bolt for use with different drums. Choose the one that fits your drum and using the the stainless steel washer attach the line as pictured below. It is easiest to flatten out the sewn loop with a rubber mallet or hammer so that it fits nice and flush on the side of the drum.
The Superline (8mm and 10mm) and Classic (8mm, 9mm, 11mm) winch line have a small-diameter Dyneema loop spliced to the drum end of the line that you use to attach to the winch drum. The provided drum kit includes a circular aluminum wedge that that secures the line to the winch drum.
First step is to run the drum attachment through the slot in the drum as pictured below.
Next, insert the aluminum wedge into the larger eye on the winch lines drum attachment.
Finally, pull the wedge and drum attachment back into the drum slot making sure that the drum attachment sits nicely on the wedge.
The Superline XD winch line has a Vectran loop sewn on the drum end of the line that you use to attach to the winch drum. The provided drum kit includes a circular aluminum wedge that that secures the line to the winch drum.
First step is to run the drum attachment through the slot in the drum as pictured below.
Next, insert the aluminum wedge into the eye on the winch lines drum attachment.
Finally, pull the wedge and drum attachment back into the drum slot making sure that the drum attachment sits nicely on the wedge.
The Superline (8mm and 10mm) and Classic (8mm, 9mm, 11mm) winch line have a small-diameter Dyneema loop spliced to the drum end of the line that you use to attach to the winch drum. The provided drum kit includes a 5/16-18 allen bolt and nut which will be used to secure the line to your 8274.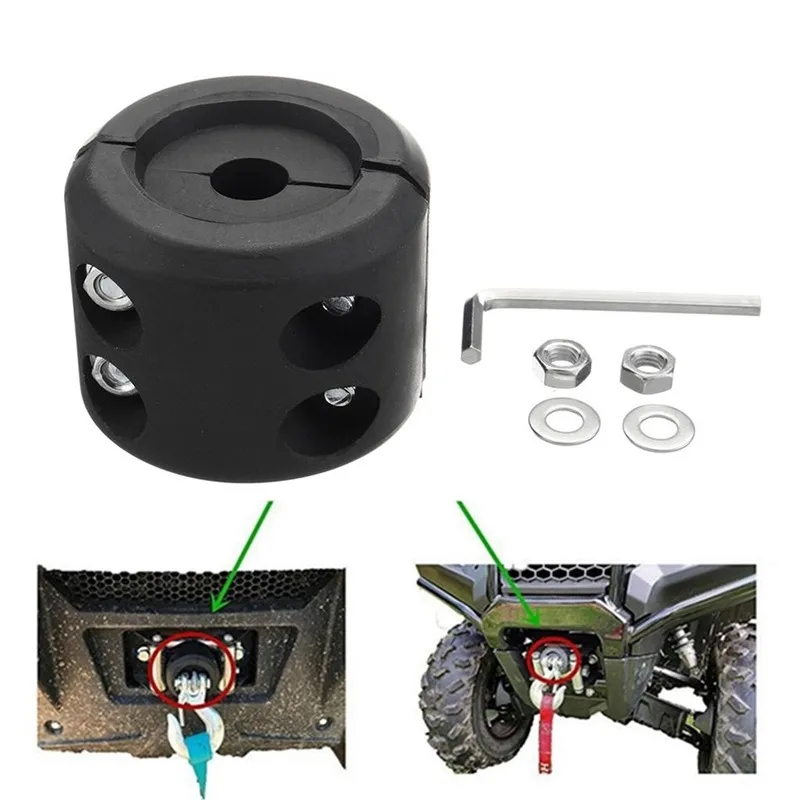
First step is to open up the side access plate on the winch drum and then insert the winch line drum attachment into the hole in the drum.
Next, pull the inserted drum attachment through the access hole and secure the 5/16 allen bolt and nut to the small eye on the drum attachment as shown below. Now pull the slack from the drum attachment, re-install the access plate and begin spooling your winch line.
Here is another shot at how the bolt should be installed on the drum attachment.
For the Superline XD, use the same method as above for Superline winch line, but instead of securing the drum attachment with the allen bolt, use the u-bolt that came with the the 8274.
 (1361 kg)
 Cost
14 600.00
Price
19 300.00
 4 HP (0.3 kW), hermetically sealed
 * Designed for 12V battery operation only. Do not connect to an inappropriate power source.
Cost
19 990.00
 2 m and Ø 4 mm
 * Designed for 12V battery operation only. Do not connect to an inappropriate power source.
Price
19 990.00
 15"/9.0" (80mm/229mm)
 Price
19 990.00
 (42 kg)
 Cost
44 000.00
Cost
34 100. 00
00
CATALOG
208 items Reset filter
Sort:
by popularity
On the page:
60 items
Article: W-101154
Base AXON 55, Warn
Available
RUB 73,200
| Add to cart |
|---|
Code: W-101144
Winch base Axon 45, Warn
Available
RUB 62,700
| Add to cart |
|---|
Code: W-89604
ProVantage 4500 winch base (without kit), Warn
Available
RUB 33,800
| Add to cart |
|---|
Code: W-7562
Gear for brake shaft Warn 8274-50 (new #98530), Warn
In stock
RUB 15,300
| Add to cart |
|---|
Article: W-7548
Gear reducer М8274, Warn
Available
26 360 rub
| Add to cart |
|---|
Article: W-70396
Gear Warn 2. 5ci, Warn
Available
RUB 3 870
| Add to cart |
|---|
Article: W-32437
Winch sun gear, Warn
In stock
RUB 4,750
| Add to cart |
|---|
Article: W-7732
Winch gear М8274-50, Warn
In stock
| Add to cart |
|---|
Code: W-75001
Sun gear RT/XT40, Warn
Available
RUB 3,970
| Add to cart |
|---|
P/N: W-19574
Series 9 Sun Gear, Warn
Available
RUB 9,990
| Add to cart |
|---|
Code: W-70398
Winch sun gear 2. 5ci, Warn
In stock
RUB 2 880
| Add to cart |
|---|
Code: W-70391
Gear 2nd Stage, 2.5ci, Warn
Available
RUB 3 870
| Add to cart |
|---|
Article: W-89576
Winch gear Vantage, Warn
Available
RUB 4,660
| Add to cart |
|---|
Article: W-89557
Winch gear for ATV Vantage 2000, Warn
Available
RUB 5,960
| Add to cart |
|---|
Code: W-70390
Sun gear 2500 GEAR SUN, STAGE 2, 2. 5CI, Warn
Available
RUB 3,030
| Add to cart |
|---|
Article: W-30329
Auxiliary drive shaft (small) 9dc/12dc. (new #98525), Warn
Available
RUB 5,620
| Add to cart |
|---|
Article: W-69343
Winch shaft assembly, Warn
Available
RUB 4 250
| Add to cart |
|---|
Article: W-74996
Clutch for winch RT \ XT 40, Warn
In stock
RUB 4,120
| Add to cart |
|---|
Article: W-60730
Motor coupling M15000 M12000 (new #98529), Warn
Available
3 570 rub
| Add to cart |
|---|
Article: W-98394
Winch motor coupling M6-XD9 (old #26006), Warn
Available
RUB 3,030
| Add to cart |
|---|
Article: W-34798
Drive shaft Z3500 200 mm, Warn
Available
RUB 3,140
| Add to cart |
|---|
Article: W-15643
Carrier Assy, 1st gear stage M12000 (new #98764), Warn
Available
| Add to cart |
|---|
Article: W-75004
2nd stage winch gearbox 25\30, Warn
Available
RUB 5 490
| Add to cart |
|---|
P/N: W-24563
Carrier Assy Stage 2nd Gear Stage (New #98766), Warn
In Stock
RUB 11,350
| Add to cart |
|---|
Article: W-27838
Carrier Assy, 2nd gear stage Warn Series 9 Industrial 31p X 21, Warn
Available
RUB 33,310
| Add to cart |
|---|
Code: W-89573
Winch shaft Vantage 3000, Warn
Available
RUB 5 880
| Add to cart |
|---|
Code: W-74997
Shaft for winch RT\XT 25\30, Warn
Available
RUB 3,420
| Add to cart |
|---|
Article: W-30335
Carrier Assy, 3rd gear stage S-12, M12000, M15000, DC2500, DC4000.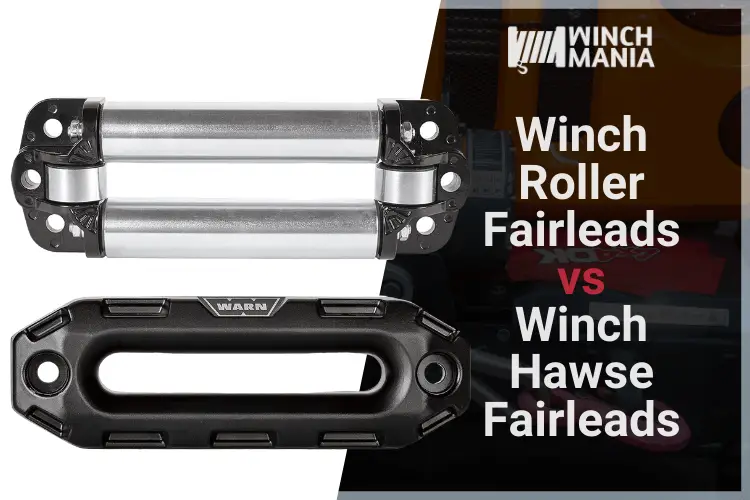 (new #98769), Warn
Available
RUB 22,810
| Add to cart |
|---|
Article: W-75002
1st stage winch gearbox 25\30, Warn
Available
RUB 5 270
| Add to cart |
|---|
Code: W-14964
Gearbox gasket, Warn
Available
RUB 1,870
| Add to cart |
|---|
Article: W-79724
Gear switch for winch 30XL, Warn
In stock
RUB 37,550
| Add to cart |
|---|
Article: W-27837
Carrier Assy, 1st gear stage Warn Series 9 Industrial 24p X 12, Warn
In stock
RUB 17,210
| Add to cart |
|---|
Article: W-30310
Planetary gear (reducer) 9DC, Warn
Available
RUB 35,720
| Add to cart |
|---|
Article: W-75005
3 stage winch gearbox Warn 25\30, Warn
In stock
RUB 6 570
| Add to cart |
|---|
Code: W-30315
Main drive shaft 12dc (new #98547), Warn
In stock
RUB 2,270
| Add to cart |
|---|
Article: W-30314
Drive shaft 9dc main / Shaft 9dc, Warn
Available
RUB 2 720
| Add to cart |
|---|
Article: W-74998
Shaft for winch RT/XT 40, Warn
Available
RUB 3 420
| Add to cart |
|---|
Article: W-89554
Winch shaft Vantage 2000, Warn
Available
RUB 5,750
| Add to cart |
|---|
Article: W-98274
Gearbox gasket M6 - 9.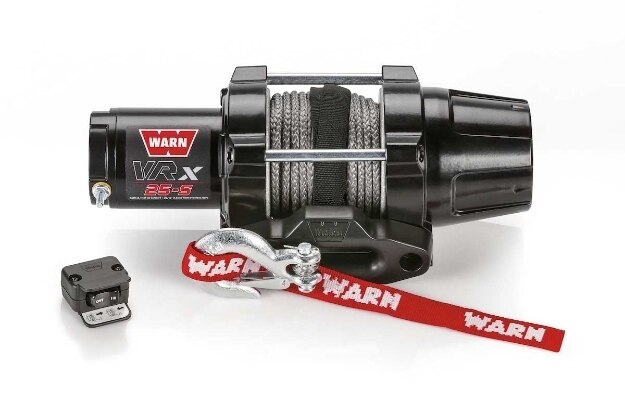 5 (old No. 13848), Warn
In stock
RUB 1,800
| Add to cart |
|---|
Code: W-75003
1 stage winch gearbox RT/XT40, Warn
Available
RUB 5,560
| Add to cart |
|---|
Article: W-7634
Brake assembly for 8274-50, Warn
Available
68 130 rub
| Add to cart |
|---|
Article: W-28432
Planetary block 3rd stage. (new #98768), Warn
Available
RUB 7,660
| Add to cart |
|---|
Article: W-34342
Planetary block 2nd stage.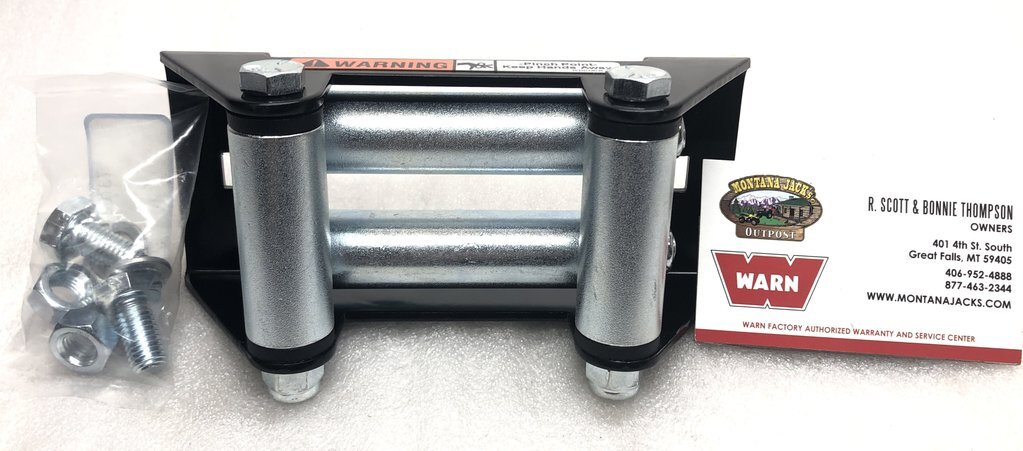 (new #98763), Warn
Available
RUB 7 390
| Add to cart |
|---|
Article: W-64633
Brake assembly 9.5 Ti, Warn
Available
29 220 rub
| Add to cart |
|---|
Article: W-32455
Brake assembly for winch Warn M6 - XD9000, Warn
Available
20 360 rub
| Add to cart |
|---|
Article: W-39438
Winch brake HS9500, Warn
In stock
RUB 16,230
| Add to cart |
|---|
Code: W-104227
Winch brake VR EVO, Warn
Available
RUB 4 250
| Add to cart |
|---|
Article: W-71355
Brake for winch 4700, Warn
Available
RUB 23,640
| Add to cart |
|---|
Article: W-28433
Planetary block 2nd stage, Warn
Available
RUB 9 160
| Add to cart |
|---|
Code: W-31683
Brake assembly for professional winch, Warn
Available
79 600 rub
| Add to cart |
|---|
Article: W-74305
Brake Powerplant, Warn
Available
RUB 36,050
| Add to cart |
|---|
Code: W-68044
Warn 9 gear ring.