Categories Home & Garden | Posted on | By: Laura MuellerTags: DIY home improvement, home fixes, home improvements, Home Repairs, nail holes, nails
◄ Prev | Next ►
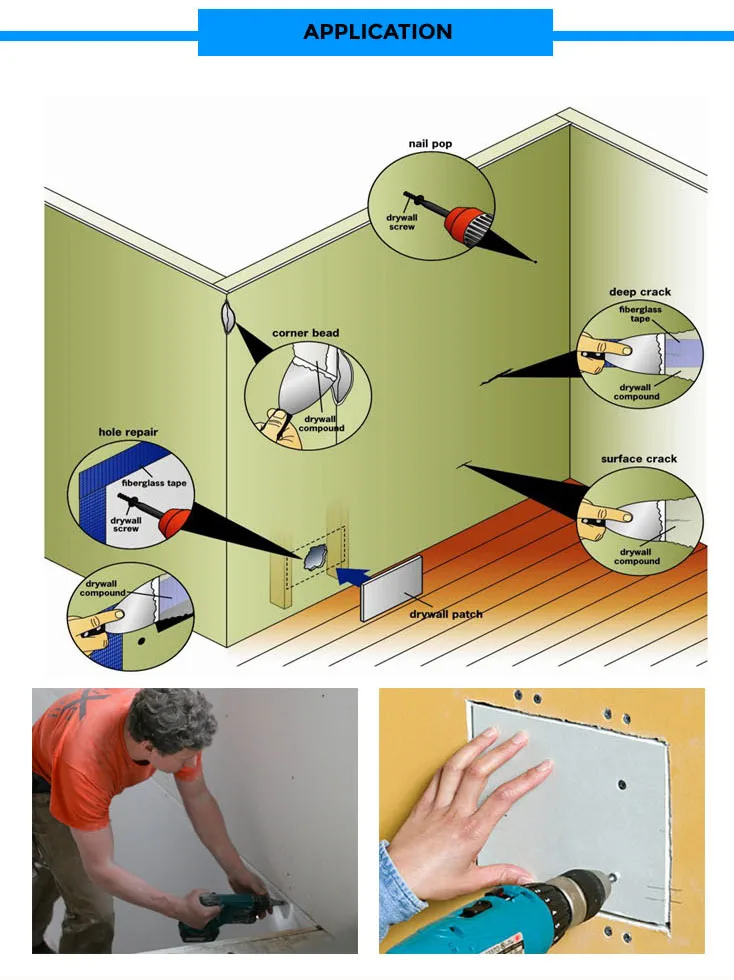
You’ve probably seen tips and tricks on how to hang pictures and shelves, but an equally important topic is its corollary: how to fill nail holes left behind by these efforts. Because whether you’re a renter who’s preparing to move out (and, hopefully, take their security deposit with them) or a homeowner who’s ready to put their house up for sale, filling nail holes is a necessary—and not always super simple—task to undertake. Do it wrong and your attempt at a fix might look even more glaring than the original nail hole.
The amount of work it takes to fill nail holes depends on the size and shape of the holes themselves. As you might be able to guess, a small hole, such as one left over from a 4X6 framed print, is going to be a touch easier to deal with then the larger holes left over from heavy shelves that had to be studded into the wall. Below, we’ll go over the basics of how to fill nail holes both small and large, including the tips you need to know to do the job right.
You don’t need a lot of supplies to fill a nail hole—just a few basics:
You can consolidate some of these tools by opting to purchase a spackle/putty knife hybrid—a tool that allows you to squeeze out spackle and smooth it onto the wall without the need to buy two separate tools.
Filling small nails holesFilling small nail holes is a pretty straightforward process:
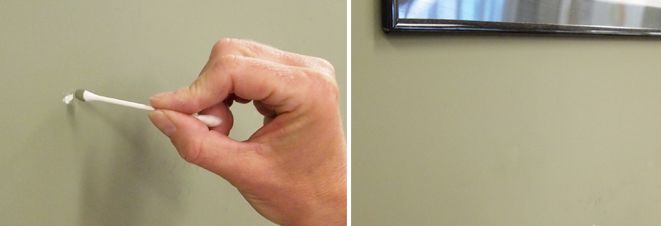
Using the sharp corner of your putty knife, scoop out a tiny amount of spackle and gently push it into the hole. Then use the flat surface of the knife to smooth it out. Any excess spackle on the area is okay (that’s what the sandpaper is for, after all), but try to smooth out the area as much as possible.
Allow the spackle to dry. To be safe, give it at least two hours to set.
After the spackle is dry, sand it down with your fine-grit sandpaper. The goal is to get the spackle to be completely flush with the wall. Be careful not to press too hard when you’re sanding so that you don’t accidentally over-sand and cause a dent in the surface area of the spackle. If you do sand off more than you mean to, add a bit more spackle, smooth it out, let it dry, and sand again.
Once you’re happy with the end result of your spackling efforts you can get to work painting the area. Use a small paintbrush so that you can carefully control where the paint goes.
The process for how to fill nail holes that are a bit larger in size (think ½ inch diameter or larger) is pretty much the same as filling small nail holes, with the added caveat that you’re probably going to want to add some reinforcement by means of adhesive-backed fiberglass mesh tape. Here’s how to do it:
 If it still doesn’t fully cover the mesh, apply a third coat.
If you only have a couple tiny nail holes to fill then it might not be worth buying an entire container of spackle. Fortunately, there are a few different ways to DIY it.
Use baking soda. Make a paste by mixing a half-tablespoon of baking soda with white glue until it turns into a pliable paste. Use a plastic knife to apply the paste to the hole and smooth it out, and allow to dry fully before sanding.
Make a play-dough inspired filler. This recipe has you following a traditional homemade play-dough formula, with a little twist. Mix together four tablespoons of white flour with one-third tablespoon of salt. Then turn the mixture into a paste by slowly adding in paint, primer, or varnish. As an added bonus, you can use the paint color of the wall as your mix-in so that the homemade spackle blends in right away.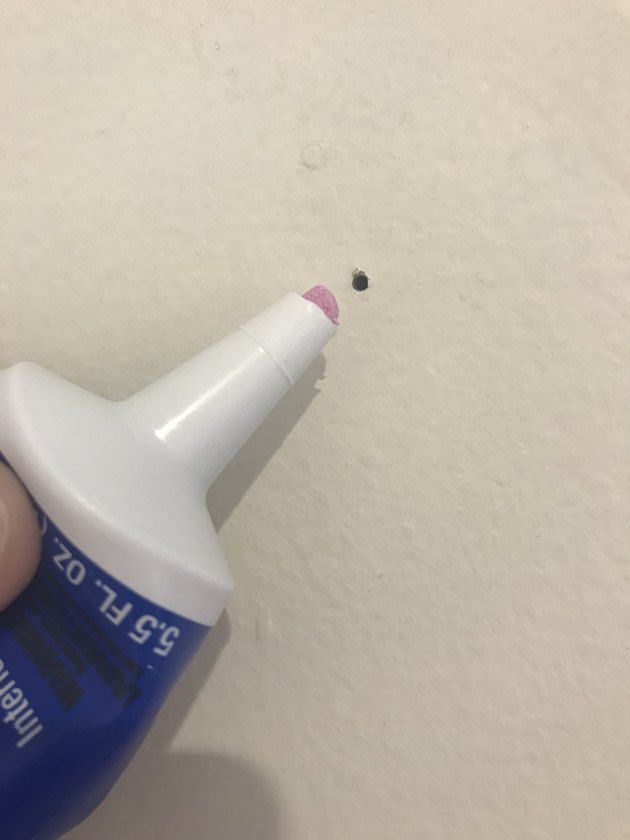
Use toothpaste. Yep, you can use toothpaste to fill a small nail hole, just go for the white paste kind. It might not be quite as solid as other DIY methods, but it will work in a pinch, particularly if you’re a renter trying to fill nail holes before your landlord comes by.
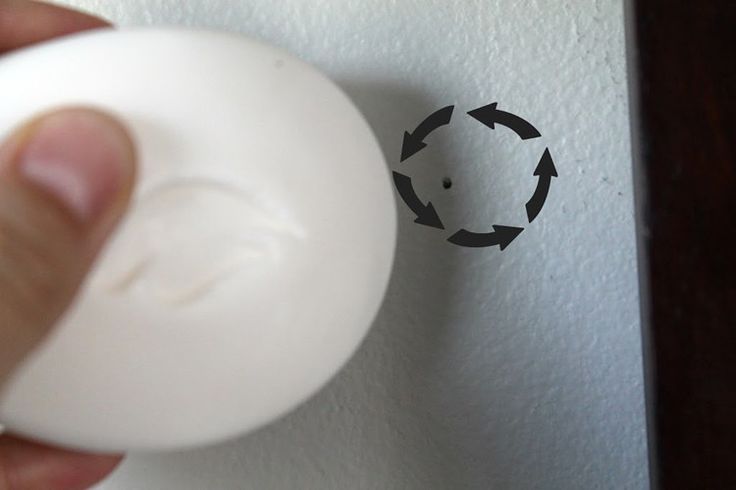
Use a bar of soap. Here’s another do-it-yourself option that won’t provide a permanent fix but will serve as a quick way to fill in tiny holes. Take a white bar of soap and rub it over the hole to fill it in. Use your finger or a dry rag to wipe away any excess in the area surrounding the hole.
Keep in mind that all of the above options will get the job done, but they’re not going to look quite as nice as professional spackle will. However, if you’re concerned more with getting the nail hole filled than providing a long-term solution, then any of these options should work for you just fine. Just be wary that they might not work on nail holes that are bigger than 1/8 inch in diameter.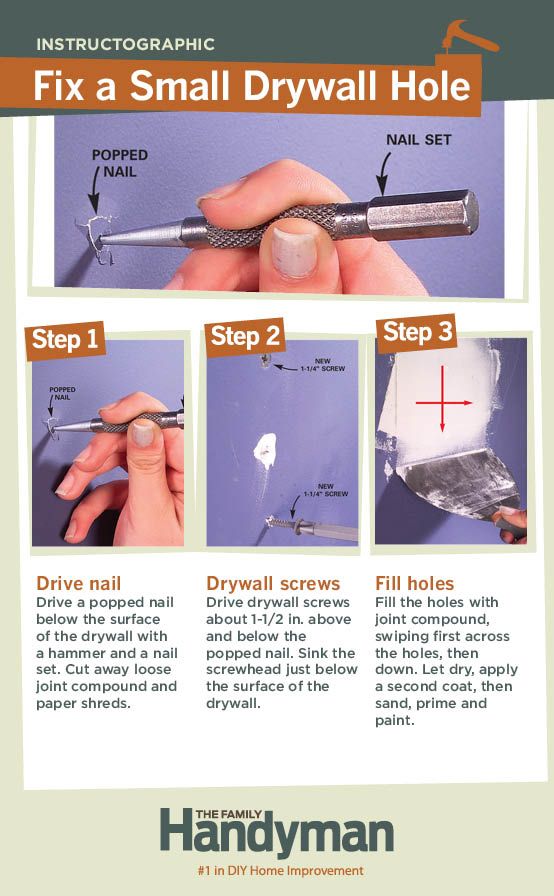
Whether or not you decide to paint over your filled nail hole is up to you, but aesthetically you’re probably going to want to do it if you’re spackling over a hole that is highly visible or on a non-white wall. To keep costs down and limit waste, go to the hardware store and inquire about getting an 8 ounce paint sample instead of buying a full jar. Snap a picture of the wall in natural day light so that you can be sure to get a shade that’s a perfect match—or at least as close of a match as possible.
Rather outsource this task to the pros? Check out our article on 8 ways to find a home service provider and bring someone in to fill those nail holes for you.
Photo: hydetools.com
If you’re reluctant to rearrange the pictures on your walls because you dread dealing with the nail holes left behind, you’re in good company. Filling nail holes can be challenging, particularly if you’re trying to completely erase any trace of the fasteners. Those dimples left by well-intended spackling jobs can haunt us long after the gallery wall comes down. But take heart: With the right tools and techniques, you can have seamlessly smooth walls once more—and you’ll never again fear relocating pictures, calendars, clocks, or even wall-mounted shelves.
MATERIALS AND TOOLS Available on Amazon
– Spackling paste (for nail holes in drywall)
– Wood filler compound (for nail holes in wood)
– 220grit sanding block
– 2” putty knife
Prepping properly before you even start spackling is key to removing all traces of former holes. When you hammer a nail into drywall, some of the chalky gypsum material inside the drywall panel is displaced and has a tendency to push outward, forming a small ridge around the nail hole. Wood, on the other hand, has a tendency to splinter a bit around the nail. In either case, if you simply fill the nail hole, the area might look smooth to the eye for now, but the bump will stick out like a sore thumb once you paint it.
To prepare the surface, lightly swipe a fine, 220-grit sanding block over the nail hole to sand away ridges. Work in a circular motion over drywall. When sanding wood, however, always sand in the direction of the wood grain to keep from leaving cross-sanding marks.
Need a hand?
Receive free, no-commitment project estimates from qualified pros near you.
Find Pros Now
+Photo: hydetools.com
STEP 2: Choose the right hand tools.For a small-scale spackling job, you’ll need to select a putty knife with a little bit of give in its blade, like HYDE’s 2” SuperFlexx Stainless Steel Putty Knife. The slight flexibility facilitates easy spreading as you pull the spackling over the hole. The bottom section of the blade glides at an angle along the wall surface, helping to push the compound into the hole and reducing the risk of scratching the surface with the corners of the blade (which can happen if you’re using a rigid blade). Plus, the tool’s stainless steel is impervious to rust.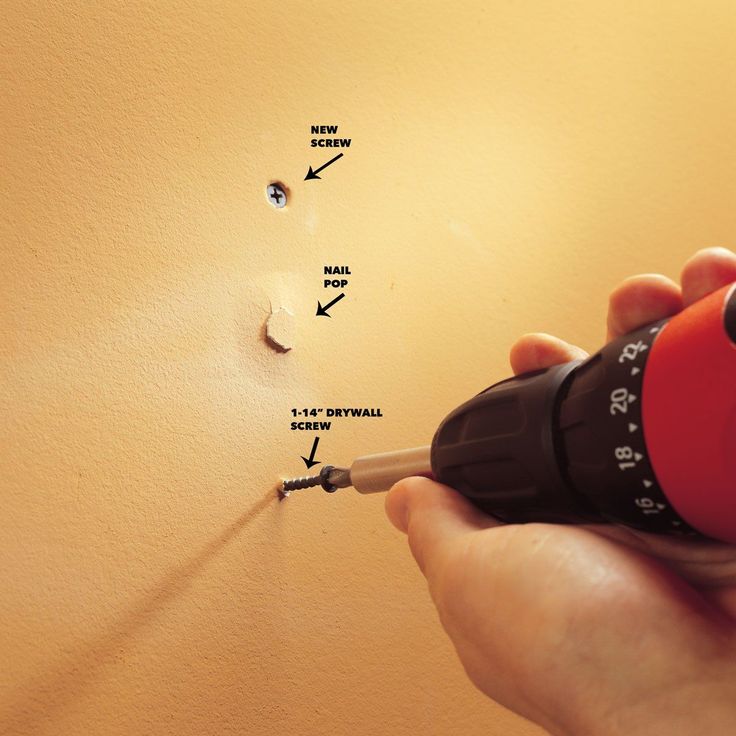 In fact, if you neglect to wipe it down immediately after the job, simply give it a small bend, and any dried leftover compound will fall right off.
Advertisement
STEP 3: Select and spread the compound.Though similar in application, different patching compounds are formulated for use on different surfaces. Make sure you select the right one for the job.
Once you’ve selected an appropriate product, scoop up a roughly dime-size dollop of spackling paste or filler, and smooth it across the nail hole using the 2″ SuperFlexx Stainless Steel Putty Knife—not your fingers, however tempting that may be. Smoothing with your hands will leave the spackled hole with a slight depression because your digits are not perfectly flat.
The best method involves two swipes: one either sideways or downward to fill the hole with compound, followed by a second swipe back in the opposite direction to wipe away the excess. If you find that your second swipe across the nail hole leaves streaks of spackling paste on the wall or wood, you’ve probably used more paste than necessary; take note and scoop up a little less the next time.
Once the spackling paste has dried completely (the time varies by brand), lightly sand the area with a fine-grit sanding block. Remember: Move in a circular pattern when sanding drywall, and follow the grain when sanding wood.
Advertisement
STEP 4: Apply a second layer of compound.Some spackling and wood filler compounds shrink more than others, but it’s difficult to see the shrinkage until the wall has been painted. For that reason, it’s best to apply another thin layer even if you think the first application filled the hole completely.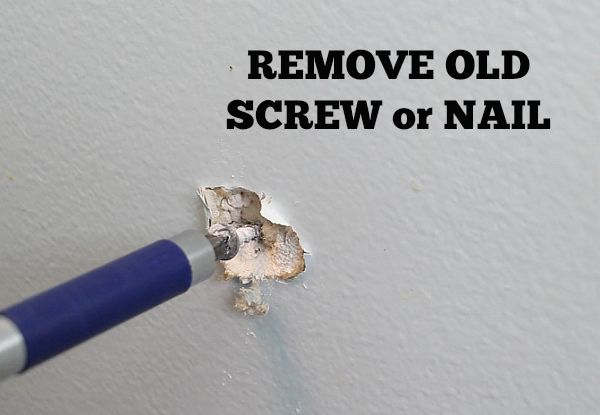 Follow the same two-swipe method described in Step 3, then let the compound dry for the recommended amount of time.
Note: Some spackling paste is advertised as “paintable when wet,” but it’s best to err on the side of caution. If you don’t give it a chance to dry, you can’t sand it, and without sanding, you can’t be sure the wall is completely free of leftover bumps or depressions that would draw attention to your spackling job.
STEP 5: Prepare for paint with one last sanding.Lightly sand the area around the hole to eliminate any excess compound from your second application, and then inspect the hole itself. The paste should only fill the hole and not extend past its edges. If you see extra filler, take care of it with some spot sanding; otherwise, you’re all set! Paint the drywall or wooden surface, and forget about those holes for good.
Need a hand?
Receive free, no-commitment project estimates from qualified pros near you.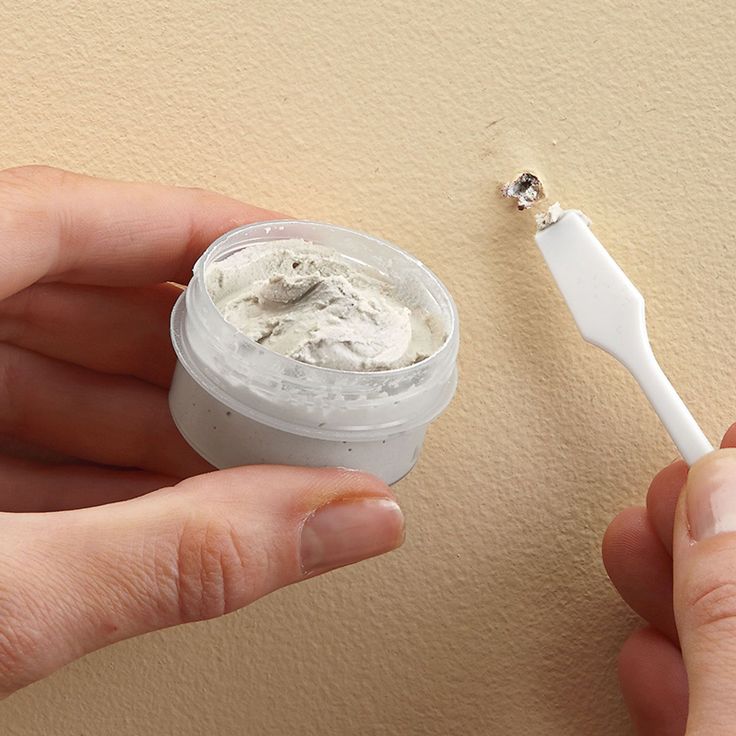
Find Pros Now
+September 10, 2021
Lunula is a light strip at the base of the nail, which can tell a lot about human health. It can be of different colors and sizes, indicating the presence of certain problems with the internal organs.
Each person's body is individual. You should not evaluate the state of your health solely by the shape, size and color of the lunula. However, it is an important “marker” that will give a signal if some kind of failure occurs in the body.
There are several main signs indicating certain health disorders:
Uneven color of the lunula, its blurry shape
Spots of white or yellow color on the nail plate
Furrows, “hills”, irregularities on the nail plate
Absence of lunula
Nails reflect the state of human health - this is a fact. Their appearance is directly affected by lifestyle, the presence of bad habits, nutrition. For those who are on strict diets, the nails suffer in the first place: they become brittle and thin. Also, problems with the strength of the nail plate can be a sign of abnormal liver function. Most chronic pathologies negatively affect the condition of the nail, manifesting itself as a change in its shape, increased fragility or, conversely, excessive thickness of the nail plate.
 In some cases, the absence of lunulae is the norm. In some people, this phenomenon is observed from birth, in others they disappear with age. Everything is individual - the state of the holes is affected not only by lifestyle, but also by genetic factors.
Many pathologies are asymptomatic - until serious complications make themselves felt. Therefore, it is worth regularly inspecting the lunula for deviations: this way you can respond in time and undergo a comprehensive examination.
Here's what lunulas can say about a person's health:
In ancient medical treatises, it was repeatedly said that just by looking at the lunula, you can learn a lot about human health. In Japanese medicine, it is believed that massage of the fingertips on the palms can positively affect various human organs and systems. Let's see what each finger is responsible for:
 A reduction in the lunula on the thumb is often observed in heavy smokers, as well as in people with mental disabilities.
 Lunula color can also tell a lot about a person's health. So, the shade of the hole can be as follows:
The size of the lunula is no less important than the color and shape. There are several features here:
Lunula monitoring is one of the easiest and surest ways to keep track of your health. If you notice any changes, do not postpone a visit to the doctor. Modern medicine has great potential: the vast majority of pathologies in the early stages are successfully treated conservatively. Pay attention to such nuances!
Tools and materials " even ":
Degreaser (gel cleaner),
Lint-free napkins,
Sanding block (white),
Sanding block (orange)344,
Silk gel,
Silk, self-adhesive strip, 90 cm long,
Silk scissors,
File black boomerang 100/180
file boomerang white 100/180
Manicure sticks
clean up the surface of the nail in places of fracture white and orange buff.
Degrease the nail in places of fracture, using a degreaser and lint-free wipes.
Apply gel to crack and stretch it with a manicure stick on the surface of the nail in the area break.
cut with scissors from silk a small patch of such size to cover the crack and a small surface of the nail in the area break.
Apply again on a silk patch gel and stretch his manicure stick on the surface patches. Let it dry.
Sand down glued surface with a file 100/180 or buff.
Lint-free napkins,
Remover varnish without acetone (Polish Reamover non aceton),
Degreaser (gel cleaner),
base for varnish (Protect base coat),
Quick dry lacquer fixer (Quick Dry),
artistic tassel.
With the help of lint-free napkins (because they do not leave lint on the nail plate) and liquid for nail polish remover (without acetone) remove from remnants of old nail polish.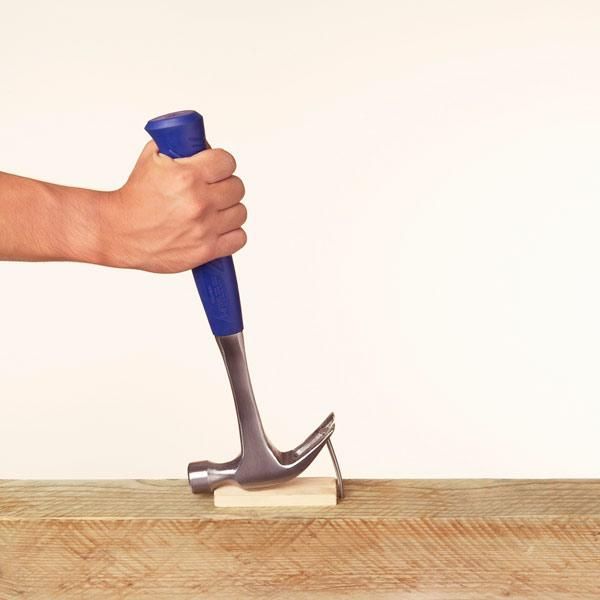
Soaked in liquid nail polish remover cotton swab , wipe once again well nail holes.
If on nails small foreign particles remain then to clean your nails use special degreaser , because they can greatly worsen the effect smooth lacquer finish.
Degreaser ( Gel cleaner ) - a special composition that is used to remove excess moisture from nail plate. Ignore the dryer not worth it.
Apply Foundation for natural nails.
There are three base type:
The basis that performs protective function;
The basis that performs healing function;
The basis that performs clutch function.
To cut drying time of the varnish, should be applied its thin layers with a break for drying.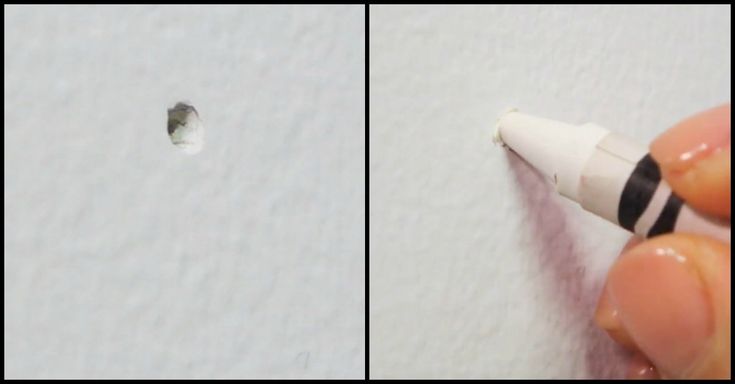
Before execution manicure ask the client to choose varnish and, after that, shake the bottle with the chosen varnish. Some masters shake the varnish before using it. This should not be done, because it contributes the formation of unwanted, air bubbles. Experienced craftsmen achieve homogeneity of the varnish by rolling bottle in the palm of your hand. The bubbles will subside while you prep your nails.
Applying varnish.
To take off excess varnish from the brush in front of it application, take it out of the bottle in a circular motion at the same time pressing against the inside of the neck. When the brush appears on the surface , swipe it again on the inside side of the neck, as if slightly squeezing , then the entire varnish will remain only with one side of the working part of the tool.
Place the tip brushes in the middle of the nail, just below cuticles, and swipe until loose edges of the nail plate.