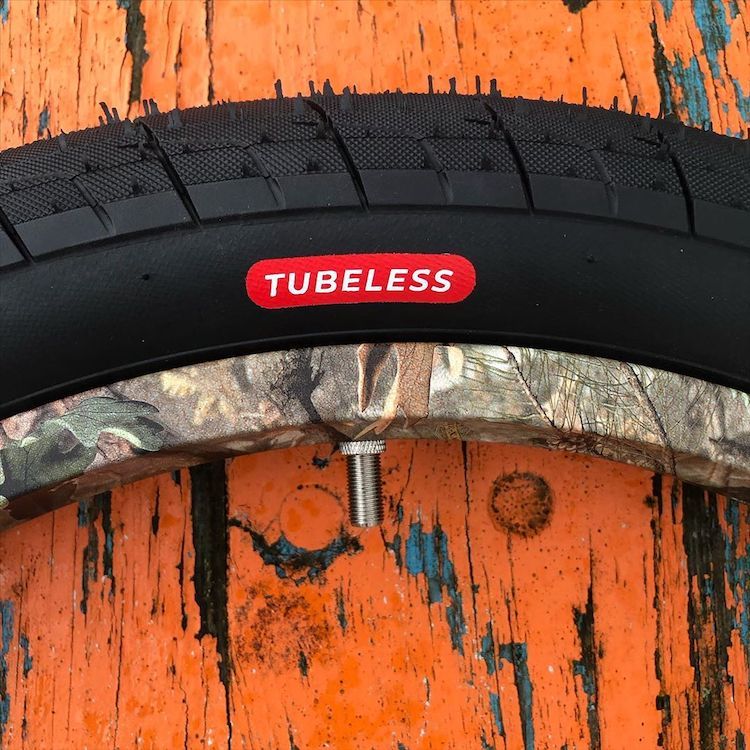
Tubeless systems have been around a few years for mountain bikes with obvious benefits. Without inner tubes, there is no need to worry about dreaded pinch flats which occur when the tube is pinched between the ground and the rim. And, without worrying about pinch flats, you can run much lower tire pressure which means better traction. Not to mention, if you do get a thorn in your tire or a small tear from an encounter with a rock, the sealant inside your tire can save you from getting a flat.
Now that tubeless has entered the world of road cycling, what are the benefits?
So, what are you waiting for? Ready to go tubeless?
Learn more about Giant Tubeless Wheel Systems and additional helpful How-to Information here.
1. Ensure your tires and rims are tubeless-ready. Don’t worry, it should say so right on the label!
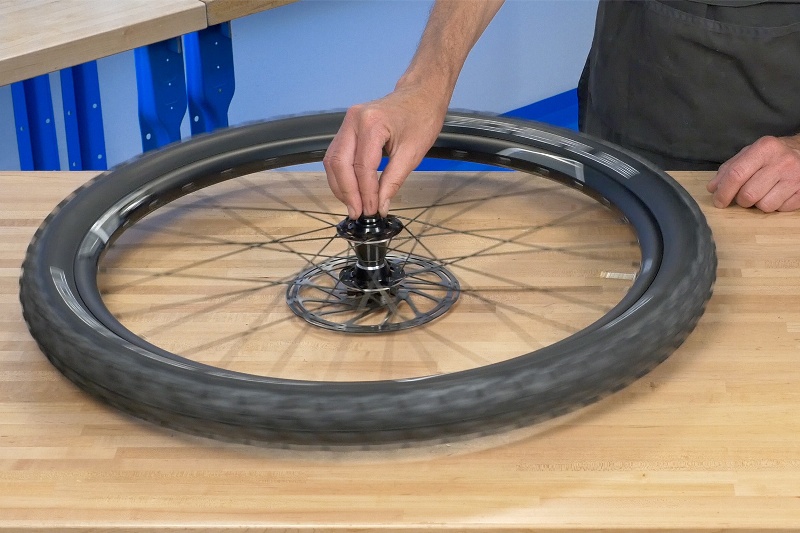
2. Remove your wheel from your bike.
3. Remove the tire and tubes from the rim. Check out our Fix-a-Flat guide for tips on removing your wheel, tires, and tubes.
4. If your rim is wrapped with a plastic rim strip that is not tubeless compatible, remove the rim strip.
5. Tape rim using tubeless-specific rim tape.
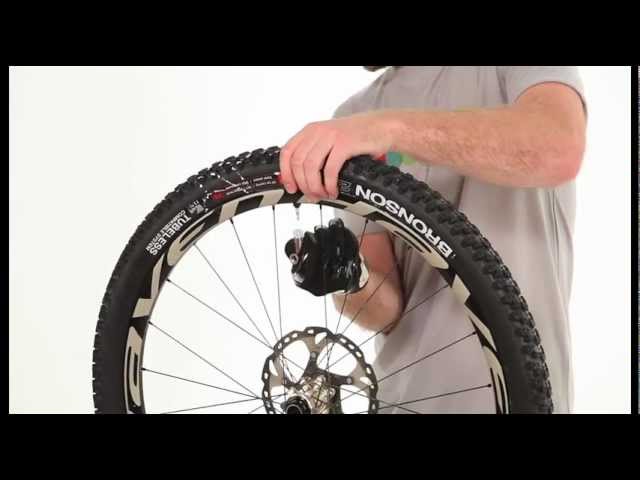
6. Using a metal pick or a small Phillip’s head screwdriver, poke a hole where the valve stem will be inserted. Be careful not to make this hole too big.
7. Insert tubeless valve stem into the valve hole and secure using plastic O-ring and washer provided.
8. Put the tire on the rim. If the tire is directional, make sure it is on correctly. Get more tips on how to change a tire by checking out our Fix-A-Flat Guide.
9. Insert recommended amount of tubeless sealant into the tire.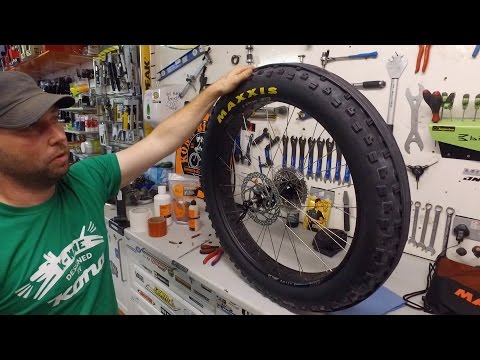 There are two different ways of doing this:
10. After the tire is mounted completely onto the rim with sealant inside, roll the tire on the ground to disperse the sealant. Pull the bead of the tire to the edge of the rim, if possible.
11. Inflate the tire! The best way to get the tire to seal is to add air as quickly as possible. That is why using an air compressor is the best method. If you do not have access to an air compressor, use a charger pump, like the Giant Control Tank Tubeless Inflator.
PRO TIP: Are you using an air compressor or tubeless inflator system and still having trouble getting your tire to inflate? Try removing the valve core on your tubeless valve. This will allow air to enter your tire even faster than it would through the valve. Just be careful once you remove the inflator nozzle from the valve since all the air will rush back out of the tire! Be ready with your finger to hold the air in and quickly replace the valve core with your tool.
12. After the tire is inflated and the bead is seated, bounce the tire on the ground. This will help disperse the sealant inside of the tire.
13. Replace your wheel and take your bike for a spin. Riding your bike right after setting the tires up tubeless will ensure a good seal.
14. You did it!
*If your tires are already set up tubeless and you are just changing to new tires, disregard steps 5-7. Remove any old sealant with an absorbent cloth and check your rim tape for damage before putting the new tire on.
*Over time, the sealant inside your tires will dry up and stop protecting you from pesky flats. Hot/ dry climates will cause the sealant to dry up faster. Check your sealant levels by shaking the wheel while it is off the bike. You should be able to hear the sealant sloshing around inside. If you can’t hear anything, you need to add more sealant! Otherwise, check your levels/ top off your sealant every 30 days.
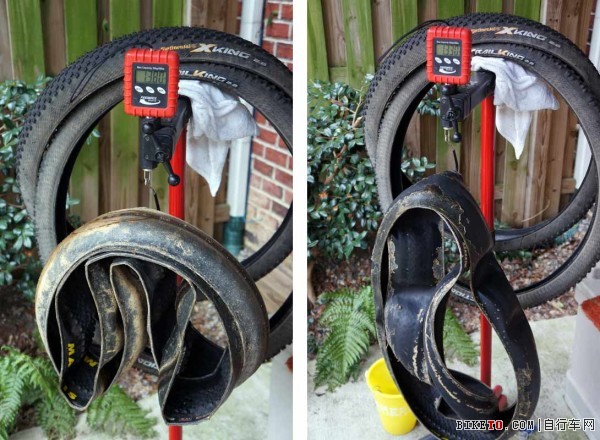
Tubeless tires have eliminated the risk of pinch flats. For riding in really rough terrain, they are a game changer. But like all new technologies, it’s taken some trial-and-error until we figured out how to run bicycle tires tubeless.
Of course, tubeless tires are nothing new. Car tires have been tubeless for decades, but translating that technology to much more flexible and lighter bicycle tires has not been easy. (We don’t want to ride on rubber that’s as stiff and heavy as car tires!) Modern bicycle tires fall into two groups:
 The sealant also will seal small punctures that otherwise would cause a flat. Most Rene Herse tires are ‘tubeless-compatible.’
Key to mounting tubeless tires is the right technique. This is especially important with supple tires. Stiff tires mount easily – just like car tires – because their casing is so stiff that it either touches the rim walls and seals, or it doesn’t.
Supple casings make tires fast and comfortable because they flex easily. This means that they may contact the rim in a few places, and have air gaps in others – making them harder to mount and seal tubeless. They follow the general rule of high-performance components: The tolerances need to be a bit tighter, and working with them requires a little more skill.
It’s not hard to install supple tires tubeless, if you work methodically. Here is how I installed my Rene Herse Extralights tubeless while traveling in Japan, with no access to a workshop and just a few tools.
To mount a tire tubeless, here is what you need: a tubeless valve; a valve core tool; a syringe for injecting the tubeless sealant; sealant; a tire lever; an inner tube; a tubeless-compatible tire. Your rims also must be tubeless-compatible, and covered with tubeless rim tape. It’s good to have extra rim tape on hand.
I only could find Stan’s sealant in Japan. It worked fine, but we recommend SealSmart because it does a better job sealing the slightly porous sidewalls of supple tires.
You also need a pump to inflate the tire. A floor pump suffices, and in a pinch, you can get away with a frame pump. You do not need an air compressor. In fact, if you use an air compressor to make up for problems in tire/rim fit, your tire may blow off the rim later without warning.
For safe tubeless installation, a good fit between tire and rim is extremely important. Unfortunately, many OEM rims are slightly undersize, because that makes it easier to install tires in the bike assembly plants. (Imagine a rim that is slightly oversize. For a factory that needs to mount 10,000 tires a month, spending five extra minutes per tire would be a total disaster.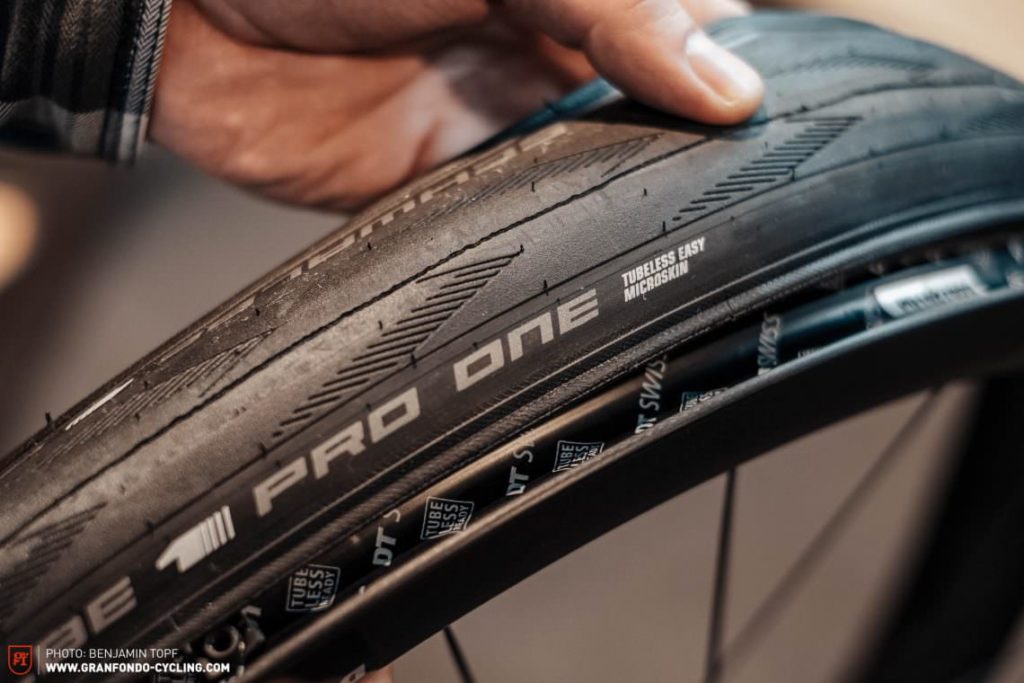 That is why OEM rims tend to run small, and never should be larger than spec. OEM tires are installed with tubes, where a slightly undersize rim doesn’t pose a problem.)
If your tire goes on easily, the rim is undersized. Don’t try to install the tire. It may work fine at first, but it can blow off the rim without warning. If this happens in your workshop, it’s just a nuisance (and a big mess). If it happens on the road, the consequences can be far worse.
If your rim is undersize, it’s not the end of the world – there is a solution. Build up the rim bed with additional layers of rim tape. Some mechanics use Gorilla Tape for the extra layers – it’s a little thicker than standard tubeless tape. (Always use tubeless tape as the first layer on the rim to seal the spoke holes.) The tire should be a slightly tight fit. This makes sure that it seats correctly and doesn’t blow off the rim later.
Before you mount your tires, inspect your rim tape. It needs to make an airtight seal with the rim. If you have any doubt – if there are gaps, wrinkles, or if the tape is folded over – replace it. Wipe the rim with alcohol to remove oils and other residue from the manufacturing process. When you install new tape, first push it onto one shelf, then into the well, and only then onto the second shelf. This ensures that the tape goes on straight and centered. It’s hard to overstate how important this step is: Many ‘leaky tires’ can be traced to a poor seal between the rim tape and the rim – and then the air escapes through the spoke holes to the inside of the rim.
When installing tires, make sure that the bead is in the rim well (above) all around before you lift the last part of the bead over the rim edge. The well is there to provide slack for the bead – the rim’s diameter is smaller in the center than toward the rim walls. With supple tires and tubeless rims, parts of the bead can end up on the shelf when you mount the tire. Push the bead into the rim well all around the tire – then the last bit of the bead will slip easily over the sidewall.
We recommend installing the tire with a tube first. The tube pushes the rim tape into place and makes sure it adheres properly to the rim. This prevents sealant from seeking between rim and tape and dislodging the tape. Then air can escape through the rim’s spoke holes… (Also make sure to wipe off the rim with alcohol before installing the tape to remove all oils and residue from the manufacturing process.)
If you use a floor pump to seat the tire, the tube also seats the beads and gives the tire its shape. Make sure both beads pop into place. Then unseat one bead (the one that popped into place first) by pushing it into the rim well, and remove the tube.
Install the tubeless valve. Don’t forget the valve nut that holds the valve in place. It pulls the valve’s rubber cone into the rim’s hole to create a tight seal. Don’t overtighten the nut: If the valve gets clogged with sealant or the tubeless setup fails, you’ll need to be able to remove the valve on the road to install a tube.
Before you inflate the tire, seat the bead as far around the rim as possible, starting at the valve.
Pull the tire upward and move the bead outward, until it sits on the shelf next to the rim wall.
Continue until the tire is too tight to pull upward. The remaining air gap is small and furthest from the valve. It will seal as the pressure pushes the tire outward.
Inflate the tire ‘dry’ without sealant at first. That way, if you need to remove the tire to add more rim tape, there won’t be messy sealant inside. Pump quickly to build up pressure faster than the air escapes.
Watch the tire as it seats. On the left, the line molded into the tire sidewall is still hidden by the rim wall. The bead hasn’t emerged from the rim’s well yet. Keep pumping until you hear a loud ‘pop’ as the tire seats.
On the right, you can see all of the line that is molded into the sidewall. Make sure it’s parallel to the rim edge all around the tire. Check this on both sides. If it’s OK, then the tire is seated on the rim.
If the tire doesn’t seat, take it off, and add more rim tape to create a tighter fit and smaller air gaps. If you use an air compressor, the tire should seat easily. If you need huge blasts of air to seat the tire, then the rim is too small. Build up the rim with extra tape, rather than risk a blow-out in the future.
Now the tire is inflated and looks great, but air will escape through small cracks and microscopic holes. To seal the tire, add sealant. Let out the air and unscrew the valve core. The beads will remain seated. (If a bead comes unseated now, it wasn’t properly seated in the first place.)
Turn the wheel so the valve is neither at the top nor at the bottom of the tire, where sealant would spray back out of the valve. Shake the sealant vigorously for a minute, so the solids are in suspension. Don’t skimp on this step! Otherwise, you’ll just inject colored water into the tire, and it won’t seal.
For our Rene Herse tires, we recommend Seal Smart sealant. It seems to seal the supple sidewalls better than other brands. When mounting the tires in the photos, I was in Japan, and the Seal Smart sealant had not yet been released. I couldn’t find our second choice, Orange Seal. So I used Stan’s. It worked fine.
Make sure to use enough sealant. Wide tires have a lot of surface area. To seal properly, you need about 90 ml (3 oz) – one to one-and-a-half of the little bottles shown in the photo.
Replace the valve core. When I installed the tires tubeless in Tokyo, I didn’t have a valve core tool. A small adjustable wrench will do the job in a pinch.
Inflate the tire again. Since it’s already seated, this will be easy.
Close the valve. Now the tire looks ready to roll, but the sealant must still be distributed to seal all the microscopic gaps. Just riding the tire isn’t enough to stop all the tiny leaks.
There are different techniques for distributing the sealant.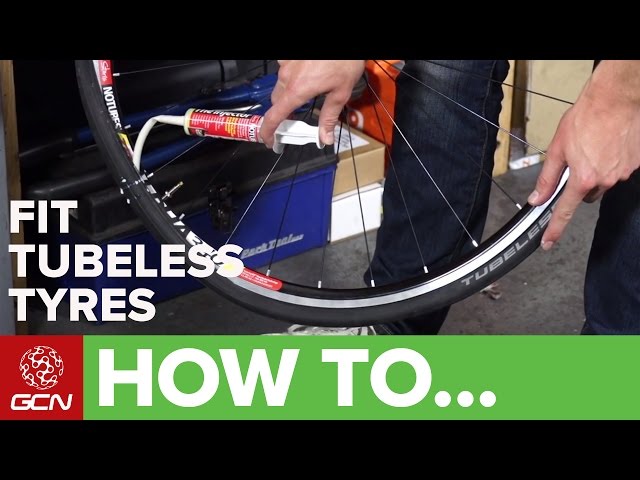 I’ve found this one to work best, because it methodically works the sealant into every part of the tire and rim interface. Make sure you have enough room. Don’t hit the ceiling, furniture, or your head. (Don’t ask how I know!)
Hold the wheel steady (left), so the sealant collects at the bottom. Quickly move the wheel upward (center). Centrifugal force will keep the sealant right under the tire tread. Hold the wheel over your head (right), still slightly tilted away from you. Now the sealant runs downward, covers the sidewall, and seeps into the gap between tire and rim.
Rotate the wheel a few degrees and repeat. (Start with the valve at the bottom, so you have a reference point.) Once you’ve worked all the way around the tire, turn the wheel around, and repeat on the other side. Now your tire is ready to ride. Go for a ride immediately, even if it’s just a few times around the block. This will help distribute the sealant further.
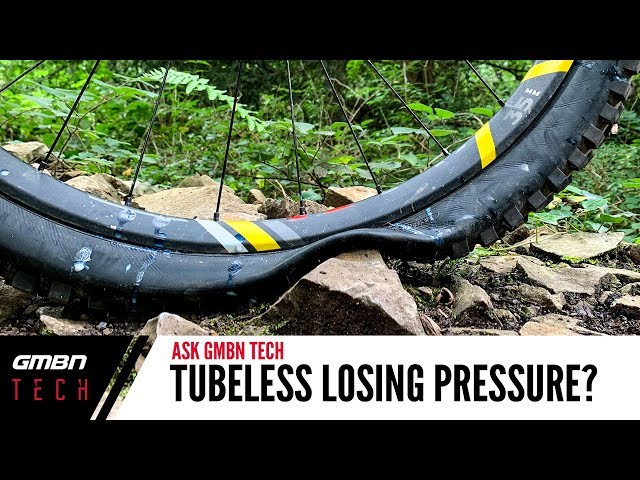
If your tire loses air overnight, check it like a leaky inner tube. Often, you can hear and feel the air escape. Hold the tire so that gravity pulls the sealant into the leak. If it doesn’t seal, there may not be enough sealant in the tire.
Now your tubeless tire is ready to roll. Enjoy the ride!
Tubeless tips:
 If the sealant dries out, air will start leaking. Then the tire can suddenly break loose from the rim wall and lose all its air. Don’t ride your tires when there is no liquid sealant left inside – the sealant not only acts as flat protection, but it constantly seals the tire against the rim.
Click here for more information about Rene Herse tires.
A tube tire for a passenger car consists of a tire and a tube with a valve fitted with a cap or key cap.
The chamber is an annular closed rubber tube with a rubber-metal valve. It is made of elastic rubber and serves only to hold compressed air.
Chambers operate under severe conditions, experiencing alternating deformations at high temperatures. Therefore, rubber for cameras should be airtight, elastic, resistant to thermal aging, not change their physical and mechanical properties at different ambient temperatures. The size of the chamber must strictly correspond to the size of the tire with which it is completed.
If we are talking about tires for passenger cars, tube tires are now a thing of the past. Foreign manufacturers have abandoned tubes, and now only tubeless tires are on the market. Cameras can be seen on domestic tire models, but not on all. Everything goes to the fact that cameras will soon become history.
A tubeless tire differs from a conventional one - it has a sealing layer 1.5...2.0 mm thick, which is vulcanized to its inner surface. It is made from a mixture of natural and synthetic rubbers with reduced gas permeability.
The tire beads are provided with a sealing rubber layer, which provides the necessary tightness in the area of the beads landing on the wheel rim flanges. This is facilitated by the special design of the tire beads, designed to increase the angle of inclination of the toe of the bead and the increased tightness of the beads on the landing shelves of the rim.
For tubeless tires, plug-in rubber-to-metal valves (rice) are used, which are installed in the valve holes of the rim with a tight fit.
Advantages of tubeless tires:
The main advantages of tubeless tires compared to tube tires are:
 ..12% more mileage, which is achieved by better temperature conditions due to increased heat transfer from the tire to the rim and the stability of the internal air pressure in the tire, as well as the absence of friction between the tire and the tube;
 Attention:
At the same time, the use of tubeless tires requires careful mounting and dismantling. Damage to the bead flanges, especially steel ones, can lead to depressurization of a tubeless tire. If a tire is damaged, it must be repaired by specialists using equipment designed for this purpose.
In case of loss of pressure, do not drive with a flat tire. this will destroy the hermetic layer.
The tube is not inserted into the tubeless tyre. At first glance, you increase the strength of the tire, in fact, an air cushion is formed between the chamber and the pressure layer, contributing to the destruction of the latter. If the load on the wheel is increased (for example: a sharp turn), the wheel may break.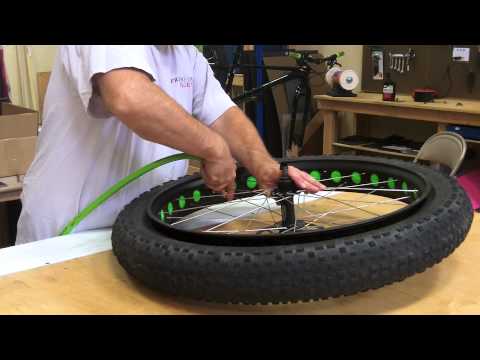
There are complaints about tubeless tires due to weak sidewalls. I would like to say that this is not so. There are no perfect tires. The manufacturer seeks from the tire not only durability, but also comfort when driving. It is the softness of the sidewall that gives a feeling of smoothness in movement. Having made a rigid sidewall, we will be able to jump on curbs and sewer wells on our car; when driving on a flat and good road, we will feel uncomfortable.
| Tire labels - how to read? From November 1, 2012, tires sold in countries within the European Union must have special stickers. They contain information, in particular, about the fuel.. July 11, 2022, 11:34 | |
| Causes of tire wear Tire wear is often the result of too much speed at which we move.  However, there are many more factors influencing this process. Tire condition during .. However, there are many more factors influencing this process. Tire condition during .. 04 July 2022, 11:58 | |
| What is the minimum tread depth allowed? The tread of a tire is sometimes analyzed in terms of appearance and shape, modern technologies implemented by the manufacturer, or performance in winter conditions. However, the key parameter of tires in.. June 23, 2022, 10:06 | |
| Tire deformation and side ties. What to do with them? One of the remarkable and main features of the structure of the inner part of any tire is the threads that make up the cord. For quite a long time they have a radial location at.. June 08, 2022, 10:21 | |
| Wheel alignment - do I need to change tires? If your vehicle behaves on the road, it may mean that you need to replace suspension components, steering system, wheels or tires.  For this may.. For this may.. 07 April 2022, 15:47 | |
Tubeless tires are gaining more and more popularity in the automotive industry. They were able to take 85-97% of the retail sales of rubber for modern vehicles. Therefore, it is important for car owners to know the distinctive features of tubeless skates and how to choose the right tire among a wide range from various manufacturers.
Content
 Since then, the struggle between the two types of rays began.
 Tubeless and tube tires can be distinguished by the markings on the sidewall. If there is a camera on the tire, there will be an inscription in English Tube Type. Tubeless tires are labeled Tubeless.
The main difference between a tubeless tire is the absence of a tube inside. Tightness is ensured due to the tight fit of the rubber to the rim. To prevent air from escaping, the rim has a shelf, and the tire wraps around it with its rounded protrusions.
The difference between tubeless and tube tyres, when punctured. The hole in the chamber leads to a rapid exit of air. The reason for this is the lack of tightness in the disc rim area. The rate of air escape in tubeless tires depends on the size of the damage. If the puncture occurred with a nail or screw, then the slope will be blown away very slowly. The jamming of a foreign object acts as a plug. Therefore, with a nail driven into a slope, you can continue to ride only occasionally pumping up the wheel.
Modern tubeless tires have a complex structure. The developers are experimenting with the tread pattern, trying to endow the slope with certain performance characteristics.
A tube tire, unlike a tubeless one, consists of two elements: a tire and a tube. The first serves for mechanical protection and provides traction with ice. The chamber is made of elastic rubber and is inflated with air.
A brief overview of the main differences between the two types of tires is given below.
Table - A brief overview of the differences between tube and tubeless tires.
| Criteria | Tubeless tire | Tubed tire |
|---|---|---|
| Puncture safety | High | Low |
| Weight | Depends on design, but usually small | Always higher than tubeless |
| Repairability | Damage dependent | Long, but do-it-yourself |
If there is no marking on the tire, for example due to abrasion, the two types of rubber can be distinguished by the nipple. In a chamber tire, it is smooth and long. A tubeless wheel has a short nipple with a small bead. On a flat tire with a chamber, the nipple can be pressed inward. The tubeless tire does not allow you to dent it. The nipple is rigidly attached to the disk surface, as it directly affects the tightness.
If it is not possible to determine the presence of the camera by external signs, then you can resort to a radical method of checking the wheel. To do this, disassemble the tire. If there is no chamber under it, then the wheel is tubeless. This method should be used only in extreme cases, as there is a high risk of damaging the rim or ramp.
Tubeless tires are currently the most popular use on passenger cars. Also, many trucks and buses have moved away from using tires. Still, the cameras have found their place. They are used on motorcycles, bicycles, scooters, mokiks, mopeds, scooters and quads. They are used in tandem with spoked wheels. The reason for this is the difficulty of ensuring the tightness of a tubeless tire on such a disc.
Trucks and light trucks did not leave the tube tires completely. The reason for this is the installation and pumping features of tubeless wheels.
Representatives of the "Soviet generation" also prefer to install tube tires. The reason for this is the ease of repairing the wheel with your own hands. It is also worth noting that replacing a tube without a tire is much cheaper than restoring a tubeless wheel at a service.
The main advantage of tubeless tires is puncture safety. In the event of a breakdown of the wheel for a long time, normal pressure is maintained in it. In most cases, it is possible to drive from several tens to several hundred kilometers. If you pump up the wheel regularly, then you can drive even more with a puncture.
The absence of an instant drop in pressure in the wheel during a breakdown allows you not to lose control and not get into a traffic accident. Therefore, tubeless tires are widely used in cars and trucks.
Modern tubeless tires are lighter. This allows you to reduce the load on the suspension. It also improves the dynamics of the vehicle.
Tubeless tires are better at dissipating heat to the metal rim because they fit more closely to the rim. Therefore, the rubber heats up and wears out less, and its performance remains more stable.
Easier and faster repair for minor damage. On sale there are special pastes, sprays, corks, tourniquets that instantly solve the problem with a puncture. However, it should be borne in mind that after such a recovery, it is still recommended to contact a service center.
Tubeless tires have no internal friction between tube and tyre. This allows you to increase the service life. Other things being equal, it is more by 10-12%.
Installation of tubeless tires requires special equipment and higher skills from the master. Any damage to the rubber bead or rim can cause depressurization. It should be borne in mind that in this case, subsequent repairs are not always able to restore the wheel.
Tubeless tires often cost a lot of money to repair. The reason for this is the need to use special equipment and the presence of a highly qualified master.
Another disadvantage is the high sensitivity to tire pressure. Prolonged driving with a flat tire leads to the destruction of the sealing layer. In most cases, recovery after this ramp is impossible.
Many tubeless tires have soft sidewalls. Because of this, it is easier to damage it. Repair of such a wheel is very expensive.
One of the main vulnerabilities of tubeless tires is their high sensitivity to rim damage.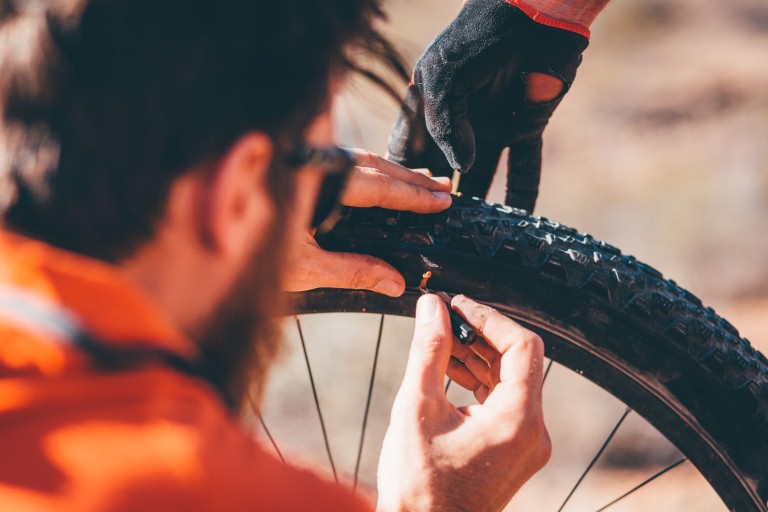 Any small dent after hitting a pothole or hitting a curb will result in a rapid loss of pressure and the inability to continue further movement.
When choosing tubeless tires, the most important thing to consider is tire size. The slopes must be suitable in diameter, profile height and width. Also, attention should be paid to the load index and speed. The first indicator should be 15% more than the expected wheel load. The recommended speed index depends on the driving style and the dynamic characteristics of the machine. It should be borne in mind that one should not strive to buy wheels with an excessively high permissible speed. They can be too stiff and have mediocre grip and increased noise at low speeds.
The second thing to consider when choosing tubeless tires is their season. It is forbidden to use summer tires in winter and vice versa. They differ in tread pattern, sidewall design, chemical composition of the rubber compound and cord.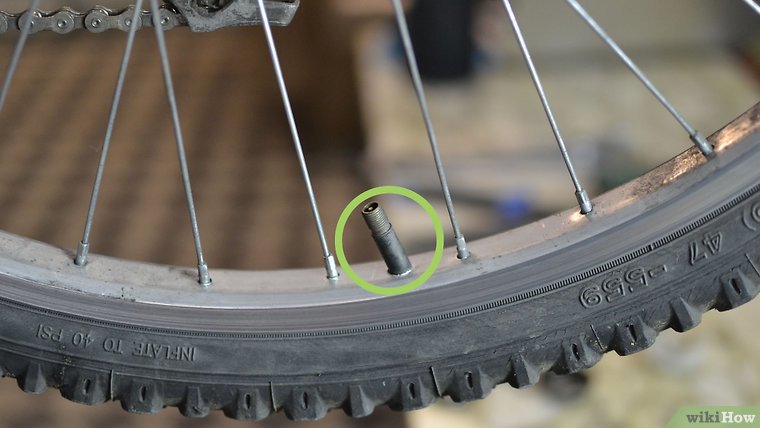
Please note that the tires are of radial construction. Diagonal slopes are being produced less and less, but are still on sale. They are not suitable for urban use.
It is also recommended to pay attention to the tread pattern. The universal option is non-directional. It should be noted that the directional pattern removes water and slush better, therefore it is more relevant for rainy regions.
When choosing tubeless tires, you should also pay attention to the price. Although it is not the main criterion for quality, it can tell a lot. Good tires can't be too cheap.
One of the world's leading tire manufacturers is Bridgestone. Its rubber has a high resource and often wins tests. Another Japanese company, Yokohama, enjoys the same popularity. The slopes of the concern can be found in the basic configuration of many car manufacturers.
One of the oldest brands is Michelin.