All-terrain vehicles improve access to the backcountry. ATVs and side-by-sides excel at carrying people, but their restricted cargo room limits the gear we can haul in, and the meat we can pack out. To better suit my outdoor adventures and projects around my homestead, I needed more space to haul the necessary gear. It was time to build a utility trailer!
Advertisement
In the spirit of any good DIY project, salvaged materials kept my costs down. I used as much repurposed metal as possible to create my ATV trailer. When using old metal, good prep improves weld quality, so I brushed or ground off rust and old paint.
Advertisement
I rate this project as intermediate both for its required skill level and time to complete. To tackle this project, you’ll need access to a welder and a compliment of workshop tools. I chose wood planks for the decking, so a method to cut wood to length helps too. I’m not a welder by training, so there was a steep learning curve.
Nevertheless, using a MIG welder and attention to detail, I achieved ‘professional’ results.
The hardest part of the project was coming up with a design. Plan considerations included trailer purpose, bed size, ground clearance, tires, hitch, load capacity and overall trailer weight. Some of decisions were easy, based on locally available materials – type of hitch, for example. Others crystalized after much deliberation. With my trailer specs and materials in hand, it was time to start cutting.
Advertisement
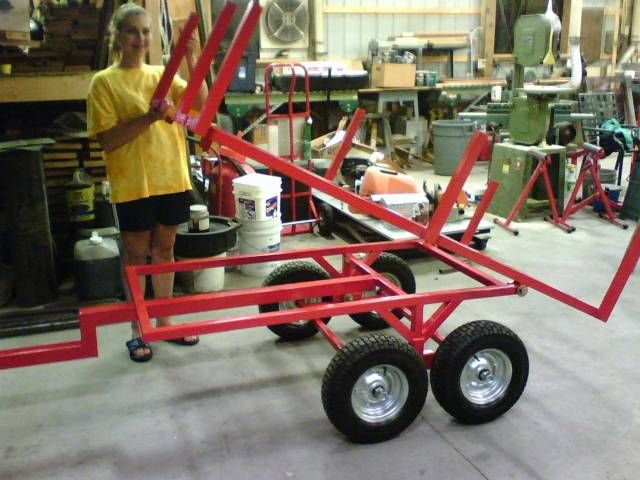
I cut the metal parts with a chop saw, a bandsaw and a special thin cutting blade on an angle grinder – any of the three will work well. The three-foot by five-foot frame was built using one-and-a-half-inch square tubing, which is strong and makes a superb platform on which to mount everything else. Simple butt joints to make neat square corners simplified welding for a beginner. Using two-inch square tubing for extra strength, I welded the tongue at 26 inches, allowing ample clearance between the ATV and trailer, even during tight turns.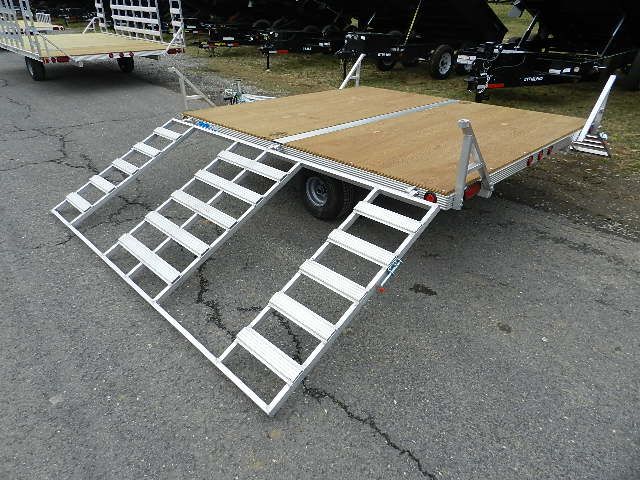 For frame strength and a place to secure the decking, I welded angle iron side to side across the trailer in strategic locations.
The wheel assembly is the most complicated part of this project. An online search returns several suitable ideas, from a simple straight axle with no suspension, to more complex walking axle designs. For me, design considerations included the type of tire. I opted for a standard 14-inch trailer tire and reduced the fabrication process by purchasing a pair of bolt-on equalizer torsion axles for a five-bolt rim. Swapping tire hubs to a four-bolt ATV style will accommodate off-road ATV-style floatation tires. I fabricated the axle supports using angle iron. Using the wheel assembly as a template, I marked and drilled holes to accommodate the bolts.
I used a wire wheel on an angle grinder to clean and rough up the metal surface of the trailer prior to painting. For paint, a rattle-can of spray paint for metal did the trick. To prevent slipping when wet, I plan to add a rubberized rocker guard paint on the tongue.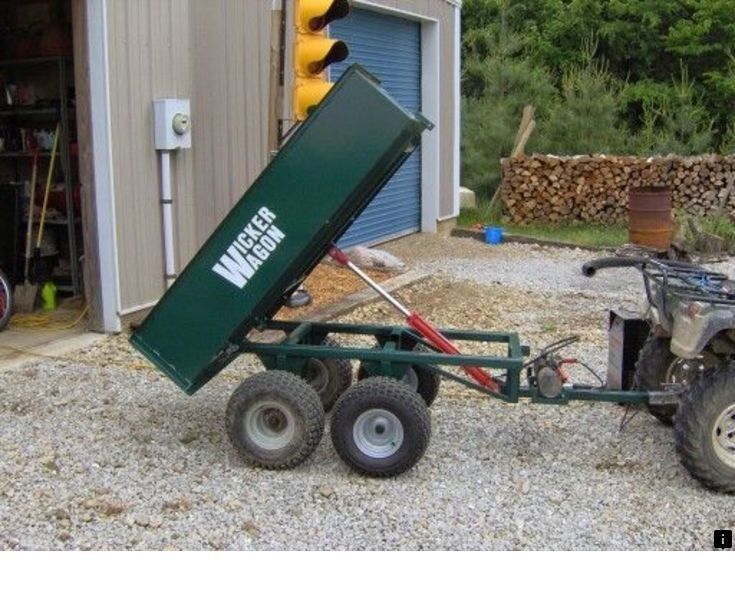
With the trailer still upside down, I bolted the axle assemblies to the frame and installed the tires. My wife and I easily lifted the trailer off the sawhorses and rotated it to sit on the ground right-side up. It wasn’t too heavy, yet!
Next was cutting the trailer decking – I used spruce 2x6s and 2x8s – securing them to the trailer using self-tapping metal screws into the angle iron supports. For longer life, I’ll paint the deck with a water seal. Treated lumber works well too, I just didn’t have any on hand at the time.
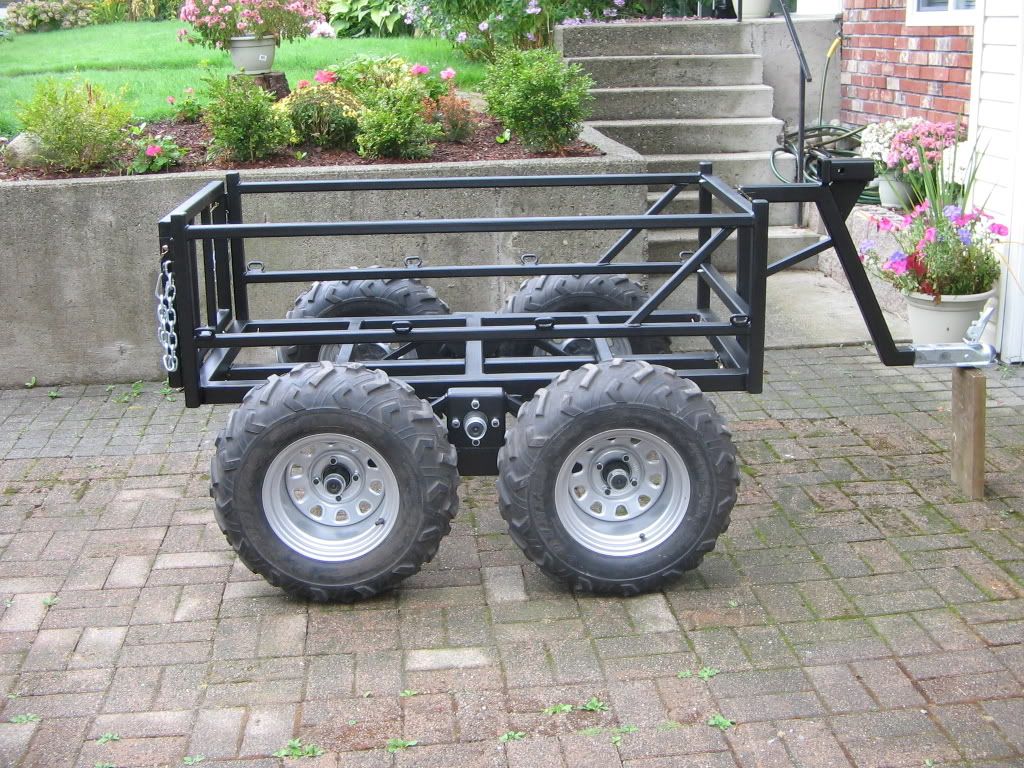
After the trailer frame and deck was built, it was time to focus on the sides. For now, I just needed a cart to haul logs and game out of the field, so I added arms that flare out from the trailer for more capacity. An alternative is quick-detach brackets and modular sides to slide in, to suit your adventure.
The last step was installing a trailer coupler. I used a standard part-store aluminum ball-hitch coupler, simply bolting the basic coupler through the tongue.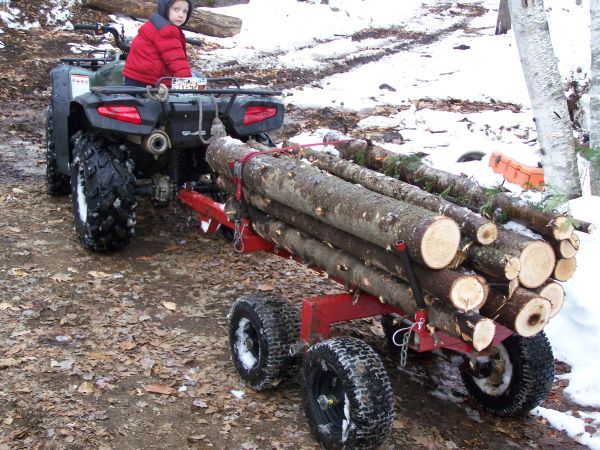 I admit, I do admire the swivel hitch designs for safety considerations in rough terrain – if you misjudge your centre of gravity, your cart can tip without flipping the ATV on its side as well.
I had a great deal of fun researching and building this project. I learned new skills and created something that makes me proud to look at and use. Plus, I now have a custom trailer that is more solid and heavy-duty than most commercially made items of this size. If I wished to get it inspected and licenced, I could use it on the road behind my truck as well.
Have fun choosing your options and building your own utility trailer!
Step 1, plans and parts: I decided on the size, shape and parts specification for the trailer I wanted to build. I scrounged used metal where I could and purchased the parts and materials I needed.
Step 2, layout: Metal parts measured and marked in preparation for cutting.
Step 3, cutting: I used a chop saw to cut most of the metal parts to length.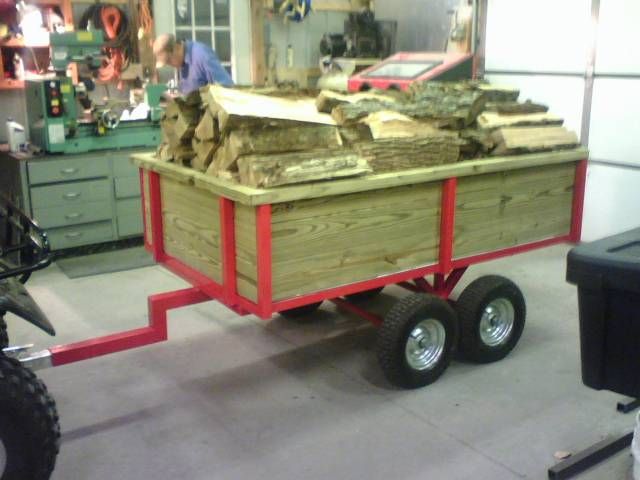 A metal cutting bandsaw is another method for cutting metal parts.
Step 4, metal preparation: Good metal preparation is crucial to good welds, especially when using recycled metal. Here, a wire brush on an angle grinder removes old paint and rust.
Step 5, welding: Magnetic clamps hold the workpiece while welding, keeping everything square. For the perfect fit, the axle assemblies were used as a spacer while the supports were tack-welded into place.
Step 6, painting: After welding the frame, the steel was painted before assembling.
Step 7A, assembly: The axel assemblies were bolted onto the frame supports, followed by tire installation.
Step 7B, assembly: The hitch coupler was bolted to the tongue to facilitate future upgrades or replacement.
Step 8, final details: Install side arms and pre-cut decking.
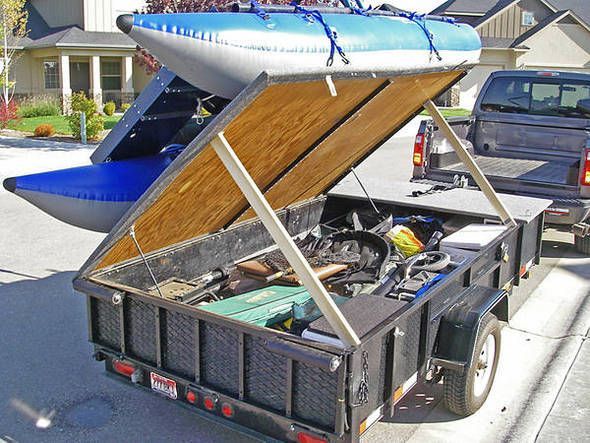
The final product, showing clearance, axel assembly and tires.
by Don Kress
black atv image by Dumitrescu Ciprian from Fotolia.com
Building a pull-behind trailer for your ATV, whether you are a hunter or simply want to haul heavy loads around your property, makes practical sense. Building your own trailer can save you hundreds of dollars, and you can also set up the trailer as you see fit.
Cut two of the eight foot boards into four foot sections, and then lay them on the ground parallel to each other. The two closest to each another will form the base of the trailer.
Cut the two six-foot boards into three foot sections, and then use screws to build two rectangles from these pieces.
Use the jig saw to cut a piece from the plywood that is three feet wide by four feet long. Screw this piece to the base of the body of the trailer. Then cut the two side boards, each of which will measure one foot wide by four feet long.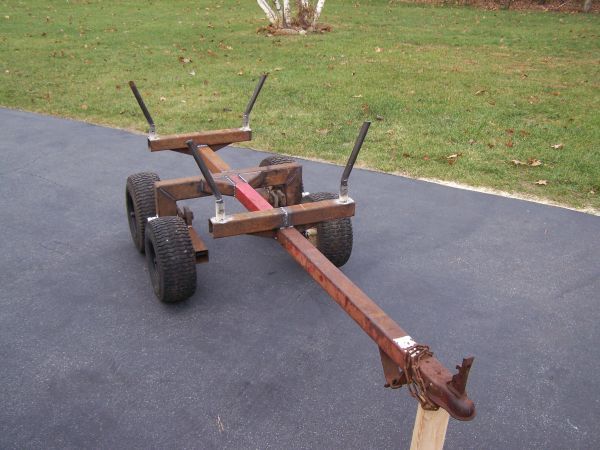 Cut the front and back panels next, measuring one foot wide by three feet long.
Cut four one-foot sections from the remaining 2-by-4 board and screw these to the inside corners of the trailer's base. With all four in place, screw the top frame of the trailer to the standing pieces to form a box, and then screw into place the side boards as well as the front and back boards.
Install the tires and wheels to the axle, and then install the axle on the bottom side of the trailer, securing it with carriage bolts. Next, install the tongue of the trailer running from the axle shaft out the front of the trailer. Drill holes where this will be placed, and secure it with carriage bolts in at least three places. Secure the trailer to the ATV hitch with a clevis pin.
References
Tips
Things You'll Need
Writer Bio
Don Kress began writing professionally in 2006, specializing in automotive technology for various websites. An Automotive Service Excellence (ASE) certified technician since 2003, he has worked as a painter and currently owns his own automotive service business in Georgia. Kress attended the University of Akron, Ohio, earning an associate degree in business management in 2000.
To buy an ATV for a child or an adult means to get a device that is distinguished by a high degree of reliability, excellent cross-country ability, and also unpretentiousness to operating conditions.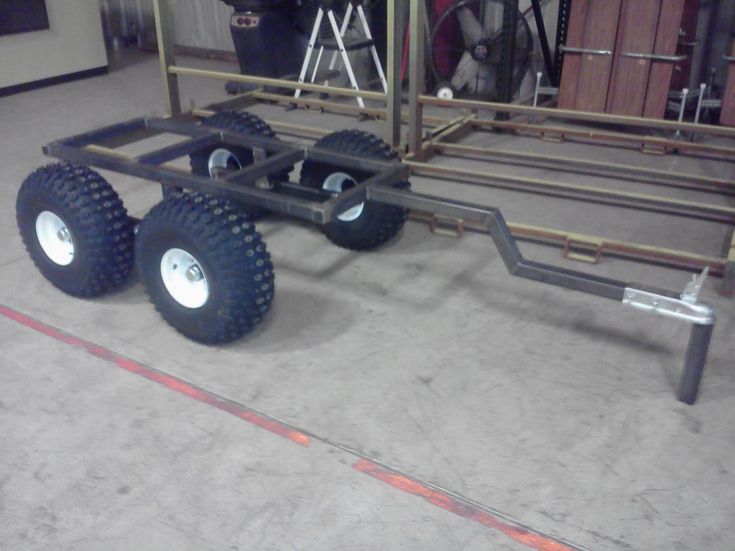 A trailer will help to significantly expand the functionality of this type of motorized equipment, which can either be purchased at a specialized store or made by hand. Many models of ATVs are capable of transporting even loads weighing a ton, and therefore a homemade trailer will be extremely useful in the household.
An ATV trailer is an auxiliary vehicle that is not equipped with an engine, and therefore can only be moved together with a motorbike. To connect motorcycles to a trailer, special fastening devices are used, for example, a hook-and-loop.
Please note that there are significant differences in driving an ATV with and without a trailer, namely:
When it comes to trailer maintenance, special attention must be paid to the coupling point. It is this that is subject to the most wear and tear.
The desire to build a home-made trailer for an ATV usually arises from a motorist for the following reasons:
On the net you can find ready-made diagrams, drawings and manuals on how to make a trailer for an ATV with your own hands. Therefore, you have the right to choose absolutely any option in accordance with your own preferences and budget. Do not forget to take all the necessary measurements from the ATV, if they are not indicated in the motorbike passport.
The assembly of such a transport structure consists of the following steps:
 You can purchase both a new part in a specialized car shop, and a used one on the bulletin board;
 In order for the trailer to be easy to use and not greatly reduce the maneuverability of the vehicle, their dimensions must match. Before starting work, thoroughly consider the design of the structure. At the final stage of creating an ATV trailer with your own hands, be sure to cover the surface of the product with an anti-corrosion coating, due to this it will be possible to significantly extend its service life.
Trailer wheels can be chosen by the owner at his own discretion, unless it is necessary to make sure that they fit the type of axle being used.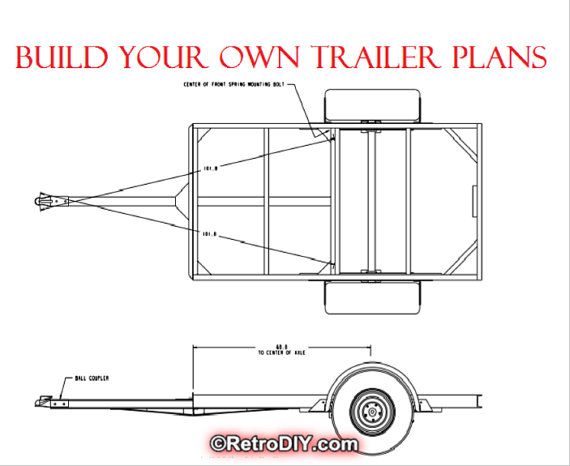 Often, heavy automobile wheels with a small surface diameter are used for this purpose. Otherwise, the trailer will turn out to be too bulky.
In the process of making your own ATV trailer, you will also need the following tools:
When assembling and manufacturing the components of the future trailer, give preference to high-quality and durable consumables. If desired, you can build both a small trailer for a children's ATV, and for full-size models.
In order to attach a purchased or home-made trailer to motorcycles, you will need to use a special auxiliary device called a hitch.
Installation of the towbar on the ATV is carried out in the following order:
After carrying out this simple manipulation, you can install almost any trailer on an ATV. Thus, buying an ATV will give you not only a lot of new experiences, but also the ability to transport various goods, thereby expanding the functionality of motorcycles.
05/29/2021 1872
ATV is a powerful four-wheeled vehicle with high cross-country ability. Owners love it very much for unpretentiousness and durability. Such transport can be used to transport quite serious goods, but this requires a special trailer for an ATV. Help in the economy from such an acquisition will be great, because the power of the ATV is enough to transport loads weighing a thousand kilograms. There is only one question left - the trailer.
A trailer is a box on wheels that can carry small loads. It is usually attached at the back. An ATV trailer differs from a car or other kind of transport only in size. This is a very important factor. If the trailer is wider than the quad itself, then it will be difficult to maneuver, and in narrow places where only a quad bike can pass, it will get stuck. If it is simply less, then there will be no benefit from it. Rather, it will be, but you can’t sip large loads on such a trailer.
ATV trailers are available in abundance on the market and in specialized stores. They will be the right size, hydraulically lift the body and have many other accessories, but the price of such a product remains sky-high. In various villages and small towns, where an ATV with a good trailer is most in demand, the amount of one and a half - two thousand dollars is unattainable (this is if we talk about the most ordinary trailers). Transportation with various lotions is much more expensive. Their price is at least three thousand dollars.
No way out! There is only one thing left: to make a trailer for an ATV with your own hands.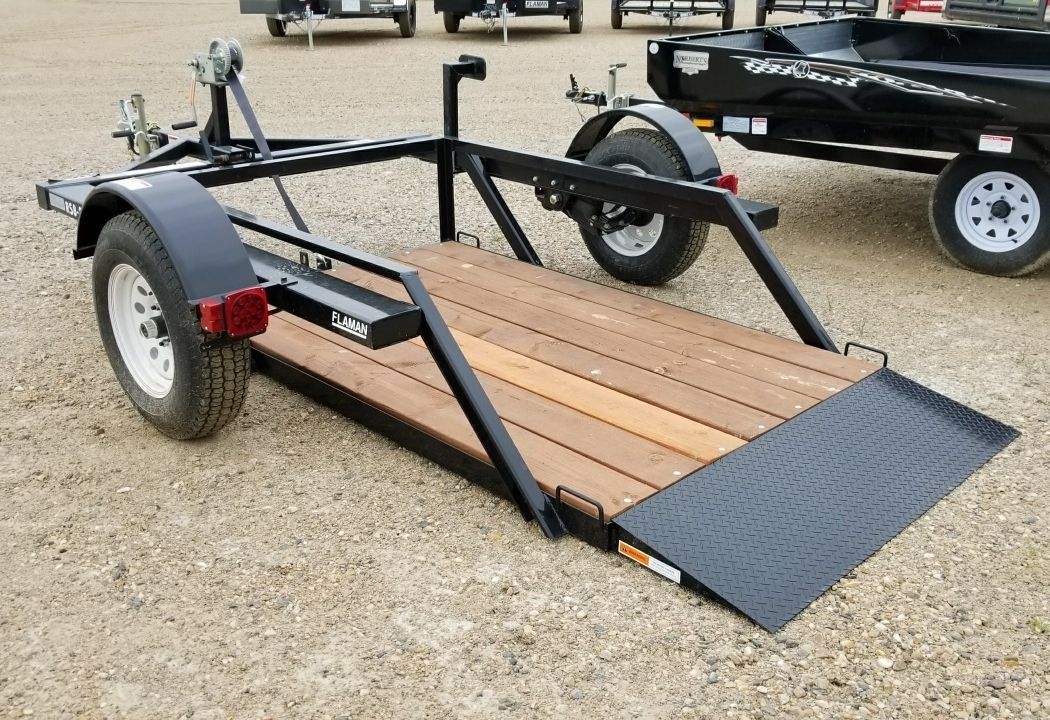 This approach will save you a lot of money. In addition, a do-it-yourself trailer for an ATV will be made the way the owner wants. It will perform all the necessary functions.
If the trailer gets stuck somewhere in a swamp or mud, you can leave it with a clear conscience and not suffer with it. This is another plus of homemade.
There are several trailer options (there are many of them, it's a matter of imagination), which differ in design, materials of manufacture and practicality. If desired, everyone can make a trailer for an ATV with their own hands. Equipment, tools and the ability to use them - this is the main issue when creating such a homemade product.
The easiest option for transportation is the "trough" option. It will be a little more difficult to make a classic one, which is very similar to the simplest car trailer. This one will last a very long time. In a classic trailer, you can already transport quite heavy loads, which significantly raises the effectiveness of such a homemade product.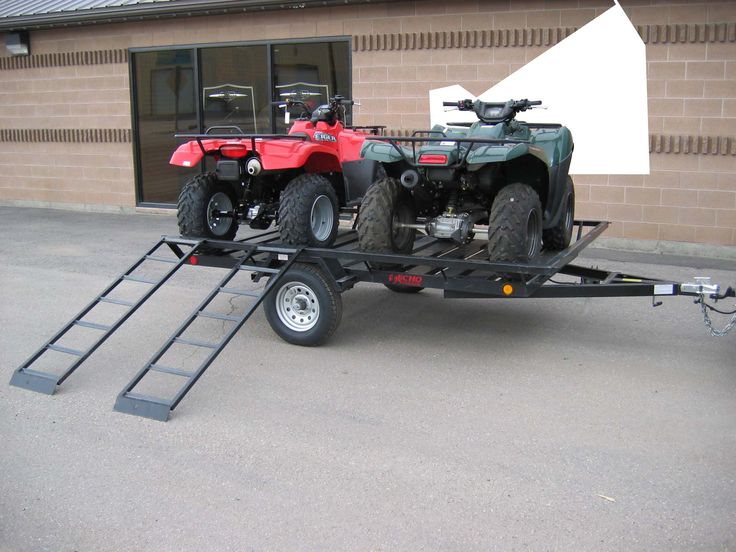
"Trough" version is a tub on wheels. Such a trailer will cost more, as many parts will have to be bought. But everyone can make it. To make such a contraption, you do not need to work hard, it is very simple to manufacture. First you need to purchase the body itself. In any hardware store you can buy a large iron trough (something like a bathtub). This will serve as the body. It is important that such a bath does not exceed the width of the ATV itself, but is about the same. This will allow you to maneuver freely in any conditions.
Then you need to weld from a square metal bar (this type of rolled metal) a rectangular frame along the perimeter of the bottom of the trough. It won't be a big deal. It is best to buy an axle for a future trailer in car services or ask a familiar craftsman to make it, as you can pick up problems with the suspension and fasteners. It takes a lot of experience to make this. If it is, then it will again save money.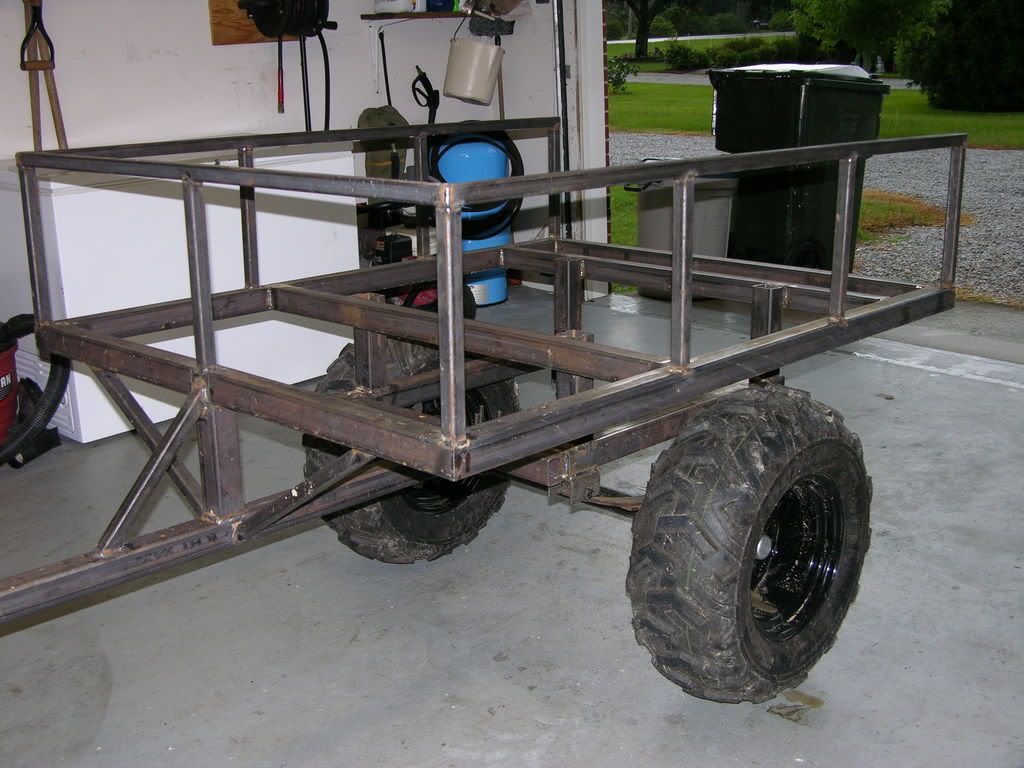
Bolts will help to fasten the trough and the steel frame. The drill needs to make a couple of holes in the bottom and in the appropriate places on the frame. At this stage, accuracy is very important, so it is better to measure everything several times so that there are no distortions that, due to operation, can cause cracks. Having drilled holes in the bottom and on the iron profile, you can insert the bolts into the holes and tighten them well with nuts. It is very important to tighten the nuts well so that they do not come loose while riding.
The last step is to attach the drawbar to the body. The drawbar is a beam that holds the tractor and trailer together. It can be made from the same square beam, only the wall thickness needs to be taken more, since when turning, a large load will be transferred to this part. The drawbar is welded to the base of the trough with a welding machine. Also, to strengthen the structure, additional fasteners can be welded at an angle of forty-five degrees.
A homemade ATV trailer, like all other trailers, is connected to the main transport thanks to a special hitch and towbar ball. This mechanism is freely sold on the market or in stores. It can also be removed from old cars. The principle of installation is simple: the hitch ball is screwed or welded to the ATV's rear beam, and the hitch is screwed to the drawbar. Now the do-it-yourself trailer for an ATV can safely pull loads. It should be borne in mind that this option will not be too heavy-lifting, since the design is a little flimsy. But it can carry not very heavy loads. Bags of cement and other building materials will fit in the back.
The classic trailer is an ordinary iron box on wheels. This option will already be more load-bearing and reliable, but it will take more effort to create it.
Be sure to buy an axle with rubber harness suspension. Such axles will be quite cheap. It is this type of suspension that will be the most optimal for a trailer.
All the axles that will be sold do not fit in the width, so they will still have to be shortened. Here you need to calculate so that with the wheels the width of the carriage does not exceed the ATV itself. It turns out such a mini-trailer for an ATV, made by hand, with a shortened axle.
From this axis, you need to cut out the central part, having initially calculated everything. After that, she became shorter. To connect them, you need to pick up a metal pipe of such a diameter that the axle shafts enter there without play. Having inserted the axle shafts into the pipe right in the center, it is necessary to weld the ends. It is important to pour water during welding so that the rubber rollers do not melt.
The drawbar is then welded to the axle at a right angle. It is made from a thicker square metal bar. Then all this is welded to the base.
The trailer body is made depending on the needs of the owner.