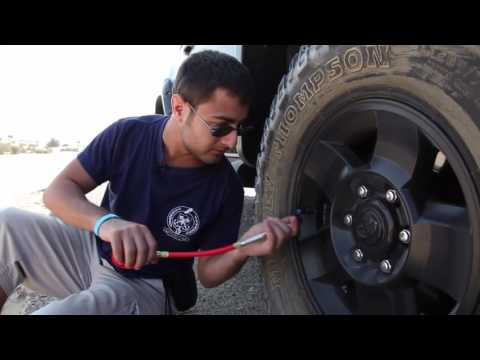
Never operate tire studding or other equipment without proper safety equipment. Shop approved safety glasses and work gloves should always be used for your own protection.
The stud gun will automatically return to the start position leaving the tire stud in the tire. The timing of steps 4, 5 and 6 are important and take some time to learn.
Helpful Hints and Recommendations
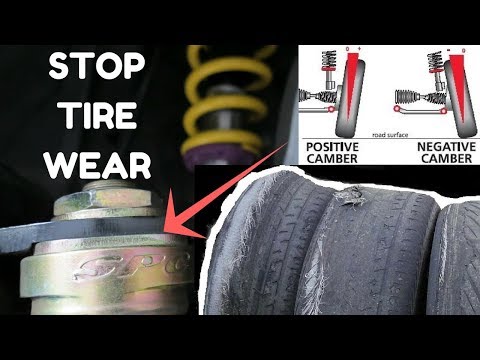
Properly and Improperly Installed Studs
Advise the customer that the studded tires require a break-in period. The customer should drive normally (try to avoid hard cornering, acceleration and braking) for a few days or so (approx. 50-100 miles) to allow for proper tire stud seating.
How to Video: TSIT-9 Stud Insertion Tool
How to Video: Stud removal
How to Video: K500 Stud Insertion Tool
How to Video: TSIT-9 Repair Video
I’d like to put studs in my winter tires this year, but my tires are only about a year old. I really don’t want to buy a whole new set of tires. Can I just add studs to the tires I already have?
Alison Daurio · Answered on Mar 30, 2022
Reviewed by Shannon Martin, Licensed Insurance Agent.
While it’s technically possible to stud used tires, it’s generally considered unsafe and you’ll probably have a hard time finding a tire shop that’s willing to do it.
There are two main issues when it comes to studding used tires:
 Your tires pick up debris as you drive. Before installing studs, you’d need to go over each hole by hand to clean off the dirt and pick out any pebbles—a long and time-consuming process for any tire shop tech.
Keep in mind that studs will only make a difference if you’re driving on sheet ice or hard-packed snow. If you’re doing most of your winter driving in typical weather conditions like wet snow and slush, a set of unstudded winter tires will be more than enough to keep you safe!
Another way to stay safe while driving in winter is by making sure you’ve got great car insurance. Whether you want to add coverage or get a new policy with a better rate, check out the Jerry app. Jerry contacts your insurance company to get the details of your current coverage so you don’t have to scale a mountain of questions. You get all the best prices and coverage with none of the legwork!
MORE: 7 winter essentials every driver needs
Car MaintenanceCar TiresRoad SafetyWear and Tear
View full answer
WHY YOU CAN TRUST JERRY
Jerry partners with more than 50 insurance companies, but our content is independently researched, written, and fact-checked by our team of editors and agents. We aren’t paid for reviews or other content.
Browse More Content
Exhaust Manifold Gasket Replacement
Fuel Pressure Regulator Replacement Cost
Ignition Relay Replacement Cost
What To Do If Your Electrical Components Are Not Working
What To Do If Car Shudders When Turning
Toyota Corolla Ve Insurance Cost
Honda Ridgeline Rts Insurance Cost
Fiat 500 Sport Insurance Cost
Volkswagen Passat Komfort Insurance Cost
Gmc Canyon Denali Insurance Cost
Massena Car Insurance
Alexandria Car Insurance
Elk Grove Car Insurance
Dubuque Car Insurance
Fenton Car Insurance
I was changing my aunt’s oil for her when I came across a bottle of oil in her shed. She couldn’t remember exactly when she had purchased it, but she thought it was about two years ago. I didn’t wind up using it because I wasn’t sure it was still good. Does engine oil have a shelf life?
Rachel Rigolino
Mar 30, 2022
I’m learning about cars so I can inherit my dad’s Suzuki when I graduate from high school. Does Suzuki use timing belts or chains?
Bonnie Stinson
Mar 30, 2022
My vehicle is making a loud noise while running. I think the timing belt is too tight. How do I adjust the timing belt tensioner?
Bonnie Stinson
Mar 30, 2022
Browse All Questions
The 2014 Jeep Cherokee gets between 20 and 25 MPG combined city/highway, depending on the engine.
Shannon Fitzgerald
Sep 27, 2022
From the results of expert testing, the 2015 BMW M4 can go from 0 to 60 mph in 3. 9 seconds.
Shannon Fitzgerald
Sep 15, 2022
There are many great national parks to explore in Kansas, such as Tallgrass Prairie in Strong City or Fort Larned in Larned.
Shannon Fitzgerald
Apr 25, 2022
Speeding
Divorce
Car Inspections
Road trips
Comprehensive Coverage
Convertibles
Connecticut
Travel
Minnesota
Towing
insurance agents and brokers
Crash Test Ratings
South Carolina
Car Prices
Cruise Control
Michigan
The General
Rental Discounts
Car Knowledge
Car Damage
Jumpstarting
GEICO Insurance
Arizona
Driving Games
Florida
Pop culture
No long forms
No spam or unwanted phone calls
Quotes from top insurance companies
Find insurance savings — it's 100% free
Toyota
Hyundai
Mercedes-Benz
Subaru
Chevrolet
Mitsubishi
It can be a shame when most of the tread height of winter tires is still preserved and performs its functions perfectly, and half of the studs have already fallen out of their sockets. Is it time to throw out the tires or can they be restored? Some motorists prefer to install new spikes on winter tires with their own hands. Self-studding tires allows you to use high-quality materials and reduces material costs for the purchase of new tires. 9Studs They are divided according to the following parameters:
When choosing studding elements, consider: riding speed, driving style, tire characteristics, tread height. When re-studding, pay attention to the size of the attachment points of the dropped spikes, as a rule, the sockets are slightly broken: it makes sense to use a larger diameter of the products. "Native" spikes will not stay in broken nests.
It is not difficult to install stud elements at home, you must follow these rules:
We recommend watching a video about tires using repair spikes:
To install thorns on winter rubber with your own hands:
Tires can be studded in three ways:

Consider the process of studding tires without special holes for studs. It is quite laborious, it is performed as follows:
The installation of studding elements in tires with special holes for studs is carried out in a similar way, while labor productivity increases several times. There is no need to make special holes in the tire for attaching spikes.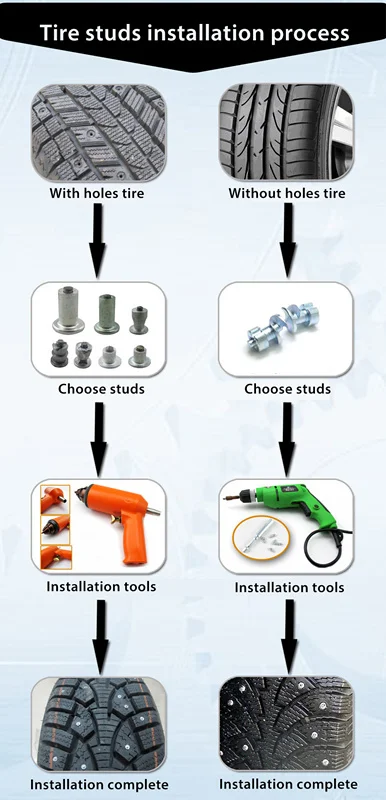
Do-it-yourself studding of winter tires is used for re-studding and re-studding of tires. The studding process makes it possible to equip winter tires for individual vehicle operating conditions. Restudding prolongs the life of tires, makes it possible to restore them.
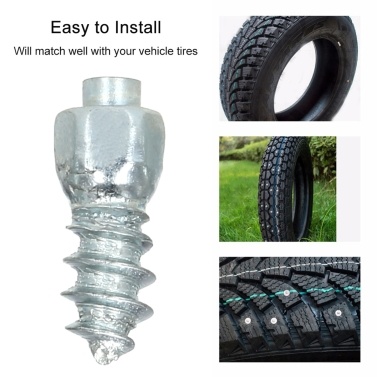
Tires with worn or broken studs are suitable for the above work. To replace missing or worn studding elements, special products are used. They have an enlarged head, so they can be installed in broken mounting sockets. The sequence of repair work when studding tires is not much different from the methods of primary studding of rubber. It has only one difference: before installing new spikes, you need to clean the sockets from particles of dirt, dust, and remnants of old spike elements.
Studding or re-studding of winter tires can be done at home. does not require special skills. When using high-quality component materials for studding, you can significantly increase the life of tires. The implementation of these procedures gives the following advantages:
You can do everything yourself, but of course in most cases it will be easier and faster to contact a tire shop. Today, many services provide a service for the restoration of spikes. In any case, it doesn't matter if you stud yourself or at a tire shop - it is usually much cheaper than buying new winter tires.
Author Sergey PolishchukPosted Headings TiresTags winter tires, winter, tires, spikes, do-it-yourselfContents of the article:
Good afternoon, dear friends. Recently, we have been looking at ways to preserve and give the factory shine to tires with the help of tire stain. In this article, we will deal with restoration of winter tires by installing repair spikes . Winter is coming, so this issue will become relevant for many motorists using studded winter tires.
Before learning to stud rubber with studs on your own, I propose to understand the question, is it worth restoring the lost studs? Consider the pros and cons of using repair spikes, what tool is required to do it yourself. I will give step-by-step instructions with pictures and videos on how to install repair spikes yourself.
Let's first figure out what they are in order to decide which ones are better to install on the tire. They come in three types according to the form of attachment to the tire:
The last two types are considered the most reliable. They have several flanges, securely clinging to the rubber. Single-flanged ones have one shoulder, so the reliability of the fit in the seat is low. Over time, it becomes larger, the spike loosens, falls out of it. After a season, the wheel may become completely “bald”.
It should be noted that the length of the protruding part of the single flange, must not exceed 1.2 mm . Otherwise, its slope increases when driving and the likelihood of losing it is greater. For other types, fluctuations in the length of the outer part from 1.4 to 1.6 mm are allowed. Because its value does not greatly affect the reliability of fastening.
Experts say that the more uniform the protrusion of the outer parts, the better the tyre's grip. Because, the angle of inclination is smaller, which means that the working surface “bites” into the road surface more. This is useful to know in the case of self-installation of repair spikes.
The first type is used on tires up to 14 diameters.
An oval shape is installed on wheels from 15 diameters, Nokian uses tetrahedral spikes on its rubber - a patented proprietary technology.
The fourth type is a new development, it has the shape of a diamond. Works better in the transverse direction, increasing the grip properties of the tire. With wear, the outer part is erased, acquiring the shape of an oval. Thus, the "diamond" spike is transformed from one type to another. This increases the service life, since the oval ones simply wore out, they were thrown away, and the diamond continues to serve.
For self-installation, you can use special tools for rubber studding or improvised means - a screwdriver or pliers. The minimum tread thickness for repair studs is 4 mm . If it is less, then they will not “sit” securely in rubber, and the outer part will stick out more, which will affect the grip properties for the worse. According to the traffic rules, it is forbidden to operate a winter tire with a tread depth less than the indicated value.
A special gun is used for this purpose. We put a spike in its body, rest against the tire, the nose is recessed into the landing nest. We press the trigger, a shot - the spike is installed in its place.
Important! When installing repair spikes, you need to choose them with a larger diameter than the hole for them. Because as the rubber wears, its diameter increases.
At the tire shop, the installation process is quick. Due to the high pressure, the spike cuts into the tire and is securely fixed in it. Studding a wheel takes a matter of minutes.
1. Washing the tire and stud seat. Dirt can accumulate in it. It is advisable to soap it so that the spike “slides” in it - this will facilitate installation.
2. Measure the depth of the mounting hole.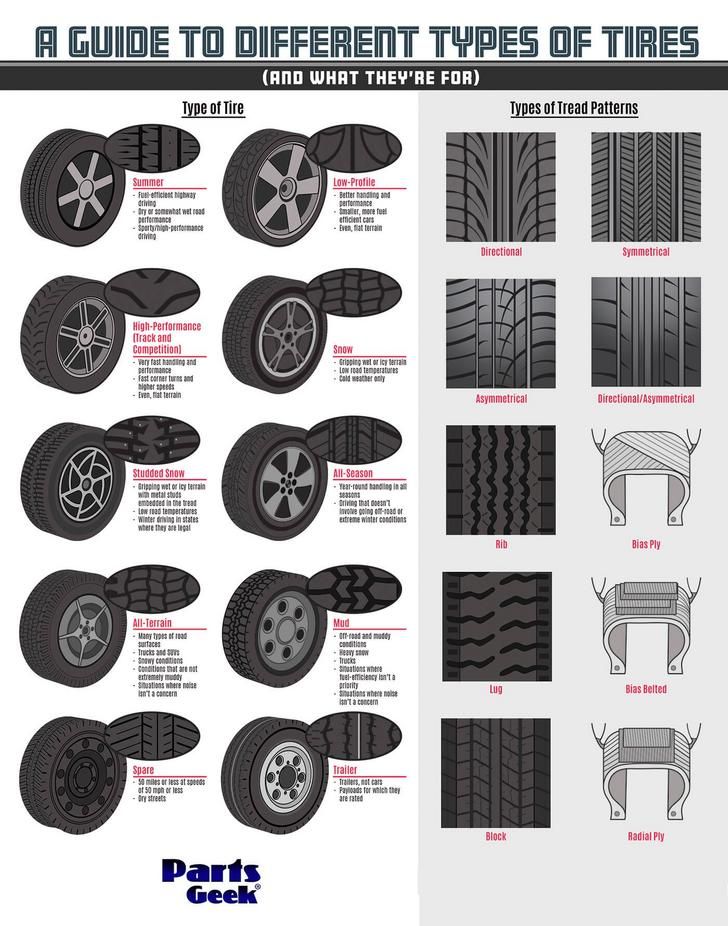 The height of the repair option should slightly exceed this value, the width was mentioned above.
Once you get the hang of it, this process will take no longer than a tire shop.
Important! The protruding part must be located strictly vertically relative to the tread surface. It is not allowed to stagger the spike after it is installed, everything should sit tight. Otherwise, the service life will be reduced, and the adhesion properties will deteriorate.
Video how to install repair spikes with a screwdriver:
To simplify self-installation, use an electric drill. A nozzle is made from a copper tube, its end is flared to the diameter of the repair spike so that it can walk freely in it. You can buy such nozzles, they are not expensive.
Since the spike moves freely in the socket, it can be easily removed from the rubber. This method is easier and faster than with a screwdriver. In the first case, there is a chance to spend a lot of time on one tire and rub a callus on your hand.
Video of self-studding with a drill or screwdriver:
You can find such options on sale, they are inexpensive. To install them, you will also need an electric drill or a screwdriver with a nozzle for screws with a diameter of 4 mm. We insert a piece of paper or another object into it, so that later it can be pulled out. This is necessary because the remship can fall into it and will not be screwed into the wheel.
We insert a new spike into the nozzle, apply a screwdriver to the tire in the place where there is no seat. We screw it into the tire with small turns until the installation side is screwed into the rubber.
This is not the best way to install repair spikes and is therefore not recommended. If you still decide, below is a video on how to do it.
After self-studding, you need to drive 100-150 km in a measured style. This will enable the new spikes to take their place in the tire, so to speak, to rub in.
This is due to the fact that on tires of the middle price segment, manufacturers use harder “grades” of rubber for studded tires. If we compare friction tires and “bald” studded tires, then the former will have higher grip properties, since the latter was designed taking into account the work of the spikes. Therefore, it is better to fully stud winter tires, if possible, than to drive with empty holes.
Self-studded tire repair restores its performance by more than 80 percent.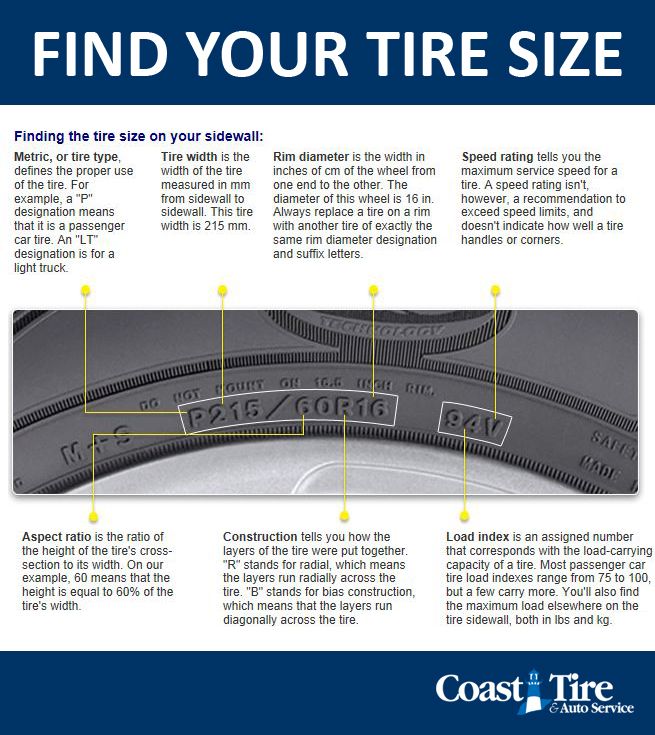 Thanks to this, it can be ridden for several more seasons, if the tread depth allows.
Repair spikes are sold only in round version. Remember, at the beginning of the article, I voiced their cons? There are no other options for sale. If your tire is from a more expensive segment, then you will get a “hodgepodge”, some branded oval or diamonds, some round. The traction will be worse than a new wheel, but it's still better than driving with empty sockets.
The height of the protruding top of the stud is less than the original. In such options, grip on a slippery surface deteriorates up to 15%.
If you drive on studded winter tires and climatic conditions require it, then it is better to monitor the condition and presence of studs on the tire. In this case, it is advisable to restore them if there is no money to change a set of wheels every season. Moreover, their wear may not be uniform, and one piece is not sold, for example.