Photos and text by Evan Chismark
A few words of caution before we begin:
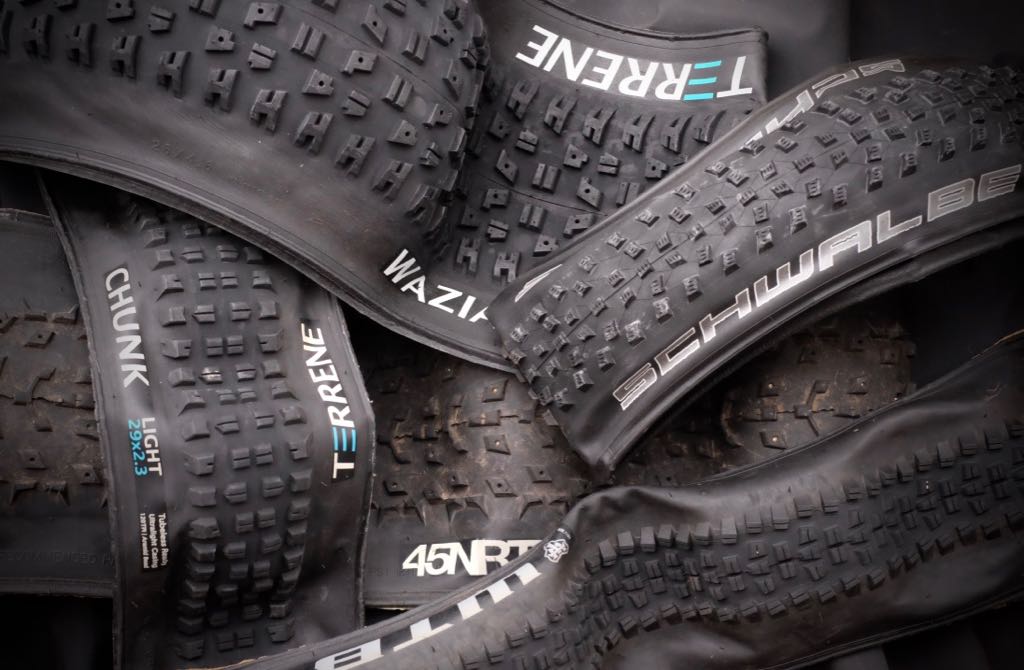
Ok, here goes. This project is a pain in the ass but I’ll admit, it’s pretty fun pedaling around on icy dirt roads without feeling like I’m going to mangle myself. Since the weather’s not been terribly cooperative and I had a spare set of tires kicking around, I figured why not. I’m looking at the forecast right now and at the moment it’s 9 degrees and by Saturday it’s supposed to be 45 and raining. So yeah, make some studded tires. Here’s what you’ll need:
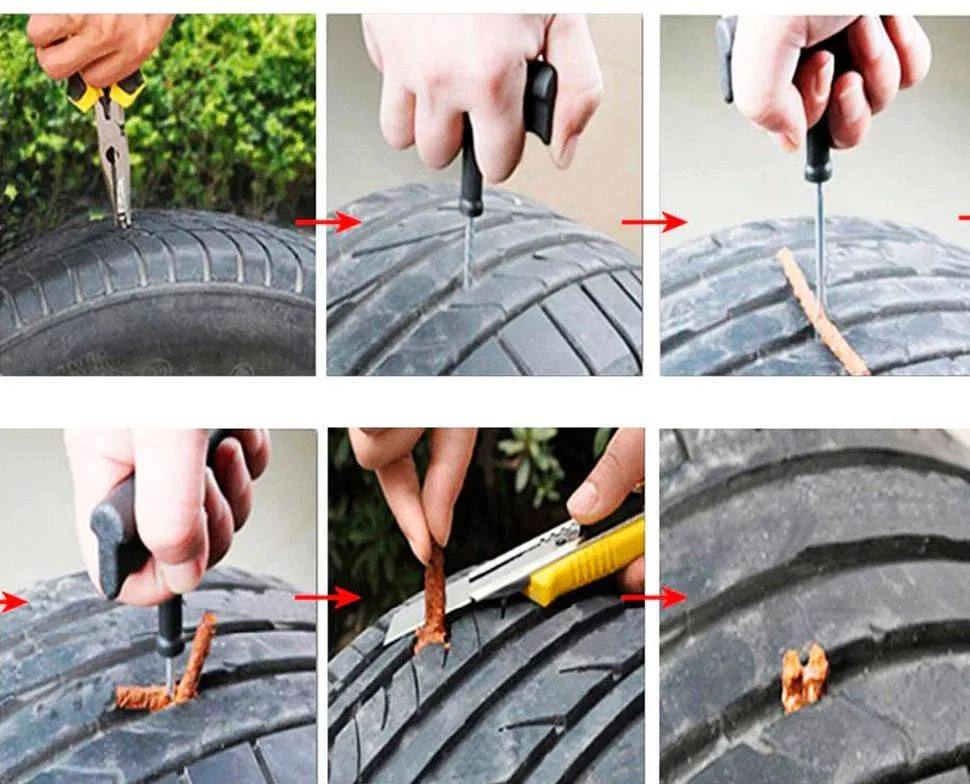
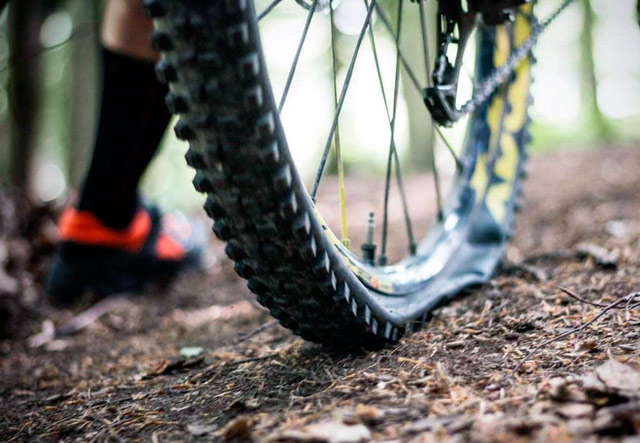
Start by counting out your lugs and mapping out the placement of your studs. My tires had something like 450 individual lugs each (seriously, count ’em, there’s a lot) so I went every fourth lug on the sides, then an alternating pattern down the middle. I came out with roughly 300 or so lugs to stud (fuzzy math at best). Side note: when I finished everything I learned the hard way that the side lugs on my back tire brushed the frame which is obviously not good. That’s why I ended up with the 3/8” studs on both the side and center lugs on the back tire. Just something to consider.
Next, drill your pilot holes from outside in. Even with self-tapping screws you’ll want to drill pilot holes—this way you can better control the angle of protrusion for each stud. Trying to screw in each stud without the pilot holes results in some wonky angles.
After you’ve drilled your pilot holes, turn the tire inside out and get ready to have some real fun. I found that the best way to do actually screw in the “studs”, was to push each screw partly into the pilot hole by hand (again, from the inside of the tire to the outside), doing 10 or 12 at a time, then screwing those 10 or 12 in with a screw gun. Going screw by screw takes a reeeeeeeally long time.
So now you’ve actually screwed all of your studs from the inside of the tire, you need to prep the tire properly to keep from destroying your tubes. Some people put a dab of caulk on each screw head which is probably a good idea.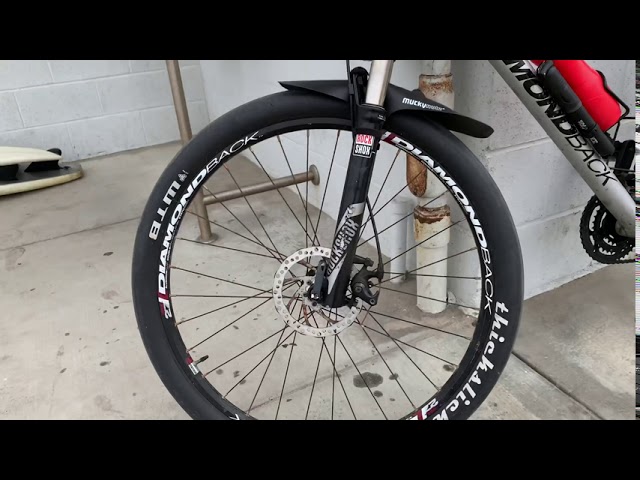 I guess it’s possible to run this set up tubeless, but that was way more work that I wanted to put in. That and I felt like it might be a big ol’ waste of sealant, what with the 300 holes I just drilled in my tires. Anyway, with the tire still inside out, run a strip of duct tape over each line of screw heads—the more you can protect the tubes the better. Duh.
After this, I took some old tubes, sliced them down the middle, and then affixed those tube strips to the inside of the tire with, you guessed it, more duct tape. This created two barriers between the screw head and where the inflated tubes will ultimately end up.
Needless to say, when you go to actually install the tubes and mount these bad boys on your wheels, you’re going to want to proceed with care. Lots of care—not just for your tubes, but for your hands as well. A thick set of work gloves enabled me to roll these tires right on to the rim with minimal flesh/blood loss.
Anyway, now that you’ve added 12 pounds of rotational weight to your bike, you’re ready to start working off some of that winter gristle that accumulated about the midsection, and/or training for the Stowe Derby Fat Bike Race. Keep in mind that if you run too much pressure in the tubes, you’ll eventually flat to so keep it south of 20 p.s.i. (This number will vary based on your particular setup.)
In my infinite wisdom, I headed up into Stowe Hollow and started rallying cutties in the frozen/hardpacked dirt—metal spikes are the best traction you’ll ever get and it’s tough to resist. Surprise surprise, I flatted within a few minutes and was quickly brought back to earth, forcing me to have to change my tube in temps that hovered in the single digits. Point being, this setup is not meant for railing and rallying like a regular tire/wheel setup—take it easy and you’ll (probably) be just fine.
I’m still working out the kinks but so far, it’s been pretty fun. I’ll reiterate that this is NOT a substitute for a fat bike. At worst, it’s a giant waste of time, tires, and sheet metal screws. At best, it’s a fun way to keep from losing your sanity during this snowless winter. Good luck, take your time, and have fun dammit!
Studded tires are a DIY project that can be done in just a few hours for less than $50, but the benefits of this DIY project go way beyond money. Studded fat bike tires give you more traction on ice and snow so you stay safer while riding your bike. If you would like to learn how to make studded fat bike tires step by step, then keep reading! 7 Steps DIY Studded Fat bike Tires:
Table of Contents
| Image | PRODUCTS | |
|---|---|---|
Tires &Tubes | Check Price | |
Studs For Fat Bike | Check Price | |
Screwdriver or drill | Check Price | |
Screwdriver or drill | Check Price | |
Tire pump | Check Price | |
Gloves | Check Price | |
Tire Sealant | Check Price |
Get all the tools needed for the job like scissors, pliers, screwdriver, or wrench
Remove the valve stem core using a screwdriver or drill. This will allow you to inflate and deflate rubber easily without taking off the tire.
For better Stud grip, you may need to cut the knobs of your tire using a scissor. Step is not done yet! You need to clean the tire first with soap and water to remove dirt.
Step 3: Use 2mm drill bit to drill a hole in every knobNow that your tire is cleaned, it’s time to drill holes. Make sure you use the right size of drill bit for better Stud grip.
Step 4: Add One Drop of Hand Sanitizer to Each PocketAfter drilling one hole, you need to add just a drop of hand sanitizer on the exposed rubber. This will help set Studs into the tire.
Step 5: Turn the tire inside out and put screws into every drilled holeTurn the tire inside out and put screws into every drilled hole. Make sure you screw Studs all around without leaving any knob exposed.
If your screws don’t have a mounting head, you need to use extra washers for a tighter grip. Then tighten them using a screwdriver or wrench.
Step 7: Mount the tire in your rim and pour in some sealant Mount the tire in your rim and pour in some sealantMount the tire in your rim and pour in some sealant. Add air then check for leaks using soap water. Don’t forget to add air and wipe off the excess sealant.
Pump it and you are done !
Your Studded fat bike tires are ready to go! Note that you should not ride on ice or snow with your new Studded Fat Bike Tires.
Making studded tires at home is a cheap and easy way to customize them. The Best Way To Make Your Own Studded Tires is with an aftermarket stud kit. Many of the options on our list include these kits so you can get more grip than ever before!
Another option for creating your own set of studs is to drill holes in some old tires and sticking them onto your new ones.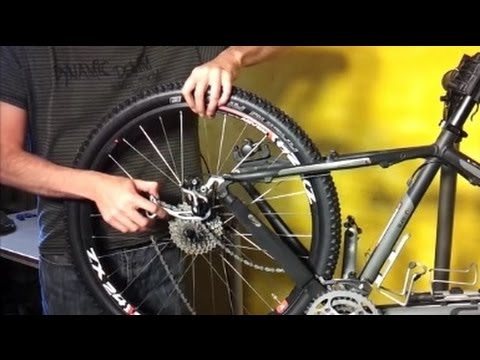 This method takes a lot of time, but it may be worth it depending on how much traction you need out there on the trails or roads!
| Image | PRODUCTS | FEATURES | Check Price |
|---|---|---|---|
| Marrkey 9mm-25mm Carbide Screw Tire Studs |
| CHECK PRICE | |
| Marrkey Tires Studs /Screw Snow Carbide Spikes |
| CHECK PRICE | |
| Screw in Tire Stud,Marrkey Steel Body Carbide |
| CHECK PRICE | |
| Qiilu 100pcs Snow Tire Studs |
| CHECK PRICE | |
| Keenso Anti-Slip Snow Tire Studs |
| CHECK PRICE | |
| AXIS Tire Studs for Fat Bike |
| CHECK PRICE |
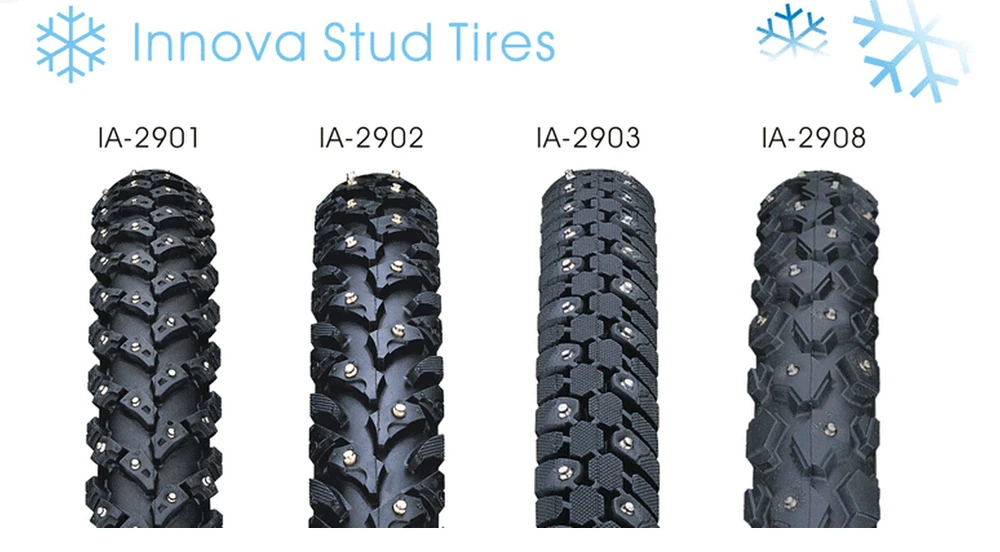
The number of studs your fat bike tire should have depends on the type of riding you will be doing. For snow and ice, go with a larger number ( 120-300 )of studs per tire. For riding on normal roads, around 60-80 studs per tire is sufficient.
Studs are mainly used for winter fat bikes. This is to provide as much traction as possible on different types of terrain such as ice and snow where non studded tires would slip out from under the rider.
The benefit of using studded fat bike tires:
So, if you’re out in the snow and ice a lot, studded fat bike tires are going to be your best option.
What are the disadvantages of studded fat bike tires?What are the disadvantages of studded fat bike tiresStudded tires can be expensive and the work involved in installing hundreds of metal studs is not something that everyone will want to do themselves.
The disadvantages of using studded fat bike tires:
studded fat bike tires both have their benefits and disadvantages. Some people don’t like the sound of studded tires on certain surfaces, so they can switch out to regular tires for summer and winter.
Taking care of your Best studded fat tire will increase its lifespan and make sure that it performs to the highest possible standards!
The first reason is cost. A set of new studded tires can be as cheap as $40, where as a pair of quality non-studded tires will set you back closer to $100. That’s not even taking into account that your studded tires will only last through one winter whereas the other ones may very well last 5 or more.
The second reason Studded tires are only useful in snow and/or mud, so if you have a set of studded tires they may be unusable for the other situations. By doing it yourself you can easily mod your tires for any condition.
The third reason is versatility. Snow and ice are the best times to use studded tires, but non-studded winter tires are more versatile. If you know how to swap tires on your bike you can quickly and cheaply modify your setup for whatever conditions that may arise.
The last reason is just pure pleasure, by wrenching on your own bike even if it’s only a simple tire swap you get to experience the satisfaction of knowing that for one winter at least, you won’t be left stranded. That feeling of knowing that you can handle it is a whole lot better than just hoping an “experienced winter rider” will come by and help you out of the jam.
Studdable Fat Bike Tires are an option especially for those who want to be in complete control of their own set up with the possibility of stud installation at any time by anyone that knows how to do it properly. Studs can be installed at any time by anyone who knows how to do it properly.
Pre-studded tires are a great way to get out on the snow for very little money. Many retailers offer studded tires ranging from about $70 -$100. The installation procedure is pretty simple and can be done in minutes with common hand tools. Read our Top 3 best Pre-Studded Tires for Fat Bikes Review here.
Read Best Studded Fat Bike Tires with detail guide and resources!
The benefits All Pre-Studded Fat Bike Tires come with Pre-Installed Studs!
1) You don’t have to do any work.
2) Most retail studded fat bike tires come with studs that are more aggressive and longer than aftermarket studs.
3) You don’t have to worry about your studs falling out.
The downsides of Pre-Studded Tires
1) These tires are mass produced and stud placement is not always uniform on the tire. This means that some tires may be better than others depending on manufacturer.
2) If you ride on overly smooth, hard-packed trails the studs will be deformed and misshapen after riding.
3) The studs are inclined to pop out on super hard-packed trails if they are not embedded enough.
This is pretty much the most common problem with pre-studded tires. Although it only takes one time for them all to pop out, so you might as well learn how to do it yourself.
The final option for a person looking to upgrade their current tires is going with studdable fat bike tires. Studding them yourself can be done at any time by anyone who has the right tools and knows how to do it beforehand!
Also Read Best Fat Bike Tires Reviews
It is not as easy as pre-studded tires, but it will provide you with more studs at a cheaper price. A set of studs from a popular manufacturer cost about $40 and will do 4 tires. You can use your existing tires or pick up a pair of new one’s for the process.
experience and don’t mind putting the studs in yourself.
It’s difficult to explain things to others. Some individuals are unaware of fat bikes with studs. This may be the case if they are riding in places without much snow. If there isn’t much snow, a bike with studs on the tires may be preferable because they will also function well.
It’s always a smart idea to seek assistance from individuals who might be more informed about the subject than you are. If you’re looking for tires for your bike and don’t know which ones to choose, consult someone who knows. Make it easy on yourself. If the snow is deep and there’s a risk of an accident or slipping, get studded tires! Studded tires will keep you safe while cycling on the trail when there is snow present.
If you are looking for an easy way to convert your fat bike tires into studded ones, this article will help. The steps outlined here should provide a good starting point no matter what the condition of your tire treads.
We hope that these instructions have been helpful and we also want to invite you to share any other tips or tricks with us in the comments section below! Have fun creating DIY studded fat bike tires at home today-and happy riding!
Yes, you can. Follow our 7 step guide on how to make Studded Fat Bike Tire!
You can use a sharpened screw or bolt to put studs in your tire. You can also use a power or pneumatic drill for this.
The time it takes to stud a fat bike tire depends on the number of tires you are doing and whether or not you have a drill. If you have a drill, it will take around 30-40 minutes per tire.
Yes, you can. Most bike tires will be compatible with studded tire systems except for road and BMX racing bikes.
No, you do not need studs on a fat bike. There are many reasons why people opt to put different types of tires on their fat bikes. You can also ride studless tires on snow and ice without any trouble.
If you are using a good quality screw or bolt, studs will last for years without requiring replacement.
Contents
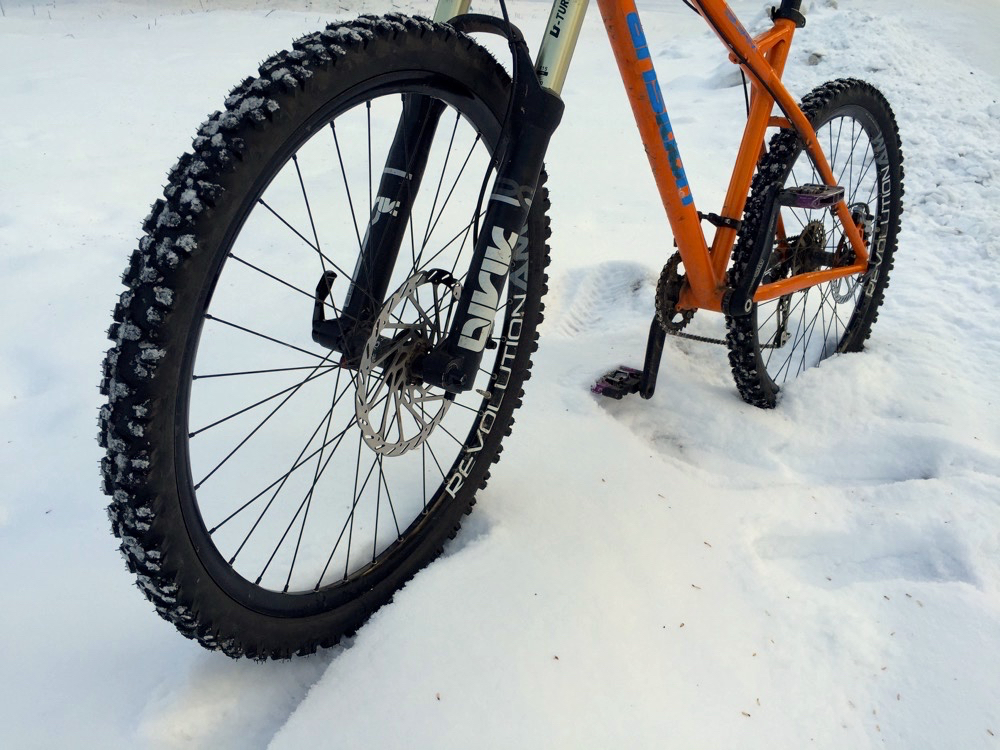
Using studded tires makes it more comfortable to ride on ice.
However, there are times when the spikes are lost, but the rubber is still in good quality.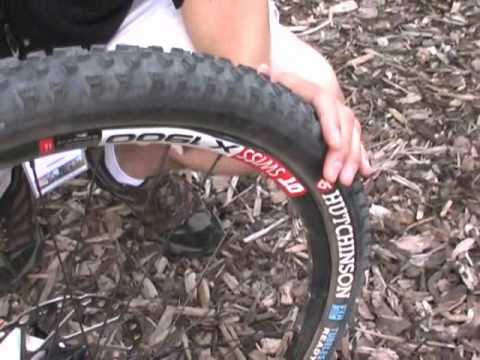 To restore products, you need to know how to put spikes on rubber with your own hands.
The method of studding bicycle tires depends on the type of rubber and the conditions in which the bicycle will be used.
In order to make studded tires at home, you need to prepare tires with a deep tread and small screws (wood screws are most commonly used).
When the components are prepared, you need to do the following:
This type of installation does not take much time. Most often, the spikes are installed at an equal distance from each other.
To make rubber, prepare tires with a fine pattern and small bolts with nuts. Bolts should be no longer than 1.5 cm.
To make this type of studded rubber, you should perform the following algorithm:

When studding tires in this way, it is necessary to drill holes in the middle. The edges and the part closest to the rim are not used.
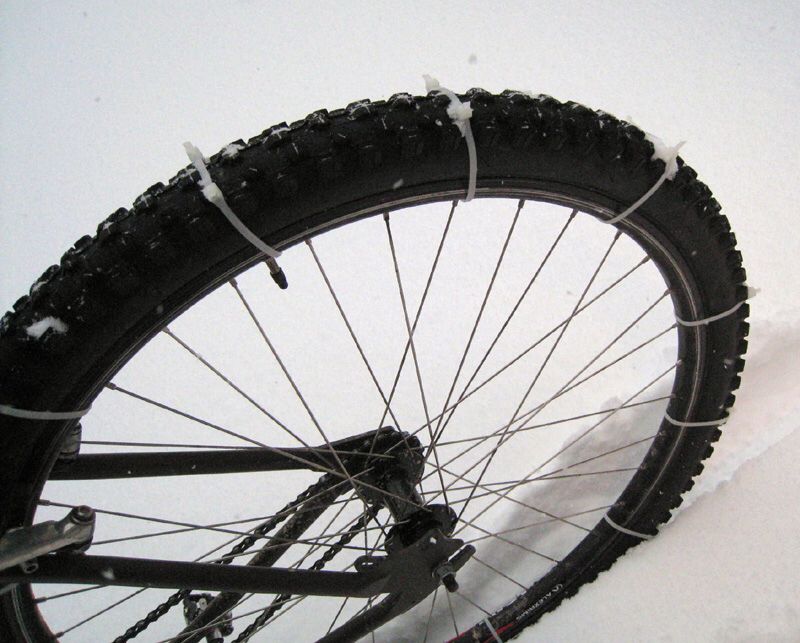
This type of bicycle tire studding can be done with an old bicycle chain or other type of small chain at the rider's discretion.
This technique is most commonly used for bicycle disc brakes, but can be applied to all types of bicycles if desired.
To install the chain pieces, proceed as follows:
This method is used much less frequently than the first two. However, it is much simpler and does not require a long installation.
In order for studded bicycle tires to last a long time, you should follow the advice of professionals:
 This will help you ride more comfortably on ice.
 Compliance with the recommendations helps prevent frequent errors and damage the tire. While studding, you should not rush and carefully monitor the location of the stud in the rubber.
High-quality bicycle tires are expensive, so I decided to update the existing tire with a deep pattern myself. I bought self-tapping screws at a hardware store and screwed them in. Screwed directly into the drawing. It turned out well, but you need to constantly monitor the condition of the spikes. There is also a risk that the spike could damage the camera.
Rating:
Maxim
I used a thin chain as a material, which I bought in a hardware store. While driving on ice, it serves well, but there is one drawback - the chain constantly breaks. And in order to restore it, you need to use new pieces, otherwise the problem will constantly arise.
Rating:
Vladimir
I think that this method of experimentation harms not only the chamber, but also the wheel itself. It is better to buy ready-made goods and not save on your own safety.
Rating:
Oleg
Properly installed self-tapping screws will not only serve well, but will also protect a person while moving in the winter. If the screws wear out, they can always be turned or replaced with new ones.
Rating:
Andrey
The best quality chain for such a procedure is a bicycle chain, but for such a procedure it was necessary to buy additional old chains on the market, one is not enough even for one wheel.
Rating:
Svyatoslav
With the onset of winter, many cyclists are beginning to use various methods to move smoothly and comfortably on ice and in snow. One proven method is studded tires. If a person does not want to spend money on the purchase of such a product, you can make such tires yourself.
If you want to safely ride a bike in winter (and not only) then you need to take care of good grip of the wheels with snow, mud, sand, ice. You can buy studded tires, or you can make studded tires on your bike with your own hands.
In this article, let's look at a more affordable and cheaper option for how to do this.
You will need:
1. Purchase a package of self-tapping screws from a hardware store.
2. Take a drill and a 2-3 mm bit. Drill holes in the places where you are going to install the spikes.
3. Try to screw in the self-tapping screw at a perpendicular angle (90 degrees) to the tire, it should not stick out to the side.
4. After these works, glue the inner surface of the tire with reinforced electrical tape (2 layers are possible). You can also use special anti-puncture tapes in the tire instead of adhesive tape, which are sold at a bike shop. They will help protect the camera from being damaged by the screw heads.
5. Place the tire on the bike rim. Be careful during installation - you can injure your hands.
 Bolts should be short, not massive, nuts should be no more than 1 cm high.
 1. Remove bike wheels, remove tires from wheels.
2. Determine the places in the tire where you can put the bolts (should be screwed between the rubber protection spikes, always in the center and preferably at the edges, but not close to the rim).
3. Mark the selected holes with a marker. Drill holes smaller than the thickness of the bolts (they will have to be screwed into the tire, but this way the bolts will not fail).
4. With the threads on the outside, screw the bolts into the tire, then screw the nuts onto the bolts on the outside of the tire. Then the nuts and bolt ends will work as spikes.
5. As in the first option, put anti-puncture tape inside the tire or glue it with reinforced electrical tape in a couple of layers.
6. Fit tires, mount wheels to bike.
Needed:

1. This method is easier, but only suitable for bikes with disc brakes.
2. Purchase the required items.
3. Remove the wheels from the bike, measure the circumference of the rim + tire using a flexible meter.
4. Cut off the chain of the measured length.
5. Attach the cut chains around the rim and tire. This can be done with wire, bolts with nuts, other metal clamps.
6. Mount the wheels. If suddenly the wheels are not put in place - remove the plastic protection.
Recommendations for work
Warnings

 8mmx7mm