Whether you experience it in a garage, driveway, or car park, seeing a flat tire always feels the same. There’s a brief glimmer of hope when you think it’s not that bad, and maybe some air has just escaped, but once you take a closer look at the limp rubber laying flat against the ground, there’s an unescapable acceptance that you have a problem.
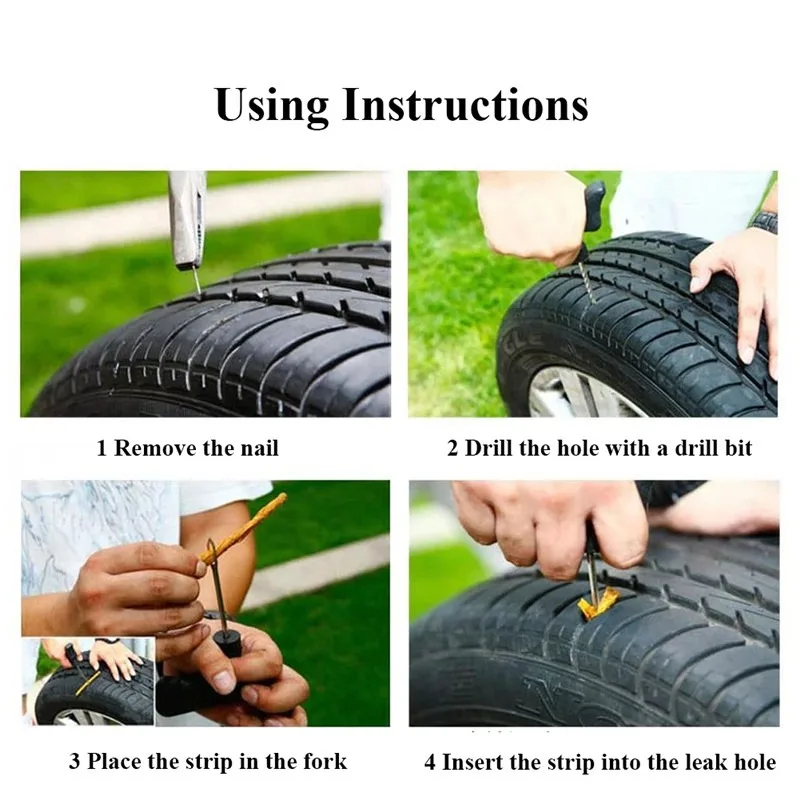
If a rogue nail or something of similarly sized did the damage, then you’re in luck because it can be easily fixed with a tire plug, and The Drive’s crack informational team is here to tell you exactly how to do it.
The Drive and its partners may earn a commission if you purchase a product through one of our links. Read more.
Estimated Time Needed: 10-20 minutes
Skill Level: Beginner
Vehicle System: Tire
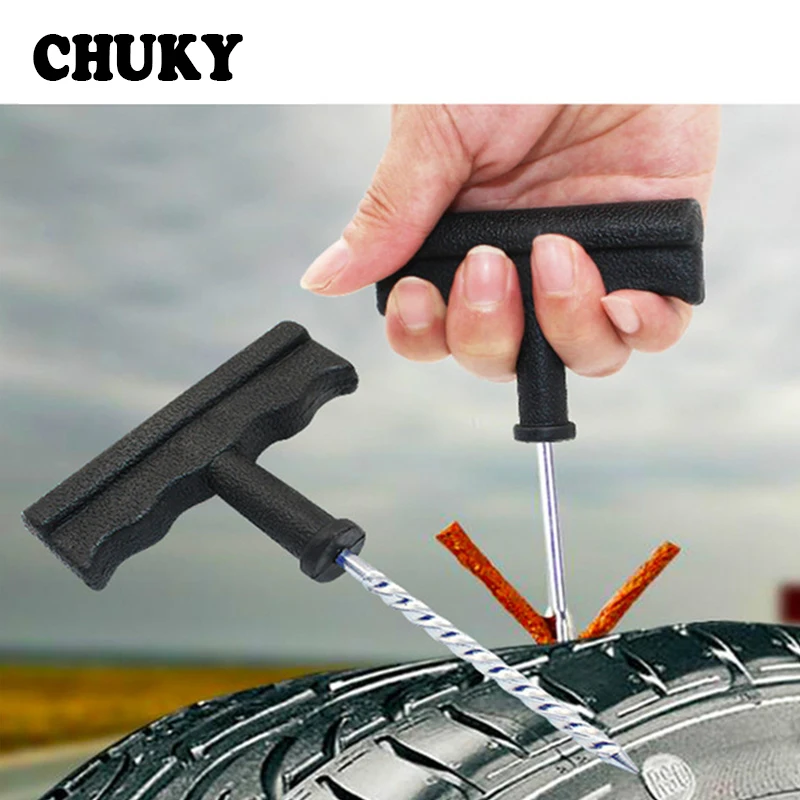
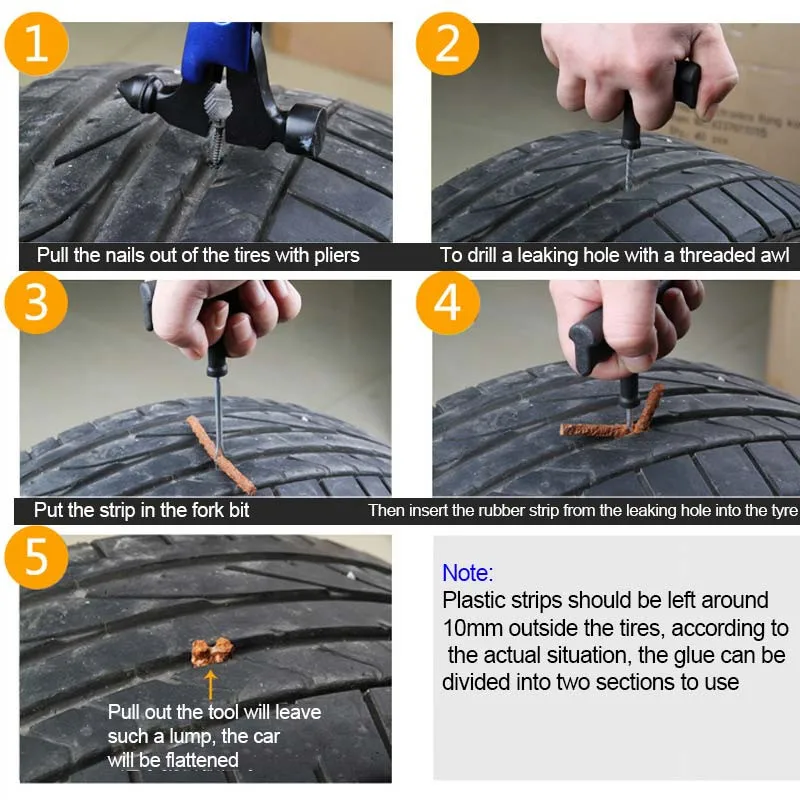
A tire plug is a cheap, easy, and reliable way to fix a tire that’s picked up a puncture. You don’t need to be a mechanic to use it and it can get you out of a sticky situation in just a few minutes.
Working on your car can be dangerous and messy, so here’s exactly what you’ll need to ensure you don’t die, get maimed, or lose a finger and that you keep your jeans, shirt, and skin spotless—hopefully. Thankfully, plugging a car tire isn’t inherently dangerous so you won’t need much in the way of protection.
We’re not psychic, nor are we snooping through your toolbox or garage, so here’s exactly what you’ll need to get the job done.
Organizing your tools and gear so everything is easily reachable will save precious minutes waiting for your handy-dandy child or four-legged helper to bring you the sandpaper or blowtorch. (You won't need a blowtorch for this job. Please don’t have your kid hand you a blowtorch—Ed. )
)
You’ll also need a flat workspace, such as a garage floor, driveway, or street parking. Check your local laws to make sure you’re not violating any codes when using the street because we aren’t getting your ride out of the clink.
Let’s do this!
Check out the video from Erick The Car Guy below. He follows the instructions given here to the letter and adds some helpful hints and pieces of advice that he's picked up over the many years he's spent working as a mechanic.
You’ve got questions. The Drive has answers!
A. Although tire plugs can last for several years, tire manufacturers and the US DOT don’t consider tire plugs to be a permanent fix. So, it’s recommended that you only use one for as long as it takes to get a permanent repair.
A. As stated above, you could potentially drive on a plugged tire for a few years, but it’s not recommended. So, instead of taking a risk, get it permanently repaired at your earliest convenience.
A. Although there’s no hard and fast rule, most mechanics won’t plug a tire more than twice. If the two holes on the tire are too close, then a mechanic might not plug a tire more than once.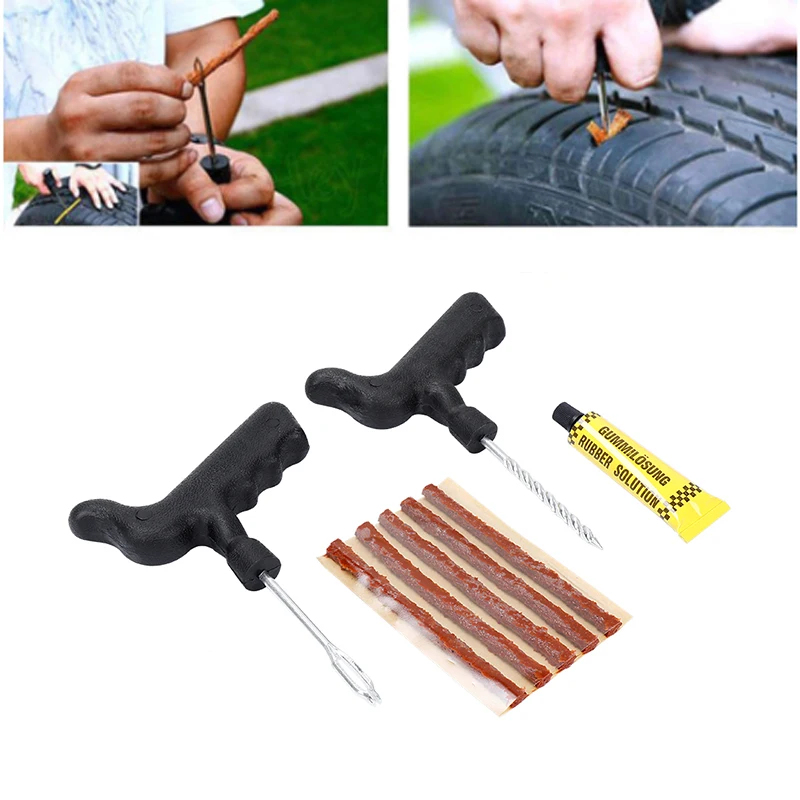
We’re here to be expert guides in everything How-To related. Use us, compliment us, yell at us. Comment below and let’s talk!
Home » Tire Patches vs. Tire Plugs: Which Is Better?
What are tire patches and tire plugs? Well, they are useful when you get a flat tire. In such cases, there’s a good chance that a minor repair can get you back up and running again quickly.
Three of the most common of these “minor repairs” are:
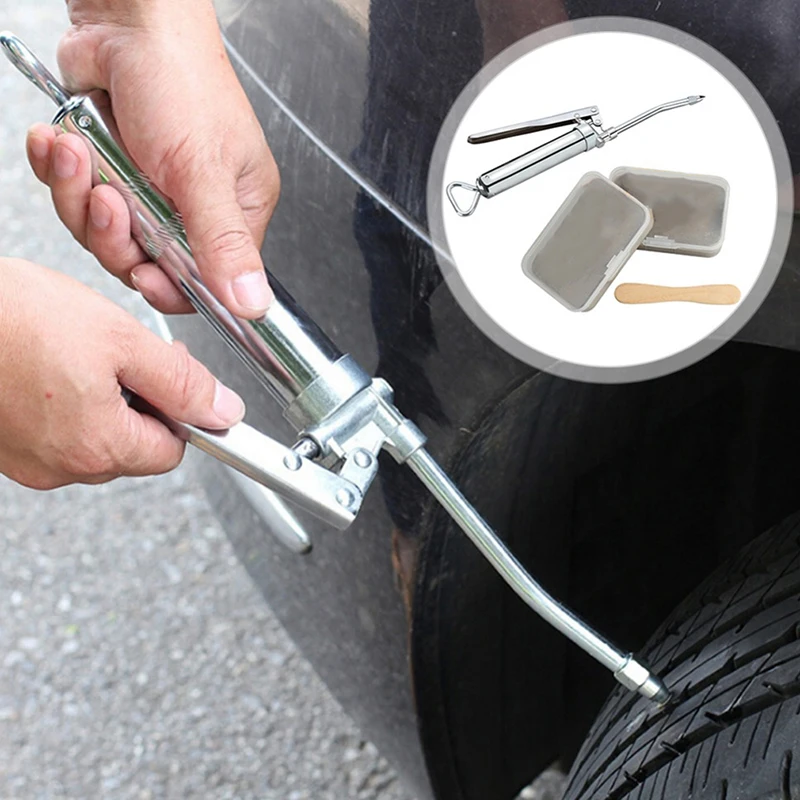
The first option, a tire plug, is cheap and fast to administer. Plugs work best when you’ve run over a nail or similar blunt object that punctures the tire and causes it to leak air. After the nail or sharp object is removed, the plug can be inserted into the hole to fix the leak. While plugs of the old days were problematic and served more as a band-aid type of repair than anything else, many plugs available today actually vulcanize to the tire to provide better stability.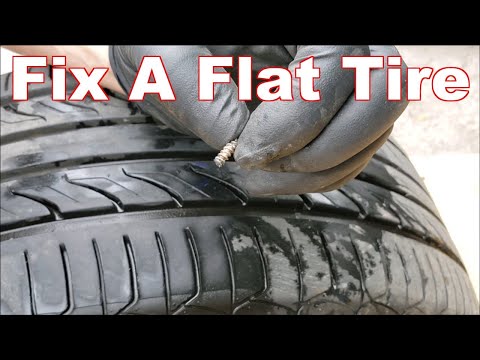
A patch, on the other hand, is considered to be a better quality tire repair. However, it’s a bit more laborious of a repair than a plug. Patching a tire actually consists of removing the tire from the rim and then using a die grinder to clean up a 2-inch diameter around the puncture to give the patch enough of an area to bond with. The patch is then pushed from inside the tire through the outside of the tire, sealed, and let dry.
The best modern tire repair solution is a plug/patch combo product. This is one piece and it combines the best benefits of both options.
Keep in mind that not all tire damage can be repaired. For example, tire bubbles are a dangerous problem that will result in needing new tires.
The question is: Can or should you repair a tire on your own?
If you purchased your tires from a mechanic or tire-specific business, then chances are they will either plug or patch your tire for free if it develops a leak and a patch or plug can resolve the issue.
Many tire-specific businesses will also fix your tire via these means as a way of developing goodwill with you, the customer, so that when it comes to buying new tires you’ll consider purchasing that next set from them.
However, outside of these two scenarios, tire patching and plugging aren’t necessarily expensive (usually only $10-$20 a repair), but more of an inconvenience.
Considering this, patching your tires on your own might not be worth it.
DIY patching or plugging is still an option, yet we’d advise you to be absolutely sure of what you’re doing before going the patching route.
The plugging route is fairly simple (and cheap, as plug kits can be purchased for just a few dollars), as all you really need to do is locate the hole and insert the plug. Going the patching route is also fairly inexpensive, but there’s a lot more involved.
For instance, patching a tire consists of:

Plugs won’t usually work when a puncture is near the sidewall, as it likely won’t be able to completely seal the area. Plugs are also ineffective when the puncture is on an angle. Patches are usually the better-recommended option, but they do have their limitations. For instance, if a puncture is greater than a quarter-inch in diameter, a patch will likely be ineffective and the tire may be too damaged to repair.
Plugs, when installed correctly and in the right situations, can help a tire last for up to 25,000 additional miles. But while plugs can be effective, usually patches are considered to be the better, more secure option of the two. The patch/plug combo is the safest and most reliable option.
Are plugs just band-aid repairs?Yes and no. Years ago they were and if they aren’t installed correctly or in the right situations today, they still are. However, today’s plugs vulcanize to the tire and can help it last for tens of thousands of miles more.
[lasso ref=”run-flat-tires-link” id=”1904″ link_id=”1211″]
Author: Oleg Polazhinets
A sudden puddle or a large spot under the car is a reason to think about what it might be. Indeed, in the units of the car there are a dozen operating fluids that may be outside. And if you are not completely sure that the stain is not left from a car previously parked in the same place, then it is worth classifying the type of liquid by appearance and smell, and also, if possible, identify the source of the leak. Let's figure out how to do this without tasting the puddle.
Engine oil
Oil leakage from the engine lubrication system is a fairly common occurrence, so in many parking lots the asphalt is literally dotted with characteristic oily spots. Recognizing an oil leak is quite simple: a small and thick greasy spot cannot be confused with water and even antifreeze. Under the hood, the problem usually reveals itself either as fresh traces of oil, if the leak is fresh or strong, or, conversely, as dirt growths covered with oil, if the engine has been losing oil for a long time and drop by drop. As a rule, oil flows out of the engine due to leaks in the crankshaft seals, as well as the sump.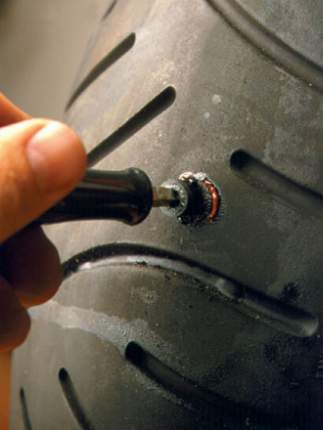 However, these are only the most common options: you need to inspect the entire engine, and if traces of oil on the crankcase protection are fresh and no leaks are visible, it is better to inspect the car on a lift.
If the puddle is large, then you need to carefully inspect the crankcase - it is possible that it was broken on the road. In any case, you need to check the oil level, as well as visually inspect the engine. Driving with a low level on the dipstick is more expensive for yourself, because many engine parts can experience oil starvation.
If the emergency pressure lamp is on or even blinking, it’s definitely not worth moving on: low oil pressure means its critically low level, capable of killing the engine in a few kilometers. In such a situation, you need to immediately turn off the car and then transport it on a tow truck. But even in the case when the level is normal, it is not worth delaying the repair, because due to the “hardened” crankshaft oil seals, oil can get on the drive belts or the clutch disc, and this will lead to completely different problems.
Transmission oil
Distinguishing engine oil from transmission oil is not easy, but there are still some features. Gear oil is usually noticeably thicker and remains light even after a long time after replacement, but engine oil darkens over time. Another way to distinguish the type of oil is to drop it into the water: the engine oil will remain there in the form of a droplet-lens, and the transmission will begin to spread. Well, to understand where the oil is flowing from, a careful inspection of the gearbox from below will help. An oily body is a reason to immediately check the oil level if the dipstick is provided structurally.
And although in Soviet times some lucky people managed to get to the garage practically on a “dry” box, turning on the fourth (direct) gear, modern practice knows many cases when even seemingly unpretentious mechanics fail prematurely due to that the owner drove several thousand with a low oil level, which gears really do not like - especially those that are located above everything in the unit.
For automatic transmissions, the oil level is even more critical, so setting off on a journey with such a leak is literally condemning the machine. It is even easier to determine that it is an automatic transmission that has flowed than in the case of mechanics, by the characteristic color of the oil, which usually ranges from red to burgundy brown.
Obvious oil leaks from the "transfer case", center differential or rear axle gearbox indicate leaks in the seals or damage to the housing. A “dry” gearbox usually quickly starts to hum and howl, and in the worst case scenario, it can jam right on the go.
Coolant
In a liquid-cooled engine, antifreeze plays an important role and the system itself must remain sealed. However, due to high temperatures, its individual elements may lose their tightness, which is especially true for older cars. We talked in detail about the main causes of antifreeze leakage, and now we will remind you again. Bend your fingers: leaky radiators (main and interior heater), a leaky thermostat (engine or automatic transmission), a burst expansion tank, a malfunctioning expansion tank cap, cracked pipes and hoses, main or additional water pumps, and even the cylinder block itself can be the culprits!
Experienced drivers can recognize antifreeze by tasting a suspicious stain, as ethylene glycol, which is the basis of almost any antifreeze, has a sweet aftertaste. However, we will not advise you to engage in such organoleptics: even though ethylene glycol is a moderately toxic substance, and for poisoning you need to take a couple of sips, but in each case it is not known what other impurities may be present in a stain on asphalt. It is better to try the liquid to the touch: antifreeze is slightly oily. So if the stain is not purely oily, but also has a color (greenish, reddish, yellowish, and so on - there are many dye options) and is greasy to the touch, it is most likely antifreeze.
If the antifreeze leak is strong, then you can get to the house or the place of repair by simply adding water to the system. However, this is a rather risky business, since it will be necessary to constantly monitor the level of antifreeze and the temperature of the coolant in the system. If the coolant level drops below the minimum while the engine is running, the engine may overheat. The probability of “boiling” the engine in the heat and in traffic jams is especially high, so if the leak is strong, and it’s summer outside and there are still a few kilometers ahead, it’s better to immediately call a tow truck.
Brake fluid
The most dangerous leak is the loss of brake fluid. If it is already on the pavement, then this usually means that the car has no brakes in the literal sense, because the volume of the brake system, unlike lubrication or cooling systems, is very small - no more than a liter. As a rule, even a small leak of brake fluid leads to the failure of one of the circuits or the complete failure of the brake system, because it is immediately aired. It’s bad that it’s not always easy to notice the place of a leak - for example, the rear brake cylinders are inside the drums, and outside they are covered with shields. A sure and bad sign of a brake fluid leak is traces of fluid on the inside of the wheel.
A cracked brake hose or broken brake pipe will have the same effect - the brakes will simply stop working. In Soviet times, in order to get to the garage, failed brakes on individual wheels were turned off in any suitable way, and any liquid was poured into the hydraulic drive, up to water, castor oil or alcohol.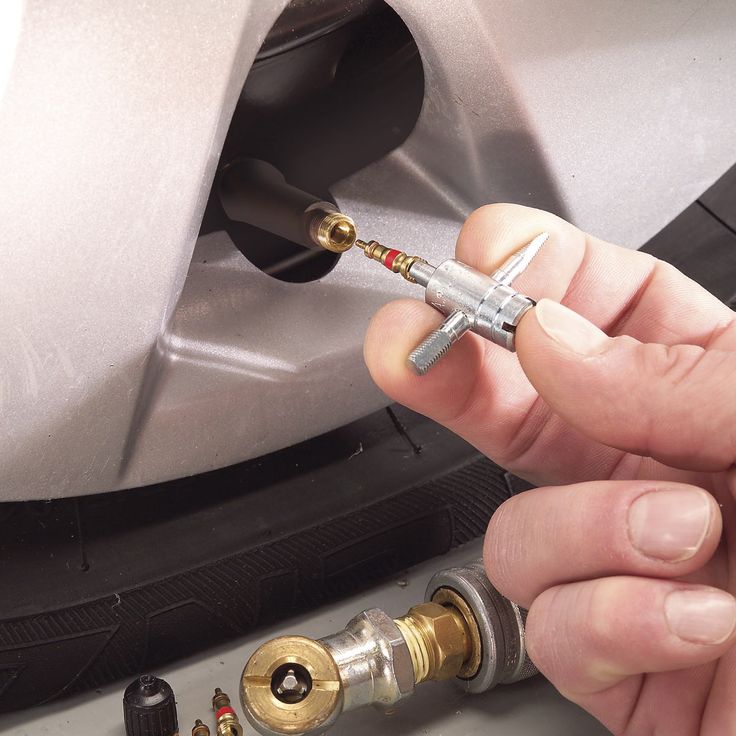 However, we categorically do not recommend any of these "folk methods". Firstly, it is deadly: a drop in pressure in the system means it is impossible to slow down. And secondly, the traffic rules forbid to continue driving with a faulty brake system, and any leakage of “brakes” is a clear sign of a malfunction.
Fuel
It is possible to understand that fuel is leaking from the car by a sharp and characteristic smell - both in the case of gasoline and diesel. There can be several reasons: a rusted or damaged by a foreign object tank, a defect in the metal fuel line, a burst fuel hose, a cracked filter housing, or damage to the filler hose at the filler neck. The result is always the same: fuel flows into the street or, even worse, into the engine.
Loss of tightness in the fuel system can also occur after unskilled repairs - for example, when changing the fuel filter unknowingly on the fuel lines, they simply did not replace the penny sealing rings. It is unnecessary to talk about the high fire hazard of gasoline, so any such leak is a reason to sound the alarm and not only not to continue moving on, but not even to leave the car unattended, because someone may decide to smoke nearby.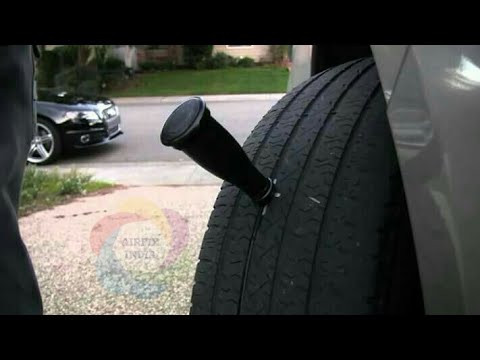 We will not recommend the “old-fashioned” way to fix a gas tank leak with soap: it was acceptable 40-50 years ago, but now the verdict is clear - only a tow truck.
Power steering
A leaking rail usually leaves marks on neighboring components - subframe, suspension parts, and so on, but reddish fluid from the power steering gets on the asphalt only if the system, as they say, “died”. Leakage can occur not only from the rail itself, but also from hoses and lines, both at the junctions and through cracks in the hoses themselves. Therefore, if there are oil smudges under the machine and a drop in the level in the hydraulic booster engine compartment, you need to inspect all lines for breaks and major damage. Typically, hydraulic boosters use the same red oil as automatic transmissions: this is worth bearing in mind to identify the source of the leak.
It is theoretically possible to drive further with a strong leak and an empty engine compartment tank: even in the absence of oil, the rack retains the ability to turn the wheels. But from the point of view of the law, this cannot be done: traffic rules prohibit the operation of the car in the event of a malfunction of the power steering. Therefore, it is worth moving without oil in the system only as a last resort and for short distances, and at the same time safety measures must be observed. After all, a non-working power steering means that it will take much more effort to turn the steering wheel - even more than on cars without power. In addition, movement with a lack of oil in the system can provoke further breakdowns: the pump can jam or its drive belt breaks, on which, depending on the design features, other units can be tied. Having noticed a leak from this system, you need to do the same as in the case of the engine and gearbox - check the level and add fluid.
Air conditioner
Many drivers panic when they discover that something is dripping from a car with the engine running. In the case of an air conditioner, fears are completely unfounded: if the system is turned on, then the condensate is simply obliged to flow out. For complete peace of mind, you can make sure that it is water that is dripping onto the ground by tasting the liquid to the touch.
But no oiliness in the condensate and on the pipes should appear - this may indicate that the system will soon fail. Moreover, the fact that the air conditioner stops cooling the interior is not the biggest problem, because if the compressor jams, the drive belt may break, and we already found out what this is fraught with in the previous section.
Other options
There are several other sources in the car that can leave traces of a leak. The most non-trivial option is a leaky shock absorber, although usually this failed suspension unit only “sweats” and does not flow so that it drips to the ground. Much more often it flows from the washer reservoir, its nozzles or connections on the tubes - these streaks are generally harmless, but also indicate that not everything is in order.
The only exception is leaking headlight washers if they have just worked.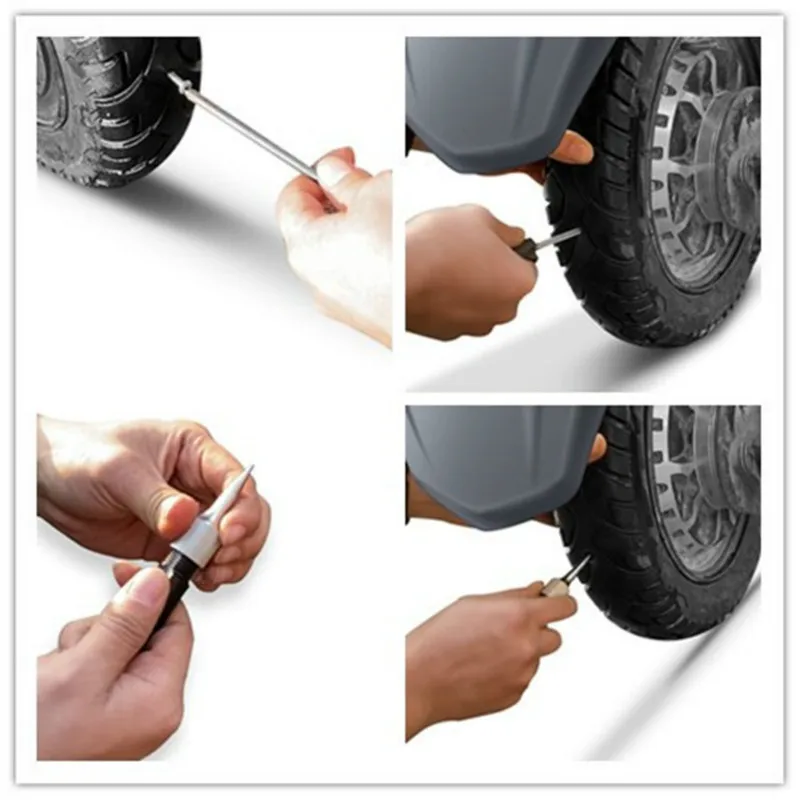 In cars equipped with a headlight hydraulic corrector, fluid leaks from the hydraulic drive are possible, but often the slave cylinders “leak” directly into the headlight. Well, we will finish with water from the exhaust pipe - this is a normal phenomenon, since it is ordinary condensate.
practice popular questions
Articles / Used cars 5 reasons to buy and not to buy Toyota Fortuner II “Impeccable car”, “phenomenal cross-country ability”, “shaky suspension, hard steering, the engine inside bellows like a buffalo”, “huge miscalculations in terms of comfort”, “comfortable handsome man”, “very ... 2190 0 09.10.2022
Articles / Practice Look into the kingpin: what is a kingpin suspension, how to maintain it and why to inject The word "pivot" today seems to someone as archaic as "zipun", "endova" and "batog".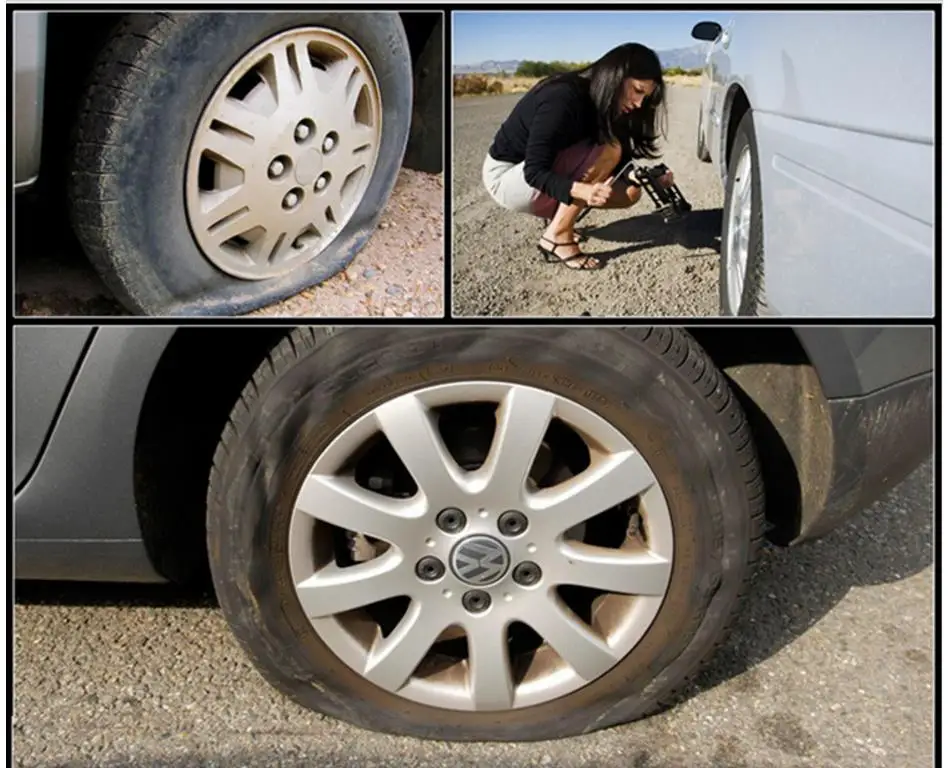 In fact, this is not so: the king pins have not left us yet, and it is likely that some will have to ... 722 7 0 07.10.2022
Articles / Used cars Along Route 60: The BMW 325i E36 Ownership Experience Getting a car from the cult road movie "Route 60" is not an easy task in our country. These are lengthy searches, and "parallel imports", and complex logistics, and years of painful waiting... 1696 7 5 06.10.2022
Test drives / Test drive Haval Dargo vs Mitsubishi Outlander: the dog is barking, the stranger is coming In the Haval dealership in the south of Moscow, life is in full swing: buyers look at cars, communicate with managers and sign some papers.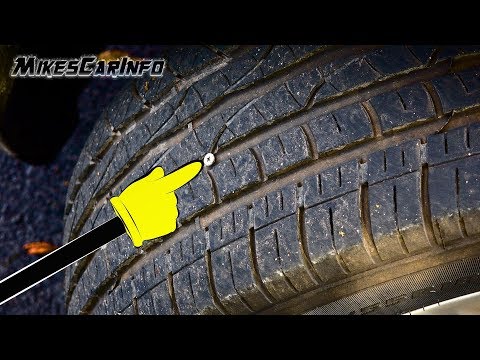 While I was waiting for the test Dargo, the same cross... 12825 7 151 13.09.2022
Test drives / Test drive Motor from Mercedes, emblem from Renault, assembly from Dacia: test drive of the European Logan 1.0 It would seem that what's new can be told about the second generation Renault Logan, known to every Russian taxi driver, as they say, up and down? However, this car has... 11248 ten 41 08/13/2022
Test drives / Test drive Geely Coolray vs Haval Jolion: Free Cheese? If! Do you want to buy a car today with a full warranty, on credit at an adequate rate, without wild dealer markups? Now this is still a task, because a full-fledged chain of "representation - s.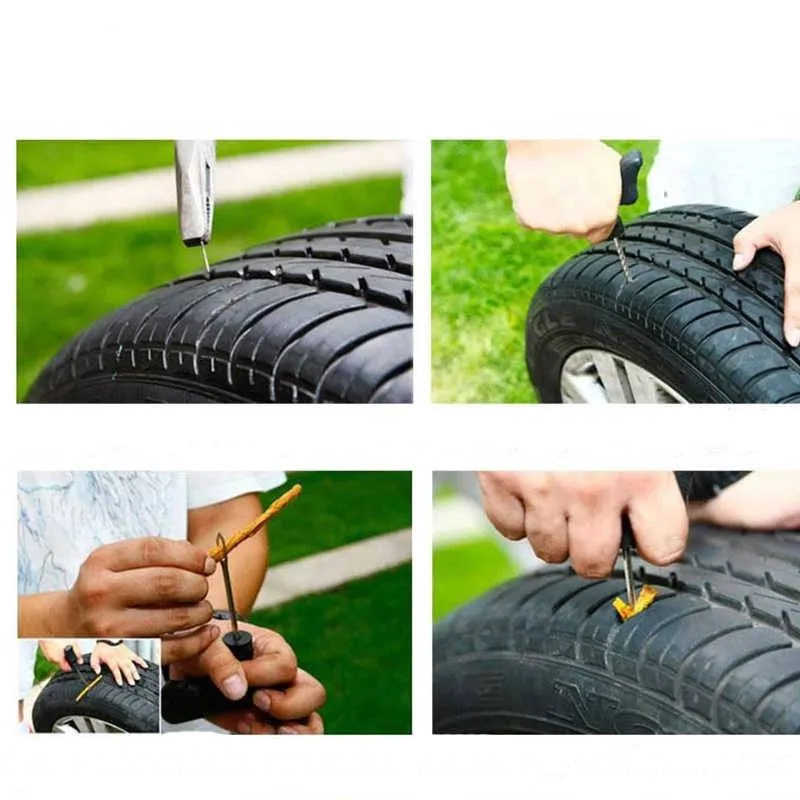 .. 8176 25 thirty 08/10/2022
Advantages
Defects
Comment
Grade
I accept the terms providing data.
 3 HP. With.
 Medium rating Gasoline chain saw SPEC BBP-1735 - 3.4
A total of 5 reviews are known about Petrol Chain Saw SPEC BBP-1735
Looking for positive and negative reviews about Petrol Chain Saw SPEC BBP-1735?
From 11 sources we collected 5 negative, negative and positive reviews.
We will show all the advantages and disadvantages of the SPETS BBP-1735 gasoline chain saw identified by users. We do not hide anything and post all positive and negative honest customer reviews about the SPEC BBP-1735 gasoline chain saw, and also offer alternative analogues. Is it worth it to buy - the decision is only yours!
Feedback information updated on 09.10.2022
write a feedback
Nikolay Ka, 10/17/2019
Advantages: A clear representative of an inexpensive tool.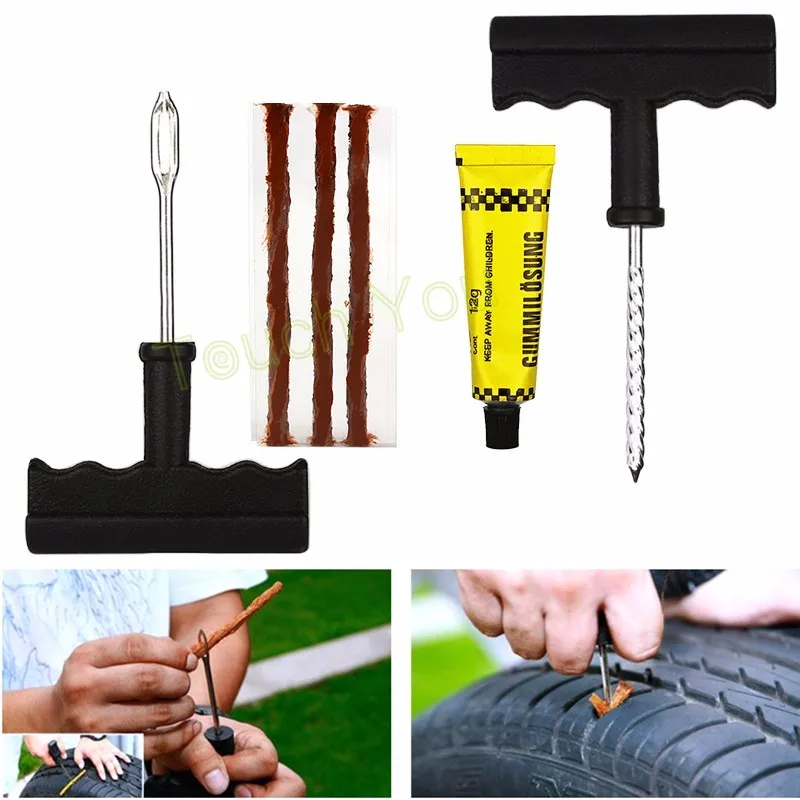 The parts are made of sufficient quality, but not very neatly assembled. During assembly, I found that half of the fasteners were simply not stretched, but wrapped by hand. But since the kit comes with a hexagon, he stretched everything himself. It starts 5-10 times, but when it starts it does not stall. After 30 min. work, the gas handle stopped working - it turned out that the thrust with the cam is attached to the carburetor with a screw and it is unscrewed from vibration. I fixed it myself - I twisted it and dripped nail polish (visiting my wife's cosmetic bag) so that it would not unscrew. Low oil consumption for chain lubrication (set at the factory for min.). The presence of a container for fuel, a tool and a good chain is a clear plus.
Disadvantages: assembly quality sucks - after purchase, check all fasteners, modify the carburetor thrust. It doesn't start right away.
Comment: Suitable for infrequent work, you probably won't find a better one for such a price.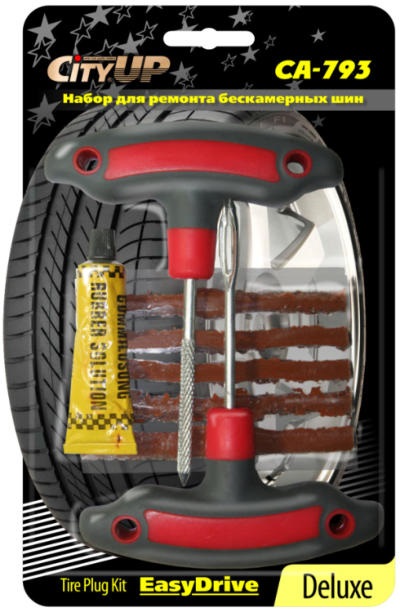
Serge N., 08.08.2019
Pros: saw works great
Cons: almost good saw
Comment: 6 years of operation changed tire twice
Alexander K., 06/04/2019
Advantages: Cheap
Disadvantages: It can be a chore to start, cheap materials, inconvenient adjustment.
Comment: So far I have not dealt with chainsaws, sawing with electricity. But the SPEC bribed the price (3190r), took it to the dacha to play. For such money, I am ready to put up with the features of chainsaws, so I rather have a positive attitude towards it. She drank a terrible cheap thing, but she does the job. It is inconvenient to adjust the chain tension, everything is very primitive.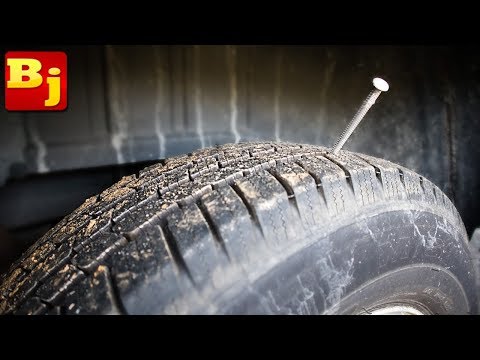 The tank cap is leaking, no matter how tight. Because usually I have it on my side so that the fuel does not drain. From the factory, idlers are not quite accurately set (if they were set at all) and the saw twitches with the chain - you have to climb into the T hole (well, at least it exists at all). Sprays oil on the chain unnecessarily - even if it is set to the minimum. And, of course, while you start it, you pull the starter up to the adoration of power saws. The devil will understand why he doesn’t grasp, he read the instructions to the holes. But if it starts up, it snorts steadily, although the mixture is too rich, maybe that's why. In short, for occasional use - it will do. And to work like this for days - yes, well, nafik.
igor n., 03/12/2019
Pluses: Reliability, 8 years of work!
Disadvantages: I think not.
Comment: after 8 years of not the most careful operation, it began to stall
Anton S., 01/03/2019
Pros: Easy to start...
Weaknesses: ...and breaks on the second day. In fact, there are no services in St. Petersburg. At best, diagnostics with a verdict is not a warranty case.
Comment: On the second day, I broke the starter return spring during operation, not at the factory! Verdict - needs a starter replacement. One service did not determine anything and returned without an act! The second - he also did not determine the cause of the breakdown, unsubscribed that it was not a guarantee (because it had already been disassembled) and that the starter needed to be replaced. They don't have a starter and haven't had it for 1.5 years. I tried to change the spring (~ 100 rubles) - 15 minutes of work and it was cut off.