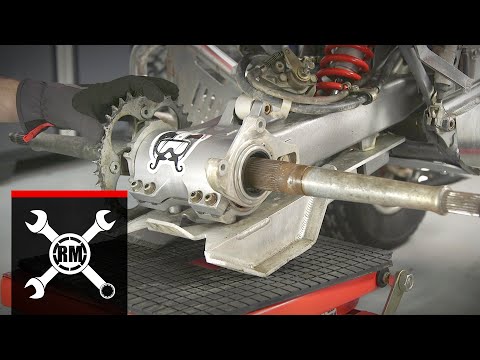
The wheel hub bearings on your ATV or UTV will no doubt need to be changed out at some point. It’s not that hard of a job to do yourself with basic hand tools you probably already have. They do make specialty tools to make the job easier, but I’ve done this with ordinary tools everyone already has in their garage.
The steps I’m going to go over are universal steps for all pre 2010 ATV and UTV wheel hub bearing replacements. For ATVs or UTVs made after 2010 the steps will be similar and you may to also read the alternate wheel bearing replacement section at the bottom of this article.
There may be slight differences from machine to machine. But you’ll get the idea of what to do, and should be able to handle any slight differences your quad has. Having your service manual handy will help. And with all maintenance projects, it’s best to wear eye protection and gloves.
Here are the steps to replace your wheel hub bearings (I explain each step in more detail below)
Before I go into more detail about each of these steps, lets make sure you really do need to replace your wheel hub bearings. It’s not an extremely difficult job, but can take a bit of time and requires you remove a lot of parts from your quad. So lets make sure it’s necessary.
You’ll be able to tell if your wheel hub bearings are bad by the way your ATV or UTV is handling. One of the most common symptoms is a grinding sound and feeling when riding. You may also hear some clanking or banging type sounds coming from the wheel hub.
If they get bad enough, you could even feel vibrations and wobbling when riding. A wobbling feeling could also mean other things like you need to Balance Your ATV Or UTV Tires. If you notice the machine pulls left or right when braking, that could be a sign of bad wheel hub bearings as well.
If it’s been a while since you’ve last replaced them, or you have an older machine, it’s a good idea to do the replacement if your sure the problem isn’t your brakes or tires.
To do a manual check, jack up the wheel in question and try to move it back and forth.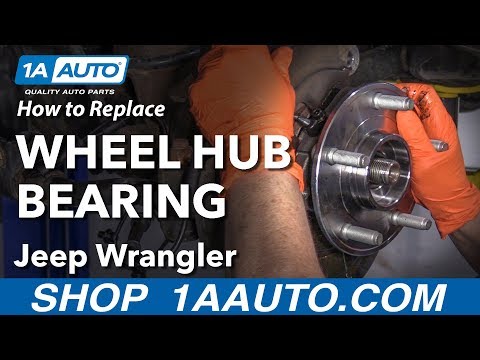 If the wheel is bolted on tightly but still wobbles back and forth, you probably need to replace the wheel hub bearings.
Most bearings come sealed, but over time, water and dirt will still find its way in there. There are ways to make the bearings last longer, which I’ll talk about later on. But eventually, they need to be replaced. Now on to the steps.
This goes without saying I suppose, but the ATV needs to be jacked up and remain so during this entire process. It’s a good idea to put in on jack stands as this can take a while and you don’t want your jack to fail.
Another safety measure you can take, after you take the tire off, put it under the quad near the jack stand. This is good to do just in case the machine falls off the jack or jack stands somehow. If you have a leg under there, it could save you a lot of pain.
I always start by loosening the lugs before I jack it up. That way it’s easier to remove when the ATV is lifted. You don’t have to worry about rocking the machine while its raised up if you get a stubborn lug nut.
The caliper will typically be bolted on with two bolts, either an allen head bolt or a 12mm bolt.
Remove both bolts and the caliper should come off easily.
This may be a good time to Change The Brake Pads On Your ATV if they need to be done.
The caliper may have a line going into it, that’s ok you don’t need to remove that or do anything else with the caliper. Just move it and let it sit somewhere out of the way the best you can.
Remove Axle NutAfter you’ve got the caliper off, it’s time to remove the castle nut holding the hub in place. Usually there will be a cotter pin holding the castle nut in place.
This is to prevent the nut from loosening while you ride. The cotter pin is easy to remove with a pair of pliers. Some machines will have a stake nut here instead of a castle nut.
I found it easiest to remove the castle nut with an impact wrench. Sometimes they can stuck on there pretty good, and if you don’t have a breaker bar, doing it by hand can be tough.
Once the castle nut is off, you can remove the hub, which will usually have the brake rotor attached to it. Some machines will have a guard mounted on the knuckle behind the brake rotor. Remove the guard, this is easy to remove and is usually only held in place by a few bolts.
The upper and lower ball joints will be held on to the knuckle by nuts usually with cotter pins in them.
Remove the cotter pins and take the nuts off, you should be able to slip the ball joint out of the knuckle after that.
They sometimes take a little persuading, but usually come out pretty easily with a little hit from a hammer.
Do this for both the top and bottom ball joint connections to the knuckle.
Remove Tie Rod Ends From KnuckleTo remove the tie rid ends, you will typically need two wrenches. Most of the time they are about one size apart, that’s helpful if you only have one of each size wrench.
The bolts for the tie rod ends will most likely be held in with cotter pins too. Remove the cotter pins and bolts holding the tie rod end into place.
Once the bolts are off the tie rod end should easily lift up. Just pull it up out of the knuckle and move it out of the way. There is no need to take the tie rod end apart any further than this, you can just rotate it out of your way.
Remove Shock Absorber BoltYou only need to remove the bottom shock absorber nut and bolt. You will need two wrenches for this part as well.
The shock absorber is held in by a bolt and nut set up connecting to the swing arm.
I found it easier to hold the bolt in place with a wrench and use an impact wrench to remove the nut.
Once the bolt and nut are removed, you should be able to move the shock absorber up and out of your way.
On some models of ATV or UTV, it will help make this whole job easier to do this step right after you’ve removed the wheel. You will notice a better range of motion in the whole shock and swing arm assembly after you remove the shock absorber.
It can give you easier access to the other parts you need to remove in the previous steps. I’ve just always done it this way and never had any issues, it depends on your machine and how you want to go about it.
Remove Knuckle From SuspensionAfter you’ve removed the shock absorber bolts and got it out of the way, you should be able to just pull the steering knuckle assembly off the axle. Sometimes it can be a bit stubborn and you’ll have wiggle it to get it started.
Remove Outer Seal And BearingsNow you’ll need to remove the seal and bearings from the steering knuckle. The seal will need to come out first.
They do make a special tool to make this easier like this Jecr Bearing and Seal Puller Tool from Amazon.
But I’ve got it done with just a screw driver before. Don’t get me wrong the seal puller tool makes the job a whole lot easier, and is useful for other projects as well. But you can get the seal out with a screw driver if your persistent enough.
To get the bearing out you’ll need a long center punch. Keep tapping around the bearing to keep it centered as you knock it out. You will most likely not be able to push the bearing clear through from one side of the knuckle to the other, so the bearings will need to removed from both sides separately from the inside out.
Clean Knuckle And Install New BearingsOnce you’ve got the seal and bearing out of the knuckle, it’s a good idea to clean the knuckle of any dirt and debris that might make installing the new bearing more difficult.
As for the bearings you use, it’s up to you. There are plenty of options out there, just make sure you get the right ones to fit your machine. I like using the All Balls bearings and seals, I’ve had good luck with them in the past.
Here’s a link to an All Balls 25-1404 Wheel Bearing Kit on Amazon, the kit comes with the bearing and seals. That’s a good place to start looking for the bearings and seals to fit your quad.
Once you have the bearings you need to install them in the knuckle assembly just as they were when you took them out. There is a sprecial bearing press you can use to press the bearings back in.
But I’ve always just used a large socket that is about the same size as the bearings and hammered them back in. Be careful not to hit the inner part of the bearings assembly because that will damage them. Use the right size socket that lines up with the outer edge of the bearings assembly. You could also try using the old bearings if they’re still intact, they should be the same size after all.
The bearing seal will go back on the outside of the bearings after you’ve got them installed. They should seat nicely on the outer edge of the knuckle like they were when you removed the old ones.
Make sure you don’t forget the spacer between the bearings if your model has that.
That’s it, you’re done replacing the wheel hub bearings on your ATV or UTV, now it’s time to put it all back together. Everything will go back together the same way took it apart just follow the steps above in reverse.
I do recommend you use all new cotter pins. People will say you can re-use them, and I’ve seen people re-use them successfully. But they’re just so cheap, and it’s recommended you use new cotter pins every time so that’s what I do.
Here’s a link to a 555 Assorted Piece Set Of Cotter Pins for around 12 bucks on Amazon. I also recommend using a new stake nut instead of re-using the old one. This only applies if you have a stake nut instead of a castle nut from the remove axle nut step.
The wheel bearings on your ATV or UTV will just go bad over time. The best thing to do is make sure you’re installing the bearing seal the right way. Riding through mud and water is one the best parts about off-roading, so eventually water and dirt will get in there. But a good seal can help them last longer.
Also, avoid pressure washing the hub assembly. It’s ok to pressure wash your machine to clean it after a muddy ride. Just be careful around the bearing seal and hub assembly area. The pressure washer can push water into the bearing making them wear out faster.
Most of these steps will be the same, except you will be dealing with the hub assembly to replace the bearings. Also, you will want to freeze the new bearings before replacing them in the hub.
To remove the old ones the process will be the same also. Use a long punch or other tool to remove the old wheel bearings.
Some models will have a snap ring clip holding the bearing in place. You can easily remove this though with a pair of snap ring pliers.
Use a heat gun to warm up the hub assembly where the new bearings need to go.
Take the new bearings out of the freezer and press them into the hub. You can use the old bearings or a large socket and hammer to help push the bearings in.
Put everything back together the same way you took them apart and you’re good to go.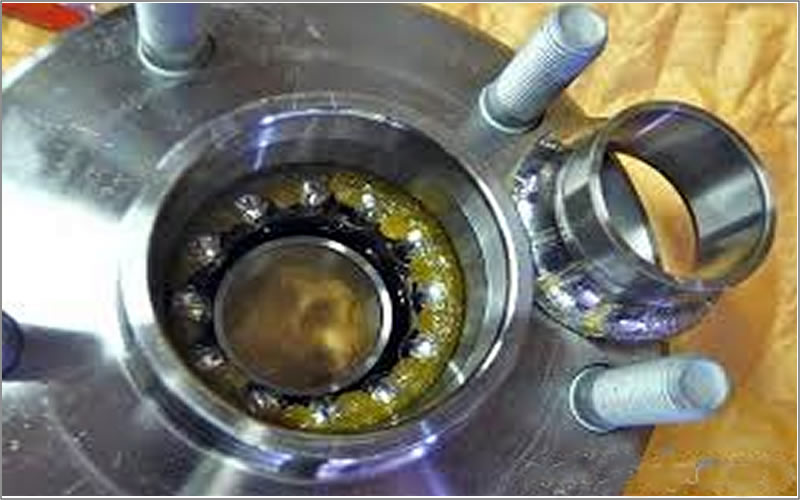 Remember to use all new cotter pins to keep things tightened down the way they’re supposed to be.
Sharing is caring!
If you own an older model ATV or Side-by-Side, at some you will have to service your wheel hub bearings and it is not always pretty.
Many things can cause the bearings to go bad and there are a few ways to prolong the life and prevent the damage, providing you catch on soon enough. Most wheel bearings are sealed bearings, but that does not always prevent water from getting in as the bearing ages. There are also seals that go in on top of the bearing itself to keep debris and trail muck from getting in close to a bearing. These can sometimes fail or be prematurely damaged, allowing mud and water to build up on the bearing itself.
If you ride in a lot of water or mud and do not clean your machine on a regular basis, then chances are that your wheel bearings will fail faster.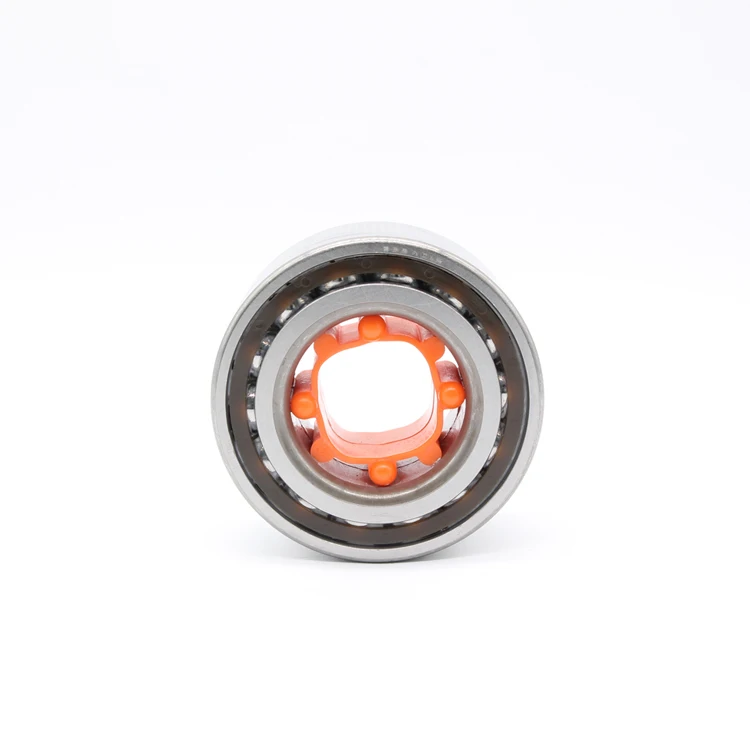 Pressure washing your machine after a good ride is not always a bad thing, but if you put really high-pressurized water in the close proximity of the wheels or axles you could be forcing water and silt into the bearings. Our advice would be to gently spray off any mud or debris with a garden hose. This takes longer, but it could prolong the life of your wheel bearings and any other pivot bearing for that matter.
Bearings and seals are available from various manufacturers but we finds that All Balls products seem to hold out the longest.
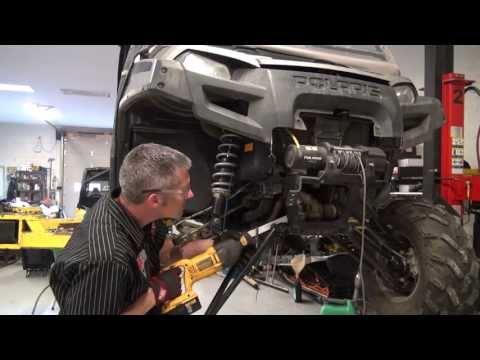
We have laid out a basic process for bearing access and replacement using a Suzuki Eiger 4×4. Most utility ATVs and also the vast majority of UTVs 2010 and older will use the same basic process, but a good OEM service manual is always nice to have for reference when working on your particular model.
Obviously you will need to jack the machine up and place it securely on a stand of some kind. This is primarily for your safety, but it also allows a better access point to the wheel hub assembly. After removing the wheel I like to place it under the machine just in case the jack or stand fail or become dislodged as this will give me a little room between the machine and the floor to escape should I have a foot or leg under there.
Be sure to add a jack stand when getting the front end jacked up to keep the machine where you want it.
Removing the lower shock bolt and freeing the shock will allow better range of motion in the suspension for even better access to the parts you need to remove. Loosen the top shock bolt and raise the shock up out of the way.
Unbolt the shock and move it up out of the way in order to get more free range movement in the suspension while you work on it.
After the wheel comes off you will be staring at a wheel hub. There should be a large castle nut on the end of the axle and potentially/hopefully a cotter pin sticking through the castle nut. In some cases you will have what’s called a stake nut on the end of the axle instead of a castle nut.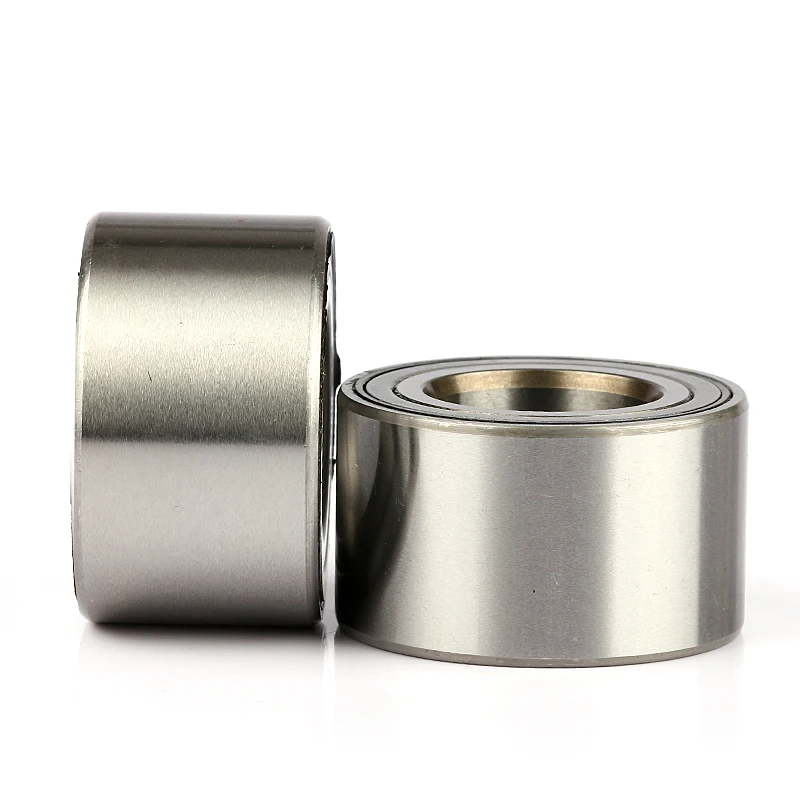 The outer face of the stake nut is thin and flexible metal and should be staked into a keyway on the end of the axle. This insures the nut does not back off. Most will say these can be reused, but this is something that is cheap and it would be in your best interest to simply replace it with a new nut.
The axle nut varies from one ATV to the next. The castle nut is common, but a stake nut may be found on others.
After removing the axle nut you will need to focus on the brake caliper. The caliper will have 12-14mm bolts or an Allen-head type bolt. Our Suzuki Eiger had the Allen-head bolt. There should be two bolts holding the caliper in place. Once removed, the caliper can be slipped off of the brake rotor. This should allow the wheel hub to slide off of the axle.
The brake caliper bolt’s can be either Allen head or metric flange head bolts.
This is when you will want to remove the steering tie rod from the knuckle as it is much easier than when the knuckle is loose from the suspension arms. There should be a castle nut and cotter pin on this part as well.
Removing the steering tie rod before loosening the ball joints simply gives you more leverage on the small castle nut.
Your next focus will be on removing the wheel bearing knuckle from the suspension arms. This Suzuki has a pinch bolt type connection holding the upper and lower ball joints to the bearing knuckle. By removing the bolt, the end of the ball joint should slip out of the knuckle. You may need to encourage the arms to drop off with a little help from a good hammer. Once free from the control arms you can now start on removing the outer seals and bearings.
These upper and lower ball joints are held in place by a simply pinch bolt system.
The seals in the bearing knuckle will need to be removed first if they are still intact. This then gives you access to the bearings. Our Suzuki Eiger has a small spacer between the bearings. When pushed aside, this allows enough space to gently tap the bearings out with a long center punch.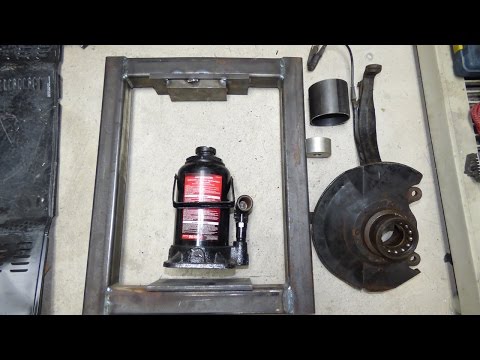 This can be a tough task, but be patient and be sure to move the punch from side to side, tapping a little at a time to keep the bearing square in the hole so it will come out easier.
Getting the outer seals off of the knuckle is easy with a seal removing tool or a flat head screw driver.
The bearing spacer can be moved from side to side to allow access to the bearing race below. The bearings have to come out each side and will not push all the way through the knuckle on most machines.
Once the old bearings are removed, the knuckle needs to be cleaned and it is ready for new bearings. Simply look for a good socket that fits the outer race size of the bearing to be used for reinstalling the bearing into the knuckle. Be sure you do not hit the inner race of the bearing or use it to install the bearing as this could weaken or potentially break the new part. The seals will go in the same way and should seat on the outer edge of the knuckle. Be sure you do not forget to install the spacer between the bearings.
I used this large socket in lieu of a traditional bearing press as it was the perfect size to get the bearing seated in the knuckle.
Most seals will seat just under the surface of the bearing knuckle. If the seal goes in too far the lip may not seal correctly.
Though not all bearing knuckles are the same, for the most part you will be able to read between the lines once you dig into the repair. This is also a great time to look for worn tie rod ends or even ball joints and a great time to replace them while the machine is already torn apart.
— DRIVE2
Do not violate the seating surface of the hub.
Full size
hub from machine .
Full size
We take a grinder and make a cut with a cutting wheel on both sides (the thickness of the circle is 2 mm-2.5 mm).
Full size
We take a grinder and make a cut with a cutting wheel on both sides (thickness of the wheel is 2 mm-2.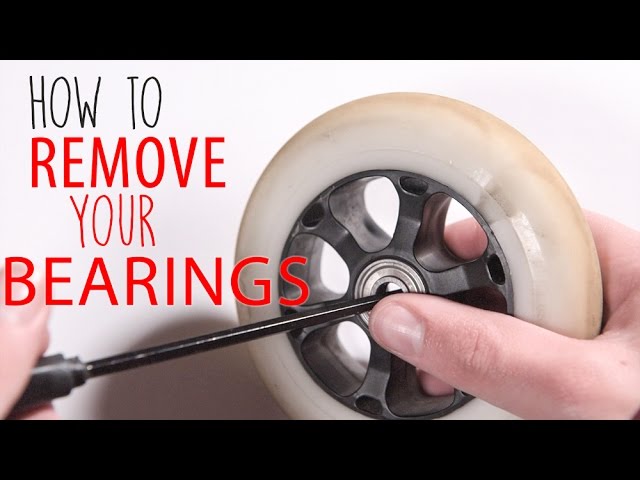 5 mm).
Full size
We take a grinder and cut it with a cutting wheel on both sides (thickness of the wheel is 2 mm-2.5 mm).
Full size
We take a grinder and make a cut with a cutting wheel on both sides (the thickness of the circle is 2 mm-2.5 mm).
Full size
Separator puller, we clamp the race from the bearing.
Full size
Separator puller, we clamp the race from the bearing.
Full size
We press with a press through the mandrel.
Full size
The bearing race has been removed.
Full size
Hub without damage.
Full size
Separator puller with bearing race removed.
Complete size
Separator puller with removed bearing race .
Full size
Separator puller with bearing race removed.
Full size
Separator puller with bearing race removed.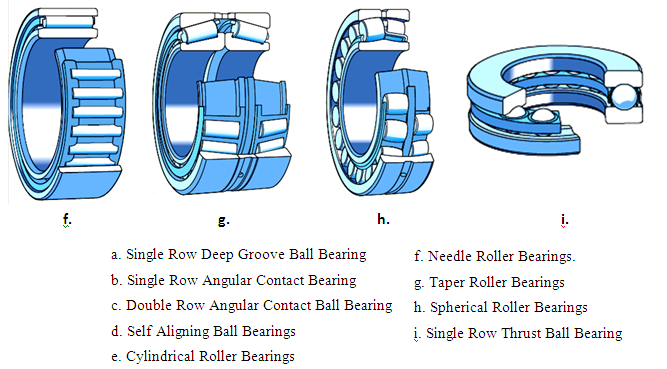
Full size
On the bearing cage you can see where the grinder needs to make a cut.
Full size
On the bearing cage you can see where the grinder needs to make a cut.
Full size
On the bearing cage you can see where the grinder needs to make a cut.
Full size
On the bearing cage you can see where the grinder needs to make a cut.
Full size
On the bearing cage you can see where the grinder needs to make a cut.
Full size
On the bearing cage you can see where the grinder needs to make a cut.
The right hub aroused suspicion (microscopic play). It didn't get hot while driving and didn't make any noise. Having a pair of Japan Cars h33012JC in stock, I decided to replace it. I trained on cats, i.e. on a similar fist lying in ferrous metal. In general, everything is easy to understand if you know how. I share for those who don't know.
Attention! This operation is irreversible - it is unlikely that it will be possible to assemble the bearing back and drive quietly. The removed fist is placed on the vise from above so that the hub passes between the jaws of the vise. The emphasis should be on the fist itself, and not on the protection of the brake disc. A head of a suitable diameter is taken and the hub itself is knocked out with an ultra-high-precision nanodevice - a sledgehammer. And by a happy coincidence, along with her one of the bearing races.
The following picture is presented to the eye:
With an awl and a screwdriver, the retaining ring can be removed remarkably, unless, of course, a special puller is available. On the reverse side, using the tip of a knife, the hub seal is removed. And again, with a suitable diameter head, the remaining bearing is knocked out of the fist, you need to hit the inner race. The most interesting thing is to remove the second half of the inner race, which remained on the hub. After trying a bunch of options, including with pullers and welding, I found the only correct one. Bulgarian. A cut is made obliquely along the clip. Of course, you need to monitor the depth and not touch the hub. Then the hub is placed on the board and a chisel is inserted into the cut. From a sharp hammer blow, the clip bursts to the end (carefully - the metal is red-hot - it happens that a piece flies off and kills a crow flying by). After that, the burst clip is removed by hand.
Having gained the necessary experience, he began to work on his fist. This time it took much less time and the lives of the crows flying by. As a result of the analysis of the old bearing, scraps of separators were found. In general, the balls and clips are alive. Next, the fist is thoroughly cleaned of rust, and the new wheel bearing is languishing in the freezer, carefully wrapped in a bag. The cleaned and washed fist is poured with engine oil and heated with a gas burner (without fanaticism, otherwise, when the bearing is installed and takes heat, you can burn the grease).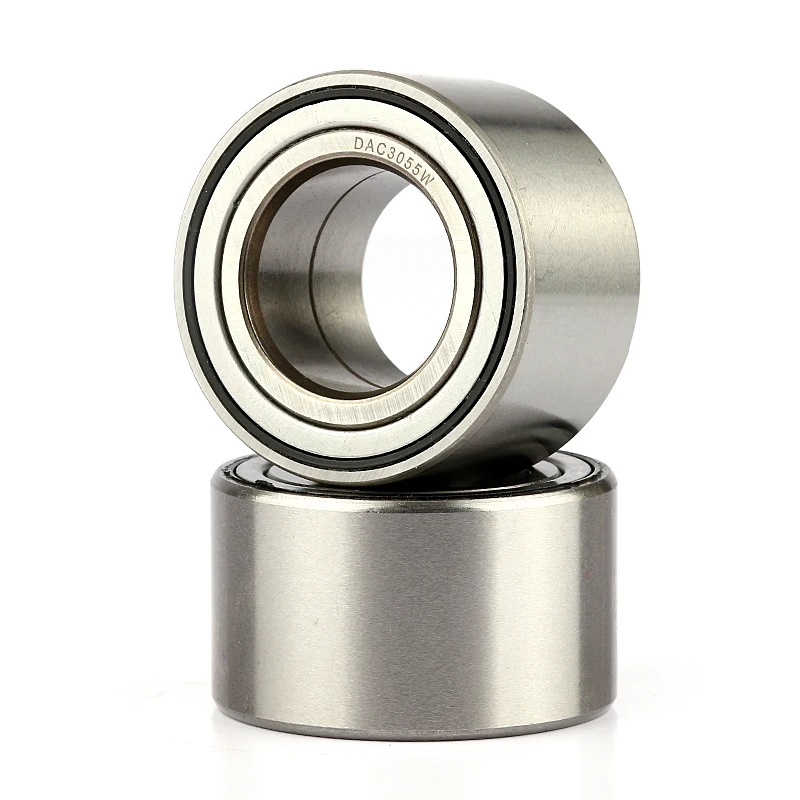 In the meantime, the hub must also be put into the freezer, and the new bearing is placed in the socket and covered with a bag (from dirt), the outer race of the old bearing is placed on top, and with small frequent blows crosswise everything is easily put into place. The retaining ring is installed. Then we take out the hub, put it on a plank, a fist on top, a suitable head according to the diameter of the inner clip and sharp blows of the nanodevice ... You don’t need to beat until you turn blue. The hub will finally sit in the clips already when the hub nut is tightened on the car (240Nm is not for you).
In general, for these purposes there is a service station and a press. But personally, I am aware of what I am doing, I appreciate the measure of my accuracy, and I accept the fact that it is for me to drive a car, and not for a stranger.
Issue price: 400 ₽
Welcome! Bearing ring - this unit is located in many places in the car, but today we will touch on the hub, on this thing, namely the hub, the bearing is installed from the factory and the bearing comes with the ring, and sometimes when the hub is removed, this ring remains to sit on it, and itself at the same time, the bearing remains in the steering knuckle in its place and therefore, with any removal of the hub, this bearing must be changed, but its component parts also need to be replaced, but basically the ring of this bearing can be very difficult to remove and it is no longer possible how it is removed, in order to avoid this, we wrote this article in which we explained in detail how to properly remove this ring from the hub, if suddenly, when removing it, the ring remained on it.
Note! In order for you to be able to remove the bearing ring, you will need to stock up on a set of tools in which you will have: A screwdriver, and it is also desirable that there be a vise, a hammer, a chisel and a needle file nearby!
Where is the bearing ring located on the hub? Since we are talking about front-wheel drive cars, this ring is located on the hub itself, that is, on its longest part, and over time it rusts there and as a result of which it can then be very, very difficult to budge, its more detailed location look at the photo below:
When should the bearing race be removed from the hub? It needs to be removed only if this ring remains sitting on the hub itself after removing the hub, twisting this ring is an integral part of the wheel bearing and due to the fact that the bearing sits very tightly on the hub, it happens that when the hub is removed, the ring simply remains sit on it and the bearing itself remains in the steering knuckle, but it also happens that the ring remains with the bearing and the hub is completely removed without the ring, so as they say, this ring will need to be removed depending only on the case.
Removal: 1) At the very beginning of the operation, you will need to remove the hub itself from the car. (Detailed removal is described in the article titled: "Replacing the front hub bearing" from point 1 to point 25)
from the hub, as shown in the figure:
3) Then, when the dirt protection ring is removed, use a chisel and a hammer and use them to knock the bearing ring off the hub, but only knock it down carefully, do not damage the hub itself and do not leave any enthusiasm, but if you leave all the scuffs then carefully remove them with a needle file and do not overdo it, otherwise if you remove too much metal from the hub and leave its long part unequal, then in the future you may expect problems, so do everything carefully and if already it so happened that you removed too much metal, then in this case it is recommended to replace this hub with a new one. (For information on how to replace the hub, see the article: "Replacing the front wheel hub on a VAZ")
Note! When you shoot down the ring, knock it down not much and in different places, that is, for example, hit the topmost part twice, then hit the bottommost part twice, etc. Because if you constantly hit only the very top of the bearing ring, then there is a high probability that you can damage the hub itself!
Installation: This ring is installed in its place, in the reverse order of removal.
How to remove the inner bearing race from the hub
Replacing the front wheel bearing Suzuki Chevrolet Cruze 4WD.
If, while driving on smooth asphalt, a rumble is heard from the front suspension, and this rumble increases in turns, and the frequency of the rumble depends on the speed, then the wheel bearing must have buzzed and it's time to change it. If you drive for a long time with a roar on a collapsed bearing, you can destroy the rubber or grind off the brake disc. With all this, you can shake the hung wheel with your hands to see the free wheeling of the wheel in a vertical plane. The unique number of the front wheel bearing is 43440-54G02, but inside the box is Koyo DAC4072W-10CS74, which is significantly cheaper than the Suzuki original! It is better to carry out this function in a special service. Especially if you have never done anything like this before without the help of others. But if there is an irresistible desire to do everything yourself, then below is an annotation for self-substituting the bearing. I did this function 3 times already.
Photo of new bearing removed from box labeled 43440-54G02.
In addition to the unusual bearing, you can also order cheaper (or affordable) analogues, for example, Febest DAC40720036.
Or Koyo DAC4072W-10CS74, which is the original, only packed in a different box:
This is how it looks on the diagram:
for unscrewing the hub nut, a bologna, keys for 17 and 14, a hammer or a sledgehammer. I recommend pressing out the old bearing and pressing in a new one on the press. You can negotiate for a lower fee at the nearest 100, which is engaged in suspension repair. A huge part of the fee there is taken for disassembly and assembly. If they bring an already removed steering knuckle with a hub, then they will take little money for work on the press. Thus, we will exclude the most difficult process from the list of our works. At 100, the inner race of the bearing is usually cut off with a grinder from the hub (I don’t have
220V, so I removed the clip with a puller) and you don’t have to suffer yourself with this not the most common procedure. Moreover, due to inexperience, you can destroy the hub with a grinder disk.
To remove the steering knuckle and hub, you must first break off the hub nut by 30 (part # 09159-18008 in the diagram). This can be done without removing the wheel, just by removing the plastic plug on the casting, or you can remove the wheel and ask your partner to press the brake pedal with all his might, and in the meantime, tear off the CV joint nut on the hub. In the 2nd option, the car can fall off the jack. After the nut is torn off and just spinning by hand, you can remove the wheel.
After we unscrew the 2 bolts by 17 that secure the brake caliper to the steering knuckle and tie the caliper to the spring so as not to break the brake hose.
If the brake disc cannot be removed by hand, you will have to rip it off by screwing 2 bolts into the threaded holes specially created for this.
After removing the brake disc, unscrew the nut and knock out (tap a couple of times on the protrusion on the steering knuckle into which the ball control rod pin is inserted) the control rod end.
Later it is necessary to unscrew the ABS wire with a 10 wrench and pull out the Abs sensor from its seat in the steering knuckle. You need to do this very carefully. The sensor housing is plastic. Unscrew the bolt that secures the sensor to the steering knuckle. And we begin to pick the sensor with a flat screwdriver, twisting the sensor with pliers in different directions.
Next, you need to unscrew 2 bolts by 17 (parts No. 09103-12051 not in the diagram) that fasten the rack to the steering knuckle, pull out the bracket that fixes the brake hose, unscrew the bolt by 14 (part No. 09100-10184 in the diagram), which fixes the ball pin and the steering knuckle with the hub in our hands.
Now you can start pressing out the old bearing. First, we knock out the hub with the inner race from the old bearing from the steering knuckle.
Later, the circlip holding the bearing in the steering knuckle must be removed. There is no spare ring in the kit of the unusual bearing!
Next, proceed to pressing the outer race of the bearing from the steering knuckle. On the inside of the steering knuckle is a collar that fixes the bearing. Knock out the remnants of the bearing can only be outward.
After that, it remains to remove the remnants of the inner race from the hub. You can use an angle grinder (grinder), or remove it with a puller.
Steering knuckle and hub without bearing.
Hub without bearing.
Old and new bearings.
I recommend entrusting the pressing of a new bearing to specialists from service stations using a press. Pressing in a new bearing with a hammer can damage it. In an unsuccessful scenario, you can damage the hub or steering knuckle. Then the repair will become much more expensive! The bearing is 2-sided. The inner side (to the CV joint) with a protective metal shutter on the stuffing box. First, we hammer the outer race of the bearing into the steering knuckle using a spacer (old bearing).
Don't forget the circlip!
Then we press the hub into the inner race (through the spacer) and you can put the fist in place.
The work is almost finished. Now you need to install the steering knuckle with a new bearing in its place and tighten all the nuts and bolts thoroughly - it’s better not to joke with the suspension!
The hub bearing is the main element of the wheel. It is he who allows the wheel to turn. It has very high loads and, like any part, it fails. This is a "survivable" element of the car, but it also has a resource.
 It will be heard both on the street and in the cabin.
 Replacing the front hub bearing VAZ 2109 2110, with these symptoms is inevitable.
3. Apply the handbrake, engage 1st gear and chock the wheels.
4. Loosen the bearing nut with a socket or 30mm socket wrench. It is tightened very tightly, so the head or key must be strong so as not to bend or break. Use a long lever to loosen the nut (piece of pipe).
5. Loosen the wheel bolts.
6. Raise the front wheels, in which case the anti-roll bar will not interfere with the repair. It is also possible to lift only the wheel on which the repair will be carried out. In this case, to wring out the suspension elements, use a pry bar. Place a safety support under the car next to the jacks (stump or something similar). -We put a new clip in the drum and knock off the hub. You can remove the bearing race. During the repair, sometimes considerable efforts will be made, and if the jack breaks, the support will hold the car.
7. Remove the wheel, brake shoe guide with caliper and brake disc.
8. Tie the brake shoe guide together with the caliper so that they do not hang on the brake hose and damage it.9. Loosen the bearing nut and remove the washer.
10. Insert bolts about 135mm long and threaded M12 x1.25mm into two diametrically opposite holes in the brake disc. Suitable mounting bolts, heads that are on the "classic" (2106, 2107, etc.)11. Return these bolts to the holes of the hub (opposite each other) to the full thickness of the hub12. Sharply driving the brake disc over the bolts, as if on guides, hit the bolt heads with it and thereby you will remove the hub.
13. Remove the bolts securing the ball joint to the steering knuckle (Replacing the ball joint) and remove the CV joint (grenade) from the bearing hole.14. Use pliers to remove the retaining ring.15. Using a puller, press the bearing into the cup, which is located outside the steering knuckle, while the bolt presses on the inner ring of the bearing through the washer from the inside of the knuckle. Puller with bearing
(although this is also not so simple, but without a puller, but of a different kind, even more difficult) and inserting it into the hole where the bearing is located, beat it with a narrow part through something metal.
17. As a rule, after the hub is pressed out, the bearing ring (cage) usually remains on it. You will need a puller to remove it. If it is not there, pry it off with a screwdriver and remove the dirt protection ring ... 18 ... move the bearing ring with a chisel.
19. When the ring is removed, remove the burrs from the chisel with a needle file.
20. Install the dirt ring and screw it onto the hub.
21. Clean and lubricate the inner surface of the steering knuckle.22. Using a puller, press the new bearing into the steering knuckle. Information on the choice of the hub bearing method is with a puller and remove the front. In this case, the large washer of the puller should rest on the inside of the steering knuckle so as not to damage its dirt protection rings, and when pressing in, the new bearing can be pressed through the old bearing, which will transmit force only through the outer ring.
When replacing the hub bearing, it often jams, and it seems to remove it from the hub without damaging it.
Removing the inner bearing race from the hub without a puller.
Install the circlip.23. Using a puller, press the hub into the bearing, pre-lubricate the hole with oil or WD-40. Now the puller washers rest against the inner ring of the bearing and the hub.
If there is no puller, drive the hub in a little and drive the end of the CV joint out so that the hub nut can be screwed on. By turning the nut, you will attract the hub with the CV joint, like a puller. Hold the bearing on the inside of the steering knuckle.
Reassemble in reverse order
Tighten the hub nut until the end only when the wheel is already on the ground. How to remove and 1 cm bearing race from the hub with a cage puller and. Don't forget to bend the collar over the nut. Replacing the front hub bearing VAZ 21092110 finished
And also transfers through itself the entire load, static and dynamic, from the machine to the wheel.
The node is very responsible and loaded, its gradual falling into disrepair on a regularly operated car is inevitable. The road surface also contributes to this, especially strong impacts when hitting deep potholes or other sudden obstacles.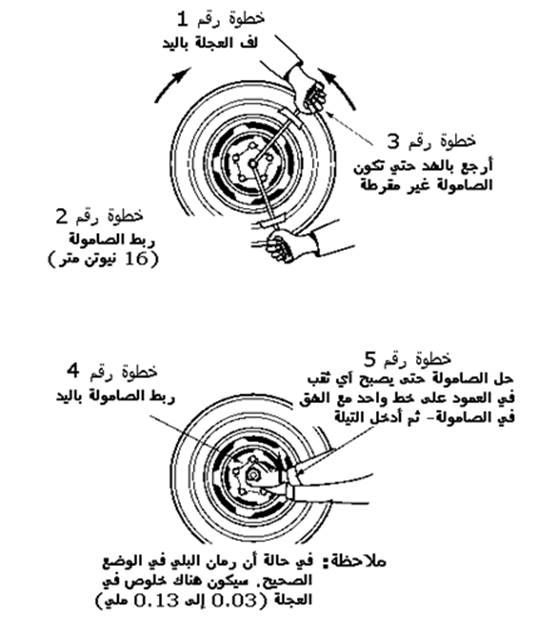 Fortunately, it still needs to be repaired before marketers get to it 🙂
There are several types of bearings used in the assembly. One of the most common is a double-row ball.
The most common steering knuckle assembly, a very common type of McPherson suspension. Everything superfluous has already been unscrewed and removed:
The unit has all the indications for replacing the bearing - a rumble that grows with speed, an increase in the rumble when loaded in a turn, an almost complete absence of a rumble when turning in the other direction when the bearing is unloaded.
We remove the entire fist and drag it to the vice, for subsequent work it will have to be fixed in any way.
The manufacturer recommends using a puller to remove the hub - like a reverse hammer.
The tool is good, but unfortunately expensive for personal occasional use. If quality. But you can make your own.
To remove the hub, there is a much easier, faster and more economical way - an ordinary assembly. How to remove the bearing race We clamp the hub in a vise, and hook the fist with one (preferably two, from different sides) assembly:
In this case, everything that holds the hub is about 15 millimeters of one inner bearing race.
The second inner race remains on the hub:
And it would be nice to have a puller to remove it. A very common type, inexpensive in price, having application in many places during repairs.
Although there are craftsmen who knock down the clip with a chisel, or cut it off with a grinder.
Put the hub aside, take the fist. The metal dust boot can be easily removed with a screwdriver:
The second inner clip can be removed by hand:
Three Torx30 bolts can be unscrewed from the outside and the brake disc cover can be removed:
The manufacturer again prescribes to remove the inner and outer seals using a puller - a reverse hammer. You can somehow try to use the existing one.
If not, you can use brute force - the manufacturer prescribes new oil seals. Another option is to tap gently evenly around the circumference with a wide, non-sharp screwdriver:
If they are in very good condition, they can be reused, in case of a defective bearing, for example. Removed external:
The second oil seal is removed in the same way, from the inside:
The bearing circlip is removed next. Platypus pliers are fine.
The outer bearing race can be removed from the knuckle. They usually use different tools - an ordinary sledgehammer, a vice, the most convenient is a press, if there is one 🙂
Pressing out is done using one inner clip, which returns with one row of balls to its place. Otherwise, there is nothing to catch on the outer clip, this is clearly visible in the photo with the outer gland removed.
Naturally, after such impacts, the bearing becomes defective. And if you had the intention to get a similar whole bearing from someone else's fist in order to put yourself - alas, alas, there is almost no chance.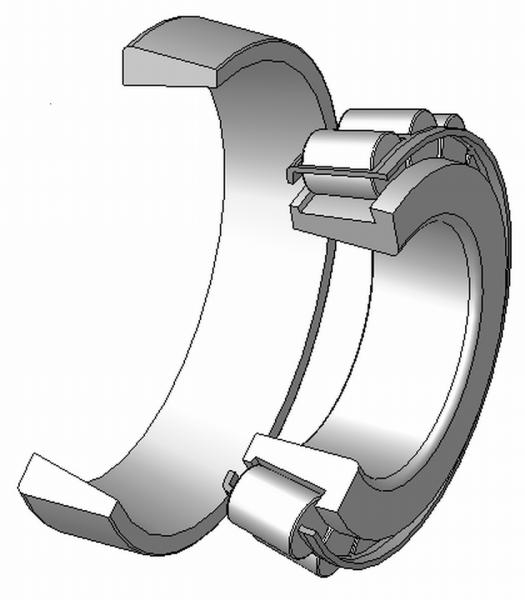 Especially when pressing out with a sledgehammer 🙂
Clip removed. You can also see the manufacturer with the bearing marking. In this case, Toyota is the manufacturer of the car, and the bearing turned out to be NSK. Variations in the form of Nachi or Koyo are possible. If you know the right marking for the order. the bearing will be two to three times cheaper than the original. Likewise with seals.
Replacement bearing. Nachi. Open type (otherwise why would there be additional oil seals? 🙂), in preservation grease (however, like NSC and Koyo).
Solely so that it does not rust, however, our services are often set right, and the cars drive, which is surprising - for a long time.
Wash out the grease. Kerosene, diesel fuel, WD-40, etc. Whatever you like 🙂
And we press it into a fist, the outer clip without internal ones, even without balls with separators.
The moment is crucial, and a sledgehammer is no longer suitable here - shock loads are useless. It is quite possible to cope with a vise, if they allow it. To facilitate the process, you can warm up the fist, apply lubricant.
Abs cope without preparation. The outer race from the old bearing as a mandrel will fit just perfect 🙂
In this case, the further use of the old fist and hub after dismantling and inspection is considered impractical, due to some defects introduced after early calls to different services.
Bearing in place, retaining ring in place, grease can be applied. We recall that the assembly is highly loaded, so we use the lubricant for the appropriate purpose:
Quantity, hmm, the manufacturer gives recommendations almost in grams 🙂 Or a percentage of the free working volume of the bearing. According to different opinions, putting too much grease into the assembly is even harmful:
We put the inner race on the outside, press in a new oil seal (the outer race of the old bearing is very well suited as a mandrel), do not forget to screw the brake disc casing into place:
We apply grease to the sealing lip and press the bearing onto the hub, remembering to put the second inner race.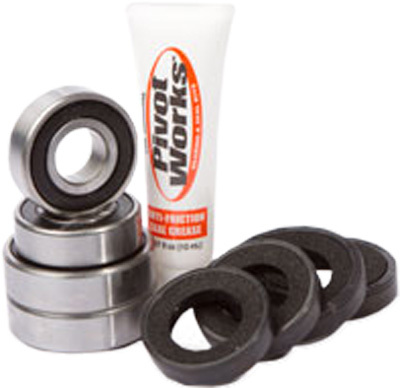 We put effort into it. As a mandrel, the inner race of the old bearing successfully looks like 🙂
The final touch in the form of an oil seal on the inside and anther of the CV joint. Grease is also applied to the sealing lip:
The bearing has been replaced, the knuckle is ready for installation on the car.
Do not forget to tighten the hub nut to the specified torque, thereby pulling the inner races of the bearing to work at design loads. Otherwise - a quick failure of the bearing and re-replacement 🙂
The ease of rotation of the wheels on the car is ensured by the presence of rolling bearings installed in the hub. But these elements experience heavy loads during operation, since they must not only ensure high-speed rotation of the hub and the wheel attached to it. Both the hub and the bearing must also take on the weight of the car, since only this bearing is located in the connection between the hub and the axle, so it takes on the entire load.
The front hubs of front-wheel drive vehicles usually use a heavy-duty bearing. But the rear one is somewhat inferior in this indicator, moreover, in the front of the car, the load on this element is almost always the same, since this bearing takes only the weight of the front of the car along with the engine and gearbox.
But the rear wheel bearing often has to work with a changing load, which depends on the workload of the passenger compartment, as well as the luggage compartment, so the rear wheel bearings fail much more often.
Signs of rear wheel bearing wear are very easy to recognize. When driving in the cabin, a hum appears in the rear of the car. At low speeds, a creak can be clearly heard.
In cases where the bearing has begun to fail, a crackling sound may occur as the wheel rotates, indicating that broken pieces of the bearing have begun to fall between the rollers.
Checking the status of this element is also easy. It is enough to hang the rear wheel with a jack, check for the presence of axial play by rocking the wheel.
Then the wheel should be turned, listening for the presence of squeaks. If the destruction of the bearing has begun, most likely the wheel will bite during rotation.
The next steps depend on the element used. On different cars, the bearing design may vary. For example, on the VAZ-2110, an angular contact double-row ball bearing of a closed type is used on the rear hub, outwardly it looks like a front hub bearing. But Daewoo Lanos uses a tapered roller bearing, consisting of two halves. Further, we will consider everything on the example of these two cars.
So, if there are signs of wear on the wheel bearing of the VAZ-2110, it is simply replaced.
In Lanos, however, hum, creaks and play can be eliminated by tightening the hub nut. Often it is enough to carry out this operation to eliminate backlash and rumble.
But if a crunch is heard during the rotation of the wheel or tightening the hub nut does not work, the rear hub bearing is replaced.
Rear hub with bearing VAZ-2110
First, consider the replacement of this element on the "Ten". The tools that will be needed are not so many, but specific ones will also be required. In total, you will need to have:
Having all this, you can start replacing. The car is placed on a flat surface, 1st gear is switched on at the checkpoint. While the car is on wheels, it is better to immediately loosen the hub nut. Often this nut is tightly tightened, so it may be necessary to extend the key with a pipe.
Then the wheel bolts are loosened, the wheel is jacked up, and the car itself is placed on supports. Next, the wheel is removed from the car.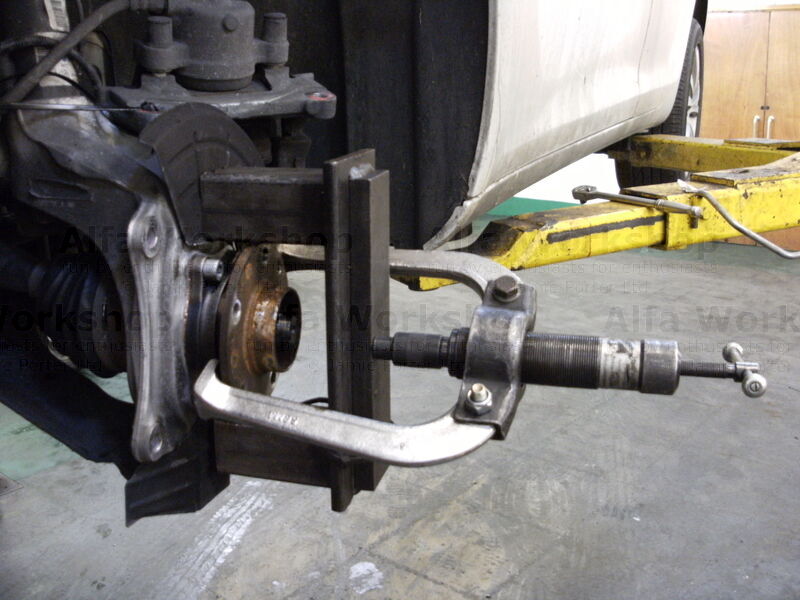
The brake drum will need to be removed before removing the hub. To do this, you first need to unscrew the guide pins. After that, the drum is removed from the hub. Sometimes it can only be removed by knocking down the drum with a hammer and a wooden tip.
Next, the hub nut is completely unscrewed to allow the hub to be removed from the axle. Since the bearing sits tightly on the axle, a hammer and a wooden tip are indispensable. It is necessary to knock down carefully, constantly turning the hub for its uniform descent from the axis.
Then it all depends on how the hub came off the axle. The fact is that with heavy wear, the inner race of the bearing can remain on the axle, and the outer one, together with the balls, in the hub.
In this situation, you will have to additionally remove the brake pads in order to “tear” the inner clip from its place, and then pull it off with a puller or with a chisel and a hammer. The method of tightening the inner race is not important, the main thing is to remove it without damaging the axle surface. If the bearing has come off the axis completely assembled, you can proceed to further work.
Press the bearing out of the removed hub. To do this, the retaining rings are first removed. Then with the help of a special puller. If there is none, you can simply knock it out.
But it is strictly forbidden to put a new element in place by hammering. Features of the operation of the bearing cage, and after the removed hub is necessary. Hub bearing replacement. bearing). Remove the inner race from the hub. It should be pressed in either with the same puller, or use a powerful vice, using the outer race of the worn bearing as a dressing.
After the new element has been seated, its retaining rings are installed, and the replacement of the rear hub bearing is completed and assembly can be started, which is performed in the reverse order.
On Lanos, this operation is performed somewhat differently, and fewer tools are needed:
The initial stage of work is almost the same as described above - the car is jacked up and the wheel is removed.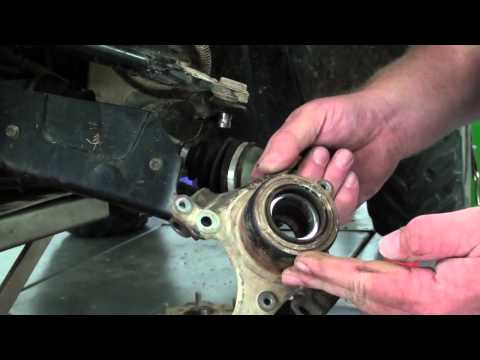
Next, using a hammer and screwdriver, the protective cap of the hub is knocked off. To unscrew the nut, the locking pin is first removed with pliers.
The hub nut is then unscrewed with a wrench and the thrust washer removed. After that, it will be possible to remove the brake drum along with the bearings. Often the inner race of the inner bearing remains on the axle. To remove it, you will have to use a puller or a hammer with a chisel.
Next, you need to press the outer race of the inner bearing and the outer bearing from the drum. For the convenience of work, special recesses have been made inside the drum, making it easy to knock out the outer races of the bearings with a hammer and a chisel.
Then press the outer races of the new bearings into the drum seats. It is better to do this with a vise and old clips as guides.
Then the inner race of the inner bearing is put on the axle and carefully stuffed with a hammer and a pipe equal in diameter to this race. The main thing is that she sits on the axis until it stops.
The next step is to install the drum in place, and then the inner race of the outer bearing is already installed. It remains only to replace the thrust washer and tighten the hub nut. It must be tightened to the stop, and then unscrewed a third of a turn to ensure the rotation of the wheel. Before installing the protective cap, the nut must be secured with a cotter pin.
After complete assembly, drive the car a little, and then make sure that the bearing does not heat up. If it heats up, you need to remove the cap again, pull out the cotter pin and loosen the nut a little more.
Source
Today I will show how to change the front wheel bearing on front-wheel drive cars without removing the rack and without a press.
If you have alloy wheels, first remove the center cap.
We find out what diameter the central nut, which fastens the joint.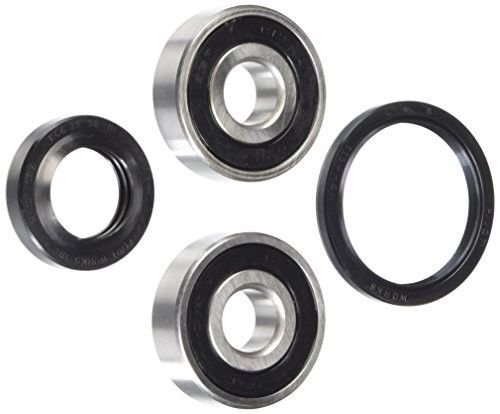
We take a very powerful head, in this case I have a 30 nut here, so the head is 30, respectively.
Then you will either need an assistant to apply full force on the brakes, or you will need to place wheel chocks under all four wheels.
Before starting to unscrew the wheel, turn it a little.
This is done so that when unscrewing the crowbar does not rest against the car body.
I put chocks and you can try to unscrew.
Immediately loosen the nuts on the wheel and jack up the car.
Completely unscrew the central nut, unscrew the wheel and remove it.
Completely unscrew the brake caliper together with the bracket, it is mounted on two bolts: one bolt on top and one bolt on the bottom.
We remove the brake caliper together with the bracket and hang it on the spring with the help of an electrode curved with a hook. Remove the brake disc.
If it does not come off, you will have to knock a little. But you need to knock not on the brake disc, but on the central tube of the hub.
At the same time I press the brake disc with a pry bar and knock on the inner tube of the hub. That's how easy and simple the brake disc is removed.
And in order to remove the brake disc well in the future, the seat must be well cleaned and treated with high-temperature grease for calipers.
Next, you need to remove the hub itself, it can be removed using a reverse hammer. A tube is screwed to the studs and twitches with the help of some kind of powerful weight.
Since I do not have a reverse hammer, I will simply knock it down with a hammer. That's how easy and simple the hub is removed.
In some cases, a reverse hammer may be needed, it also happens that the bearing race remains on the hub itself.
In such cases, the clip has to be knocked down separately or cut off with a grinder. Then you need to unscrew the lower ball joint and disconnect it from the lever.
To move the strut and remove the CV joint, turn the steering wheel so that the tie rod is as far out as possible.
In this case, I turn the steering wheel to the right. If it was on the right side, then the steering wheel would have to be turned to the left.
Then at the same time I squeeze the CV joint out of the steering knuckle and pull it towards me. Thus, the wheel drive is removed from the steering knuckle.
Now you can start removing the wheel bearing itself. I immediately delete everything that bothers me.
There is a retaining ring in front of the bearing, this must be removed.
This can be done with the help of round nose pliers, insert them into the hole in the retaining ring and squeeze. This will remove the retaining ring.
To make the bearing come out more easily, the rust must be removed with a metal brush.
To remove the bearing without removing the struts, you will need a puller. In this case, this is a puller from a VAZ-2108, 2109 car.
It is sold in any spare parts store for Zhiguli, it is quite inexpensive.
In this case, I change the bearing not on a VAZ, but on a Chevrolet Aveo. In order for this puller to fit the Chevrolet Aveo, it only took a washer to be machined.
I turned it with the help of a grinder, I just reduced it in diameter. Also, if you work on a puller, such a welded bolt from a Zhiguli is made for convenience, since it is inconvenient to use a simple pin here.
With this puller, the bearing is both pressed out of the steering knuckle and pressed back. To press out the wheel bearing, we take a puller, remove all the washers from it.
We unfold the smallest washer with a groove inward, towards the thread, insert the screw from the inside into the bearing. And on this side we put on two large washers.
On one side I will hold the screw with a spanner wrench, and on the side of the puller I will tighten the nut. Thus, the puller will squeeze out the bearing.
Be prepared for the fact that you will not be able to turn the nut by hand and press the bearing out. You will need some other long pipe.
I put this pipe in the form of a lever on the key and turn the key as a pipe. Thus, we twist until it stops, then remove the pipe and unscrew the nut back.
We remove two washers from the screw, the bearing has already begun to come out, and it came out flush with the steering knuckle.
To continue pressing out, put on the ring from the puller kit, then put on the large washer with the groove inside.
If space permits, we put on a small washer, then screw on the nut.
After that, we continue to rotate the nut and press out the wheel bearing. That's all. The bearing is pressed out, it is inside the puller.
Here is the bearing we just removed from the steering knuckle without using presses and without removing the strut.
After dismantling the bearing, protect the seat and lubricate the seat with high temperature caliper grease.
You can install a new bearing, it has no orientation, you can put it like this, like this, but I always put the inscriptions out.
To press the bearing, remove the straightening washer - this is the smallest washer. We put the largest washer on the screw.
It doesn't matter which side you put it on. We insert the screw from the back into the hub, then we put a washer of medium diameter on the screw.
Please note that the washer is installed with a groove towards the bearing.
This is done for a reason: the washer with a groove should press on the outer race of the bearing.
If the screw is long enough, put on the second washer. We screw the nut and press the new bearing into the steering knuckle.
Screw it in until it stops. Then unscrew the nut and remove the puller.
Then compress the retaining ring with round nose pliers and install it in place.
Very often, the inner part of the race from the bearing remains on the hub. As you can see, here she came out, but here she remained on the bearing.
Although I removed this clip with the bearing, I stuffed it back to show how to remove it.
Clamp the hub in a vice, set the chisel between the bearing race and the hub itself, strike the chisel and the cage should start to come off.
Then we take a hammer with a sharp thick angle, point it at the hub and strike it. Thus, the hub descends further. Then you need to knock on the edge of the hammer.
As you can see, this method works, but it only works if the bearing race is not strongly stuck.
If the clip is very stuck and does not budge, then only a grinder will help you.
With the help of a grinder, you need to grind off the clip, just grind it off, and not cut it off, because some people cut it, in fact, you need to slowly grind it down with a disk.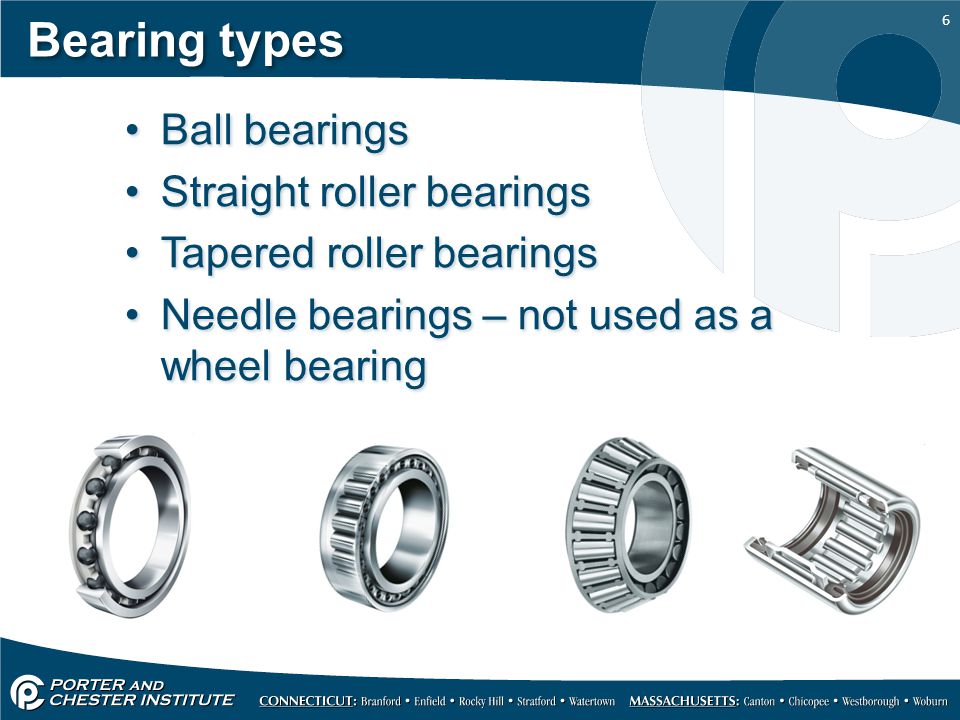
We grind the clip, as soon as we grind to the body of the hub itself, we will see blue overheating. Thus, we grind the bearing body very carefully and do not hook the hub.
After cutting the bearing race, it can be removed very easily.
It was possible to machine the bearing race. I also lubricate the hub with high-temperature grease and press it into the bearing.
The hub is also pressed in with a puller. It cannot be simply pointed and stuffed.
Since the inner race of the bearing consists of two parts, the outer part of the bearing may fall out.
Take the smallest puller washer, put it on the screw.
We insert the screw from the inside into the bearing, put the hub on the screw, screw the nut onto the screw and press the hub into the bearing by tightening the nut.
When the screw begins to rest against the head, unscrew the nut back, put a washer on the screw and tighten the hub until it stops.
The bearing has already been replaced. It remains only to fasten the brake caliper, lower support and wheel drive.
The nut has a drive-in lock, so we drive the locking collar into a special groove on the CV shaft.
It's so easy and simple, without a press, without removing the rack, you can replace the front wheel bearing on almost any front wheel drive car.
That's it. See you soon!
zones.
Briefly about the process of removing the entire lever together with the soured drive, suddenly it will come in handy for someone: 1. Removed the disc cap and unscrewed the hub nut. Who does not have a cap (but there is a plug in the center of the disk and is removed inward) - we hang out the machine, remove the wheel, clamp the brake with a stick / seat or someone else's foot and then unscrew the hub :) 2. Hung klepu and removed the wheel. 3. Unscrewed 2 caliper bolts, removed the caliper, removed the brake disc.4. I removed the abs sensor wire - the connector is under the wing, and in order to get close to it, it is enough to unscrew and put aside the plastic under the arch.5. He unscrewed and knocked out two ball joints at the bottom - first straight, then curved levers6. Unscrewed and knocked out the steering tip.7. He brought out the tripoid (or whatever it is called) of the inner CV joint from the grenade. In general, you can either split one of the CV joints in half, or remove the entire inner CV joint from the box, but then the oil will run :) I didn’t choose the method for a long time when I saw a torn boot of the inner CV joint - it’s still a replacement)
8. Unscrewed and knocked out the top ball joint. Everything.
Separately, about ball joints: When unscrewing, they sometimes really like to turn along with the nut. It is treated by clamping the mount - the point is to warp the ball cone in the mounting hole, or push it there harder.
When knocking out, you can use a puller, or you can just as cheaply and cheerfully use a pry bar. Create tension in the direction of the ball outlet and hammer with a sledgehammer / hammer on everything that is nearby)))) Well, try not to damage the rubber boot, ABS wires and brake hose)))
That's it, there is happiness, a lever is in hand and a press for 20-25 tons was found in a nearby box ... But they didn’t succeed in squeezing it out, the men suffered for 30 minutes, and then for some reason they apologized for a long time that they could not help.
By this time, the park went to work and had to resort to third-party help - he gave the entire assembly to his father and asked him to travel to the services. An hour later, good news - squeezed out! After another 2 hours, he brought the result of torment:
0003
But I really liked the pressing method. Moreover, a device specially made for this remained a trophy with me. So if someone suddenly happens like this - please contact :)
Ordinary centimeter plate, holes for studs. We knock out the studs, rest the lever with the drive to the center, and with long bolts we pull the hub to the plate. It's simple :) Although I was surprised that the press of 25 tons could not cope, but some 5 bolts from medium quality hardware could ...
Next is the favorite - knocking the inner race of the bearing from the hub. I decided not to suffer for a long time and cut a piece with a grinder. True, he overdid it a little in a fit, but there really is nothing wrong with that:
I made an oblique cut and chipped off a piece of the clip with a chisel. After that, knocking down went faster, and in the end it cracked at all - you can see in the photo.
By the way, I advise you not to throw away the second piece of the inner race right away - it helps a lot when driving (because we don’t have our own press) a new bearing:
When putting on a new one, the main thing is to try not to warp. Skewed - hit on the opposite side. I don’t advise knocking down and starting over - there is a high probability that you will damage the anther . ..
..
A small smoke break and again into battle - I cleaned the slots of the hub with a small needle file, and a card brush for a screwdriver fit perfectly for the drive. Yes, I completely forgot, before that I had evened out the thread for an hour, removed the dead turns, and so on :) Well, plus I made a new hole for the cotter pin with a 4 9 drill0003
Well, then I installed the drive in place, screwed on the upper ball joint, put the hub on the grease-lubricated drive, screwed on the lower ball and steering tips, tightened everything that had already been installed, returned the abs wiring, put the disk and caliper, put on the wheel, screwed , tightened and locked the hub nut. And most importantly - ODERL CAPS))))
That seems to be all ...
I'm completely exhausted, but now my pants are full of happiness)))
Issue price: 3 000 ₽ Mileage: 147100 km
The weather is disgusting, overcast, it's raining, it's 14 degrees outside. naturally set the cheapest one) and I drove 28 thousand on it. I recently changed it on the left side. I took 2 sets at once.
You will need a bunch of tools and other improvised means, I will not paint, because list big
Briefly: -Remove the CV joint nut -Jack and remove the wheel -Release one end of the stabilizer bar -Disconnect the steering tip -Disconnect the brake hose from the strut -Remove the brake caliper and disc -Unscrew the strut from the knuckle -Unscrew the CVJ nut to the end and remove it from the hub - Loosen the ball pin and remove the steering knuckle - Knock out the hub - Knock the bearing out of the fist - Press in the bearing and hub
- Assemble in reverse order
Here are the comics). it was not possible to wash
One relics did not have enough)
of the jack and remove the wheel
Disconnect one edge of the stable rack. Statter from the thread
Disconnect the steering tip
We disconnect the brake from the rack
9000Update the braking and reiterate remove disk
We unscrew the rack from the rotary fist
We pull out the bar from the fist, free the clamp of the ball of the ball and remove the fist
here and at large
Wash the barn. , apparently because of this, the bearing died
This is part of a bad CV joint, with its help the hub will be knocked out. Then the second part will be involved)
The hub is knocked out, but the sleeve from the bearing remains on it, it always remains and then you have to shoot it down
We remove the bearing of the bearing
This is a large piece of soft lead, it will help not to cut a fist when we knock out the bearing
This is the second half of the Shrus mentioned above, and we will knock out
9000of the Scrap to not be enough to make it so that it will not be enough knock out and have to put washers (they lie on top)
The bearing is knocked out
We knock this muck with a chisel or something like that. (I didn’t have time to take a picture of the hub)
We clean the seats from dirt and rust
We start to press in the bearing.
Issue price: 600 ₽
The weather is disgusting, overcast, it's raining, it's 14 degrees outside. cheap) and I drove 28 thousand on it. I recently changed it on the left side. I took 2 sets at once.
You will need a lot of tools and other improvised means, I will not paint, because large list
In short: -Remove the CV joint nut -Jack and remove the wheel -Release one end of the stabilizer strut -Disconnect the steering tip -Disconnect the brake hose from the strut -Remove the brake caliper and disc -Unscrew the strut from the steering knuckle -Unscrew the CVJ nut to the end and remove it from the hub - Weaken the ball pin and remove the steering knuckle - Knock out the hub - Knock out the bearing from the knuckle - Press in the bearing and hub
-Assemble in reverse order
Here are the comics). it was not possible to wash
One relics did not have enough)
of the jack and remove the wheel of
Disconnect one edge of the stable rack.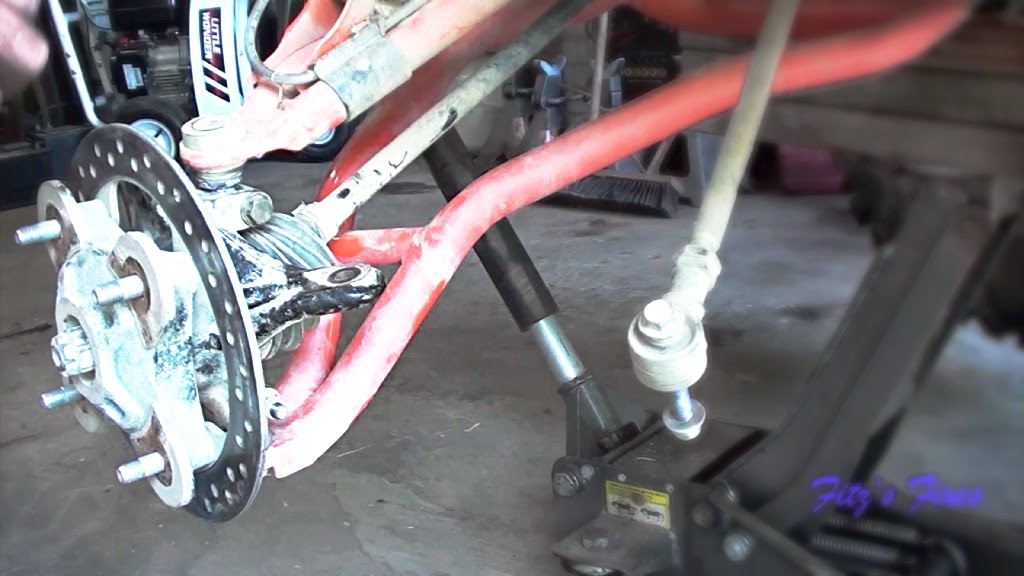 Store
Store
Disconnect the steering tip
Disconnect the brake from the rack
The hub is knocked out, but the sleeve from the bearing remains on it, it always remains and then it must be knocked down
We remove the bearing stopper
This is the second half of the CV joint mentioned above, we will knock it out
The CV joint is not enough to knock it out and you will have to put washers (they lie on top)
The bearing is knocked out
This disgusting is knocked down by a chisel or something like that. (I didn’t have time to take a photo of the hub)
We clean the seats from dirt and rust
We begin to press the bearing. and bait, and then, with the help of a bar, besiege a little
There was no more space for photos. See the second part for more.
Issue price: 600 ₽
Many will agree that unscrewing the hub nut is one of those activities that can be punished in court, it is too inconvenient, hard even for a physically strong person with all the necessary tools.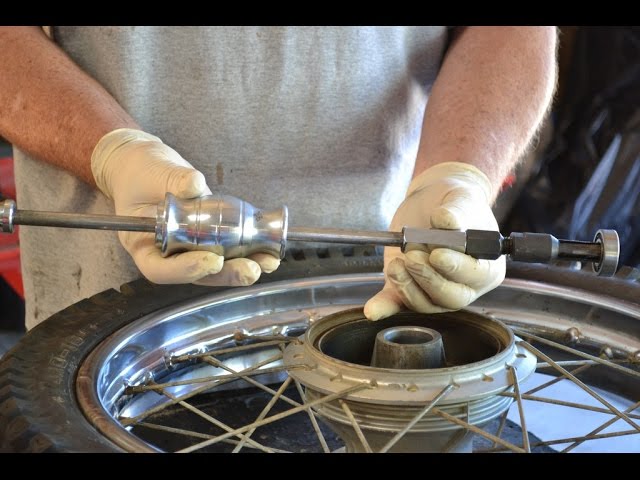 However, since it is not always possible to choose the easiest one (Option One, he is also the Main one!) - sending the car to the service station, where they will not only unscrew it, but also make subsequent repairs. Then you will have to deal with the task on your own, and using the easiest and most effective way possible.
Yes, you may very well be one of the lucky ones who will not need extra effort, since the problem with unscrewing the hub nut may simply be choosing the wrong direction.
So, we take the knob and, when your car is far from new, try, if the nut is not locked, on the left wheel - unscrew the nut counterclockwise, and on the right - clockwise. In modern stamps, usually both on the left and on the right you need unscrew the hub counterclockwise .
Before unscrewing the hub nut, remember that it breaks off when the machine is on the wheels and stops are placed under them. On the side from which the nut will be unscrewed, the stop is securely installed.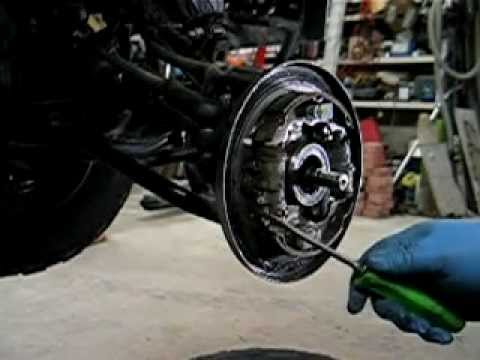
Although if the nut is deep and the brake disc is ventilated, then you can try to unscrew it (by fixing it with a powerful screwdriver) and so, only after making sure that the car is securely secured. Remember about personal safety precautions: protect your eyes, do not be too zealous, because in courage and enthusiasm you can accidentally get hurt or ruin the car body.
Unfortunately, in most cases it is not enough to use a wrench with a large lever, you have to use additional tools, special mixtures. Let's consider other options.
The following method can be considered the easiest, but it involves a complete replacement of the nut. Do not worry, any method does not guarantee the safety of this part. To easily unscrew or break the hub nut from its place (an option for all brands - from VAZ to foreign cars, where there is a groove on the shaft), you need to take:
Unscrewing the VAZ hub nut using a drill
Process.
But this method should be used only as a last resort, first try using more or less simple and humane methods.
What you need:
Process.
 You can take a break for 10-15 minutes, and then you should put the head of the key on the nut and hit it with a hammer several times, gradually increasing the force of impact. Just do not overdo it: the point of this action is to make a slight deformation of the nut, due to this it will be easier to remove it. And immediately after the blows, you should try to unscrew the hub nut on a VAZ or a car of another brand.
 What you need:
Process.
We put the head of the key on the hub nut, insert the knob and put the pipe on the handle. Gradually increasing the applied efforts, we turn off the part.
As experienced car enthusiasts say, few hub nut can resist for a long time if you use a "Zilovsky" balloon!
Now consider the methods that may be the only effective in your case, but they are no less radical, even barbaric.
Hit the hub, hit the bearing! If you make a replacement, then go ahead! If you value the bearing, avoid this method.
Heating the hub nut with a torch. Not recommended!
The law of physics is guaranteed to work, and the body (read: hub nut) will expand. And this will greatly facilitate the removal of a stubborn part. There is one “but”: not only this one part is heated, but everything else, in the area of the burner. For example, a bearing. And it is better not to allow this. As a more gentle option, we can suggest using a soldering iron and ... patience. You will need it.
Chisel will help break the hub nut
"Method" is fraught with the danger of unexpected failure of the edges of the nut, breakage of the key, and so on. Just don't do it.
Increasing the diameter, of course, makes the hub nut unsuitable for further use, but it will be easy to unscrew it.
Now let's look at ways for those who do not rely on the help of physics, but want to solve the problem with the help of chemistry. Your laboratory should have: kerosene, white spirit, acidified sulfuric acid, zinc, plasticine, hammer, water, sandpaper, wrench, chisel.
Attributes of the chemical method of loosening the nut
Process.
Kerosene (experienced recommend making a mixture of White Spirit and kerosene) moisten the nut and bolt, applying a swab to them, no matter whether it is cotton or gauze. After some time - from an hour to a day, and with repeated attempts, you may find that the hub nut can be easily unscrewed. But even here you can’t do without strength: at a minimum, you will probably have to work with sandpaper to clean the parts from rust. If after that it still doesn’t work, you should help with a hammer: tap it on the edges of the hub nut.
If in this case you have not succeeded, make a small container of plasticine, fasten it on top of the hub nut, pour water with sulfuric acid into it, put zinc in the container.