When your ATV doesn’t start, it could have a problem with the starter or starter solenoid. However, the symptoms of a bad starter or starter solenoid are not always enough to conclude what’s wrong.
Before spending money on new parts, it’s usually worthwhile to do some testing to identify the root cause.
This guide covers troubleshooting the entire ATV starting system circuit, including testing the starter motor and the starter solenoid.
The starter circuit consists of these main components that all need to work for the ATV to start:
When the starter behaves strangely or doesn’t work, all of these components are on the list of possible suspects.
Many modern ATVs have non-serviceable starter units with a protective coating that will lead to premature component failure if removed. If your testing verifies that the starter is bad, you should replace the starter motor and solenoid assembly.
However, some starters are serviceable and can be disassembled for cleaning or replacing worn-out brushes.
The best way to test an ATV starter and starter solenoid is through a process of elimination, beginning with the smallest effort items and working your way through the circuit until you identify the culprit.
Often you will find that the starter unit works fine, but there is an issue with one of the supporting components, preventing the starter from operating normally.
To narrow down your search, you can note how the starter behaves when you try to start the ATV.
Depending on your findings, you might be able to skip one or more of the troubleshooting procedures as outlined below.
Caution: Always wear eye protection when working on the electrical system.
Before you do anything, ensuring the battery is in good condition and holds a sufficient charge is a good idea.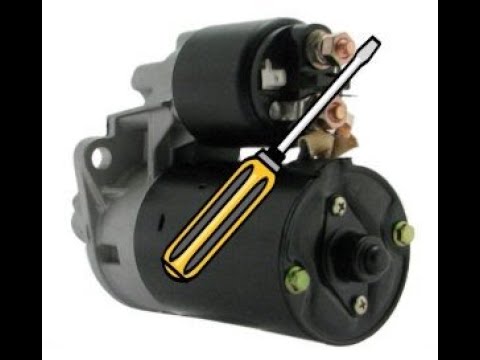
Use a multimeter to read the battery’s state of charge.
If the battery voltage is low (below 12.4V), give it a proper charge to eliminate a low voltage condition from the list of possible causes.
If you suspect your battery is going bad, here is how you can test the condition of the battery.
Also, ensure the battery terminals are on tight and not corroded or damaged.
The fastest way to eliminate or identify an electrical issue is to test for power at the solenoid battery terminal and ignition key terminal.
The starter is cylinder-shaped, about 3×5 inches big, and connects to the engine on either side by the flywheel.
Often you need to remove a plastic side cover or the seat to get to where the starter and solenoid are mounted.
There are two main types of starters, and ATVs use both.
The easiest way to find a separately mounted starter solenoid is to start by the positive battery terminal and trace the biggest wire down towards the starter.
The solenoid typically has two large terminals and one or two small terminals. The terminals and connectors are usually covered by rubber boots.
The solenoid battery side terminal should always have power. The solenoid ignition key switch terminals should have power only when pressing the starter button.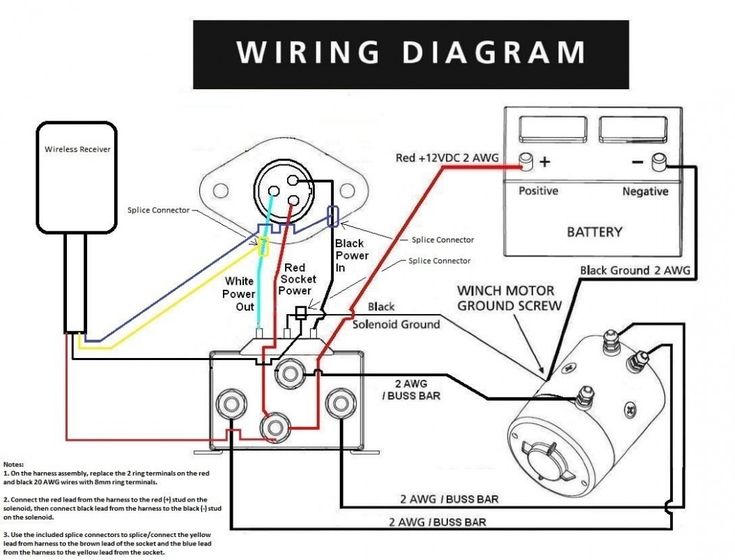
Before you begin testing, ensuring your test light is working is a good idea. Connect the test light alligator clip to the negative (-) battery terminal and put the test probe to the positive (+) battery terminal. The test light should come on.
To test for power on the solenoid, leave the test light connected to ground and put the test probe to the solenoid battery cable terminal. The test light should come on.
If the test light did not come on, you likely have a dead battery, loose, damaged, or corroded battery terminal connectors, or damaged battery cables.
Leave your test light or multimeter connected to ground and put the test probe to the solenoid ignition key switch terminal.
Press the starter button. The test light should come on, indicating that the key switch circuit works.
Suppose you don’t get power to the key switch terminal. You probably have loose or damaged key-switch wiring or a faulty key switch, starter button, transmission (neutral) switch, or starter diode.
Check the wiring between the solenoid and the ignition switch for continuity using a multimeter to identify any breaks in the wiring.
Test the various switches for continuity as well to ensure they work.
The starter diode is like a one-way valve in the starter circuit. You likely need a vehicle-specific wiring diagram to see where it is located.
Use a multimeter to measure between the diode connections. Continuity should flow only in one direction.
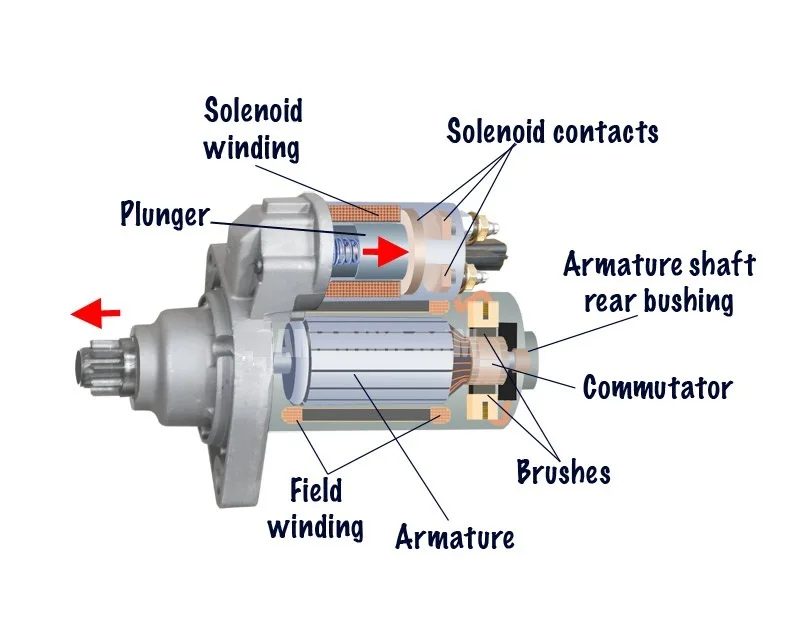
Inside the solenoid is a plunger operated by an electromagnet.
When pressing the starter button, a small current activates the electromagnet that shifts the steel bar, connecting the two large solenoid terminals.
When releasing the starter button, the electromagnet shuts off, and the spring moves the steel bar to its normal position, away from the two terminals, to break the circuit.

The click sound you hear when activating the starter is the electromagnet shifting the plunger.
If the solenoid gets power but does not click, it may be faulty or seized due to internal corrosion.
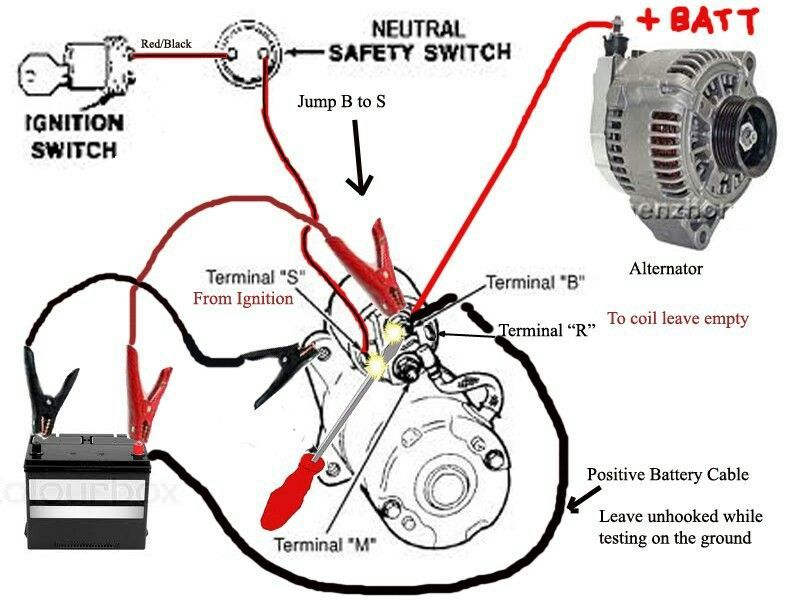
To verify a faulty solenoid, you can use a screwdriver or a heavy gauge cable to bridge the two large solenoid terminals briefly. Bridging the terminals should cause the starter to turn.
Caution: Ensure the ATV is in park (P) or neutral (N), and wear safety glasses to protect you from the sparks. Use a heavy gauge screwdriver with an insulated handle and be careful not you touch any metal parts, including the screwdriver shaft.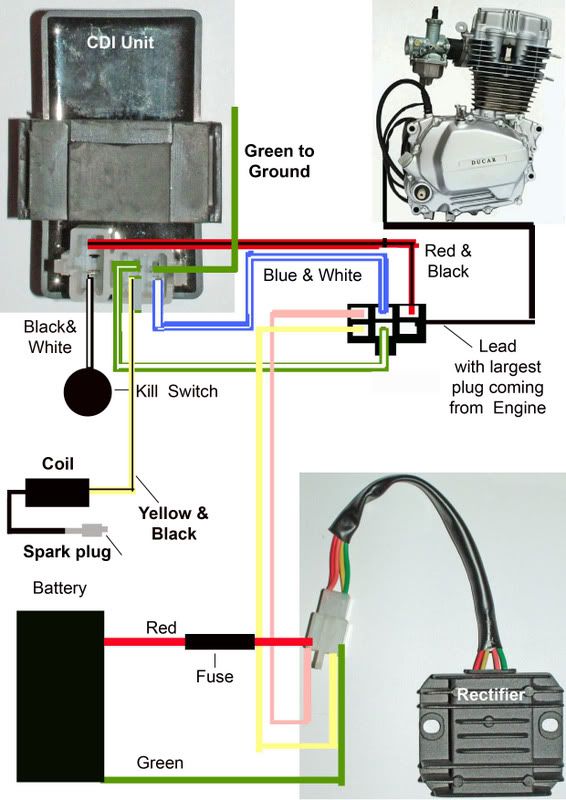
If there is current on the starter side of the solenoid, but the starter does not turn on, the starter motor might be faulty, the ATV engine might be seized, or the starter circuit might have poor grounding.
A voltage drop test as described below, can help very an internal connectivity problem with the solenoid.
A quick way to test if the starter brushes are sticking in the brush holder or beginning to wear out is to gently tap or bump the starter housing while pressing the starter button to see if this frees it up.
The wooden handle of a hammer or a plastic or rubber hammer works well for this test. Do not hit the starter housing too hard or with anything metal, as the aluminum housing can easily crack.
Often you’ll find that this helps the starter kick in, and the ATV will start as normal. However, this is only a temporary solution. What caused the starter to turn is still there and needs to be identified and fixed for a permanent solution.
A voltage-drop test can help identify poor connections or excessive resistance in an electrical circuit.
Poor connections or excessive resistance anywhere in the starter circuit can prevent the starter from working.
The test sounds complicated, but it becomes relatively straightforward when you understand how it works and what it tells you.
When troubleshooting a starting circuit, we typically voltage drop test the following parts of the circuit:
To do this test, you’ll use a multimeter set in the 20V DV setting, connected in parallel with the part of the circuit you’re testing (for example: from the battery to the starter solenoid).
When the starter is not engaging, the circuit has no load, and the meter should read either 0V or 12V (battery voltage).
When activating the starter and the circuit is under load, the meter will read the difference in voltage between the two test leads. All wiring has some resistance, and a difference up to 0.3V is acceptable.
If you read more than 0.3V, an issue in the circuit prevents it from handling the current.
Move the lead up the circuit one connection at a time until the value drops below the 0.3V threshold. Once the value changes, you’ve isolated the problem area and can inspect and repair the issue.
The test can be used to test any part of an electrical circuit. Always put the test leads directly to the terminals and not on the connectors or exposed wire for a good result.
When the key is off (no load), the meter should read 0V. When activating the starter, the meter should read no more than 0.3V.
When the key is off (no load), the meter should read 0V. When activating the starter, the meter should read no more than 0.3V.
When the key is off (no load), the meter should read 12V (battery voltage). When activating the starter, the meter should read no more than 0.3V.
When a mechanical issue causes the ATV engine to seize or prevents it from rotating freely, the starter motor might not have the power to turn the engine. You might hear a buzzing sound from the starter motor when you press the starter.
If your ATV has been sitting or you don’t know the motor’s condition, this issue might be worth looking into.
Testing typically requires some disassembly to access the flywheel to the crankshaft. You should get a vehicle-specific service manual if you decide to do this at home.
Remove the starter from the ATV to inspect the gears for wear or damage.
This is how you remove the starter:
On some ATVs, the starter pinion gear engages directly with the flywheel ring gear, called the drive coupler.
Other bikes, typically older or budget-friendly models, use a bendix starter gear to engage the starter with the engine.
Damages to look for:
To better understand how your starter sounds and behaves, you can test its operation on your workbench.
You will need a fully charged battery, jumper cables, and alligator clip test leads.
Caution: Remember to wear safety glasses and to keep clear of the starter pinion gear.

Also, measure the resistance of the copper windings inside the starter.
Testing an ATV starter and starter circuit may seem overwhelming at first, with so many things could prevent the starter from working properly.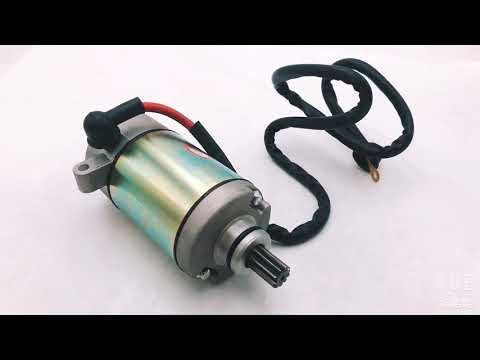 But, by applying the systematic approach outlined above, I hope you managed to identify the root cause of your starting problem.
If you could not find a problem with the starter, maybe you missed one of the many other possible causes that can prevent an ATV from starting.
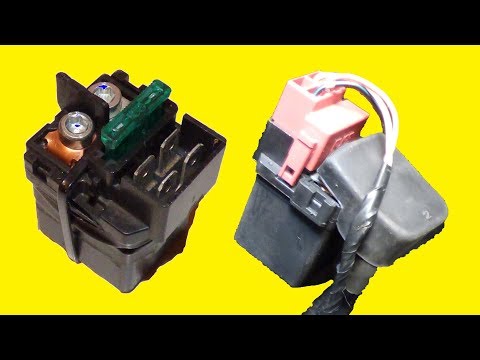
The starter solenoid on your ATV plays a significant role in starting your machine. The starter solenoid collects a small electrical signal when you turn the ignition key and converts it into a high-voltage signal required to start your ATV engine.
This means your ATV cannot start without a solenoid. Hence, your vehicle not starting might signify a bad solenoid, and you want to test the component and ascertain if a bad solenoid is preventing your machine from starting.
Common signs of a bad solenoid include clicking sounds and intermittent starting problems.
Image from www.goodmuddin.com
Different signs point to a bad starter solenoid, but the basic one is the ATV not starting. When you turn the key, you hear the clicking sound of the starter, but the engine is not coming to life.
The starter solenoid can be faulty with minor issues, and the engine still starts. Now, how do you know if the starter solenoid is bad when the ATV engine starts?
A starter solenoid becomes bad gradually before it finally stops functioning. You know your starter solenoid has minor problems when you hear a continuous clicking sound after the engine has started.
Another way to know if your ATV starter solenoid is losing its value is intermittent starting. If you face difficulties starting the machine when you turn the ignition key multiple times before the engine starts, you may need to test your ATV starter solenoid.
The good part of a bad ATV starter solenoid is that while some faults are not repairable and only demand a replacement, you can fix other faults yourself. However, the best way to know if you need to repair or replace a bad ATV starter solenoid is by establishing the type of fault.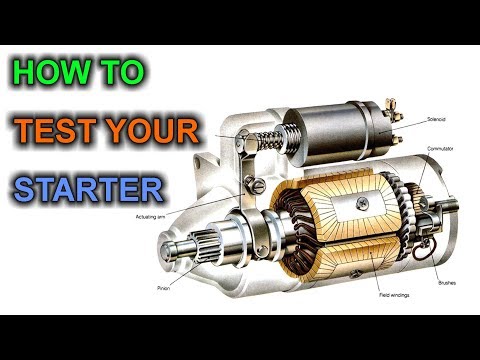
Again, there are different means to fix a bad solenoid on an ATV starter. The right fix for your solenoid depends on the type of fault. Here are common issues with solenoids and how to fix them:
Blown Fuse: the fuses are a good place to start looking for faults on a solenoid. When a fuse is blown in the circuitry of the solenoid, the starter doesn’t function correctly, but people often overlook this. If any fuses are faulty, you have less work to do as they are easier to repair than any other jobs on the solenoid.
Corroded Wiring: this is more common in old ATVs. The wiring in the circuitry of the solenoid is old and can result in bad connections. Hence, check for a corroded wire in the circuitry if you have an old ATV. If you find any, replace it.
Alternator: when your ATV engine fails to start, you cannot outrightly blame it on a bad starter solenoid. There are other reasons why an ATV engine might not start.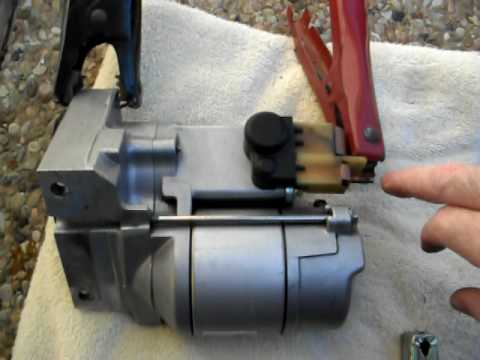 A faulty alternator is one. The alternator powers the electrical systems of your ATV and charges the battery when the engine is working. When this component is bad, the ATV might fail to start. Replacing the alternator will solve this issue.
Starter: fixing a bad ATV starter solenoid can mean replacing the whole set of starter and solenoid. This is the case when the solenoid shares a housing with the starter. Hence, if this is the type of system on your vehicle, you want to replace the whole set.
HIT
ENDURO LIGHT Graphite
the most durable
458 EUR
HIT
ENDURO Camogrey
the most durable
657 EUR
ENDURO Graphite
the most durable
279 EUR
HIT
ENDURO Graphite
the most durable
657 EUR
AQUAMASTER-ZIP LIGHT Camogrey
with central zipper
598 EUR
HIT
ENDURO LIGHT Camogrey
the most durable
458 EUR
AQUAMASTER LIGHT Red
reliability & comfort
438 EUR
NEODRY Black
NEOPRENE SOCKS
17 EUR
11. 90 EUR
ENDURO Camogrey
the most durable
279 EUR
AQUAMASTER Blue
reliability & comfort
647 EUR
-20%
HIT
AQUAMASTER Red
reliability & comfort
259 EUR
207.20 EUR
-40%
HIT
AQUAMASTER Orange
reliability & comfort
259 EUR
155.40 EUR
AQUAMASTER Red
reliability & comfort
677 EUR
ENDURO BF Camogrey
bootfoot waders
528 EUR
ALL SEASON Black
HIGH-ACTIVITY THERMAL UNDERWEAR
69 EUR
ENDURO BF Camogrey
bootfoot waders
329 EUR
MUDWAY Graphite
RELIABLE JACKET
179 EUR
MUDWAY Camogrey
RELIABLE JACKET
179 EUR
NEOSENSOR Camoarmy
SEMI FINGERLESS GLOVES
12 EUR
8. 40 EUR
MUDWAY Red
RELIABLE JACKET
179 EUR
Explore all
Posted by by MotoDoctor
One of the problems with starting the engine on an ATV is found in the electrical system. To start the engine, we need to turn on the ignition and press the "Start" button (if the ATV is in gear, you need to additionally press the brake pedal). All ATV owners are familiar with this startup process. But here is the problem itself, after the actions performed, your ATV does not even make any sounds. Of course, first of all, we check whether the battery is holding a charge. If the battery is good, we proceed to check the wiring connections. Sometimes at the factory, when installing electrical equipment, the connecting chips are turned on, but not fixed with a lock.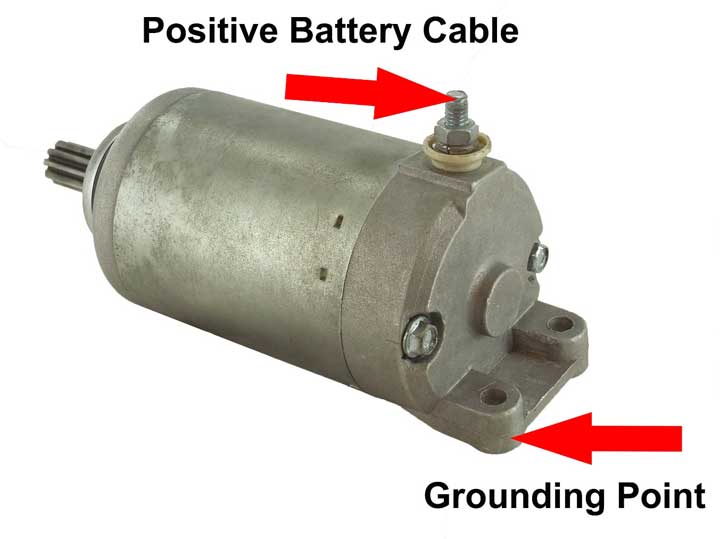 So sometimes, due to unscrupulous assemblers, these chips are disconnected and the contact naturally disappears. It is not very difficult to identify such a malfunction; it is enough to inspect the entire electrical wiring circuit and determine where there is no reliable connection. True, for this it is often necessary to dismantle plastic elements, so that there would be access to all electrical equipment connections. If it's plastic on a Chinese ATV, be extra careful as he is very fragile.
 But in rare cases, the power relay itself is working properly, but the power that should come to it is missing and naturally the relay will not work. This is where you will need a control or multimeter to check whether power is supplied (+) and (-) (12 volts) to the starter relay. In some ATV circuits, the starter relay constantly receives (-) and (+) is supplied when the (start) button is pressed, and in others, vice versa, you can determine all this with the help of instruments. For example, you have determined that the power is not going to the relay, then we recommend that you check the start button for serviceability. But as we said, the first thing to check is all electrical wiring connections. And now let's consider the option if power comes to the starter power relay and the relay itself works but the electric starter is silent, then here it seems to be faulty. In this case, you need to unscrew the mounting bolts and remove the starter from the ATV launcher. In this state, turn on the button (start), if the electric starter does not start working, then the malfunction is in it.
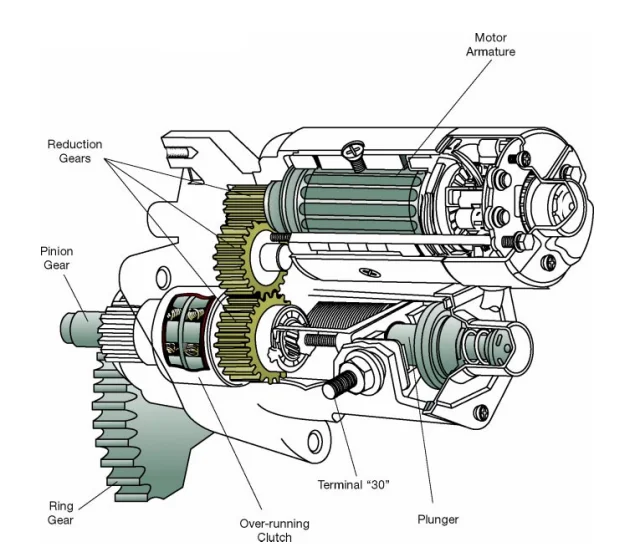
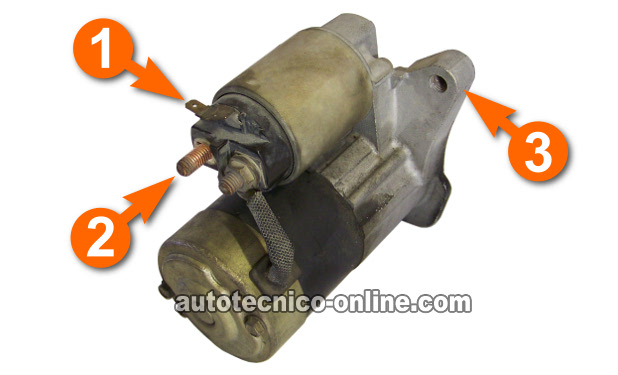 In this article, we examined the problem of an electric start malfunction on an ATV, which is directly related to the operation of electrical equipment, but in some cases the engine cannot be started from an electric starter due to a malfunction of the mechanical start system, this is the so-called electric starter overrunning clutch. If it fails, only the hum of the electric starter will be heard at the time of launch. In this case, this part must be replaced. This entry was posted in Motorcycle Repair Tips by MotoDoctor. Bookmark the permalink.
 ATV won't start? Don't know where to start troubleshooting? Then let's try to find out the main reasons why an ATV may refuse to start.
Unfortunately, the equipment of any manufacturer sooner or later starts to act up, no one is safe from this, but finding a malfunction and starting an ATV that refuses to start is not so easy, especially if you are far from a service station.
No matter how trite it may sound, the first thing to do is to check the presence of gasoline in the gas tank: believe me, very often a person tries to start an ATV with a dry tank.
Check if the engine power button is disconnected, it is usually located on the steering wheel on the left side, and also pay attention to the fuses, one of them may have blown.
Next, take a multimeter and measure the ATV battery charge level: a charged battery should produce from 12.6 to 12.8 volts and confidently turn the starter, if the battery is low, charge it.
It is also necessary to pay attention to the battery terminals, they must be clean and not oxidized, and the clamping bolts must be tightened.
If, when trying to start the ATV, you notice that the starter does not turn, you must first check and, if necessary, replace the starter relay. To check if the starter itself is working, you need to make sure that the engine mass is in good condition (oxides, no contact, wire damage) and apply positive to it directly from the battery (observing the polarity), if the starter spins, look for a problem in the wiring. If there is no reaction to your actions, most likely the starter is out of order.
Check spark plug condition and spark. This is what a spark plug looks like when installed in a serviceable and tuned engine:
If you notice a significant deviation in the color of the spark plug, you may need to tune the ATV carburetor.
In order to check the presence of a spark, you need to unscrew the spark plug, insert it into the candle cap, lean it against any metal part of the ATV (do not forget about safety precautions: there should be no gasoline smudges nearby) and turn the starter, the spark should be sure and distinct noticeable. If there is no spark, it is necessary to replace the spark plug, if there is no spark, look at the wiring, and also replace the ignition coil.
Make sure your ATV's air filter is clean and saturated and that the air pipe from the filter to the carburetor is free of damage or blockage.
Determine if fuel is entering the carburetor, if the fuel filter is clean, if the fuel pipes are intact, clean the carburetor with cleaning fluids and blow out the passages.