The ignition switch is responsible for turning on the circuits or signals that get the vehicle to start. Replacing the ignition switch becomes imperative when it becomes difficult to turn on the vehicle’s electrical system or say the starter motor does not stop turning even after the motor is on. You never know when it might fail, so you need to understand how to wire ignition switch.
Thankfully, it is not a complicated process to handle once you have the know-how. This article will walk you through the steps needed to wire your vehicle’s ignition switch.
Read on.
Here are the steps you need to take to wire the ignition switch yourself. However, depending on the vehicle in question, you might need a push-button starter switch wiring diagram.
Ensure that your vehicle is parked on level ground before turning off the engine.
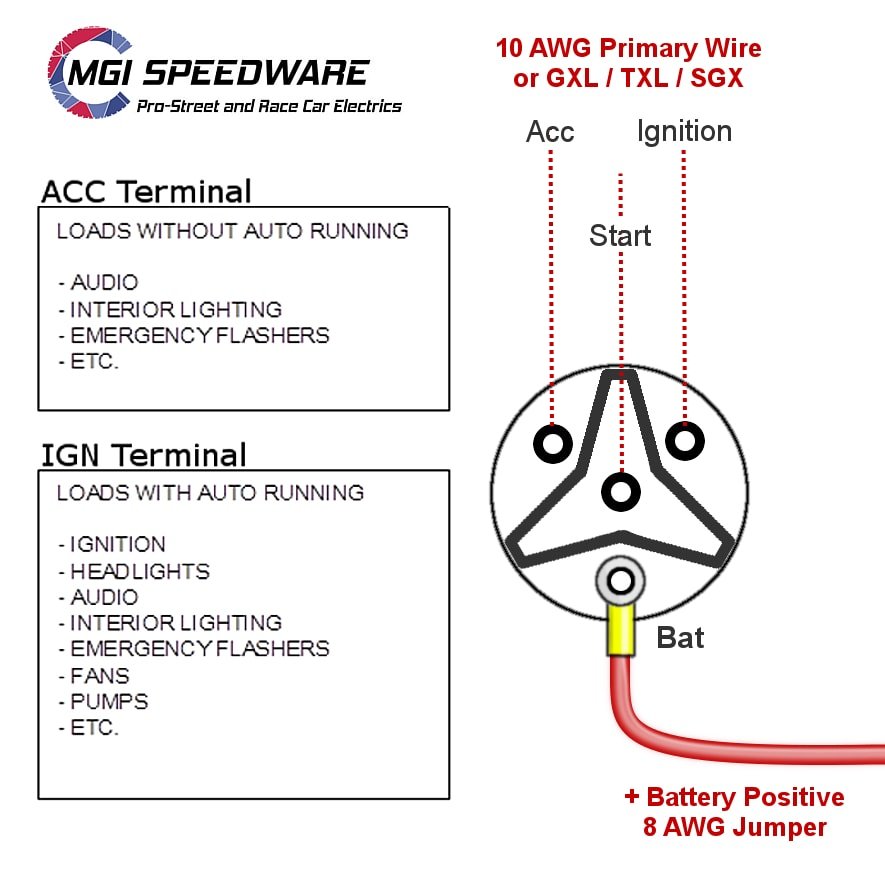
Ascertain and locate and ascertain the pins on the back of the vehicle’s ignition switch. Depending on the car, you’d find four terminals that are marked as “BATT”(Battery), “ST” (Start), “IGN”(Ignition), and “ACC”(Accessory).To be on the safe side, get some confirmation from your car’s repair manual or the manufacturer.
Disconnect the negative terminal on the battery. There are two terminals marked positive (+) and negative (-) on your vehicle’s battery. Use a wrench to loosen the bolt before disconnecting the battery terminals. Ensure that you secure the negative cable safely to prevent it from coming in contact with any of the terminals in the course of wiring the ignition.
Take away any trim that might be around the steering wheel. You might have to remove them by taking off the plastic clips, securing them, or unfastening any bolts or screws.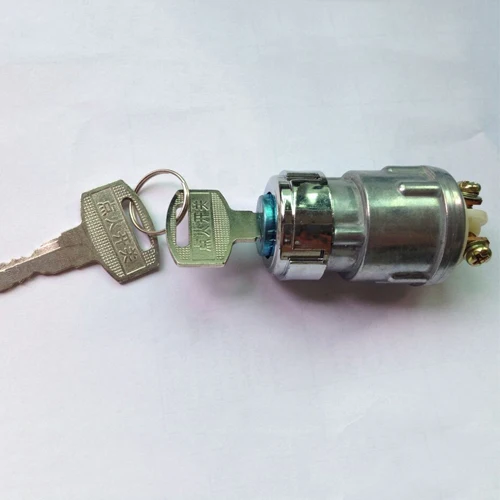 Once you have taken them off, keep them somewhere safe where they won’t get damaged.
Remove the steering wheel. Some vehicles have their ignition switch in the dashboard, while others might have it along the steering column. Regardless of its location, removing the steering column will make your job a lot easier. You might need to do this using a steer wheel puller to make your task easier for you. It is important that you consult the repair manual for your vehicle before undergoing this step. Or better still get a racing ignition switch panel wiring diagram
Unlock the hooks on the ignition module cover. This allows you to take away the cover so that you can access the ignition switch. There should be some releases on the clips. You might need a screwdriver to be able to press down the release mechanism on the hooks.
Set the key in the ignition and turn it to the “accessory” position.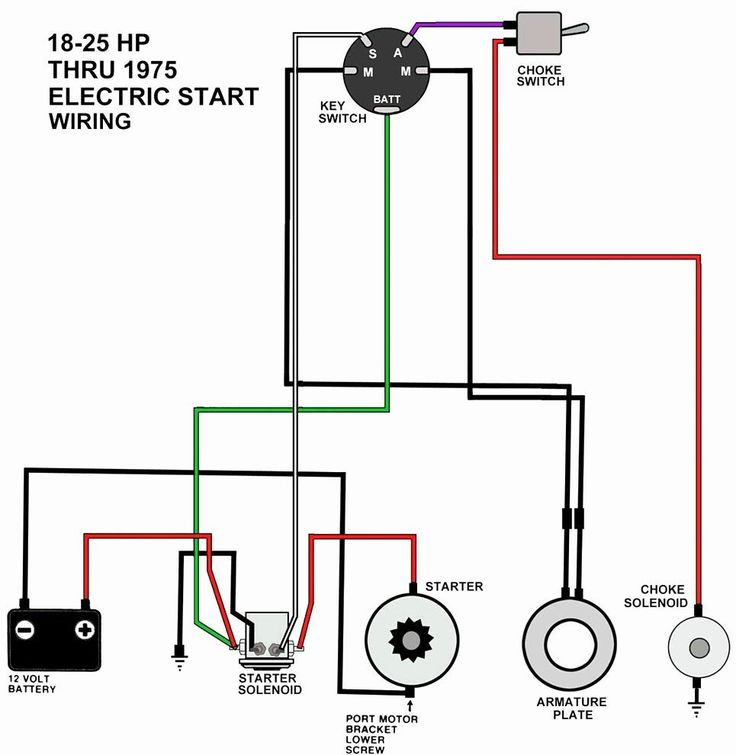 It is necessary to do this because this is the only way to release it from the ignition module. If you don’t have access to your car key at the moment, you might need to use a flathead screwdriver instead.
If you have to use a flathead screwdriver, then you’d need to be careful. Start by pressing the release pin inside the hole on the ignition module with the screwdriver. There should be a tiny hole to insert the screwdriver and press down on the release pin inside.
Once the release pin that secures the ignition switch is released, you can pull it out from its position. If you got all the steps right up to this point, you should be able to pull it out easily. If, however, you encounter some resistance, ensure that you are pressing the release pin firmly enough.
Check the switch to ascertain what is wrong with it. You’d need a test light to do this. Depending on the manufacturer, the dealership involved, and your needs, you might need to rebuild the ignition or get a new one.
Ascertain the positive power lead from the battery to the vehicle’s ignition switch. It is often a thick red wire that is always energized. Once you have identified it, fit the right terminal end on the power lead wire and secure it with a terminal multi-tool. You then connect the power lead to the “BATT” terminal of the switch.
Install the accessory lead wire to the “ACC” terminal of the ignition switch. This wire is responsible for energizing the car’s accessories when the ignition switch is turned to the “ACC” position.
Fit the starter relay wire to the “ST” terminal of the ignition switch. The “ST” terminal only starts when the ignition switch is turned to the “START” position.
Attach the ignition wire to the “IGN” terminal of the vehicle’s ignition switch. The central terminal serves the car’s ignition, wipers, accessories, and other operating features.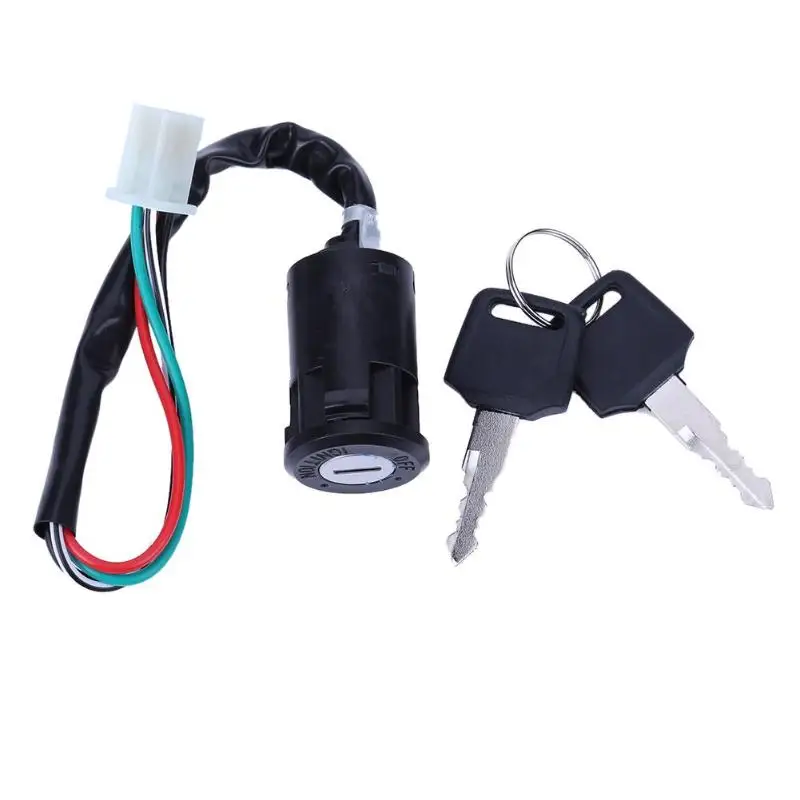 It is essentially the default “run” position of the ignition switch.
To install the newly rewired switch, you’d need to apply some pressure on the release pin so that you can put the new ignition switch in. Once that is done, you put the new(or rebuilt) ignition switch in the steering column.
You want to line up the shape of the cylinder, the position of the release pin, and the coinciding grooves in the ignition module. You will hear the click of the release pin as the ignition switch sets into place. Don’t stop pushing the ignition switch in until you hear the click from the release pin.
Once you have secured the ignition switch, it is time to test the newly wired ignition switch. To do this, you’d have to reconnect the battery. There is no need to reassemble any of the components until you are sure that the new ignition switch is appropriately working.
To reconnect the disconnected negative battery terminal, insert the key and try to turn the ignition. If the ignition is in good condition and you have done an excellent job, the car should turn quickly. If it doesn’t, then you might have to repeat the process.
Once you have verified that the ignition switch is in good working condition, the next step would be to reassemble the parts. Shut down the engine before disconnecting the battery as you did at the start of the procedure.
You might need to consult your vehicle’s repair manual to get the vehicle’s pieces to fit back correctly again. Whatever you do, ensure that you put the right components in the right place with the screws, bolts, and clips attached as suggested in the car’s repair manual, especially if you have to deal with any of the installed devices in newer car models.
If you follow these steps to this point, you will be able to wire your ignition switch successfully with little or no hassles.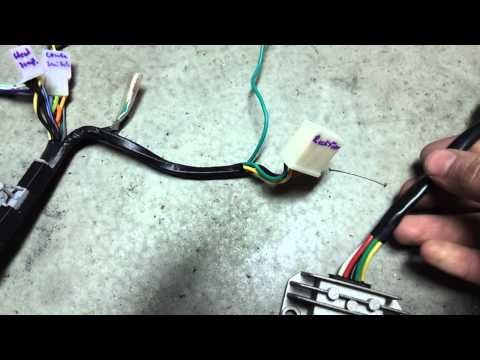
Most cars are set up differently, but depending on the vehicle, you’d find four terminals. These terminals are marked as “BATT”(Battery), “ST” (Start), “IGN”(Ignition), and “ACC”(Accessory).To be on the safe side, get some confirmation from your car’s repair manual or the manufacturer. That way, you avoid making unnecessary errors. Another great idea would be to consult a 4 wire ignition switch diagram.
The vehicle’s ignition wire goes to the “IGN” terminal of the ignition switch. This is an essential terminal because it serves the vehicle ignition, wipers, accessories, and other operating features. It is also the normal “run” position of the switch.
The colors of the wires that go to the ignition switch are red, black, white-Red, and white black.
No. Your vehicle’s ignition switch won’t need to be grounded to start your car. This is because all the terminals in the car’s ignition switch should be isolated from the grounds. Once these terminals have been separated from the grounds, the rest of the car’s ignition switch serves mechanical functions.
Yes. It is one of the problems associated with car starting issues. This is because any issues with the ignition switch could be due to electrical problems. Once your car battery is in good condition and your car refuses to turn after a few tries, you might have some issues with the ignition switch.
Yes, you might be able to handle it if you have the training and experience. Without any of these things, you might not be able to do it yourself because it is a technical procedure that requires more than a manual and a can-do spirit.
Your best bet would be to get professional help to avoid any complications that might arise.
The ignition switch of vehicles is arguably the most essential part of the car’s electrical system. Like all vehicle components, they fail after repeated use. A failed ignition switch can be inconvenient, which is why you need to know how to wire an ignition switch.
This article has provided a sequence of steps that should help you wire your vehicle’s ignition switch whenever the need arises. All you need to do is to follow them to the letter. We also recommend that you get a universal ignition switch wiring diagram.
Off-roading and camping out in the wilderness can be lots of fun. However, you need to always keep your eyes open for any emergency situations. Now, this might come as a surprise, but the biggest headache for four-wheeler owners isn’t the mud or the expensive fuel. Most drivers complain about losing their keys.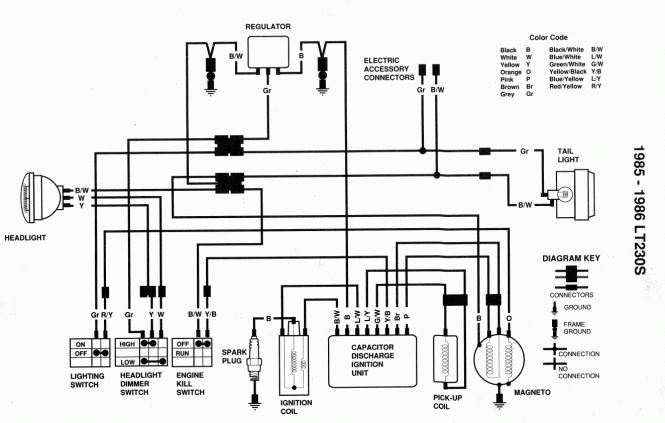 And, since they rarely (if ever) carry any spares, all that’s left to do is call for transportation.
But that usually costs a lot. The good news is – there’s more than one way to get around this. Normally, the ignition switch doesn’t send the engine a signal to run without a key. But, as you’ll learn today, it is very well possible to “trick” the system and start the vehicle with no keys. So, join me, and let’s talk about this in more detail!
Alright, we begin our “How to start an ATV without a key” guide with the old but reliable technique of bypassing the ignition switch. Most ATV ignition switches are pretty easy to make sense of. They are usually connected to the engine with two wires. One of the wires is responsible for the ignition. But, that only happens when there’s a key inserted. Now, what you should do is outmaneuver the vehicle by cutting the wires.
Some experts recommend physically removing the ignition switch, but it’s not actually necessary.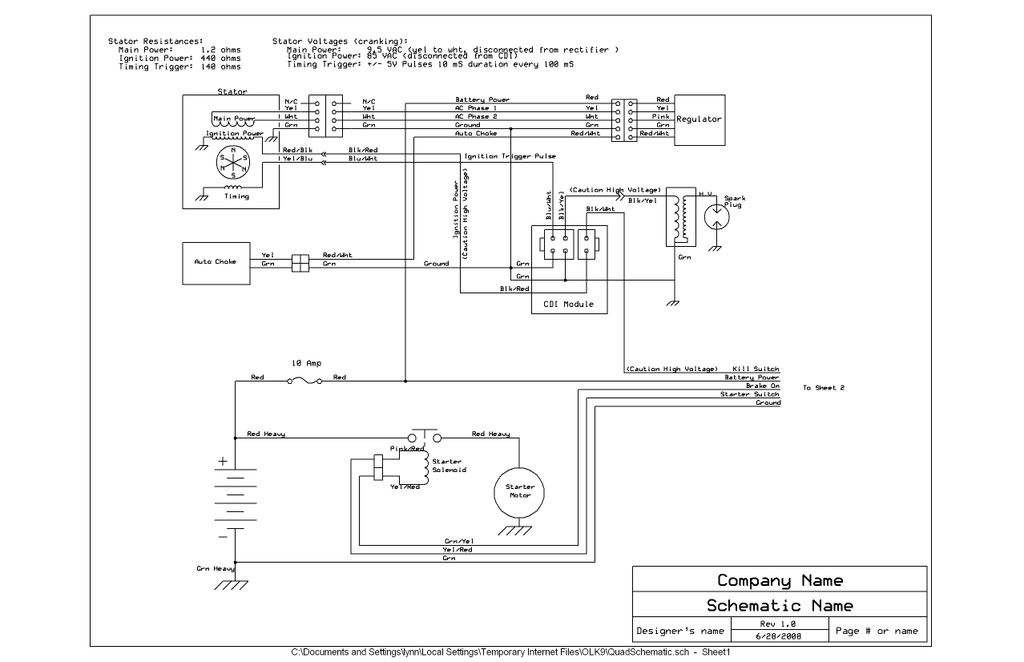 What’s more important, when cutting each wire, you need to be very careful not to overdo this and leave enough of it to bring the switch back to life and reconnect it. With the wires cut, connect them to each other. And please remember to disconnect them once you’ve arrived at your destination. Otherwise, you’ll end up with a drained and (potentially) dead battery.
A quick note: if you own a brand-new four-wheeler, it probably has more than a pair of wires. In that case, remember to only cut the red and the black wires and leave the rest be – that’s pretty much it. So, if you were wondering how to bypass ignition switch on Honda ATV (the latest editions), this is how you do it.
The next method may seem a bit violent, but it’s pretty effective. As you’ve probably already guessed, the screwdriver needs to go directly into the ignition switch. Yes, it will serve as a key – don’t forget to turn it! This technique is largely used by thieves and teenagers that try to take their dads’ cars for a spin. There’s a catch, though: unless you’re super careful, chances are, the screwdriver will damage the ignition switch.
A new one doesn’t cost much, but still – this can cause some inconvenience. If there isn’t a screwdriver lying around, scissors can do the trick. Use one of its blades, insert it, turn it, and the ATV will start. The best thing about this approach is functionality. What I mean by that is you’ll probably have something to stick into the ignition in your backpack when stuck with no keys.
Disclaimer: this only works on all-terrain vehicles with an electric start. If your ATV doesn’t have that, just skip to the next part. And if it does, find the solenoid. It should be hidden somewhere between the wiring harness and the battery unit. Can’t seem to locate it? I bet there’s a panel in your way – remove it gently. There should be a bunch of wires staring at you now. Don’t mind the tiny ones, only focus on the big wires.
The main wires come in a pair, and the idea here is to connect them using something metallic. A wrench or a screwdriver will do. As you know, metal is a very good conductor, and, once the two wires are connected, it shouldn’t be hard to start the four-wheeler. Remember: the wrench should ONLY be touching the wires, nothing else. If it gets in contact with the frame or some other metallic tools, the ATV’s engine will get damaged.
Only the electric parts will be affected, but that can be enough to ruin the motor.
Does your vehicle have a built-in alternative start method? If the answer is yes, you’re in luck, because this is one of the easiest and most effective ways to get the ATV going. I would strongly recommend using a dedicated user manual as your guide for this because different quad vehicles follow a slightly different routine. The basics are the same, though, and won’t take long to complete.
First of all, pop the hood that’s protecting all the electrical components of the ATV. Can you see the wire that’s running from the engine to the ignition switch? Take out the plug that’s leading the wire into the ignition switch. Put the hood back on and engage the pull or kick start, depending on your quad’s model.
Last, but not least, consider making a spare key. Obviously, if you need a right here and right now decision, this one won’t help. Therefore, remember to make a replacement key before your next trip into the wilderness. To answer a potential question, no, these keys can’t just be bought from a local store. You’ll have to go to the nearest ATV dealer and ask them for a spare key.
They’ll require a unique code (usually stamped on the master key). In some cases, the staff will also request a VIN (vehicle identification number) to make sure they get all the tiny details right. And if for some reason, the code isn’t anywhere to be found, a locksmith might be able to help with this.
If all your attempts at making a new key fail, it might be a good idea to buy a new ignition switch. As I already mentioned, these are available at a very reasonable price. The installation process is pretty straightforward as well and shouldn’t cause you any inconveniences. Or, just ask the dealer to handle the installation. Again, they won’t charge a lot for this.
Bypassing the ignition switch to start your ATV without a key is a pretty cool trick. If there are no fellow riders nearby, and you’ve lost your one and only key, a fun trip can quickly turn into a nightmare. I’m confident that my guide will be of great help and allow you to start the engine swiftly on your own. Thanks to the universal design of all-terrain vehicles, most of these techniques can be used on any ATV.
The make, model, and year don’t matter that much. So, if you were looking for instructions on how to bypass ignition switch on Chinese ATV or European ATV, use everything that we learned today to get yourself out of a dire situation. There aren’t any significant differences between quads developed in different countries.
ATTENTION!!! DO NOT SWITCH ON THE IGNITION WITHOUT THE HIGH WIRE, THE PLUG, OR IF THE PLUG IS NOT TWISTED INTO ITS PLACE OR IS NOT RELIABLELY EARTHED TO THE ENGINE BODY!!!
THE COIL WILL COME WITH A PROBABILITY OF MORE THAN 50 PERCENT!!!
IN THIS COIL, THERE IS A BREAKDOWN INSIDE THE COIL AND THE INTERTURN SHORT CAN APPEAR!!! THE PRESENCE OF THE INTERTURN CLOSURE OFTEN DOES NOT INTERFERE TO WORK AND THE SPARK IS PRESENT, BUT NOT FOR LONG - AT THE END OF THE END THE COIL DIES AT ALL.
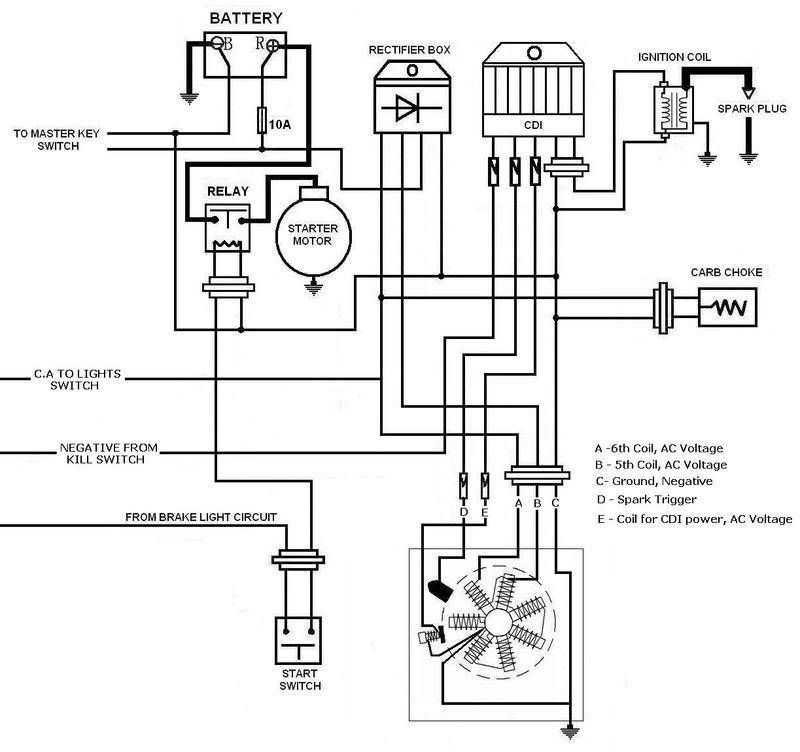
To connect the ignition control unit (BUZ) to the ATV's on-board network (only connector 1 is used), disconnect the standard CDI unit from its connector (on some models, the standard unit is not disconnected, see clarifications in the descriptions) or disconnect the DPK connector, disconnect the BB wire of the standard ignition coil from the spark plug, to the “signal” wire (most often it is a blue or white-blue wire) of the DPK, connect the input of the BUZ (blue wire) ,)
the DPK wire (let's call it "-" DPK) (most often green) is connected to ground (sometimes it is connected to ground only in the CDI unit, sometimes directly in the generator itself, if not, we connect it to the "-" battery, the yellow wire of the BUZ to + Battery after the ignition switch (most often it is a black wire), white wire to the “-” terminal of the ignition coil, Terminal “+” of the ignition coil through a 15 amp fuse to + battery, BB wire to the coil and spark plug.![]()
Everything, you can start. As wound up, you should adjust the speed of the twentieth.
To return to the standard ignition system: disconnect connector 1 BUZ, the standard CDI unit into its place in its socket, the BB wire from the standard coil to the spark plug.
Connector number 2 is optional, add. functions are activated by shorting the desired wire to MASS !!! If they are not needed, insert a chip into the connector anyway so that WATER does not get in !!! it is necessary !!!
There are a few things to pay attention to when installing and starting up the system. Here is a list of what caused the ignition to work poorly on different quadrics:
 In fact, the ignition coil will work whenever it is connected, but for contact systems it is turned on exactly the opposite and there is some confusion in the marking of the terminals. You don’t have to think much about this issue, if the engine starts but it immediately starts to sausage straight from idle - change the wires on the coil in places.